User Guide
Page 28
28 Contents Using the computer for the first time 48 Opening the display panel 48 Your computer's features and specifications ....49 Turning on the power 49 Adding memory (optional 50 Installing a memory module 51 Removing a memory module 56 ... Scrolling with the TouchPad 69 Control buttons 69 Disabling or enabling the TouchPad 70 Using external display devices 70 Directing the display output when you turn on the computer 71 Adjusting the quality of the external display......72 Using an external keyboard 72 Using a mouse 72 Connecting a printer 73 Setting up a printer 73...
28 Contents Using the computer for the first time 48 Opening the display panel 48 Your computer's features and specifications ....49 Turning on the power 49 Adding memory (optional 50 Installing a memory module 51 Removing a memory module 56 ... Scrolling with the TouchPad 69 Control buttons 69 Disabling or enabling the TouchPad 70 Using external display devices 70 Directing the display output when you turn on the computer 71 Adjusting the quality of the external display......72 Using an external keyboard 72 Using a mouse 72 Connecting a printer 73 Setting up a printer 73...
User Guide
Page 32
... Resolving a hardware conflict 177 A plan of action 177 Fixing a problem with Device Manager ...........178 Memory problems 179 Power and the batteries 180 Keyboard problems 181 Display problems 182 Disk drive problems 184 Optical drive problems 186 Sound system problems 187 ExpressCard® problems 187 Printer problems 189 Modem problems 190 Wireless...
... Resolving a hardware conflict 177 A plan of action 177 Fixing a problem with Device Manager ...........178 Memory problems 179 Power and the batteries 180 Keyboard problems 181 Display problems 182 Disk drive problems 184 Optical drive problems 186 Sound system problems 187 ExpressCard® problems 187 Printer problems 189 Modem problems 190 Wireless...
User Guide
Page 33
... A: Hot Keys/TOSHIBA Cards 202 Hot Key Cards 202 Using the Hot Key Cards 203 Application Cards 204 Using the Application Cards 205 Card Case 205 Hot key functions 206 Volume Mute 206 Lock (Instant security 207 Power plan 208 Sleep mode 209 Hibernation mode 210 Output (Display switch 211 Display brightness 212...
... A: Hot Keys/TOSHIBA Cards 202 Hot Key Cards 202 Using the Hot Key Cards 203 Application Cards 204 Using the Application Cards 205 Card Case 205 Hot key functions 206 Volume Mute 206 Lock (Instant security 207 Power plan 208 Sleep mode 209 Hibernation mode 210 Output (Display switch 211 Display brightness 212...
User Guide
Page 34
... Toshiba notebook computer, your computer will provide the most stable operating environment and optimum system performance for more information on the computer and the following information applies. To conserve energy, your computer is set to enter the low-power Sleep mode which shuts down the system and display ...wake the computer from Sleep mode by pressing the power button. See the "Mobile Computing" section of powerful, portable, multimedia computing. Toshiba is labeled with the power management options preset to a configuration that you leave this computer to the world of the...
... Toshiba notebook computer, your computer will provide the most stable operating environment and optimum system performance for more information on the computer and the following information applies. To conserve energy, your computer is set to enter the low-power Sleep mode which shuts down the system and display ...wake the computer from Sleep mode by pressing the power button. See the "Mobile Computing" section of powerful, portable, multimedia computing. Toshiba is labeled with the power management options preset to a configuration that you leave this computer to the world of the...
User Guide
Page 43
... software setup choices. Getting Started 43 Setting up your software. 1 From the Welcome screen click Next to enter the Setup Wizard. 2 Confirm acceptance of windows displayed, and the order in which windows appear, may restart your background and then click Next. 5 Click the appropriate option from the Help Protect Windows Automatically...
... software setup choices. Getting Started 43 Setting up your software. 1 From the Welcome screen click Next to enter the Setup Wizard. 2 Confirm acceptance of windows displayed, and the order in which windows appear, may restart your background and then click Next. 5 Click the appropriate option from the Help Protect Windows Automatically...
User Guide
Page 44
... ❖ Connect a full-size keyboard (see "Using an external keyboard" on page 72) ❖ Connect an external monitor (see "Using external display devices" on page 70) ❖ Connect a local printer (see "Connecting a printer" on page 73) ❖ Connect an optional external disk...(see "Using an ExpressCard®" on page 134) 44 Getting Started Registering your computer with Toshiba Registering your computer with Toshiba Product registration is strongly recommended, and allows Toshiba to send you periodic updates, announcements, and special offers applicable to your software" on page...
... ❖ Connect a full-size keyboard (see "Using an external keyboard" on page 72) ❖ Connect an external monitor (see "Using external display devices" on page 70) ❖ Connect a local printer (see "Connecting a printer" on page 73) ❖ Connect an optional external disk...(see "Using an ExpressCard®" on page 134) 44 Getting Started Registering your computer with Toshiba Registering your computer with Toshiba Product registration is strongly recommended, and allows Toshiba to send you periodic updates, announcements, and special offers applicable to your software" on page...
User Guide
Page 48
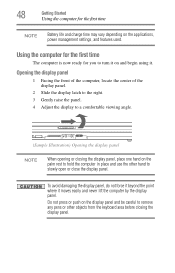
...the applications, power management settings, and features used. Do not press or push on the display panel and be careful to remove any pens or other hand to slowly open or close the display panel. 48 Getting Started Using the computer for you to turn it on and begin ... the front of the computer, locate the center of the display panel. 2 Slide the display latch to the right. 3 Gently raise the panel. 4 Adjust the display to a comfortable viewing angle. (Sample Illustration) Opening the display panel NOTE When opening or closing the display panel, place one hand on the palm rest to hold ...
...the applications, power management settings, and features used. Do not press or push on the display panel and be careful to remove any pens or other hand to slowly open or close the display panel. 48 Getting Started Using the computer for you to turn it on and begin ... the front of the computer, locate the center of the display panel. 2 Slide the display latch to the right. 3 Gently raise the panel. 4 Adjust the display to a comfortable viewing angle. (Sample Illustration) Opening the display panel NOTE When opening or closing the display panel, place one hand on the palm rest to hold ...

User Guide
Page 49
... computer is also an intrinsic characteristic of the TFT manufacturing technology. Below are properly connected and ready. 2 Check to all those features. Your display contains an extremely large number of the many possible icons used on your computer: (Sample Illustration) System icons Turning on the power To turn ...small bright dots that all optical drives are designed to all possible configurations for the first time Small bright dots may appear on your screen display when you turn on the computer: 1 Make sure any external devices (such as the AC adaptor, if you plan to use AC ...
... computer is also an intrinsic characteristic of the TFT manufacturing technology. Below are properly connected and ready. 2 Check to all those features. Your display contains an extremely large number of the many possible icons used on your computer: (Sample Illustration) System icons Turning on the power To turn ...small bright dots that all optical drives are designed to all possible configurations for the first time Small bright dots may appear on your screen display when you turn on the computer: 1 Make sure any external devices (such as the AC adaptor, if you plan to use AC ...
User Guide
Page 52
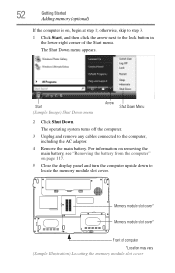
... "Removing the battery from the computer" on , begin at step 1; 52 Getting Started Adding memory (optional) If the computer is on page 117. 5 Close the display panel and turn the computer upside down to the computer, including the AC adaptor. 4 Remove the main battery. Memory module slot cover* Memory module slot...
... "Removing the battery from the computer" on , begin at step 1; 52 Getting Started Adding memory (optional) If the computer is on page 117. 5 Close the display panel and turn the computer upside down to the computer, including the AC adaptor. 4 Remove the main battery. Memory module slot cover* Memory module slot...
User Guide
Page 58
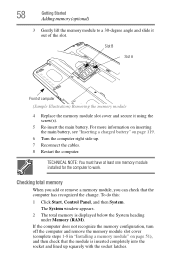
... lined up . 7 Reconnect the cables. 8 Restart the computer. Checking total memory When you add or remove a memory module, you can check that the module is displayed below the System heading under Memory (RAM). 58 Getting Started Adding memory (optional) 3 Gently lift the memory module to work. For more information on inserting...
... lined up . 7 Reconnect the cables. 8 Restart the computer. Checking total memory When you add or remove a memory module, you can check that the module is displayed below the System heading under Memory (RAM). 58 Getting Started Adding memory (optional) 3 Gently lift the memory module to work. For more information on inserting...

User Guide
Page 59
If unsure, cancel and try again. Getting Started 59 Hard Drive Recovery Utilities NOTE From time to time, Windows® will display a pop-up that you create recovery CDs/DVDs before using a writable drive. ❖ Recover your hard disk drive to the factory-set default without your ...
If unsure, cancel and try again. Getting Started 59 Hard Drive Recovery Utilities NOTE From time to time, Windows® will display a pop-up that you create recovery CDs/DVDs before using a writable drive. ❖ Recover your hard disk drive to the factory-set default without your ...
User Guide
Page 61
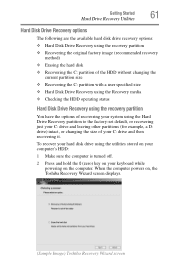
... default, or recovering just your C: drive and leaving other partitions (for example, a D: drive) intact, or changing the size of your keyboard while powering on , the Toshiba Recovery Wizard screen displays. (Sample Image) Toshiba Recovery Wizard screen
... default, or recovering just your C: drive and leaving other partitions (for example, a D: drive) intact, or changing the size of your keyboard while powering on , the Toshiba Recovery Wizard screen displays. (Sample Image) Toshiba Recovery Wizard screen

User Guide
Page 62
...recovered. 4 Press any key on the hard disk drive and your information will be lost during the recovery process. Once complete, a message displays that all partitions on the keyboard to begin the recovery. Be sure to save your work to external media before proceeding. 3 Click Next ...to restart the computer. Be sure to save your work to external media first. 1 On the Toshiba Recovery Wizard screen, select Recovery of box state deletes all data will be lost . The options are: ❖ Recovery of Factory Default Software ...
...recovered. 4 Press any key on the hard disk drive and your information will be lost during the recovery process. Once complete, a message displays that all partitions on the keyboard to begin the recovery. Be sure to save your work to external media before proceeding. 3 Click Next ...to restart the computer. Be sure to save your work to external media first. 1 On the Toshiba Recovery Wizard screen, select Recovery of box state deletes all data will be lost . The options are: ❖ Recovery of Factory Default Software ...
User Guide
Page 63
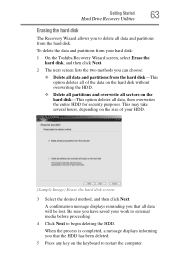
... from your HDD. (Sample Image) Erase the hard disk screen 3 Select the desired method, and then click Next. When the process is completed, a message displays informing you that all data, then overwrites the entire HDD for security purposes. This may take several hours, depending on the size of the data... The Recovery Wizard allows you to delete all data and partitions from the hard disk-This option deletes all of your hard disk: 1 On the Toshiba Recovery Wizard screen, select Erase the hard disk, and then click Next. 2 The next screen lists the two methods you can choose: ❖ ...
... from your HDD. (Sample Image) Erase the hard disk screen 3 Select the desired method, and then click Next. When the process is completed, a message displays informing you that all data, then overwrites the entire HDD for security purposes. This may take several hours, depending on the size of the data... The Recovery Wizard allows you to delete all data and partitions from the hard disk-This option deletes all of your hard disk: 1 On the Toshiba Recovery Wizard screen, select Erase the hard disk, and then click Next. 2 The next screen lists the two methods you can choose: ❖ ...
User Guide
Page 64
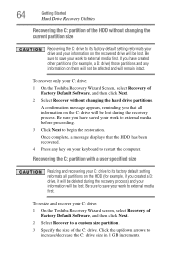
... Software, and then click Next. 2 Select Recover to its factory default setting reformats all information on your C: drive: 1 On the Toshiba Recovery Wizard Screen, select Recovery of Factory Default Software, and then click Next. 2 Select Recover without changing the current partition size Recovering the...and recovering your C: drive to its factory default setting reformats your drive and your work to begin the restoration. Once complete, a message displays that all partitions on the HDD (for example, a D: drive) those partitions and any key on the C: drive will be lost ...
... Software, and then click Next. 2 Select Recover to its factory default setting reformats all information on your C: drive: 1 On the Toshiba Recovery Wizard Screen, select Recovery of Factory Default Software, and then click Next. 2 Select Recover without changing the current partition size Recovering the...and recovering your C: drive to its factory default setting reformats your drive and your work to begin the restoration. Once complete, a message displays that all partitions on the HDD (for example, a D: drive) those partitions and any key on the C: drive will be lost ...
User Guide
Page 65
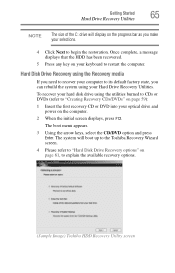
...begin the restoration. Getting Started 65 Hard Drive Recovery Utilities NOTE The size of the C: drive will boot up to the Toshiba Recovery Wizard screen. 4 Please refer to "Hard Disk Drive Recovery options" on page 61, to explain the available recovery options. (Sample Image...) Toshiba HDD Recovery Utility screen Once complete, a message displays that the HDD has been recovered. 5 Press any key on the computer. 2 When the initial screen displays, press F12. Hard Disk Drive Recovery using your computer to restart the ...
...begin the restoration. Getting Started 65 Hard Drive Recovery Utilities NOTE The size of the C: drive will boot up to the Toshiba Recovery Wizard screen. 4 Please refer to "Hard Disk Drive Recovery options" on page 61, to explain the available recovery options. (Sample Image...) Toshiba HDD Recovery Utility screen Once complete, a message displays that the HDD has been recovered. 5 Press any key on the computer. 2 When the initial screen displays, press F12. Hard Disk Drive Recovery using your computer to restart the ...

User Guide
Page 66
...the on the Dual Mode Pad which provide convenient shortcuts to frequently used applications. Installing drivers and applications (Available on certain models) The Toshiba Application Installer (available on certain models) Using Dual Mode The Dual Mode feature allows you can also use the virtual buttons on -screen... prompts to display its status in the Volume list to complete the installation process. You can check its status as follows: 1 Click Start. 2 Right-...
...the on the Dual Mode Pad which provide convenient shortcuts to frequently used applications. Installing drivers and applications (Available on certain models) The Toshiba Application Installer (available on certain models) Using Dual Mode The Dual Mode feature allows you can also use the virtual buttons on -screen... prompts to display its status in the Volume list to complete the installation process. You can check its status as follows: 1 Click Start. 2 Right-...
User Guide
Page 69
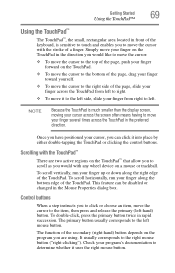
... the TouchPad™ Using the TouchPad™ The TouchPad™, the small, rectangular area located in front of the keyboard, is much smaller than the display screen, moving your cursor across the screen often means having to move your finger several times across the TouchPad from left to right. ❖ To...
... the TouchPad™ Using the TouchPad™ The TouchPad™, the small, rectangular area located in front of the keyboard, is much smaller than the display screen, moving your cursor across the screen often means having to move your finger several times across the TouchPad from left to right. ❖ To...
User Guide
Page 70
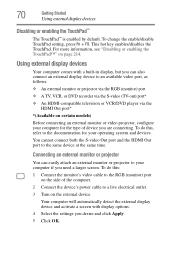
...connecting an external monitor or video projector, configure your computer for your computer if you need a larger screen. 70 Getting Started Using external display devices Disabling or enabling the TouchPad™ The TouchPad™ is enabled by default. To do this : 1 Connect the monitor's video...to the RGB (monitor) port on the side of device you desire and click Apply. 5 Click OK. Using external display devices Your computer comes with display options. 4 Select the settings you are connecting. This hot key enables/disables the TouchPad. Connecting an external monitor or...
...connecting an external monitor or video projector, configure your computer for your computer if you need a larger screen. 70 Getting Started Using external display devices Disabling or enabling the TouchPad™ The TouchPad™ is enabled by default. To do this : 1 Connect the monitor's video...to the RGB (monitor) port on the side of device you desire and click Apply. 5 Click OK. Using external display devices Your computer comes with display options. 4 Select the settings you are connecting. This hot key enables/disables the TouchPad. Connecting an external monitor or...
User Guide
Page 71
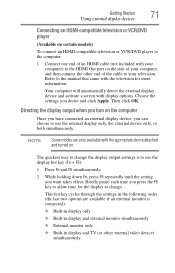
...time for more information. NOTE Some modes are available if an external monitor is to the manual that came with the television for the display to your computer, and then connect the other external video device) simultaneously This hot key cycles through the settings in... display and TV (or other end of the cable to change. Getting Started 71 Using external display devices Connecting an HDMI-compatible television or VCR/DVD player (Available on certain models) To connect an...
...time for more information. NOTE Some modes are available if an external monitor is to the manual that came with the television for the display to your computer, and then connect the other external video device) simultaneously This hot key cycles through the settings in... display and TV (or other end of the cable to change. Getting Started 71 Using external display devices Connecting an HDMI-compatible television or VCR/DVD player (Available on certain models) To connect an...


