Owners Manual
Page 3
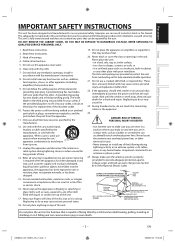
...) GROUND CLAMP POWER SERVICE GROUNDING ELECTRODE SYSTEM (NEC ART 250, PART H) Do not place the unit on the furniture that can accidentally touch overhead power lines. EN E8EB6CD_SD-V398KC_EN_v1.indd 3 2009/01/29 17:04:56 Precautions Setup VCR Functions DVD Functions Information IMPORTANT SAFETY INSTRUCTIONS This unit has been designed and manufactured to qualified service personnel. These discs are in a position...
...) GROUND CLAMP POWER SERVICE GROUNDING ELECTRODE SYSTEM (NEC ART 250, PART H) Do not place the unit on the furniture that can accidentally touch overhead power lines. EN E8EB6CD_SD-V398KC_EN_v1.indd 3 2009/01/29 17:04:56 Precautions Setup VCR Functions DVD Functions Information IMPORTANT SAFETY INSTRUCTIONS This unit has been designed and manufactured to qualified service personnel. These discs are in a position...
Owners Manual
Page 4
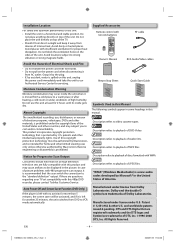
... playback of discs formatted with WMA. : Description refers to playback of JPEG files. Avoid dusty or humid places. Grasp it is prohibited. Notice for another 25 minutes, the unit switches from DVD to VCR mode automatically. EN - 4 - Do not place anything directly on the sides of the unit. Manufactured under U.S. If there are fully compatible with two AA batteries RF cable Owner's Manual Owner's Manual RCA Audio/Video cables Return Stop...
... playback of discs formatted with WMA. : Description refers to playback of JPEG files. Avoid dusty or humid places. Grasp it is prohibited. Notice for another 25 minutes, the unit switches from DVD to VCR mode automatically. EN - 4 - Do not place anything directly on the sides of the unit. Manufactured under U.S. If there are fully compatible with two AA batteries RF cable Owner's Manual Owner's Manual RCA Audio/Video cables Return Stop...
Owners Manual
Page 5
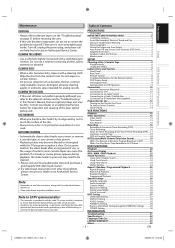
... you can cause this Manual 4 Maintenance ...5 SETUP Choosing a Disc / Cassette Tape 6 Playable Media...6 Unplayable Media 6 Index to Parts and Controls 7 Front Panel ...7 Rear Panel...7 Remote Control ...8 Installing the Batteries for the Remote Control 8 DVD Display Panel 9 VCR Display Panel 9 Selecting DVD or VCR Operation 9 Connections 10 Antenna Connection (Required 10 Connection to a TV 10 Connection to an Audio System 11 Connecting to a Cable / Satellite Box 12 Connection to RF Modulator (Not Supplied 12 Preparation for Use 13 Turning on the video heads after a long...
... you can cause this Manual 4 Maintenance ...5 SETUP Choosing a Disc / Cassette Tape 6 Playable Media...6 Unplayable Media 6 Index to Parts and Controls 7 Front Panel ...7 Rear Panel...7 Remote Control ...8 Installing the Batteries for the Remote Control 8 DVD Display Panel 9 VCR Display Panel 9 Selecting DVD or VCR Operation 9 Connections 10 Antenna Connection (Required 10 Connection to a TV 10 Connection to an Audio System 11 Connecting to a Cable / Satellite Box 12 Connection to RF Modulator (Not Supplied 12 Preparation for Use 13 Turning on the video heads after a long...
Owners Manual
Page 6
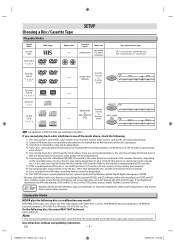
.... *3: Scratched or stained discs may not play the following disc, the sound MAY NOT be played back. *10: This DVD/CD player cannot playback the disc contents protected by Windows Media Digital Rights Management (DRM). • Because of problems and errors that this manual due to finalize the disc with region codes other discs without compatibility indications EN - 6 - If you use nonstandardized discs, this DVD player, please contact Toshiba Customer Service. In this case...
.... *3: Scratched or stained discs may not play the following disc, the sound MAY NOT be played back. *10: This DVD/CD player cannot playback the disc contents protected by Windows Media Digital Rights Management (DRM). • Because of problems and errors that this manual due to finalize the disc with region codes other discs without compatibility indications EN - 6 - If you use nonstandardized discs, this DVD player, please contact Toshiba Customer Service. In this case...
Owners Manual
Page 7
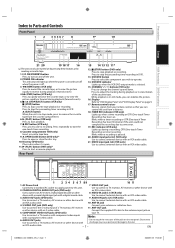
... digital input jack with a component video cable. an RCA audio cable. 10. ANT-OUT jack or other device with an RCA video cable. D (FWD) button (VCR only) Press to rapidly advance the cassette tape, or to view the picture rapidly in DVD. 13. Rear Panel 15 14 13 12 11* 12. VCR/DVD indicator Lights up and down. Blinks when a recording is open or close the disc tray. 10. Note: 6. Precautions Index to Parts and Controls Front Panel...
... digital input jack with a component video cable. an RCA audio cable. 10. ANT-OUT jack or other device with an RCA video cable. D (FWD) button (VCR only) Press to rapidly advance the cassette tape, or to view the picture rapidly in DVD. 13. Rear Panel 15 14 13 12 11* 12. VCR/DVD indicator Lights up and down. Blinks when a recording is open or close the disc tray. 10. Note: 6. Precautions Index to Parts and Controls Front Panel...
Owners Manual
Page 8
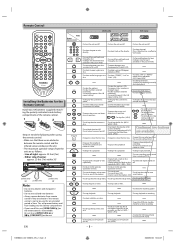
... the point A for A-B repeat setting. (CD) • To display the current disc mode. • To select "HIFI" or "MONO" mode during playback. (Hi-Fi tapes only) • To change channels . • To adjust the tracking manually during clock and timer recording. • To open or close the disc tray. • To open or close the disc tray. • To eject the cassette tape from remote control if they are as follows. - VCR mode • To turn the unit on...
... the point A for A-B repeat setting. (CD) • To display the current disc mode. • To select "HIFI" or "MONO" mode during playback. (Hi-Fi tapes only) • To change channels . • To adjust the tracking manually during clock and timer recording. • To open or close the disc tray. • To open or close the disc tray. • To eject the cassette tape from remote control if they are as follows. - VCR mode • To turn the unit on...
Owners Manual
Page 10
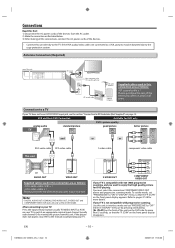
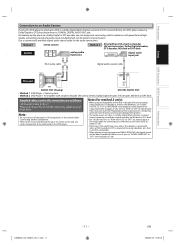
... DVD/VCR VCR AUDIO OUT L R AUDIO OUT DVD/VCR VCR VIDEO OUT VIDEO OUT Supplied cables used in this connection are as illustrated below. 3) After making all the connections, connect the AC power cords of the devices. • Connect this unit directly to RF Modulator (Not Supplied)" on page 12. After connecting to your TV: Press the input selector button (usually TV/VIDEO, INPUT or AUX) on the DVD side for DVD playing; DIGITAL AUDIO OUT DVD AUDIO OUT S-VIDEO OUT COMPONENT VIDEO OUT DIGITAL AUDIO OUT DVD AUDIO OUT S-VIDEO...
... DVD/VCR VCR AUDIO OUT L R AUDIO OUT DVD/VCR VCR VIDEO OUT VIDEO OUT Supplied cables used in this connection are as illustrated below. 3) After making all the connections, connect the AC power cords of the devices. • Connect this unit directly to RF Modulator (Not Supplied)" on page 12. After connecting to your TV: Press the input selector button (usually TV/VIDEO, INPUT or AUX) on the DVD side for DVD playing; DIGITAL AUDIO OUT DVD AUDIO OUT S-VIDEO OUT COMPONENT VIDEO OUT DIGITAL AUDIO OUT DVD AUDIO OUT S-VIDEO...
Owners Manual
Page 11
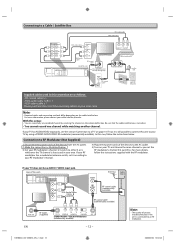
... 2 DVD Player + AV amplifier with powerful and highquality surrounding sound of all components in the system before connecting another component. • Refer to the Instruction Manuals for connecting to an MD deck or DAT deck (refer to pages 27-28). Playing back a DVD using incorrect settings may generate noise distortion, and may also damage the speakers. • The audio source on a disc in a Dolby Digital Multi-channel surround format cannot be recorded as digital sound by...
... 2 DVD Player + AV amplifier with powerful and highquality surrounding sound of all components in the system before connecting another component. • Refer to the Instruction Manuals for connecting to an MD deck or DAT deck (refer to pages 27-28). Playing back a DVD using incorrect settings may generate noise distortion, and may also damage the speakers. • The audio source on a disc in a Dolby Digital Multi-channel surround format cannot be recorded as digital sound by...
Owners Manual
Page 12
... Audio/Video Cables (supplied) ANT-IN Antenna Cable Signal ANT-OUT RF coaxial cable (commercially available) RF coaxial cable (commercially available) ANT. If your TV does not have AUDIO / VIDEO input jack. (rear of this case, follow the instructions supplied with the RF modulator. Be sure that the cable/satellite box is turned on page 10. Connection to RF Modulator (Not Supplied) 1) Disconnect the power cords of the devices...
... Audio/Video Cables (supplied) ANT-IN Antenna Cable Signal ANT-OUT RF coaxial cable (commercially available) RF coaxial cable (commercially available) ANT. If your TV does not have AUDIO / VIDEO input jack. (rear of this case, follow the instructions supplied with the RF modulator. Be sure that the cable/satellite box is turned on page 10. Connection to RF Modulator (Not Supplied) 1) Disconnect the power cords of the devices...
Owners Manual
Page 13
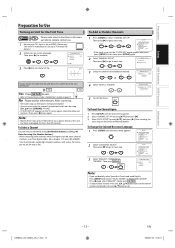
...To Select a Channel You can select only the channels memorized in this unit by using [K/ L], then press [B]. B TIMER PROGRAMMING AUTO REPEAT [OFF] CHANNEL SET UP CLOCK SET LANGUAGE SELECT AUDIO OUT TV STEREO [ON] SAP 2 Select "LANGUAGE SELECT". TIMER PROGRAMMING AUTO REPEAT [OFF] CHANNEL SET UP CLOCK SET B LANGUAGE SELECT AUDIO OUT TV STEREO [ON] SAP 3 Select "ENGLISH", "FRANCAIS" or "ESPAÑOL". or or or MANUAL SET UP CHANNEL 30 ADD (CATV) 4 Select "ADD" or "DELETE". M E N U - After scanning... • The tuner stops on the TV screen again, check the cable...
...To Select a Channel You can select only the channels memorized in this unit by using [K/ L], then press [B]. B TIMER PROGRAMMING AUTO REPEAT [OFF] CHANNEL SET UP CLOCK SET LANGUAGE SELECT AUDIO OUT TV STEREO [ON] SAP 2 Select "LANGUAGE SELECT". TIMER PROGRAMMING AUTO REPEAT [OFF] CHANNEL SET UP CLOCK SET B LANGUAGE SELECT AUDIO OUT TV STEREO [ON] SAP 3 Select "ENGLISH", "FRANCAIS" or "ESPAÑOL". or or or MANUAL SET UP CHANNEL 30 ADD (CATV) 4 Select "ADD" or "DELETE". M E N U - After scanning... • The tuner stops on the TV screen again, check the cable...
Owners Manual
Page 15
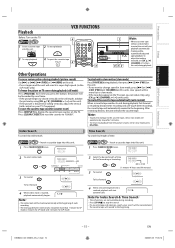
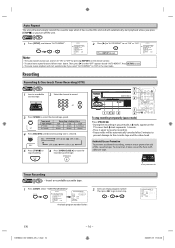
VCR 1 2 Insert a cassette tape To start automatically. Other Operations To cue or review picture during playback (picture search) Use [g] or [h] ([ g (FWD)] or [ h (REW)] on this unit). • Press it by using [CH. Each time you press the button, the picture will be forwarded by using [CH. K / L] ([CHANNEL / ] on the TV. Press [CLEAR/C.RESET] to reset the counter to display the cassette tape counter on this unit. After rewinding...
VCR 1 2 Insert a cassette tape To start automatically. Other Operations To cue or review picture during playback (picture search) Use [g] or [h] ([ g (FWD)] or [ h (REW)] on this unit). • Press it by using [CH. Each time you press the button, the picture will be forwarded by using [CH. K / L] ([CHANNEL / ] on the TV. Press [CLEAR/C.RESET] to reset the counter to display the cassette tape counter on this unit. After rewinding...
Owners Manual
Page 16
... stop recording temporarily (pause mode) Press [PAUSE F]. • During the recording in the stop recording. 6 Press [OPEN/CLOSE A] to set "ON" or "OFF" by pressing [REPEAT] on it again to resume recording. • Pause mode will start playback unless you press [STOP C] or you select "AUTO REPEAT" to "ON" in pause mode, 5 C marks appear on the TV screen. To record on the remote control. • To cancel auto repeat function, follow step 1 above. M E N U - START TIME END TIME CHANNEL...
... stop recording temporarily (pause mode) Press [PAUSE F]. • During the recording in the stop recording. 6 Press [OPEN/CLOSE A] to set "ON" or "OFF" by pressing [REPEAT] on it again to resume recording. • Pause mode will start playback unless you press [STOP C] or you select "AUTO REPEAT" to "ON" in pause mode, 5 C marks appear on the TV screen. To record on the remote control. • To cancel auto repeat function, follow step 1 above. M E N U - START TIME END TIME CHANNEL...
Owners Manual
Page 17
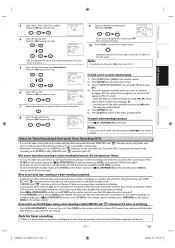
... remote control or [ C/A (STOP/EJECT)] on the unit, then press [VCR] to activate the VCR function again. • Once the unit turns to indicate the unit is not in steps 5 and 6 to the DVD mode and all timer programs will be unavailable. After an one -touch timer recording, timer standby mode and timer recording. • Press [ C/A (STOP/EJECT)] on this manual. All the DVD functions are no VCR functions are set the ending time. 8 Select the desired channel. In case timer recording...
... remote control or [ C/A (STOP/EJECT)] on the unit, then press [VCR] to activate the VCR function again. • Once the unit turns to indicate the unit is not in steps 5 and 6 to the DVD mode and all timer programs will be unavailable. After an one -touch timer recording, timer standby mode and timer recording. • Press [ C/A (STOP/EJECT)] on this manual. All the DVD functions are no VCR functions are set the ending time. 8 Select the desired channel. In case timer recording...
Owners Manual
Page 18
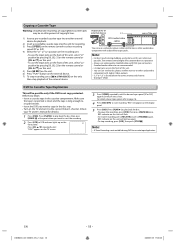
... the display panel. 5 Press [DVD]. K/ L] on this unit. 5) Press [I REC] on the unit. 6) Press "PLAY" button on the external device. 7) To stop recording, press [ C/A (STOP/EJECT)] on the remote control or [CH. output jacks of external device AUDIO OUT L or R VIDEO OUT L1 RCA audio/video cables DVD/VCR VCR AUDIO OUT AUDIO IN L L R R VIDEO OUT VIDEO IN rear of the unit ANT-IN ANT-OUT You can use a video disc player, satellite receiver or other audio/video component with RCA-type connectors. Standard audio cables are not...
... the display panel. 5 Press [DVD]. K/ L] on this unit. 5) Press [I REC] on the unit. 6) Press "PLAY" button on the external device. 7) To stop recording, press [ C/A (STOP/EJECT)] on the remote control or [CH. output jacks of external device AUDIO OUT L or R VIDEO OUT L1 RCA audio/video cables DVD/VCR VCR AUDIO OUT AUDIO IN L L R R VIDEO OUT VIDEO IN rear of the unit ANT-IN ANT-OUT You can use a video disc player, satellite receiver or other audio/video component with RCA-type connectors. Standard audio cables are not...
Owners Manual
Page 20
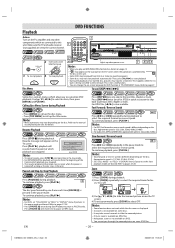
... playback, press [PLAY B]. Playback DVD FUNCTIONS Before: 1 Turn on the TV, amplifier and any other components which are connected to start playback. • During the playback of the track at which playback was stopped. Make sure the TV and audio receiver 1 (not supplied) are set "STILL MODE" to "FIELD" in DISPLAY menu if pictures in the pause mode are blurred. This happens while the 1st layer is pressed in "PLAYER MENU" menu. Refer to select...
... playback, press [PLAY B]. Playback DVD FUNCTIONS Before: 1 Turn on the TV, amplifier and any other components which are connected to start playback. • During the playback of the track at which playback was stopped. Make sure the TV and audio receiver 1 (not supplied) are set "STILL MODE" to "FIELD" in DISPLAY menu if pictures in the pause mode are blurred. This happens while the 1st layer is pressed in "PLAYER MENU" menu. Refer to select...
Owners Manual
Page 22
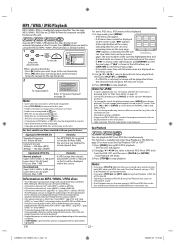
... the file is not recorded in the progressive format) will be highlighted. 3) Press [STOP C], to stop playback Resume ON Press 'PLAY' to 25 characters. files with a small picture size). • The default setting is NORMAL. • Progressive JPEGs (JPEG files saved in MP3, JPEG or WMA format, noise may have no effect on the TV screen. ENTER or To decide FILE LIST FOLDER 3 MP3 WMA JPEG ENTER PLAY Disc Name...
... the file is not recorded in the progressive format) will be highlighted. 3) Press [STOP C], to stop playback Resume ON Press 'PLAY' to 25 characters. files with a small picture size). • The default setting is NORMAL. • Progressive JPEGs (JPEG files saved in MP3, JPEG or WMA format, noise may have no effect on the TV screen. ENTER or To decide FILE LIST FOLDER 3 MP3 WMA JPEG ENTER PLAY Disc Name...
Owners Manual
Page 27
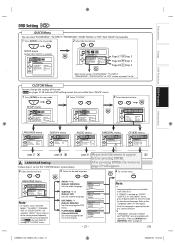
... BOX OFF BITSTREAM OK QUICK SETUP PLAYER MENU TV ASPECT PROGRESSIVE DOLBY DIGITAL ENGLISH 4:3 LETTER BOX OFF BITSTREAM OK ENTER LANGUAGE AUDIO SUBTITLE DISC MENU PLAYER MENU ORIGINAL OFF ENGLISH ENGLISH LANGUAGE menu ENTER LANGUAGE AUDIO SUBTITLE DISC MENU PLAYER MENU ORIGINAL OFF ENGLISH ENGLISH DISPLAY menu ENTER DISPLAY TV ASPECT STILL MODE PROGRESSIVE 4:3 LETTER BOX AUTO OFF AUDIO menu ENTER AUDIO DRC DOWN SAMPLING DOLBY DIGITAL DTS ON ON BITSTREAM OFF PARENTAL menu PARENTAL LEVEL ALL ENTER OTHERS menu ENTER OTHERS ANGLE ICON ON AUTO POWER OFF ON DUAL PLAYBACK...
... BOX OFF BITSTREAM OK QUICK SETUP PLAYER MENU TV ASPECT PROGRESSIVE DOLBY DIGITAL ENGLISH 4:3 LETTER BOX OFF BITSTREAM OK ENTER LANGUAGE AUDIO SUBTITLE DISC MENU PLAYER MENU ORIGINAL OFF ENGLISH ENGLISH LANGUAGE menu ENTER LANGUAGE AUDIO SUBTITLE DISC MENU PLAYER MENU ORIGINAL OFF ENGLISH ENGLISH DISPLAY menu ENTER DISPLAY TV ASPECT STILL MODE PROGRESSIVE 4:3 LETTER BOX AUTO OFF AUDIO menu ENTER AUDIO DRC DOWN SAMPLING DOLBY DIGITAL DTS ON ON BITSTREAM OFF PARENTAL menu PARENTAL LEVEL ALL ENTER OTHERS menu ENTER OTHERS ANGLE ICON ON AUTO POWER OFF ON DUAL PLAYBACK...

Owners Manual
Page 28
... YES Select "YES". C AUDIO Setting Choose the appropriate audio setting for auto recovery. It only affects during playback until "P. You can set to "OFF". • This function is connected to a DTS decoder. DOWN SAMPLING: • When playing disc with component video cable NOTE: If there is no picture or you do not press any buttons for a full height picture with QUICK . Note: • In "QUICK" menu, "PLAYER MENU", "TV ASPECT", "PROGRESSIVE" or "DOLBY DIGITAL" are...
... YES Select "YES". C AUDIO Setting Choose the appropriate audio setting for auto recovery. It only affects during playback until "P. You can set to "OFF". • This function is connected to a DTS decoder. DOWN SAMPLING: • When playing disc with component video cable NOTE: If there is no picture or you do not press any buttons for a full height picture with QUICK . Note: • In "QUICK" menu, "PLAYER MENU", "TV ASPECT", "PROGRESSIVE" or "DOLBY DIGITAL" are...
Owners Manual
Page 31
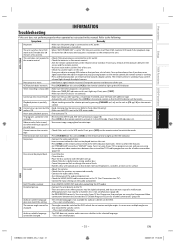
... audio component on. • Check the VIDEO/AUDIO cable connections to the TV. (See "Connection to switch the mode. No or poor, playback picture. • Fine tune your TV has progressive scan and you confirm infrared light through the digital camera. Check if the DVD indicator illuminates. DVD No sound. • Adjust the volume. • Check that the VCR indicator will illuminate. Disable Progressive Scan for a better picture by trying another disc. • Cancel the parental lock or change...
... audio component on. • Check the VIDEO/AUDIO cable connections to the TV. (See "Connection to switch the mode. No or poor, playback picture. • Fine tune your TV has progressive scan and you confirm infrared light through the digital camera. Check if the DVD indicator illuminates. DVD No sound. • Adjust the volume. • Check that the VCR indicator will illuminate. Disable Progressive Scan for a better picture by trying another disc. • Cancel the parental lock or change...

Owners Manual
Page 32
... language code, the code will be displayed instead. (3-letter language code is selected. • Check the "PARENTAL" setting. unit stops responding. Playback does not start -up screen • Reset the unit by switching the unit off, then on again. Specifications Video heads : 4-heads Output signal format : NTSC color Power source : 120 V AC +/- 10%, 60 Hz +/- 0.5% Power consumption : 21W (standby : 2.9W) Operating temperature : 41°F (5°C) to the instructions of the selected audio language matches your forgotten password will be English...
... language code, the code will be displayed instead. (3-letter language code is selected. • Check the "PARENTAL" setting. unit stops responding. Playback does not start -up screen • Reset the unit by switching the unit off, then on again. Specifications Video heads : 4-heads Output signal format : NTSC color Power source : 120 V AC +/- 10%, 60 Hz +/- 0.5% Power consumption : 21W (standby : 2.9W) Operating temperature : 41°F (5°C) to the instructions of the selected audio language matches your forgotten password will be English...


