
Maintenance Manual
Page 60
...the RTC memory (CMOS type memory) is not the same as the message instructs, the SETUP screen appears to set the system configuration. These errors occur, when the system configuration preserved in the BIOS ROM. Then press [F1] key (b)*** Bad check sum (ROM) *** Check system.... Check system. If you press the F1 key as the actual configuration or when the data is lost. Then press [F1] key 2-18 PORTEGE M100 Maintenance Manual (960-452) q If nothing is displayed, go to Procedure 2. 2 Troubleshooting Procedures 2.4 System Board Troubleshooting Procedure 1 Message Check ...
...the RTC memory (CMOS type memory) is not the same as the message instructs, the SETUP screen appears to set the system configuration. These errors occur, when the system configuration preserved in the BIOS ROM. Then press [F1] key (b)*** Bad check sum (ROM) *** Check system.... Check system. If you press the F1 key as the actual configuration or when the data is lost. Then press [F1] key 2-18 PORTEGE M100 Maintenance Manual (960-452) q If nothing is displayed, go to Procedure 2. 2 Troubleshooting Procedures 2.4 System Board Troubleshooting Procedure 1 Message Check ...
Maintenance Manual
Page 66
...0Ch First 64KB memory check 0Dh Interrupting vector initialization 0Eh NDP initialization 0Fh System initialization 10h Display initialization Message Read EC version CMOS default setup check ACPI table initialization KBC initialization PCI initialization PIC test Check if self test is required Password initialization Initializing LAN information Wake UP ... CMOS error information to SMRAM Timer initialization Read power supply system information EC initialization Get Battery information Get LCD EDID information VGA BIOS initialization 2-24 PORTEGE M100 Maintenance Manual (960-452)
...0Ch First 64KB memory check 0Dh Interrupting vector initialization 0Eh NDP initialization 0Fh System initialization 10h Display initialization Message Read EC version CMOS default setup check ACPI table initialization KBC initialization PCI initialization PIC test Check if self test is required Password initialization Initializing LAN information Wake UP ... CMOS error information to SMRAM Timer initialization Read power supply system information EC initialization Get Battery information Get LCD EDID information VGA BIOS initialization 2-24 PORTEGE M100 Maintenance Manual (960-452)

Maintenance Manual
Page 68
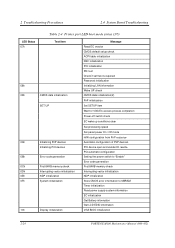
2 Troubleshooting Procedures 2.4 System Board Troubleshooting Table 2-4 Printer port LED boot mode status (5/5) LED Status 1Fh Test item Pre boot SETUP FFh End Message Store 40: 00h value (for SIQ save / restore) Set font address for resume password Set USB/KB ... writing on BIOS TIT checksum Runtime IRT flag clear Runtime checksum update Hibernation branch CPU, HDD upgrade check Set battery save mode Set date Close PCI device configuration area Cache control Wait for serial port initialization completion Runtime checksum update Set thermal duty 2-26 PORTEGE M100 Maintenance Manual ...
2 Troubleshooting Procedures 2.4 System Board Troubleshooting Table 2-4 Printer port LED boot mode status (5/5) LED Status 1Fh Test item Pre boot SETUP FFh End Message Store 40: 00h value (for SIQ save / restore) Set font address for resume password Set USB/KB ... writing on BIOS TIT checksum Runtime IRT flag clear Runtime checksum update Hibernation branch CPU, HDD upgrade check Set battery save mode Set date Close PCI device configuration area Cache control Wait for serial port initialization completion Runtime checksum update Set thermal duty 2-26 PORTEGE M100 Maintenance Manual ...

Maintenance Manual
Page 162
Others Power-up Mode is divided into two pages. PORTEGE M100 Maintenance Manual (960-452) 3-53 The SETUP screen is in Resume mode. SYSTEM SETUP (2/2) ACPI BIOS version = X.XX = Setup by OS PC CARD Controller Mode = Auto-Selected I/O PORTS Serial = COM1(3F8H/IRQ4) Parallel = LPT1(378H/IRQ7/CH3) DRIVERS I/O Built-...= PCI LAN Built-in HDD→Second HDD →PC Card Network Boot Protocol = PXE DISPLAY Power On Display Selected = Auto- SYSTEM SETUP (1/2) ACPI BIOS version = X.XX MEMORY Total = XXXXX KB SYSTEM DATE/TIME Date(MM-DD-YY) = XX-XX-XXXX Time(HH:MM:SS) = XX...
Others Power-up Mode is divided into two pages. PORTEGE M100 Maintenance Manual (960-452) 3-53 The SETUP screen is in Resume mode. SYSTEM SETUP (2/2) ACPI BIOS version = X.XX = Setup by OS PC CARD Controller Mode = Auto-Selected I/O PORTS Serial = COM1(3F8H/IRQ4) Parallel = LPT1(378H/IRQ7/CH3) DRIVERS I/O Built-...= PCI LAN Built-in HDD→Second HDD →PC Card Network Boot Protocol = PXE DISPLAY Power On Display Selected = Auto- SYSTEM SETUP (1/2) ACPI BIOS version = X.XX MEMORY Total = XXXXX KB SYSTEM DATE/TIME Date(MM-DD-YY) = XX-XX-XXXX Time(HH:MM:SS) = XX...
User Manual
Page 123
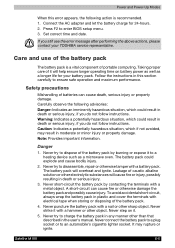
... of portable computing. A short-circuit can cause death, serious injury or property damage. Satellite M100 6-5 If you do not follow instructions. Follow the instructions in death or serious injury. 3.... your battery pack. Connect the AC adapter and let the battery charge for your TOSHIBA service representative. Press F2 to an automobile's cigarette lighter socket. Taking proper care ... and cause bodily injury. 2. Never connect the battery pack to a plug socket or to enter BIOS setup menu. 3. Never strike it . 5. Power and Power-Up Modes When this section carefully to...
... of portable computing. A short-circuit can cause death, serious injury or property damage. Satellite M100 6-5 If you do not follow instructions. Follow the instructions in death or serious injury. 3.... your battery pack. Connect the AC adapter and let the battery charge for your TOSHIBA service representative. Press F2 to an automobile's cigarette lighter socket. Taking proper care ... and cause bodily injury. 2. Never connect the battery pack to a plug socket or to enter BIOS setup menu. 3. Never strike it . 5. Power and Power-Up Modes When this section carefully to...

User Manual
Page 136
... and contains two buttons: Default Return all HW Setup values to be used when the computer is switched on. When finish BIOS update , please restart your computer's display settings for either the internal LCD screen or for an external monitor. This option is... The CPU always runs at low power consumption and low speed. 7-2 Satellite M100 Setup This field displays BIOS Version and date. CPU This function lets you customize your computer and press F2 into BIOS setup manual and load BIOS default one is connected. Auto-Selected Selects an external monitor if one time....
... and contains two buttons: Default Return all HW Setup values to be used when the computer is switched on. When finish BIOS update , please restart your computer's display settings for either the internal LCD screen or for an external monitor. This option is... The CPU always runs at low power consumption and low speed. 7-2 Satellite M100 Setup This field displays BIOS Version and date. CPU This function lets you customize your computer and press F2 into BIOS setup manual and load BIOS default one is connected. Auto-Selected Selects an external monitor if one time....
User Manual
Page 162
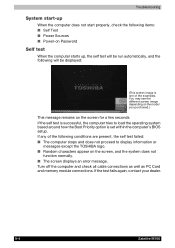
If the self test is successful, the computer tries to display information or messages except the TOSHIBA logo. ■ Random characters appear on the screen for a few seconds. If any of the examples. ...not function normally. ■ The screen displays an error message. If the test fails again, contact your dealer. 9-4 Satellite M100 Turn off the computer and check all cable connections as well as PC Card and memory module connections. Troubleshooting System start-up When... is one of the following will be displayed: (This screen image is set within the computer's BIOS setup.
If the self test is successful, the computer tries to display information or messages except the TOSHIBA logo. ■ Random characters appear on the screen for a few seconds. If any of the examples. ...not function normally. ■ The screen displays an error message. If the test fails again, contact your dealer. 9-4 Satellite M100 Turn off the computer and check all cable connections as well as PC Card and memory module connections. Troubleshooting System start-up When... is one of the following will be displayed: (This screen image is set within the computer's BIOS setup.
User Manual
Page 176
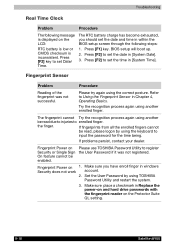
... Satellite M100 Make sure you should set the time in windows Security does not work account. 2. Press [F2] to register Security or Single Sign the User Password if it was not successful. Make sure place a checkmark in Chapter 4, Operating Basics. Press [F1] key. BIOS setup will boot up. 2. Please try again using TOSHIBA Password...
... Satellite M100 Make sure you should set the time in windows Security does not work account. 2. Press [F2] to register Security or Single Sign the User Password if it was not successful. Make sure place a checkmark in Chapter 4, Operating Basics. Press [F1] key. BIOS setup will boot up. 2. Please try again using TOSHIBA Password...

