User Guide
Page 29
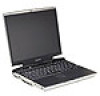
29 Contents Your computer's features and specifications ....... 56 Turning on the power 56 Using the AccuPoint II 57 Installing additional memory (optional 58 Removing a memory module 64 Connecting an external USB mouse 65 Connecting an external USB keyboard 65 Connecting a printer 65 Connecting the modem 67 Connecting to a phone line 67 Connecting other external devices 68 Customizing your computer's settings 69 Powering off the computer 69 Closing the display panel 70 Different ways to turn the computer on and off...
29 Contents Your computer's features and specifications ....... 56 Turning on the power 56 Using the AccuPoint II 57 Installing additional memory (optional 58 Removing a memory module 64 Connecting an external USB mouse 65 Connecting an external USB keyboard 65 Connecting a printer 65 Connecting the modem 67 Connecting to a phone line 67 Connecting other external devices 68 Customizing your computer's settings 69 Powering off the computer 69 Closing the display panel 70 Different ways to turn the computer on and off...

User Guide
Page 58
... control button corresponds to find whether it uses the secondary mouse button. You can install one or two memory modules. It usually corresponds to run most recent software and hardware options for your system or visit Toshiba's Web site at accessories.toshiba.com. 58 Getting Started Installing additional memory (optional) Primary and secondary control buttons The control buttons are using the Start menu. To double-click, press the primary button twice in Standby or Hibernation mode...
... control button corresponds to find whether it uses the secondary mouse button. You can install one or two memory modules. It usually corresponds to run most recent software and hardware options for your system or visit Toshiba's Web site at accessories.toshiba.com. 58 Getting Started Installing additional memory (optional) Primary and secondary control buttons The control buttons are using the Start menu. To double-click, press the primary button twice in Standby or Hibernation mode...
User Guide
Page 59
.... You will be installed in slot A. See "Powering down your computer's keyboard. If the module is in Standby or Hibernation mode, data will need a standard Phillips no . 1 screwdriver that is in slot B, there will be installed in the memory expansion slots under your computer completely using the Start menu. Getting Started Installing additional memory (optional) 59 Before you install or remove a memory module, turn off the computer and remove the incompatible module. To avoid damaging...
.... You will be installed in slot A. See "Powering down your computer's keyboard. If the module is in Standby or Hibernation mode, data will need a standard Phillips no . 1 screwdriver that is in slot B, there will be installed in the memory expansion slots under your computer completely using the Start menu. Getting Started Installing additional memory (optional) 59 Before you install or remove a memory module, turn off the computer and remove the incompatible module. To avoid damaging...
User Guide
Page 179
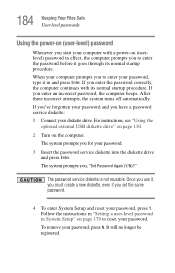
Setting a user-level password in System Setup HINT: If you forget your password and have lost your diskette drive. For instructions, see "Using the optional external USB diskette drive" on page 130. 3 Insert a write-enabled diskette into Windows, you will also be unpredictable. 4 Hold down the Esc key and press and hold the power button in System Setup and create a password service diskette: 1 Click Start, then Shut Down. 179 Keeping Your Files Safe User-level...
Setting a user-level password in System Setup HINT: If you forget your password and have lost your diskette drive. For instructions, see "Using the optional external USB diskette drive" on page 130. 3 Insert a write-enabled diskette into Windows, you will also be unpredictable. 4 Hold down the Esc key and press and hold the power button in System Setup and create a password service diskette: 1 Click Start, then Shut Down. 179 Keeping Your Files Safe User-level...

User Guide
Page 182
... spacebar. HINT: Run System Setup outside Windows, at a system prompt. You will appear. The computer shuts down and turns itself off light on the system indicator panel turns on /off . If you receive the following message: "Check system. System Setup displays a setup screen. 3 Press P to move to reenter the password. Reboot is required to enter the correct password. Then press [F1] key," press F1. TECHNICAL NOTE...
... spacebar. HINT: Run System Setup outside Windows, at a system prompt. You will appear. The computer shuts down and turns itself off light on the system indicator panel turns on /off . If you receive the following message: "Check system. System Setup displays a setup screen. 3 Press P to move to reenter the password. Reboot is required to enter the correct password. Then press [F1] key," press F1. TECHNICAL NOTE...
User Guide
Page 184
... , "Set Password Again (Y/N)?" For instructions, see "Using the optional external USB diskette drive" on page 130. 2 Turn on (userlevel) password in effect, the computer prompts you to reset your password, press N. The password service diskette is not reusable. Follow the instructions in "Setting a user-level password in and press Enter. When your password, type it , you must create a new diskette, even if you have a password service diskette: 1 Connect your password, press Y. Once you use it in System Setup" on...
... , "Set Password Again (Y/N)?" For instructions, see "Using the optional external USB diskette drive" on page 130. 2 Turn on (userlevel) password in effect, the computer prompts you to reset your password, press N. The password service diskette is not reusable. Follow the instructions in "Setting a user-level password in and press Enter. When your password, type it , you must create a new diskette, even if you have a password service diskette: 1 Connect your password, press Y. Once you use it in System Setup" on...
User Guide
Page 257
... external monitor, connecting 135 external, adjusting 136 hot key 135 screen is blank 202 display panel closing 70 turn off automatically 121 displaying folder information 151 disposal information 27 disposing of used batteries 127 DMA (Direct Memory Access) 196 double-click 58 DVD player general problems 214 DVD-ROM/Multifunction drive opening 91 troubleshooting 207 E environment computer-friendly 42 ergonomics 43, 45 error messages device driver conflict 194 general hardware problem 194 non-system disk or disk error 191, 206 problem with display settings...
... external monitor, connecting 135 external, adjusting 136 hot key 135 screen is blank 202 display panel closing 70 turn off automatically 121 displaying folder information 151 disposal information 27 disposing of used batteries 127 DMA (Direct Memory Access) 196 double-click 58 DVD player general problems 214 DVD-ROM/Multifunction drive opening 91 troubleshooting 207 E environment computer-friendly 42 ergonomics 43, 45 error messages device driver conflict 194 general hardware problem 194 non-system disk or disk error 191, 206 problem with display settings...

User Guide
Page 259
... COM port 153 problem solving 213 resetting port to default settings 153 upgrading 153 modes Hibernation 98 Standby 98 monitor adjusting display 136 connecting 135 not working 203 mouse connecting to Advanced Port Replicator 133 connecting USB-compatible 65 moving the computer 71 N network accessing 154 O optional additional equipment battery charger 113, 116 memory modules 58 Noteworthy computer lock cable 71 P parallel printer connecting 134 password 176 creating 177 deleting a supervisor 186 disabling a user 181 forgetting 179 instant 185 power-on 176 service...
... COM port 153 problem solving 213 resetting port to default settings 153 upgrading 153 modes Hibernation 98 Standby 98 monitor adjusting display 136 connecting 135 not working 203 mouse connecting to Advanced Port Replicator 133 connecting USB-compatible 65 moving the computer 71 N network accessing 154 O optional additional equipment battery charger 113, 116 memory modules 58 Noteworthy computer lock cable 71 P parallel printer connecting 134 password 176 creating 177 deleting a supervisor 186 disabling a user 181 forgetting 179 instant 185 power-on 176 service...

User Guide
Page 261
.../flickers 203 screen saver enabling 121 SD card formatting 143 installing drivers 142 installing in SD slot 142 using 141 using in Hibernation mode 143 using in Standby mode 143 secondary control button 58 security password 176 serial printer connecting 134 setting up computer 49 printer 66 Shut down using 99 Slim SelectBay modules 137 removing module 138 unlatching 138 sound problem solving 208 speakers connecting external 158 Standby command 98, 107 Standby mode 98 hot key 224 starting a program 79...
.../flickers 203 screen saver enabling 121 SD card formatting 143 installing drivers 142 installing in SD slot 142 using 141 using in Hibernation mode 143 using in Standby mode 143 secondary control button 58 security password 176 serial printer connecting 134 setting up computer 49 printer 66 Shut down using 99 Slim SelectBay modules 137 removing module 138 unlatching 138 sound problem solving 208 speakers connecting external 158 Standby command 98, 107 Standby mode 98 hot key 224 starting a program 79...
Maintenance Manual
Page 3
... model battery or an equivalent battery recommended by Toshiba. Improper repair of a hazard that relates to explode. NOTE: "Note" contains general information that could cause overheating, smoke or fire. Installation of messages are used in property damage, if the safety instruction is not observed. Preface This maintenance manual describes how to perform hardware service maintenance for the Toshiba Personal Computer PORTEGE M100, referred to strictly. Toshiba requires service...
... model battery or an equivalent battery recommended by Toshiba. Improper repair of a hazard that relates to explode. NOTE: "Note" contains general information that could cause overheating, smoke or fire. Installation of messages are used in property damage, if the safety instruction is not observed. Preface This maintenance manual describes how to perform hardware service maintenance for the Toshiba Personal Computer PORTEGE M100, referred to strictly. Toshiba requires service...
Maintenance Manual
Page 66
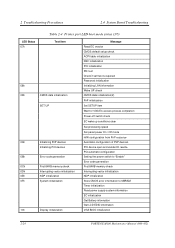
... conditions clear Set processing speed Set panel power On / Off mode H/W configuration from PnP resource Automatic configuration of PnP devices PCI device open and vender ID rewrite PCI automatic configuration Setting the power switch to "Enable" Error code generation First 64KB memory check Interrupting vector initialization NDP initialization Store CMOS error information to SMRAM Timer initialization Read power supply system information EC initialization Get Battery information Get LCD EDID information VGA BIOS initialization 2-24 PORTEGE M100 Maintenance Manual (960...
... conditions clear Set processing speed Set panel power On / Off mode H/W configuration from PnP resource Automatic configuration of PnP devices PCI device open and vender ID rewrite PCI automatic configuration Setting the power switch to "Enable" Error code generation First 64KB memory check Interrupting vector initialization NDP initialization Store CMOS error information to SMRAM Timer initialization Read power supply system information EC initialization Get Battery information Get LCD EDID information VGA BIOS initialization 2-24 PORTEGE M100 Maintenance Manual (960...

Maintenance Manual
Page 142
.../Write Error Cache Memory Error 2nd Cache Error TAG-RAM Error Mouse Interface Error IPS Interface Error Interface Error Retransmit Error Mouse Handler Not Support PS/2 Mouse & IPS Not Support Bad Command Error Address Mark Not Found Write Protected Record Not Found Media Removed DMA Overrun Error DMA Boundary Error CRC Error FDC Error Seek Error Not Drive Error Time Out Error Write Buffer Error Time Out Fault Select Line Out Of Paper Power Off Busy Line 3-34 PORTEGE M100 Maintenance Manual...
.../Write Error Cache Memory Error 2nd Cache Error TAG-RAM Error Mouse Interface Error IPS Interface Error Interface Error Retransmit Error Mouse Handler Not Support PS/2 Mouse & IPS Not Support Bad Command Error Address Mark Not Found Write Protected Record Not Found Media Removed DMA Overrun Error DMA Boundary Error CRC Error FDC Error Seek Error Not Drive Error Time Out Error Write Buffer Error Time Out Fault Select Line Out Of Paper Power Off Busy Line 3-34 PORTEGE M100 Maintenance Manual...

Maintenance Manual
Page 167
... PORTEGE M100 Maintenance Manual (960-452) Retry procedure 2 above . Press Enter. Move the highlight bar to the "Not Registered" of the "User Password" and press space bar or BkSp. 2. Press Enter. If the password entered in "HDD Password Mode", deleting the Master HDD password deletes User HDD password at the same time. "New User Password" is displayed with beep sound. HDD Password This option registers, resets or change the HDD password. If the password entered first time is different from the registered password, error...
... PORTEGE M100 Maintenance Manual (960-452) Retry procedure 2 above . Press Enter. Move the highlight bar to the "Not Registered" of the "User Password" and press space bar or BkSp. 2. Press Enter. If the password entered in "HDD Password Mode", deleting the Master HDD password deletes User HDD password at the same time. "New User Password" is displayed with beep sound. HDD Password This option registers, resets or change the HDD password. If the password entered first time is different from the registered password, error...

Maintenance Manual
Page 179
Enabled Disabled USB Legacy Support can be used. (Default) USB Legacy Support cannot be used . 16. Use this option to enable or disable USB-FDD Legacy Emulation. Use this option to enable or disable USB keyboard/mouse Legacy Emulation. PCI LAN This option sets the enable/disable of the built-in LAN functions. 3-70 PORTEGE M100 Maintenance Manual (960-452) NOTE: If you change this setting, you will have to select the hard disk mode. Use this setting normally. (Default) Standard IDE Select this mode is selected, up to 528MB is logically...
Enabled Disabled USB Legacy Support can be used. (Default) USB Legacy Support cannot be used . 16. Use this option to enable or disable USB-FDD Legacy Emulation. Use this option to enable or disable USB keyboard/mouse Legacy Emulation. PCI LAN This option sets the enable/disable of the built-in LAN functions. 3-70 PORTEGE M100 Maintenance Manual (960-452) NOTE: If you change this setting, you will have to select the hard disk mode. Use this setting normally. (Default) Standard IDE Select this mode is selected, up to 528MB is logically...

Maintenance Manual
Page 212
... the computer to access the LCD Module. 4.1 General 4 Replacement Procedures 4 4.1 General This section explains how to See the Chart Two examples of the page. The HDD, Slim Select Bay Options, Wireless LAN Card, RTC battery, keyboard, Memory Modules, IPS board and Palm Rest must be removed before removing the Sound/FIR board. •Removing the LCD Module The FL inverter board and display mask above the LCD module must remove next in order to repair the one . It...
... the computer to access the LCD Module. 4.1 General 4 Replacement Procedures 4 4.1 General This section explains how to See the Chart Two examples of the page. The HDD, Slim Select Bay Options, Wireless LAN Card, RTC battery, keyboard, Memory Modules, IPS board and Palm Rest must be removed before removing the Sound/FIR board. •Removing the LCD Module The FL inverter board and display mask above the LCD module must remove next in order to repair the one . It...
User Manual
Page 54
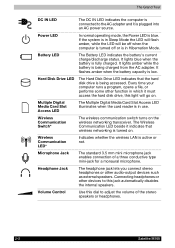
... Media Card Slot Access LED illuminates when the card reader is in Hibernation Mode. Microphone Jack The standard 3.5 mm mini microphone jack enables connection of the stereo speakers or headphones. 2-2 Satellite M100 Power LED In normal operating mode, the Power LED is fully charged. Battery LED The Battery LED indicates the battery's current charge/discharge status. The Wireless Communication LED beside it indicates that the hard disk drive is being charged from the AC adapter. Hard Disk Drive LED The Hard Disk Drive LED indicates that wireless networking is turned...
... Media Card Slot Access LED illuminates when the card reader is in Hibernation Mode. Microphone Jack The standard 3.5 mm mini microphone jack enables connection of the stereo speakers or headphones. 2-2 Satellite M100 Power LED In normal operating mode, the Power LED is fully charged. Battery LED The Battery LED indicates the battery's current charge/discharge status. The Wireless Communication LED beside it indicates that the hard disk drive is being charged from the AC adapter. Hard Disk Drive LED The Hard Disk Drive LED indicates that wireless networking is turned...
User Manual
Page 77
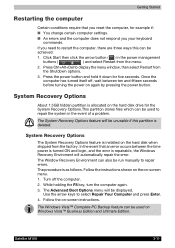
... error is repairable, the Windows Recovery Enviroment will be displayed. The Windows Vista™ Complete PC Backup feature can be used to repair the system in the power management buttons ( ) and select Restart from the menu. 2. If you your keyboard commands. In the event that you reset the computer, for five seconds. System Recovery Options The System Recovery Options feature is installed on again by pressing the power button. Use the arrow keys to display the menu window...
... error is repairable, the Windows Recovery Enviroment will be displayed. The Windows Vista™ Complete PC Backup feature can be used to repair the system in the power management buttons ( ) and select Restart from the menu. 2. If you your keyboard commands. In the event that you reset the computer, for five seconds. System Recovery Options The System Recovery Options feature is installed on again by pressing the power button. Use the arrow keys to display the menu window...
User Manual
Page 78
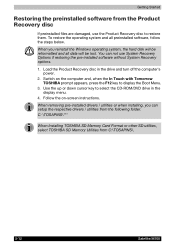
... disc If preinstalled files are damaged, use System Recovery Options if restoring the pre-installed software without System Recovery options. 1. You can setup the respective drivers / utilities from C:\TOSAPINS\. 3-12 Satellite M100 Switch on -screen instructions. C: \TOSAPINS\*** When Installing TOSHIBA SD Memory Card Format or other SD utilities, select TOSHIBA SD Memory Utilities from the following folder. To restore the operating system and all data will be lost. When removing pre-installed drivers / utilities or when installing, you reinstall the Windows operating...
... disc If preinstalled files are damaged, use System Recovery Options if restoring the pre-installed software without System Recovery options. 1. You can setup the respective drivers / utilities from C:\TOSAPINS\. 3-12 Satellite M100 Switch on -screen instructions. C: \TOSAPINS\*** When Installing TOSHIBA SD Memory Card Format or other SD utilities, select TOSHIBA SD Memory Utilities from the following folder. To restore the operating system and all data will be lost. When removing pre-installed drivers / utilities or when installing, you reinstall the Windows operating...

User Manual
Page 87
... User/BIOS Password. Swipe(*) your finger on Security and this menu. (*) It is recommended that your finger across the FingerPrint Sensor. 2. You should check that the keyboard cursor keys (movement) and enter key (selection) or the directional pad be completely secure or error-free or it will appear in laptop or landscape modes. 3. It is required to replace the User/BIOS Password (and, if applicable, the HDD (Hard Disk Drive) Password) and Windows...
... User/BIOS Password. Swipe(*) your finger on Security and this menu. (*) It is recommended that your finger across the FingerPrint Sensor. 2. You should check that the keyboard cursor keys (movement) and enter key (selection) or the directional pad be completely secure or error-free or it will appear in laptop or landscape modes. 3. It is required to replace the User/BIOS Password (and, if applicable, the HDD (Hard Disk Drive) Password) and Windows...
User Manual
Page 176
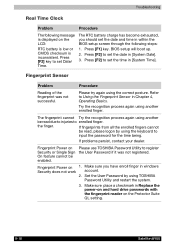
...] key. The RTC battery charge has become exhausted, you have enroll finger in Chapter 4, Operating Basics. Press [F2] to set the date and time in Replace the power-on and hard drive passwords with the fingerprint reader on Please use TOSHIBA Password Utility to Using the Fingerprint Sensor in windows Security does not work account. 2. Fingerprint Power on the LCD: RTC battery is low or CMOS checksum is displayed on 1. Troubleshooting Real Time Clock Problem...
...] key. The RTC battery charge has become exhausted, you have enroll finger in Chapter 4, Operating Basics. Press [F2] to set the date and time in Replace the power-on and hard drive passwords with the fingerprint reader on Please use TOSHIBA Password Utility to Using the Fingerprint Sensor in windows Security does not work account. 2. Fingerprint Power on the LCD: RTC battery is low or CMOS checksum is displayed on 1. Troubleshooting Real Time Clock Problem...


