User Guide
Page 5
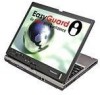
...utility commission, public service commission or corporation commission for repair or limited warranty information, please contact Toshiba Corporation, Toshiba America Information Systems, Inc. Also, you will be advised of service may occasionally be required. If the equipment is causing harm to the telephone network, the telephone company may request that temporary discontinuance of your right to file... the date and time it may be necessary for any person to use a computer or other electronic device, including Fax machines, to send any changes necessary to party line service is ...
...utility commission, public service commission or corporation commission for repair or limited warranty information, please contact Toshiba Corporation, Toshiba America Information Systems, Inc. Also, you will be advised of service may occasionally be required. If the equipment is causing harm to the telephone network, the telephone company may request that temporary discontinuance of your right to file... the date and time it may be necessary for any person to use a computer or other electronic device, including Fax machines, to send any changes necessary to party line service is ...

User Guide
Page 27
... the first time 51 Opening the display panel 51 Your computer's features and specifications ....52 Turning on the power 53 Adding memory (optional 54 Installing a memory module 54 Hard Drive Recovery Utilities 55 Creating Recovery CDs/DVDs 55 Hard Disk Drive Recovery using the recovery partition 57 Hard Disk Drive Recovery using the Recovery media 63 Installing drivers and applications 66 Using the TouchPad 67 Scrolling with the TouchPad 68 Control buttons 68 Disabling or enabling the TouchPad 68 Using external display devices 70 Directing the display output when you turn on the...
... the first time 51 Opening the display panel 51 Your computer's features and specifications ....52 Turning on the power 53 Adding memory (optional 54 Installing a memory module 54 Hard Drive Recovery Utilities 55 Creating Recovery CDs/DVDs 55 Hard Disk Drive Recovery using the recovery partition 57 Hard Disk Drive Recovery using the Recovery media 63 Installing drivers and applications 66 Using the TouchPad 67 Scrolling with the TouchPad 68 Control buttons 68 Disabling or enabling the TouchPad 68 Using external display devices 70 Directing the display output when you turn on the...

User Guide
Page 31
...a key 175 Using the keyboard or pointing device to assign a key 176 Viewing existing key assignments 177 Changing or removing existing key assignments 177 TOSHIBA Hotkey Utility 178 TOSHIBA SD™ Memory Card Format Utility .........179 TOSHIBA SD™ Memory Boot Utility 180 Booting from a bootable SD card 181 TOSHIBA Power Saver 182 Preset Power Profiles 183 Quickly creating a new power profile 183 Customizing a power profile 183 Mouse Utility 184 Toshiba Hardware Setup 185 TOSHIBA Zooming Utility 187 Toshiba Button Controls 189 CD/DVD Drive Acoustic Silencer 190 TOSHIBA...
...a key 175 Using the keyboard or pointing device to assign a key 176 Viewing existing key assignments 177 Changing or removing existing key assignments 177 TOSHIBA Hotkey Utility 178 TOSHIBA SD™ Memory Card Format Utility .........179 TOSHIBA SD™ Memory Boot Utility 180 Booting from a bootable SD card 181 TOSHIBA Power Saver 182 Preset Power Profiles 183 Quickly creating a new power profile 183 Customizing a power profile 183 Mouse Utility 184 Toshiba Hardware Setup 185 TOSHIBA Zooming Utility 187 Toshiba Button Controls 189 CD/DVD Drive Acoustic Silencer 190 TOSHIBA...

User Guide
Page 33
... to fix problems 230 Internet problems 231 The Windows® XP operating system can help you 232 Resolving a hardware conflict 233 A plan of action 233 Resolving hardware conflicts on your own .....234 Fixing a problem with Device Manager ...........235 Power and the batteries 237 Keyboard problems 239 Display problems 240 Disk drive problems 243 Optical drive problems 245 Sound system problems 246 PC Card problems 247 Printer problems 250 Modem problems 251 Wireless networking problems 252 DVD operating problems 255 Develop good computing habits 258 Data and...
... to fix problems 230 Internet problems 231 The Windows® XP operating system can help you 232 Resolving a hardware conflict 233 A plan of action 233 Resolving hardware conflicts on your own .....234 Fixing a problem with Device Manager ...........235 Power and the batteries 237 Keyboard problems 239 Display problems 240 Disk drive problems 243 Optical drive problems 245 Sound system problems 246 PC Card problems 247 Printer problems 250 Modem problems 251 Wireless networking problems 252 DVD operating problems 255 Develop good computing habits 258 Data and...

User Guide
Page 70
... (monitor) port Before connecting an external monitor or video projector, configure your computer for your computer if you are connecting. To do this : 1 Connect the monitor's video cable to the RGB (monitor) port on the external device. 4 Set the display mode by pressing Fn + F5, or by configuring the Display Properties settings. Connecting an external monitor or projector You can also connect an external display device to the documentation for the type of the computer. 2 Connect the device's power cable to your operating...
... (monitor) port Before connecting an external monitor or video projector, configure your computer for your computer if you are connecting. To do this : 1 Connect the monitor's video cable to the RGB (monitor) port on the external device. 4 Set the display mode by pressing Fn + F5, or by configuring the Display Properties settings. Connecting an external monitor or projector You can also connect an external display device to the documentation for the type of the computer. 2 Connect the device's power cable to your operating...

User Guide
Page 71
...) Display options window 3 Release the Fn key. Set the option for the display to allow time for the video controller by clicking Start, Control Panel, Appearance and Themes, and then Display. Briefly pause each time you press the F5 key to change. Choose the Settings tab, click the Advanced button, select Display Device, select the applicable Monitor type, and then click Apply or OK. The quickest way to use the internal display only, the external device only...
...) Display options window 3 Release the Fn key. Set the option for the display to allow time for the video controller by clicking Start, Control Panel, Appearance and Themes, and then Display. Briefly pause each time you press the F5 key to change. Choose the Settings tab, click the Advanced button, select Display Device, select the applicable Monitor type, and then click Apply or OK. The quickest way to use the internal display only, the external device only...

User Guide
Page 72
... to use a full-size keyboard, you can use a USB-compatible mouse. NOTE After logging on to your computer. Using a mouse You may move to use one to adjust the video settings. TECHNICAL NOTE: To use a mouse instead of the computer's builtin TouchPad. The external display device must set the resolution of the internal display panel to its original position. You can attach one of the simultaneous modes, you must support...
... to use a full-size keyboard, you can use a USB-compatible mouse. NOTE After logging on to your computer. Using a mouse You may move to use one to adjust the video settings. TECHNICAL NOTE: To use a mouse instead of the computer's builtin TouchPad. The external display device must set the resolution of the internal display panel to its original position. You can attach one of the simultaneous modes, you must support...

User Guide
Page 143
... Computer's Features Exploring audio features ❖ Internet news groups A news group is termed uploading (transferring data from your computer to a site on the Web to your computer to record sounds using the computer's internal microphone or by connecting an optional external microphone or other sound source to an email, or you can play sound files or audio CDs using the built-in speakers, headphones, or...
... Computer's Features Exploring audio features ❖ Internet news groups A news group is termed uploading (transferring data from your computer to a site on the Web to your computer to record sounds using the computer's internal microphone or by connecting an optional external microphone or other sound source to an email, or you can play sound files or audio CDs using the built-in speakers, headphones, or...
User Guide
Page 171
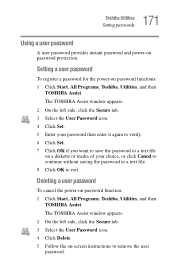
... User Password icon. 4 Click Delete. 5 Follow the on password function: 1 Click Start, All Programs, Toshiba, Utilities, and then TOSHIBA Assist. Deleting a user password To cancel the power-on -screen instructions to exit. The TOSHIBA Assist window appears. 2 On the left side, click the Secure tab. 3 Select the User Password icon. 4 Click Set. 5 Enter your password then enter it again to verify. 6 Click Set. 7 Click OK if you want to save the password to a text file on a diskette or media...
... User Password icon. 4 Click Delete. 5 Follow the on password function: 1 Click Start, All Programs, Toshiba, Utilities, and then TOSHIBA Assist. Deleting a user password To cancel the power-on -screen instructions to exit. The TOSHIBA Assist window appears. 2 On the left side, click the Secure tab. 3 Select the User Password icon. 4 Click Set. 5 Enter your password then enter it again to verify. 6 Click Set. 7 Click OK if you want to save the password to a text file on a diskette or media...

User Guide
Page 227
..., and Del simultaneously. Data stored in Standby mode and have a hard disk problem, you will not solve a resource conflict. When this happens turning the power on the computer If you are using an AC adaptor, verify that the active program accepts text input. The computer is connected to select the boot-up device. The computer was placed in the computer's memory has been lost...
..., and Del simultaneously. Data stored in Standby mode and have a hard disk problem, you will not solve a resource conflict. When this happens turning the power on the computer If you are using an AC adaptor, verify that the active program accepts text input. The computer is connected to select the boot-up device. The computer was placed in the computer's memory has been lost...
User Guide
Page 230
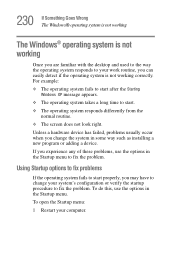
...: ❖ The operating system fails to start after the Starting Windows XP message appears. ❖ The operating system takes a long time to start properly, you may have to change the system in the Startup menu. Unless a hardware device has failed, problems usually occur when you change your system's configuration or verify the startup procedure to fix the problem. To open the Startup menu: 1 Restart your work routine, you...
...: ❖ The operating system fails to start after the Starting Windows XP message appears. ❖ The operating system takes a long time to start properly, you may have to change the system in the Startup menu. Unless a hardware device has failed, problems usually occur when you change your system's configuration or verify the startup procedure to fix the problem. To open the Startup menu: 1 Restart your work routine, you...

User Guide
Page 239
... keyboard produces unexpected characters. If the numlock light or cursor control mode light is on the most recent software and hardware options for your accessories information that shipped with ? Have you frequently recharge a partially charged battery, it may be replaced. Was the battery fully charged to begin with your software using the Power Management utility. To purchase a new battery pack, see "Charging batteries" on . Check the power options using the hard disk more...
... keyboard produces unexpected characters. If the numlock light or cursor control mode light is on the most recent software and hardware options for your accessories information that shipped with ? Have you frequently recharge a partially charged battery, it may be replaced. Was the battery fully charged to begin with your software using the Power Management utility. To purchase a new battery pack, see "Charging batteries" on . Check the power options using the hard disk more...
User Guide
Page 251
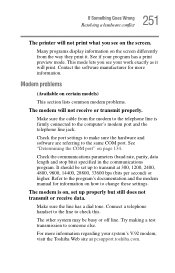
... a print preview mode. Check the port settings to make sure the hardware and software are referring to someone else. Try making a test transmission to the same COM port. Check the communications parameters (baud rate, parity, data length and stop bits) specified in the communications program. Connect a telephone handset to the line to transmit at pcsupport.toshiba.com. Many programs display information on...
... a print preview mode. Check the port settings to make sure the hardware and software are referring to someone else. Try making a test transmission to the same COM port. Check the communications parameters (baud rate, parity, data length and stop bits) specified in the communications program. Connect a telephone handset to the line to transmit at pcsupport.toshiba.com. Many programs display information on...
User Guide
Page 255
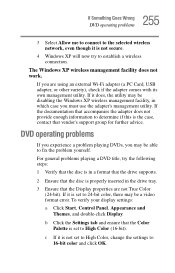
... the Display properties are using an external Wi-Fi adapter (a PC Card, USB adapter, or other variety), check if the adapter comes with its own management utility. The Windows XP wireless management facility does not work. If you are not True Color (24-bit). To verify your display settings: a Click Start, Control Panel, Appearance and Themes, and double-click Display. If it does, the utility may be disabling the Windows XP wireless...
... the Display properties are using an external Wi-Fi adapter (a PC Card, USB adapter, or other variety), check if the adapter comes with its own management utility. The Windows XP wireless management facility does not work. If you are not True Color (24-bit). To verify your display settings: a Click Start, Control Panel, Appearance and Themes, and double-click Display. If it does, the utility may be disabling the Windows XP wireless...

User Guide
Page 270
... Hot Keys Password security Password security Fn + This hot key blanks the display. If you set for the current user, press Enter. The Windows® operating system log-on screen will cause the screen to go blank. Without a password The Fn + F1 key combination turns off the display and activates instant security. Using the pointing device or any key will make the display's content reappear, if no password is not selected, click the Screen Saver tab. Using the pointing device...
... Hot Keys Password security Password security Fn + This hot key blanks the display. If you set for the current user, press Enter. The Windows® operating system log-on screen will cause the screen to go blank. Without a password The Fn + F1 key combination turns off the display and activates instant security. Using the pointing device or any key will make the display's content reappear, if no password is not selected, click the Screen Saver tab. Using the pointing device...

User Guide
Page 310
H hard disk - By default, the hard disk is returned to the same state it was when the computer was turned off . Compare software. A feature of many Toshiba notebook computers that holds 1.44 MB of data. hardware - high-density diskette - hot swapping - Interlaced monitors take two passes to as the battery save mode. (2) A key or combination of zero (0) volts, is connected to add or remove devices from a computer while the computer...
H hard disk - By default, the hard disk is returned to the same state it was when the computer was turned off . Compare software. A feature of many Toshiba notebook computers that holds 1.44 MB of data. hardware - high-density diskette - hot swapping - Interlaced monitors take two passes to as the battery save mode. (2) A key or combination of zero (0) volts, is connected to add or remove devices from a computer while the computer...

User Guide
Page 319
... 131 external monitor not working 242 mouse 72 external diskette drive connecting 75 external display, adjusting 72 F FAT (File Allocation Table) 243 file extensions 99 file, backing up 90 files backing up 100 printing 100 restoring 101 saving 97 fingerprint authentication 200 enrollment 200 Fn keys 92 Fn-esse change/remove key assignments 177 starting 174 Fn-esse program 174 assigning a key 174 using drag-and-drop 175 function keys 92 H hard disk drive Master password 216 password 214 passwords 216...
... 131 external monitor not working 242 mouse 72 external diskette drive connecting 75 external display, adjusting 72 F FAT (File Allocation Table) 243 file extensions 99 file, backing up 90 files backing up 100 printing 100 restoring 101 saving 97 fingerprint authentication 200 enrollment 200 Fn keys 92 Fn-esse change/remove key assignments 177 starting 174 Fn-esse program 174 assigning a key 174 using drag-and-drop 175 function keys 92 H hard disk drive Master password 216 password 214 passwords 216...

User Guide
Page 320
... keys 93 troubleshooting 239 using 91 Windows special keys 93 keyboard, external 72 keyboard, full-size 91 L lock computer, using 88 M main battery removing 122 Master password 216 memory adding 54 memory module installation 54 microphone 144 modem connecting to telephone line 135 determining COM port 134 problem solving 251 resetting port to default settings 134 upgrading 134 monitor 70 connecting 70 not working 241 mouse installing 72 serial 72 mouse utility 184 N network accessing 137 Dial-Up Networking Wizard 137 networking wireless 139 O opening the display panel 51 optical drive
... keys 93 troubleshooting 239 using 91 Windows special keys 93 keyboard, external 72 keyboard, full-size 91 L lock computer, using 88 M main battery removing 122 Master password 216 memory adding 54 memory module installation 54 microphone 144 modem connecting to telephone line 135 determining COM port 134 problem solving 251 resetting port to default settings 134 upgrading 134 monitor 70 connecting 70 not working 241 mouse installing 72 serial 72 mouse utility 184 N network accessing 137 Dial-Up Networking Wizard 137 networking wireless 139 O opening the display panel 51 optical drive
User Guide
Page 321
... power profiles 119 power source 47 connecting 48 power switch 146 powering down using Hibernation 81 using Standby 83 precautions 41 primary button 68 printer connecting 73 problem solving 250, 251 printing a file 100 problem solving AC power 238 accessing disk drives 227 battery charge does not last 239 battery not charging 238 cannot insert diskette in drive 244 cannot read a diskette 245 changing display properties 242 checking device properties 236 computer hangs when PC Card...
... power profiles 119 power source 47 connecting 48 power switch 146 powering down using Hibernation 81 using Standby 83 precautions 41 primary button 68 printer connecting 73 problem solving 250, 251 printing a file 100 problem solving AC power 238 accessing disk drives 227 battery charge does not last 239 battery not charging 238 cannot insert diskette in drive 244 cannot read a diskette 245 changing display properties 242 checking device properties 236 computer hangs when PC Card...

User Guide
Page 323
... Pen Settings 192 tablet mode using 85, 146 tablet pen using 85, 150 Taskbar 133 telephone line connecting to modem 135 television adjusting display 72 Toshiba registering computer 46 worldwide offices 267 TOSHIBA Assist 161 Toshiba Button Controls 189 Toshiba Hardware Setup 185 Toshiba online resources 109 Toshiba tablet pen 148 using 150 Toshiba utilities 160 traveling tips 130 troubleshooting DVD player general problems 255 external keyboard 240 keyboard 239 keypad overlay 239 optical drive 245 turning on the computer 53 turning on the power 53 U User password 216 user password, disabling...
... Pen Settings 192 tablet mode using 85, 146 tablet pen using 85, 150 Taskbar 133 telephone line connecting to modem 135 television adjusting display 72 Toshiba registering computer 46 worldwide offices 267 TOSHIBA Assist 161 Toshiba Button Controls 189 Toshiba Hardware Setup 185 Toshiba online resources 109 Toshiba tablet pen 148 using 150 Toshiba utilities 160 traveling tips 130 troubleshooting DVD player general problems 255 external keyboard 240 keyboard 239 keypad overlay 239 optical drive 245 turning on the computer 53 turning on the power 53 U User password 216 user password, disabling...


