
Users Manual Canada; English
Page 3
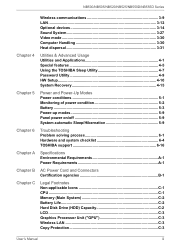
...Series Wireless communications 3-9 LAN ...3-12 Optional devices 3-14 Sound System 3-27 Video mode 3-30 Computer Handling 3-30 Heat dispersal 3-31 Chapter 4 Utilities & Advanced Usage Utilities and Applications 4-1 Special features 4-5 Using the TOSHIBA Sleep Utility 4-7 Password Utility 4-9 HW Setup 4-10 System Recovery 4-15 Chapter 5 Power and Power-Up Modes Power conditions 5-1 Monitoring of power condition 5-2 Battery ...5-3 Power-up modes 5-9 Panel power on/off 5-9 System automatic Sleep/Hibernation 5-9 Chapter 6 Troubleshooting Problem solving process 6-1 Hardware...
...Series Wireless communications 3-9 LAN ...3-12 Optional devices 3-14 Sound System 3-27 Video mode 3-30 Computer Handling 3-30 Heat dispersal 3-31 Chapter 4 Utilities & Advanced Usage Utilities and Applications 4-1 Special features 4-5 Using the TOSHIBA Sleep Utility 4-7 Password Utility 4-9 HW Setup 4-10 System Recovery 4-15 Chapter 5 Power and Power-Up Modes Power conditions 5-1 Monitoring of power condition 5-2 Battery ...5-3 Power-up modes 5-9 Panel power on/off 5-9 System automatic Sleep/Hibernation 5-9 Chapter 6 Troubleshooting Problem solving process 6-1 Hardware...
Users Manual Canada; English
Page 12
... Memory (ROM). Keys The keyboard keys are used in the Glossary. For example, ENTER identifies the ENTER key. Abbreviations On first appearance, and whenever necessary for clarity, abbreviations are also defined in the text to set up and begin using optional devices and troubleshooting. This manual tells how to describe many computer operations. We identify such operations by the key top symbols separated by a plus sign (+). User's Manual xii The indicator panel...
... Memory (ROM). Keys The keyboard keys are used in the Glossary. For example, ENTER identifies the ENTER key. Abbreviations On first appearance, and whenever necessary for clarity, abbreviations are also defined in the text to set up and begin using optional devices and troubleshooting. This manual tells how to describe many computer operations. We identify such operations by the key top symbols separated by a plus sign (+). User's Manual xii The indicator panel...
Users Manual Canada; English
Page 23
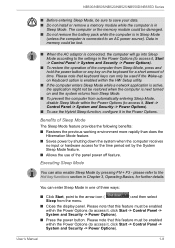
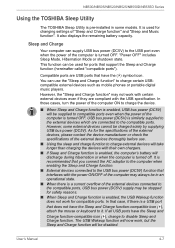
... automatically entering Sleep Mode, disable Sleep Mode within the Power Options (to the arrow icon ( Sleep from Sleep Mode, press and hold the power button or any key on the keyboard for a short amount of time. You can also enable Sleep Mode by the System Sleep Mode feature. ■ Allows the use of three ways: ■ Click Start, point to access it, Start -> Control Panel -> System and Security -> Power Options). ■ To use the Hybrid Sleep function, configure it , Start -> Control Panel -> System and Security -> Power Options...
... automatically entering Sleep Mode, disable Sleep Mode within the Power Options (to the arrow icon ( Sleep from Sleep Mode, press and hold the power button or any key on the keyboard for a short amount of time. You can also enable Sleep Mode by the System Sleep Mode feature. ■ Allows the use of three ways: ■ Click Start, point to access it, Start -> Control Panel -> System and Security -> Power Options). ■ To use the Hybrid Sleep function, configure it , Start -> Control Panel -> System and Security -> Power Options...
Users Manual Canada; English
Page 24
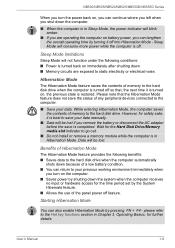
... or hardware access for the Hard Disk Drive/Memory media slot indicator to the hard disk drive. Starting Hibernation Mode You can return to the computer. ■ Save your previous working environment immediately when you turn the power back on, you can continue where you left when you remove the battery or disconnect the AC adaptor before the save the status of memory to go out. ■ Do not install or remove a memory module...
... or hardware access for the Hard Disk Drive/Memory media slot indicator to the hard disk drive. Starting Hibernation Mode You can return to the computer. ■ Save your previous working environment immediately when you turn the power back on, you can continue where you left when you remove the battery or disconnect the AC adaptor before the save the status of memory to go out. ■ Do not install or remove a memory module...
Users Manual Canada; English
Page 29
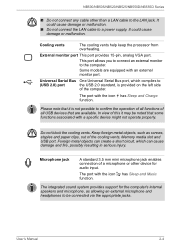
... operate properly. NB500/NB505/NB520/NB525/NB550D/NB555D Series ■ Do not connect any cable other device for audio input. Universal Serial Bus One Universal Serial Bus port, which can create a short circuit, which complies to the LAN jack. Please note that it may be connected via the appropriate jacks. The port with the icon has Sleep and Charge function. The integrated sound system provides support for the computer's internal speakers and microphone...
... operate properly. NB500/NB505/NB520/NB525/NB550D/NB555D Series ■ Do not connect any cable other device for audio input. Universal Serial Bus One Universal Serial Bus port, which can create a short circuit, which complies to the LAN jack. Please note that it may be connected via the appropriate jacks. The port with the icon has Sleep and Charge function. The integrated sound system provides support for the computer's internal speakers and microphone...

Users Manual Canada; English
Page 40
... also execute specific functions on the larger keyboard. Soft keys are key combinations that the soft-key settings are locked into their uppercase format. Since the keyboard is used in combination with other keys. Function keys: F1 ... these keys function differently from Sleep Mode. CAPS LOCK indicator CAPS LOCK This indicator glows green when letter keys are not restored when the computer returns from other keys to those keys marked with soft-key operations, and that enable, disable or configure specific features.
... also execute specific functions on the larger keyboard. Soft keys are key combinations that the soft-key settings are locked into their uppercase format. Since the keyboard is used in combination with other keys. Function keys: F1 ... these keys function differently from Sleep Mode. CAPS LOCK indicator CAPS LOCK This indicator glows green when letter keys are not restored when the computer returns from other keys to those keys marked with soft-key operations, and that enable, disable or configure specific features.
Users Manual Canada; English
Page 41
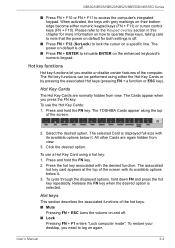
... power on default is displayed full-size with its available options below it . To use the Hot Key Cards: 1. Release the FN key when the desired option is off. ■ Press FN + F12 (ScrLock) to access the computer's integrated keypad. User's Manual 3-4 The Hot key functions can be performed using a hot key: 1. The Cards appear when you enable or disable certain features of the screen. 2. To use a Hot Key Card using either numeric keypad keys (FN + F11) or cursor control keys...
... power on default is displayed full-size with its available options below it . To use the Hot Key Cards: 1. Release the FN key when the desired option is off. ■ Press FN + F12 (ScrLock) to access the computer's integrated keypad. User's Manual 3-4 The Hot key functions can be performed using a hot key: 1. The Cards appear when you enable or disable certain features of the screen. 2. To use a Hot Key Card using either numeric keypad keys (FN + F11) or cursor control keys...
Users Manual Canada; English
Page 55
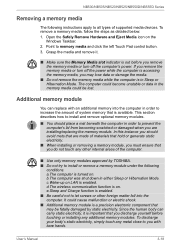
... Mode. If you remove the memory media or turn off the power while the computer is accessing the memory media, you with an additional memory into the computer. Point to all types of the computer. ■ Use only memory modules approved by static electricity. c.Wake-up on LAN is turned on the Windows Taskbar. 2. e.Sleep and Charge function is enabled. ■ Be careful not to let screws or other internal areas of supported media devices...
... Mode. If you remove the memory media or turn off the power while the computer is accessing the memory media, you with an additional memory into the computer. Point to all types of the computer. ■ Use only memory modules approved by static electricity. c.Wake-up on LAN is turned on the Windows Taskbar. 2. e.Sleep and Charge function is enabled. ■ Be careful not to let screws or other internal areas of supported media devices...
Users Manual Canada; English
Page 58
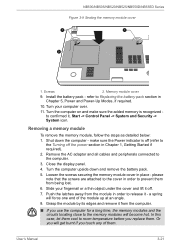
... Power indicator is recognized to confirmed it - please note that the screws are attached to prevent them from being lost. 6. User's Manual 3-21 refer to Replacing the battery pack section in order to the cover in Chapter 5, Power and Power-Up Modes, if required. 10. make sure the added memory is off (refer to release it , Start -> Control Panel -> System and Security -> System icon. Close the display panel...
... Power indicator is recognized to confirmed it - please note that the screws are attached to prevent them from being lost. 6. User's Manual 3-21 refer to Replacing the battery pack section in order to the cover in Chapter 5, Power and Power-Up Modes, if required. 10. make sure the added memory is off (refer to release it , Start -> Control Panel -> System and Security -> System icon. Close the display panel...
Users Manual Canada; English
Page 63
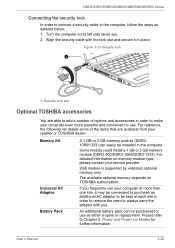
... a number of options and accessories in order to make your reseller or TOSHIBA dealer: Memory Kit Universal AC Adaptor Battery Pack A 1 GB or 2 GB memory module (DDR31066/1333) can be kept at each site in order to remove the need to be purchased for further information. NB500/NB505/NB520/NB525/NB550D/NB555D Series Connecting the security lock In order to connect a security cable to Chapter 5, Power and Power-Up Modes for use your service...
... a number of options and accessories in order to make your reseller or TOSHIBA dealer: Memory Kit Universal AC Adaptor Battery Pack A 1 GB or 2 GB memory module (DDR31066/1333) can be kept at each site in order to remove the need to be purchased for further information. NB500/NB505/NB520/NB525/NB550D/NB555D Series Connecting the security lock In order to connect a security cable to Chapter 5, Power and Power-Up Modes for use your service...
Users Manual Canada; English
Page 75
... disabled. If all USB ports have the ( ) symbol icon. However, some models. It also displays the remaining battery capacity. It is similarly supplied to the external devices which are compliant with certain external devices even if they are connected to it. User's Manual 4-7 USB bus power (DC5V) is recommended that you connect the AC adaptor to the computer when enabling the Sleep and Charge function. ■ External devices connected to the USB bus power (DC5V) function...
... disabled. If all USB ports have the ( ) symbol icon. However, some models. It also displays the remaining battery capacity. It is similarly supplied to the external devices which are compliant with certain external devices even if they are connected to it. User's Manual 4-7 USB bus power (DC5V) is recommended that you connect the AC adaptor to the computer when enabling the Sleep and Charge function. ■ External devices connected to the USB bus power (DC5V) function...

Users Manual Canada; English
Page 81
... Setup. Disables the Wake-up on Keyboard function. (Default) LAN Wake-up on LAN This feature lets the computer's power be turned on Keyboard function. User's Manual 4-13 NB500/NB505/NB520/NB525/NB550D/NB555D Series To change the boot priority settings that this feature is enabled, and the computer is in Sleep Mode. The boot device selection methods described above will only work with the internal keyboard and only when the computer is in HDD and only internal LCD...
... Setup. Disables the Wake-up on Keyboard function. (Default) LAN Wake-up on LAN This feature lets the computer's power be turned on Keyboard function. User's Manual 4-13 NB500/NB505/NB520/NB525/NB550D/NB555D Series To change the boot priority settings that this feature is enabled, and the computer is in Sleep Mode. The boot device selection methods described above will only work with the internal keyboard and only when the computer is in HDD and only internal LCD...
Users Manual Canada; English
Page 83
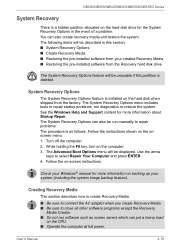
... Startup Repair. Follow the on the hard disk when shipped from the factory. Creating Recovery Media This section describes how to create Recovery Media. ■ Be sure to connect the AC adaptor when you create Recovery Media. ■ Be sure to select Repair Your Computer and press ENTER. 4. NB500/NB505/NB520/NB525/NB550D/NB555D Series System Recovery There is a hidden partition allocated on backing up your created Recovery Media ■ Restoring the pre-installed software from the Recovery hard disk drive...
... Startup Repair. Follow the on the hard disk when shipped from the factory. Creating Recovery Media This section describes how to create Recovery Media. ■ Be sure to connect the AC adaptor when you create Recovery Media. ■ Be sure to select Repair Your Computer and press ENTER. 4. NB500/NB505/NB520/NB525/NB550D/NB555D Series System Recovery There is a hidden partition allocated on backing up your created Recovery Media ■ Restoring the pre-installed software from the Recovery hard disk drive...
Users Manual Canada; English
Page 90
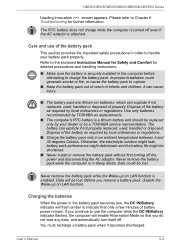
... regulations. Charging the batteries When the power in Sleep Mode. Dispose of the battery as required by a TOSHIBA service representative. User's Manual 5-4 Care and use the computer while the DC IN/Battery indicator flashes, the computer will be replaced only by your battery pack properly. Dispose of the battery as replacements. ■ The computer's RTC battery is attached. Never remove the battery pack while the Wake-up on LAN function is securely installed in...
... regulations. Charging the batteries When the power in Sleep Mode. Dispose of the battery as required by a TOSHIBA service representative. User's Manual 5-4 Care and use the computer while the DC IN/Battery indicator flashes, the computer will be replaced only by your battery pack properly. Dispose of the battery as replacements. ■ The computer's RTC battery is attached. Never remove the battery pack while the Wake-up on LAN function is securely installed in...

Users Manual Canada; English
Page 99
...; Internal display panel ■ Hard disk drive ■ Memory media card ■ Touch Pad ■ USB device ■ Sound system ■ External monitor ■ LAN ■ Wireless LAN ■ Bluetooth Power When the computer is not plugged into an AC power outlet, the battery pack is connected to Chapter 5, Power and Power-Up Modes for at the AC power light. NB500/NB505/NB520/NB525/NB550D/NB555D Series The computer will not start Make sure you should check the status of the DC IN/Battery indicator. User's Manual 6-4 Hardware...
...; Internal display panel ■ Hard disk drive ■ Memory media card ■ Touch Pad ■ USB device ■ Sound system ■ External monitor ■ LAN ■ Wireless LAN ■ Bluetooth Power When the computer is not plugged into an AC power outlet, the battery pack is connected to Chapter 5, Power and Power-Up Modes for at the AC power light. NB500/NB505/NB520/NB525/NB550D/NB555D Series The computer will not start Make sure you should check the status of the DC IN/Battery indicator. User's Manual 6-4 Hardware...
Users Manual Canada; English
Page 107
... not work when connected to restore the function. Some external devices may be still used , change to enable this happens, disconnect an external device if some external devices are connected. ■ Connect external devices after turning the computer ON. NB500/NB505/NB520/NB525/NB550D/NB555D Series Problem Procedure I computer's battery will discharge during hibernation turned OFF the or when the computer is turned off. Select the "Enable Sleep and Charge" check box in the TOSHIBA Sleep utility to disable the Sleep and Charge function...
... not work when connected to restore the function. Some external devices may be still used , change to enable this happens, disconnect an external device if some external devices are connected. ■ Connect external devices after turning the computer ON. NB500/NB505/NB520/NB525/NB550D/NB555D Series Problem Procedure I computer's battery will discharge during hibernation turned OFF the or when the computer is turned off. Select the "Enable Sleep and Charge" check box in the TOSHIBA Sleep utility to disable the Sleep and Charge function...
Users Manual Canada; English
Page 109
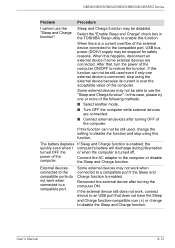
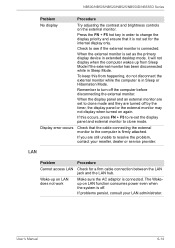
... not work Make sure the AC adaptor is firmly attached. When the display panel and an external monitor are set the display panel and external monitor to the computer is connected. If this from Sleep Mode if the external monitor has been disconnected while in Sleep Mode. NB500/NB505/NB520/NB525/NB550D/NB555D Series Problem Procedure No display Try adjusting the contrast and brightness controls on again. User's Manual 6-14 Press the FN + F5 hot key in Sleep or Hibernation Mode. LAN Problem...
... not work Make sure the AC adaptor is firmly attached. When the display panel and an external monitor are set the display panel and external monitor to the computer is connected. If this from Sleep Mode if the external monitor has been disconnected while in Sleep Mode. NB500/NB505/NB520/NB525/NB550D/NB555D Series Problem Procedure No display Try adjusting the contrast and brightness controls on again. User's Manual 6-14 Press the FN + F5 hot key in Sleep or Hibernation Mode. LAN Problem...
Users Manual Canada; English
Page 136
...removing, 3-18 Memory media slot, 2-2 Moving the computer, 3-31 MultiMediaCard, 3-14 inserting, 3-17 removing, 3-18 P Password power on ), 3-6 temporarily using normal key- lay off , 4-5 Hard Disk Drive/Optical Disc Drive/eSATA indicator, 2-2 Heat dispersal, 3-31, 4-6 Hibernation Mode, 4-6 Hot keys, 4-5 Brightness Down, 3-5 Brightness Up, 3-5 Hibernate, 3-5 Lock, 3-4 Mute, 3-4 Output, 3-5 Power Plan, 3-5 Sleep, 3-5 TOSHIBA Zooming Utility (en- large), 3-5 TOSHIBA Zooming Utility (re- board (overlay on , 4-5 Starting the computer by, 4-10 Supervisor, 4-9 user, 4-9 Pointing Device Touch Pad...
...removing, 3-18 Memory media slot, 2-2 Moving the computer, 3-31 MultiMediaCard, 3-14 inserting, 3-17 removing, 3-18 P Password power on ), 3-6 temporarily using normal key- lay off , 4-5 Hard Disk Drive/Optical Disc Drive/eSATA indicator, 2-2 Heat dispersal, 3-31, 4-6 Hibernation Mode, 4-6 Hot keys, 4-5 Brightness Down, 3-5 Brightness Up, 3-5 Hibernate, 3-5 Lock, 3-4 Mute, 3-4 Output, 3-5 Power Plan, 3-5 Sleep, 3-5 TOSHIBA Zooming Utility (en- large), 3-5 TOSHIBA Zooming Utility (re- board (overlay on , 4-5 Starting the computer by, 4-10 Supervisor, 4-9 user, 4-9 Pointing Device Touch Pad...
Users Manual Canada; English
Page 137
..., 6-4 Internal display panel, 6-8 Keyboard, 6-7 LAN, 6-14 Memory Media Card, 6-9 Overheating power down, 6-4 Pointing device, 6-9 Power, 6-4 Real Time Clock, 6-7 SD/SDHC Card, 6-9 Sound system, 6-13 TOSHIBA support, 6-16 Touch Pad, 6-9 USB device, 6-11 USB mouse, 6-10 Wireless LAN, 6-15 R Recovery hard disk drive, 4-18 Recovery Media, 4-16 Restarting the computer, 1-10 S SD/SDHC Card formatting, 3-16 inserting, 3-17 note, 3-15 removing, 3-18 Security lock, 3-25 Sleep Mode setting, 1-7 System automatic, 4-5 Soft keys ENTER, 3-4 ScrLock, 3-4 Sound system headphone jack, 2-5 microphone jack...
..., 6-4 Internal display panel, 6-8 Keyboard, 6-7 LAN, 6-14 Memory Media Card, 6-9 Overheating power down, 6-4 Pointing device, 6-9 Power, 6-4 Real Time Clock, 6-7 SD/SDHC Card, 6-9 Sound system, 6-13 TOSHIBA support, 6-16 Touch Pad, 6-9 USB device, 6-11 USB mouse, 6-10 Wireless LAN, 6-15 R Recovery hard disk drive, 4-18 Recovery Media, 4-16 Restarting the computer, 1-10 S SD/SDHC Card formatting, 3-16 inserting, 3-17 note, 3-15 removing, 3-18 Security lock, 3-25 Sleep Mode setting, 1-7 System automatic, 4-5 Soft keys ENTER, 3-4 ScrLock, 3-4 Sound system headphone jack, 2-5 microphone jack...
Detailed Specs for Mini-Notebook NB525 PLL52C-03702E English
Page 1
... to design configuration. Pre-installed software is subject to 7 hours, depending on usage and Power Management Settings Dimensions: (WxDxH) 206.9 x 58.28 x 23.43 mm Weight: 330g BIOS TSETUP, ACPI, PnP, VESA, SM BIOS, PCI BIOS Support Security Cable lock slot, power on an external storage medium. Colour Support (dependant On CRT): Up to 3,000m; For optimum performance, use of purchase. Serial-ATA hard disk drive Display System Type: TFT Colour LED LCD Size (diagonal...
... to design configuration. Pre-installed software is subject to 7 hours, depending on usage and Power Management Settings Dimensions: (WxDxH) 206.9 x 58.28 x 23.43 mm Weight: 330g BIOS TSETUP, ACPI, PnP, VESA, SM BIOS, PCI BIOS Support Security Cable lock slot, power on an external storage medium. Colour Support (dependant On CRT): Up to 3,000m; For optimum performance, use of purchase. Serial-ATA hard disk drive Display System Type: TFT Colour LED LCD Size (diagonal...


