
User Manual
Page 11
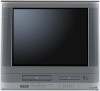
... 11 3/8/05, 9:55 AM Front panel Illustration of MW27F51. This owner's manual uses the illustrations of MW27F51 Cassette loading slot 34 TIMER REC indicator 41 Remote sensor 13 Disc tray "# *PHONES jack 25 MEDIA CARD slot ## POWER button *AUDIO (L/R)/VIDEO IN (LINE IN 2) jacks 43 REW (Rewind) button !# STOP/EJECT button... to access the *PHONES jack and the *AUDIO (L/R)/VIDEO IN (LINE IN 2) jacks. Introduction Identification of controls See the page in appearance from the illustrations. MW24F51 and MW20F51 has some differences in for details.
... 11 3/8/05, 9:55 AM Front panel Illustration of MW27F51. This owner's manual uses the illustrations of MW27F51 Cassette loading slot 34 TIMER REC indicator 41 Remote sensor 13 Disc tray "# *PHONES jack 25 MEDIA CARD slot ## POWER button *AUDIO (L/R)/VIDEO IN (LINE IN 2) jacks 43 REW (Rewind) button !# STOP/EJECT button... to access the *PHONES jack and the *AUDIO (L/R)/VIDEO IN (LINE IN 2) jacks. Introduction Identification of controls See the page in appearance from the illustrations. MW24F51 and MW20F51 has some differences in for details.

User Manual
Page 12
... 30 REPEAT A-B button 49 DVD/CARD button 55 SPEED button 39 RETURN button 57 EJECT button 34 3/8/05, 9:55 AM Introduction Identification of controls (Continued) Remote control The instructions in "DVD menu." # 12 5T80101B [E]p06-13 12 POWER button 19 SLEEP button 25 CM SKIP button 36 JUMP button 48 VOL... button 36 TOP MENU button 51 OPEN/CLOSE button 45 *DVD MENU button Use the DVD MENU button to display the menu included on the remote control. DVD button 45 TV/VCR button 20 Direct channel selection buttons (0-9) 24 Number buttons (0-9) 28 DISPLAY button 23 CH / buttons 25 ZERO RETURN ...
... 30 REPEAT A-B button 49 DVD/CARD button 55 SPEED button 39 RETURN button 57 EJECT button 34 3/8/05, 9:55 AM Introduction Identification of controls (Continued) Remote control The instructions in "DVD menu." # 12 5T80101B [E]p06-13 12 POWER button 19 SLEEP button 25 CM SKIP button 36 JUMP button 48 VOL... button 36 TOP MENU button 51 OPEN/CLOSE button 45 *DVD MENU button Use the DVD MENU button to display the menu included on the remote control. DVD button 45 TV/VCR button 20 Direct channel selection buttons (0-9) 24 Number buttons (0-9) 28 DISPLAY button 23 CH / buttons 25 ZERO RETURN ...

User Manual
Page 13
... in the direction of the arrow. 2 Install two "R03/AAA" batteries (supplied), paying attention to prevent battery acid from leaking into a fire. Remote control basics • Press POWER to turn the unit on -screen menu system. • You can directly access specific channels using the...to move through the channels one channel at a time. • The Direction buttons ( / / / ) are also used batteries with new ones. • If the remote control does not operate correctly, or if the operating range becomes reduced, replace both batteries with new ones. • If the batteries are dead or...
... in the direction of the arrow. 2 Install two "R03/AAA" batteries (supplied), paying attention to prevent battery acid from leaking into a fire. Remote control basics • Press POWER to turn the unit on -screen menu system. • You can directly access specific channels using the...to move through the channels one channel at a time. • The Direction buttons ( / / / ) are also used batteries with new ones. • If the remote control does not operate correctly, or if the operating range becomes reduced, replace both batteries with new ones. • If the batteries are dead or...

User Manual
Page 20
... clock may affect the player's operation. Notes: • If the unit does not operate properly, or No key operation (by the unit and/or the remote control): Static electricity, etc., may not function properly if the reception condition is not good. When shipped from factory the AUTO CLOCK is set to...
... clock may affect the player's operation. Notes: • If the unit does not operate properly, or No key operation (by the unit and/or the remote control): Static electricity, etc., may not function properly if the reception condition is not good. When shipped from factory the AUTO CLOCK is set to...
User Manual
Page 25
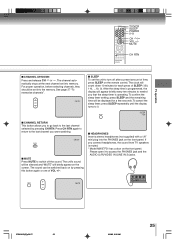
.... The sound can be set the unit to remind you connect headphones, the sound from TV speakers is muted. * Model MW27F51 has a door on the remote control. MUTE 5T80101B [E]p23-27 25 3/8/05, 9:56 AM 25 The clock will appear briefly every ten minutes to turn off the sound. Please open...
.... The sound can be set the unit to remind you connect headphones, the sound from TV speakers is muted. * Model MW27F51 has a door on the remote control. MUTE 5T80101B [E]p23-27 25 3/8/05, 9:56 AM 25 The clock will appear briefly every ten minutes to turn off the sound. Please open...

User Manual
Page 34
... the erase prevention tab with a piece of the tape until it is "OFF". Unloading 1 Press STOP/EJECT on the front panel or EJECT on the remote control. 2 Remove the cassette tape. Notes: • Always eject the tape when not in use. • The cassette tape can be ejected even if the...
... the erase prevention tab with a piece of the tape until it is "OFF". Unloading 1 Press STOP/EJECT on the front panel or EJECT on the remote control. 2 Remove the cassette tape. Notes: • Always eject the tape when not in use. • The cassette tape can be ejected even if the...
User Manual
Page 35
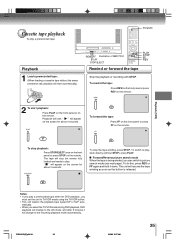
... To play a prerecorded tape after the DVD playback, you can switch to the still mode, and after 5 minutes it down. " " will appear on the remote. To stop playback: Press STOP/EJECT once on the front panel or press STOP on the screen for about 4 seconds. To stop the tape-winding... Playback 1 Load a prerecorded tape: (When loading a cassette tape without STOP), press PLAY. " " will start playback: Press PLAY on the front panel or on the remote. To do this, press REV or FF again and hold it will resume the tape winding as soon as the button is being winded, you...
... To play a prerecorded tape after the DVD playback, you can switch to the still mode, and after 5 minutes it down. " " will appear on the remote. To stop playback: Press STOP/EJECT once on the front panel or press STOP on the screen for about 4 seconds. To stop the tape-winding... Playback 1 Load a prerecorded tape: (When loading a cassette tape without STOP), press PLAY. " " will start playback: Press PLAY on the front panel or on the remote. To do this, press REV or FF again and hold it will resume the tape winding as soon as the button is being winded, you...
User Manual
Page 41
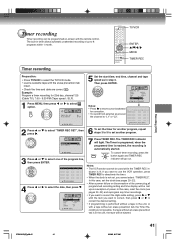
... automatically started. If you want to use the VCR operation, press TIMER REC to select the TV/VCR mode. • Load a cassette tape with the remote control. If a tape without an erase prevention tab, the Timer Recording is in the unit, the tape will be lost upon resumption of power. TV...
... automatically started. If you want to use the VCR operation, press TIMER REC to select the TV/VCR mode. • Load a cassette tape with the remote control. If a tape without an erase prevention tab, the Timer Recording is in the unit, the tape will be lost upon resumption of power. TV...
User Manual
Page 45
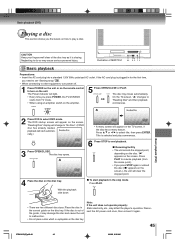
...). • If you need to set "Starting setup" ' . • When connecting to other equipment, turn power off. 1 Press POWER on the unit or on the remote control to turn on the TV screen, if the disc has a menu feature. If the AC cord plug is unplayable on the disc tray. The...
...). • If you need to set "Starting setup" ' . • When connecting to other equipment, turn power off. 1 Press POWER on the unit or on the remote control to turn on the TV screen, if the disc has a menu feature. If the AC cord plug is unplayable on the disc tray. The...

User Manual
Page 46
... the amount of loaded disc. Remove the disc after playback of information. About DVD VCD CD CARD The DVD VCD CD CARD icons on your remote control once the movie is completed. • There may not be intentionally fixed by software producers. CARD : You can use this function with Audio CDs...
... the amount of loaded disc. Remove the disc after playback of information. About DVD VCD CD CARD The DVD VCD CD CARD icons on your remote control once the movie is completed. • There may not be intentionally fixed by software producers. CARD : You can use this function with Audio CDs...

User Manual
Page 61
... ---- Select Files When playing back a CD or Media card containing a mixture of rating level by DVD disc" on page 62.) Notes: • Depending on the remote control. Music Only: Displays only MP3/WMA files. Select from the level 1 to input a 4-digit password. Press Number buttons (0-9) to level 8. Such discs can not...
... ---- Select Files When playing back a CD or Media card containing a mixture of rating level by DVD disc" on page 62.) Notes: • Depending on the remote control. Music Only: Displays only MP3/WMA files. Select from the level 1 to input a 4-digit password. Press Number buttons (0-9) to level 8. Such discs can not...

User Manual
Page 66
...Insert a disc. Timer recording does not work . The time is lit). 34 21, 22 41 41 Replace the tape. - appears on the remote control. The batteries are weak. Some times a small amount of picture distortion may prevent a proper progress of the beam. Cancel the parental lock ...function or change the parental lock level. REMOTE CONTROL Remote control does not operate. buttons on the screen. Clean the video heads. 38 35 Eject the disc and clean it. Place the ...
...Insert a disc. Timer recording does not work . The time is lit). 34 21, 22 41 41 Replace the tape. - appears on the remote control. The batteries are weak. Some times a small amount of picture distortion may prevent a proper progress of the beam. Cancel the parental lock ...function or change the parental lock level. REMOTE CONTROL Remote control does not operate. buttons on the screen. Clean the video heads. 38 35 Eject the disc and clean it. Place the ...

User Manual
Page 67
... output -8 dBm, 1 kΩ, negative sync., pin jack (L/R) x 1 Audio output 0.5 V (p-p), 75 Ω, pin jack x 1 (DIGITAL COAXIAL) Supplied accessories Remote control (WC-SB1 1 Batteries (R03/AAA 2 300-75 Ω matching transformer 1 * Screen size is approximate. • This model complies with the above specifications. ...-15/16 inches (481 mm) 18-5/8 inches (472.5 mm) 19-7/16 inches (493 mm) Tuner 181 channel freq. Specifications MW20F51 MW24F51 MW27F51 General Power supply AC 120 V 60 Hz Power consumption Operation: 110 W 135 W 145 W Stand by: 4 W Picture tube...
... output -8 dBm, 1 kΩ, negative sync., pin jack (L/R) x 1 Audio output 0.5 V (p-p), 75 Ω, pin jack x 1 (DIGITAL COAXIAL) Supplied accessories Remote control (WC-SB1 1 Batteries (R03/AAA 2 300-75 Ω matching transformer 1 * Screen size is approximate. • This model complies with the above specifications. ...-15/16 inches (481 mm) 18-5/8 inches (472.5 mm) 19-7/16 inches (493 mm) Tuner 181 channel freq. Specifications MW20F51 MW24F51 MW27F51 General Power supply AC 120 V 60 Hz Power consumption Operation: 110 W 135 W 145 W Stand by: 4 W Picture tube...

