Toshiba Online Users Guide for Tecra M9
Page 31
... Formatting an SD card 134 Using Sleep or Hibernate while using the SD card 134 Removing an SD card 134 Using the Ultra SlimBay 135 Removing a module from the Ultra SlimBay ...135 Inserting a module into the Ultra SlimBay.......137 Using an expansion device 137 Using an Optional Toshiba Express Port Replicator with your computer ..........137 Chapter 5: Toshiba Utilities 138 TOSHIBA Assist 139 Connect 140 Secure 141 Protect & Fix 142 Optimize 143 TOSHIBA Application Installer 144 Setting passwords...
... Formatting an SD card 134 Using Sleep or Hibernate while using the SD card 134 Removing an SD card 134 Using the Ultra SlimBay 135 Removing a module from the Ultra SlimBay ...135 Inserting a module into the Ultra SlimBay.......137 Using an expansion device 137 Using an Optional Toshiba Express Port Replicator with your computer ..........137 Chapter 5: Toshiba Utilities 138 TOSHIBA Assist 139 Connect 140 Secure 141 Protect & Fix 142 Optimize 143 TOSHIBA Application Installer 144 Setting passwords...
Toshiba Online Users Guide for Tecra M9
Page 50
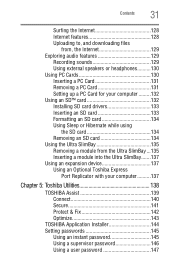
... Down Menu 50 Getting Started Adding memory (optional) Installing a memory module A memory module can be installed in the memory module slot on , begin at step 1; Allow the module to cool to the lock button in Sleep or Hibernation mode, data will need a small Phillips screwdriver for this procedure. otherwise, skip to step 3. 1 Click Start, and then click the arrow next to room temperature before they have cooled. Avoid touching the cover, the module...
... Down Menu 50 Getting Started Adding memory (optional) Installing a memory module A memory module can be installed in the memory module slot on , begin at step 1; Allow the module to cool to the lock button in Sleep or Hibernation mode, data will need a small Phillips screwdriver for this procedure. otherwise, skip to step 3. 1 Click Start, and then click the arrow next to room temperature before they have cooled. Avoid touching the cover, the module...
Toshiba Online Users Guide for Tecra M9
Page 56
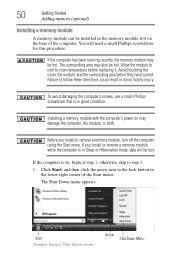
... one memory module installed for the computer to a 30-degree angle and slide it using the screw. 5 Re-insert the main battery. Checking total memory When you add or remove a memory module, you can check that the computer has recognized the change. The System window appears. 2 The total memory is displayed below the System heading under Memory (RAM). 56 Getting Started Adding memory (optional) 3 Gently lift the memory module to work.
... one memory module installed for the computer to a 30-degree angle and slide it using the screw. 5 Re-insert the main battery. Checking total memory When you add or remove a memory module, you can check that the computer has recognized the change. The System window appears. 2 The total memory is displayed below the System heading under Memory (RAM). 56 Getting Started Adding memory (optional) 3 Gently lift the memory module to work.
Toshiba Online Users Guide for Tecra M9
Page 57
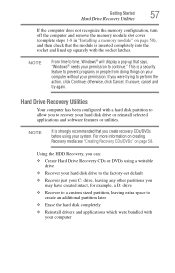
... to time, Windows® will display a pop-up squarely with a hard disk partition to prevent programs or people from doing things on your computer without your hard disk drive or reinstall selected applications and software features or utilities. otherwise, click Cancel. Getting Started 57 Hard Drive Recovery Utilities If the computer does not recognize the memory configuration, turn off the computer and remove the memory module slot cover (complete steps 1-8 in "Installing a memory module" on page...
... to time, Windows® will display a pop-up squarely with a hard disk partition to prevent programs or people from doing things on your computer without your hard disk drive or reinstall selected applications and software features or utilities. otherwise, click Cancel. Getting Started 57 Hard Drive Recovery Utilities If the computer does not recognize the memory configuration, turn off the computer and remove the memory module slot cover (complete steps 1-8 in "Installing a memory module" on page...

Toshiba Online Users Guide for Tecra M9
Page 67
... connecting an external monitor or video projector, configure your computer for your operating system and devices. Connecting an external monitor or projector You can easily attach an external monitor or projector to scroll as you would with any wheel device on a mouse or trackball. Getting Started 67 Using external display devices Scrolling with the TouchPad™ There are two active regions on the TouchPad™ that allow you to your computer if you need a larger screen. Control buttons...
... connecting an external monitor or video projector, configure your computer for your operating system and devices. Connecting an external monitor or projector You can easily attach an external monitor or projector to scroll as you would with any wheel device on a mouse or trackball. Getting Started 67 Using external display devices Scrolling with the TouchPad™ There are two active regions on the TouchPad™ that allow you to your computer if you need a larger screen. Control buttons...
Toshiba Online Users Guide for Tecra M9
Page 148
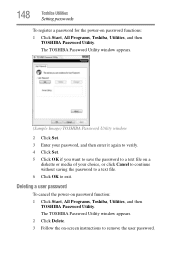
... Cancel to continue without saving the password to a text file. 6 Click OK to remove the user password. Deleting a user password To cancel the power-on password functions: 1 Click Start, All Programs, Toshiba, Utilities, and then TOSHIBA Password Utility. The TOSHIBA Password Utility window appears. (Sample Image) TOSHIBA Password Utility window 2 Click Set. 3 Enter your password, and then enter it again to verify. 4 Click Set. 5 Click OK if you want to save the password to a text file on -screen instructions to exit.
... Cancel to continue without saving the password to a text file. 6 Click OK to remove the user password. Deleting a user password To cancel the power-on password functions: 1 Click Start, All Programs, Toshiba, Utilities, and then TOSHIBA Password Utility. The TOSHIBA Password Utility window appears. (Sample Image) TOSHIBA Password Utility window 2 Click Set. 3 Enter your password, and then enter it again to verify. 4 Click Set. 5 Click OK if you want to save the password to a text file on -screen instructions to exit.
Toshiba Online Users Guide for Tecra M9
Page 181
... when your computer model. Unless a hardware device has failed, problems usually occur when you change your work routine, you are familiar with Networking The Windows® operating system is not working Once you can easily detect if the operating system is correct, and the plug fits correctly in the Startup menu. To do this, use the options in some way such as installing a new program or adding...
... when your computer model. Unless a hardware device has failed, problems usually occur when you change your work routine, you are familiar with Networking The Windows® operating system is not working Once you can easily detect if the operating system is correct, and the plug fits correctly in the Startup menu. To do this, use the options in some way such as installing a new program or adding...

Toshiba Online Users Guide for Tecra M9
Page 185
... instructions in "Removing a memory module" on page 50, and making sure the module is causing a problem. The computer shuts down completely. 3 Remove the memory module, following the instructions in the lower-right part of the Start menu. This tab also provides options for updating the driver or rolling back the driver in the dialog box vary from one memory module installed for the error again. Memory problems Incorrectly connected or faulty memory modules may be hardware or even software...
... instructions in "Removing a memory module" on page 50, and making sure the module is causing a problem. The computer shuts down completely. 3 Remove the memory module, following the instructions in the lower-right part of the Start menu. This tab also provides options for updating the driver or rolling back the driver in the dialog box vary from one memory module installed for the error again. Memory problems Incorrectly connected or faulty memory modules may be hardware or even software...
Toshiba Online Users Guide for Tecra M9
Page 188
... make sure the display priority is firmly attached. ❖ Try adjusting the contrast and brightness controls on the external monitor. ❖ Press Fn and F5 simultaneously to activate the screen. Click Windows Color and Appearance to continue working power outlet. ❖ Check that the monitor's power cord/cable is not set for the built-in screen flickers. If you through the display options. The screen does not look right. Click Display settings...
... make sure the display priority is firmly attached. ❖ Try adjusting the contrast and brightness controls on the external monitor. ❖ Press Fn and F5 simultaneously to activate the screen. Click Windows Color and Appearance to continue working power outlet. ❖ Check that the monitor's power cord/cable is not set for the built-in screen flickers. If you through the display options. The screen does not look right. Click Display settings...

Toshiba Online Users Guide for Tecra M9
Page 234
... or remove devices from a storage device (such as a hard disk) into the processor to perform a task instead of using a pointing device such as the battery save mode. (2) A key or combination of pixels is refreshed. A type of display that provides electronic mail, the World Wide Web, and other line of keys that represents a function, file, or program. L L1 (level one) cache - Memory cache installed on the network. See device...
... or remove devices from a storage device (such as a hard disk) into the processor to perform a task instead of using a pointing device such as the battery save mode. (2) A key or combination of pixels is refreshed. A type of display that provides electronic mail, the World Wide Web, and other line of keys that represents a function, file, or program. L L1 (level one) cache - Memory cache installed on the network. See device...
Toshiba Online Users Guide for Tecra M9
Page 240
... charging 44, 46 conserving power 109 disposal 117 low charge 107 monitoring power 46, 105 240 not charging 186 notification 108 power plan 216 power plan hot key 111 real-time clock (RTC) 102 removing 112 BIOS Setup see Toshiba Hardware Setup button power 49, 58 start 121 C CD creating 98 playing an audio 96 CD, using 93 character keys 85 charging the battery 46 checking device properties 184 click 67 communications network connection 124 set up 122 compact disc...
... charging 44, 46 conserving power 109 disposal 117 low charge 107 monitoring power 46, 105 240 not charging 186 notification 108 power plan 216 power plan hot key 111 real-time clock (RTC) 102 removing 112 BIOS Setup see Toshiba Hardware Setup button power 49, 58 start 121 C CD creating 98 playing an audio 96 CD, using 93 character keys 85 charging the battery 46 checking device properties 184 click 67 communications network connection 124 set up 122 compact disc...
Toshiba Online Users Guide for Tecra M9
Page 241
... files/trouble accessing a disk 190 running slow 190 diskette drive cannot insert a diskette 191 cannot read a diskette 191 connecting 71 external, connecting 71 display does not look normal/flickers 188 external monitor not working 189 screen is blank 188 display device external 67 display output settings 68 display, external adjusting 69 disposal information 26 disposing of used batteries 117 double-click 67 DVD creating 98 DVD player general problems 199 DVD, using 93 E environment computer-friendly 39 error messages device driver...
... files/trouble accessing a disk 190 running slow 190 diskette drive cannot insert a diskette 191 cannot read a diskette 191 connecting 71 external, connecting 71 display does not look normal/flickers 188 external monitor not working 189 screen is blank 188 display device external 67 display output settings 68 display, external adjusting 69 disposal information 26 disposing of used batteries 117 double-click 67 DVD creating 98 DVD player general problems 199 DVD, using 93 E environment computer-friendly 39 error messages device driver...

Toshiba Online Users Guide for Tecra M9
Page 242
... printing 92 restoring 93 saving 90 fingerprint authentication 162 enrollment 163 Fn keys 86 function keys 86 H hard disk drive secondary options 135 hardware conflicts 183 resolving 184 headphones using 130 Help and Support Windows® operating system 183 Hibernation mode 72 configuring 76 starting again from 78 hot key display brightness 220 display modes 219 Hibernation mode 218 keyboard overlays 224 password security 215 power plan 216 Sleep mode 217 volume mute 214 zooming 224 Hot Key Cards 209 Hot key functions 213 hot key power plan...
... printing 92 restoring 93 saving 90 fingerprint authentication 162 enrollment 163 Fn keys 86 function keys 86 H hard disk drive secondary options 135 hardware conflicts 183 resolving 184 headphones using 130 Help and Support Windows® operating system 183 Hibernation mode 72 configuring 76 starting again from 78 hot key display brightness 220 display modes 219 Hibernation mode 218 keyboard overlays 224 password security 215 power plan 216 Sleep mode 217 volume mute 214 zooming 224 Hot Key Cards 209 Hot key functions 213 hot key power plan...
Toshiba Online Users Guide for Tecra M9
Page 243
... Windows® keys 86 troubleshooting 187 using 85 keyboard, external 69 keyboard, full-size 85 L lock computer, using 82 M main battery removing 112 memory adding 49 problem solving 185 removing expansion slot cover 52 memory module inserting 52 installation 50 removing 56 microphone 129 modem connecting to telephone line 123 determining COM port 122 problem solving 195, 196 resetting port to default settings 122 upgrading 122 monitor 67 connecting 67 not working 188 mouse installing 69 serial 69 mouse utility 155 N network accessing 124 Dial-Up Networking Wizard 124 networking wireless...
... Windows® keys 86 troubleshooting 187 using 85 keyboard, external 69 keyboard, full-size 85 L lock computer, using 82 M main battery removing 112 memory adding 49 problem solving 185 removing expansion slot cover 52 memory module inserting 52 installation 50 removing 56 microphone 129 modem connecting to telephone line 123 determining COM port 122 problem solving 195, 196 resetting port to default settings 122 upgrading 122 monitor 67 connecting 67 not working 188 mouse installing 69 serial 69 mouse utility 155 N network accessing 124 Dial-Up Networking Wizard 124 networking wireless...

Toshiba Online Users Guide for Tecra M9
Page 244
... files 191 Device Manager 184 disk drive is slow 190 display is blank 188 external display not working 189 external monitor 188 faulty memory 185 hardware conflict 183 high-pitched noise 193 Internet bookmarked site not found 182 Internet connection is slow 182 keyboard not responding 179 missing files/trouble accessing a disk 190 modem not receiving or transmitting 195, 196 no sound 192 non-system disk or disk error 180 PC Card 193 checklist...
... files 191 Device Manager 184 disk drive is slow 190 display is blank 188 external display not working 189 external monitor 188 faulty memory 185 hardware conflict 183 high-pitched noise 193 Internet bookmarked site not found 182 Internet connection is slow 182 keyboard not responding 179 missing files/trouble accessing a disk 190 modem not receiving or transmitting 195, 196 no sound 192 non-system disk or disk error 180 PC Card 193 checklist...

Maintenance Manual
Page 3
... that relates to help service technicians isolate faulty Field Replaceable Units (FRUs) and replace them in property damage, if the safety instruction is not observed. Toshiba requires service technicians and authorized dealers or service providers to ensure the following safety precautions are intended to your attention. Installation of these messages will be sure to your safe maintenance service. TECRA M9 Maintenance Manual (960-631) [CONFIDENTIAL...
... that relates to help service technicians isolate faulty Field Replaceable Units (FRUs) and replace them in property damage, if the safety instruction is not observed. Toshiba requires service technicians and authorized dealers or service providers to ensure the following safety precautions are intended to your attention. Installation of these messages will be sure to your safe maintenance service. TECRA M9 Maintenance Manual (960-631) [CONFIDENTIAL...
Maintenance Manual
Page 68
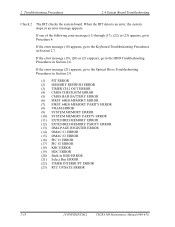
... board. If the error message (18) appears, go to the Keyboard Troubleshooting Procedures in HDD ERROR (21) Select Bay ERROR (22) TIMER INTERRUPT ERROR (23) RTC UPDATE ERROR 2-18 [CONFIDENTIAL] TECRA M9 Maintenance Manual (960-631) If the error message (21) appears, go to the Optical Drive Troubleshooting Procedures in Section 2.9. (1) PIT ERROR (2) MEMORY REFRESH ERROR (3) TIMER CH.2 OUT ERROR (4) CMOS CHECKSUM ERROR (5) CMOS BAD BATTERY ERROR (6) FIRST 64KB MEMORY ERROR (7) FIRST 64KB MEMORY PARITY ERROR (8) VRAM ERROR (9) SYSTEM MEMORY ERROR (10) SYSTEM MEMORY...
... board. If the error message (18) appears, go to the Keyboard Troubleshooting Procedures in HDD ERROR (21) Select Bay ERROR (22) TIMER INTERRUPT ERROR (23) RTC UPDATE ERROR 2-18 [CONFIDENTIAL] TECRA M9 Maintenance Manual (960-631) If the error message (21) appears, go to the Optical Drive Troubleshooting Procedures in Section 2.9. (1) PIT ERROR (2) MEMORY REFRESH ERROR (3) TIMER CH.2 OUT ERROR (4) CMOS CHECKSUM ERROR (5) CMOS BAD BATTERY ERROR (6) FIRST 64KB MEMORY ERROR (7) FIRST 64KB MEMORY PARITY ERROR (8) VRAM ERROR (9) SYSTEM MEMORY ERROR (10) SYSTEM MEMORY...

Maintenance Manual
Page 162
... FEATURE2 ERROR USB - GET DESCR.ERROR(SECOND) VRAM SIZE NOT SUPPORT 3-36 [CONFIDENTIAL] TECRA M9 Maintenance Manual (960-631) 3 Tests and Diagnostics 3.18 Error Code and Error Status Names 3.18 Error Code and Error Status Names Table 3-2 lists the error codes and error status names for the DIAGNOSTIC TEST. NOT SUPPORTED PS-SYSTEM ROM - THORMISTOR ERROR(1) ROM - CACHE MEMORY ERROR USB - CLEAR FEATURE ERROR HUB - SERIAL ID WRITE ERROR ROM - SET FEATURE ERROR(RESET) HUB - CHECKSUM ERROR ROM - SENSING ERROR(AC-ADAPT) ROM - SET ADDRESS ERROR HUB - SET CONFIGURATION ERROR HUB...
... FEATURE2 ERROR USB - GET DESCR.ERROR(SECOND) VRAM SIZE NOT SUPPORT 3-36 [CONFIDENTIAL] TECRA M9 Maintenance Manual (960-631) 3 Tests and Diagnostics 3.18 Error Code and Error Status Names 3.18 Error Code and Error Status Names Table 3-2 lists the error codes and error status names for the DIAGNOSTIC TEST. NOT SUPPORTED PS-SYSTEM ROM - THORMISTOR ERROR(1) ROM - CACHE MEMORY ERROR USB - CLEAR FEATURE ERROR HUB - SERIAL ID WRITE ERROR ROM - SET FEATURE ERROR(RESET) HUB - CHECKSUM ERROR ROM - SENSING ERROR(AC-ADAPT) ROM - SET ADDRESS ERROR HUB - SET CONFIGURATION ERROR HUB...
Maintenance Manual
Page 163
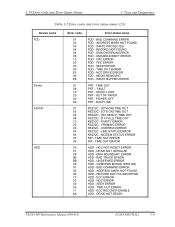
... NOT FOUND HDD - ECC RECOVER ENABLE HDD - DRIVE NOT READY TECRA M9 Maintenance Manual (960-631) [CONFIDENTIAL] 3-37 DMA BOUNDARY ERROR FDD - FRAMING ERROR RS232C - UNDEFINED ERROR HDD - BAD COMMAND ERROR FDD - ADDRESS MARK NOT FOUND FDD - CRC ERROR FDD - OUT OF PAPER PRT - DMA BOUNDARY ERROR HDD - ECC ERROR HDD - TIME OUT ERROR HDD - 3.18 Error Code and Error Status Names 3 Tests and Diagnostics Table 3-2 Error codes and error status names (2/3) Device name FDD Printer ASYNC HDD Error code 01...
... NOT FOUND HDD - ECC RECOVER ENABLE HDD - DRIVE NOT READY TECRA M9 Maintenance Manual (960-631) [CONFIDENTIAL] 3-37 DMA BOUNDARY ERROR FDD - FRAMING ERROR RS232C - UNDEFINED ERROR HDD - BAD COMMAND ERROR FDD - ADDRESS MARK NOT FOUND FDD - CRC ERROR FDD - OUT OF PAPER PRT - DMA BOUNDARY ERROR HDD - ECC ERROR HDD - TIME OUT ERROR HDD - 3.18 Error Code and Error Status Names 3 Tests and Diagnostics Table 3-2 Error codes and error status names (2/3) Device name FDD Printer ASYNC HDD Error code 01...

Maintenance Manual
Page 248
.... 4-14 [CONFIDENTIAL] TECRA M9 Maintenance Manual (960-631) 4 Replacement Procedures 4.4 Memory module B 2. Inserting the memory module with the left and right latches outside and remove the memory module B. Never press hard or bend the memory module. Then perform the following procedure. (See Figure 4-4 and 4-5.) 1. Install the memory slot cover and secure it to connect firmly. After installing the memory module, confirm that the memory module is in boot mode and powered off when you insert the memory module. Open the left...
.... 4-14 [CONFIDENTIAL] TECRA M9 Maintenance Manual (960-631) 4 Replacement Procedures 4.4 Memory module B 2. Inserting the memory module with the left and right latches outside and remove the memory module B. Never press hard or bend the memory module. Then perform the following procedure. (See Figure 4-4 and 4-5.) 1. Install the memory slot cover and secure it to connect firmly. After installing the memory module, confirm that the memory module is in boot mode and powered off when you insert the memory module. Open the left...


