User Guide
Page 14
...63 Recording optical media 64 Removing a disc with the computer on 65 Removing a disc with the computer off 65 Toshiba's online resources 65 Chapter 3: Computing 66 Toshiba's energy-saver design 66 Power management 66 Charging the RTC battery 67 Power Plans 68 Using the eco power plan 69... Chapter 4: Exploring Your Computer's Features 70 Exploring the Start screen 70 Charms 71 Tiles 72 Exploring the desktop 72 Finding your way around the desktop 72 ...
...63 Recording optical media 64 Removing a disc with the computer on 65 Removing a disc with the computer off 65 Toshiba's online resources 65 Chapter 3: Computing 66 Toshiba's energy-saver design 66 Power management 66 Charging the RTC battery 67 Power Plans 68 Using the eco power plan 69... Chapter 4: Exploring Your Computer's Features 70 Exploring the Start screen 70 Charms 71 Tiles 72 Exploring the desktop 72 Finding your way around the desktop 72 ...
User Guide
Page 15
Contents 15 Toshiba remote control 79 Chapter 5: Utilities 80 Desktop Assist 81 Media & Entertainment 82 Tools & Utilities 83 Support & Recovery 84 eco Utility 85 Setting ... 91 Enabling/Disabling USB Sleep and Charge........92 Power supply mode settings 93 TOSHIBA function key 94 PC Diagnostic Tool Utility 95 PC Health Monitor 96 Recovery Media Creator 97 Service Station 97... TOSHIBA Application Installer 98 Chapter 6: If Something Goes Wrong 99 Problems that are easy to fix ...
Contents 15 Toshiba remote control 79 Chapter 5: Utilities 80 Desktop Assist 81 Media & Entertainment 82 Tools & Utilities 83 Support & Recovery 84 eco Utility 85 Setting ... 91 Enabling/Disabling USB Sleep and Charge........92 Power supply mode settings 93 TOSHIBA function key 94 PC Diagnostic Tool Utility 95 PC Health Monitor 96 Recovery Media Creator 97 Service Station 97... TOSHIBA Application Installer 98 Chapter 6: If Something Goes Wrong 99 Problems that are easy to fix ...
User Guide
Page 29
... appear, click the Search ( ) Charm and, in the Start screen, locate and complete the registration process. 3 From the Desktop: On the Desktop, move the pointer over the upper or lower right corner of the screen. Product registration can be completed by one of windows ...displayed, and the order in order to your software setup choices. Getting Started 29 Registering your computer with Toshiba Product registration is strongly recommended, and allows Toshiba...
... appear, click the Search ( ) Charm and, in the Start screen, locate and complete the registration process. 3 From the Desktop: On the Desktop, move the pointer over the upper or lower right corner of the screen. Product registration can be completed by one of windows ...displayed, and the order in order to your software setup choices. Getting Started 29 Registering your computer with Toshiba Product registration is strongly recommended, and allows Toshiba...
User Guide
Page 30
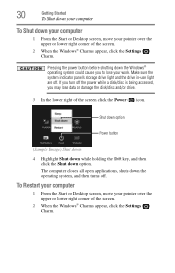
... or lower right corner of the screen click the Power ( ) icon. The computer closes all open applications, shuts down your computer 1 From the Start or Desktop screen, move your pointer over the upper or lower right corner of the screen. 2 When the Windows® Charms appear, click the Settings ( ) Charm. Make...
... or lower right corner of the screen click the Power ( ) icon. The computer closes all open applications, shuts down your computer 1 From the Start or Desktop screen, move your pointer over the upper or lower right corner of the screen. 2 When the Windows® Charms appear, click the Settings ( ) Charm. Make...

User Guide
Page 31
... Image) Sleep mode 4 Highlight Sleep, and then click the Sleep option. Getting Started 31 To place your computer in Sleep mode 1 From the Start or Desktop screen, move your work first. 3 In the lower right of the screen click the Power ( ) icon. Restart option Power button (Sample Image) Restart 4 Highlight Restart...
... Image) Sleep mode 4 Highlight Sleep, and then click the Sleep option. Getting Started 31 To place your computer in Sleep mode 1 From the Start or Desktop screen, move your work first. 3 In the lower right of the screen click the Power ( ) icon. Restart option Power button (Sample Image) Restart 4 Highlight Restart...
User Guide
Page 33
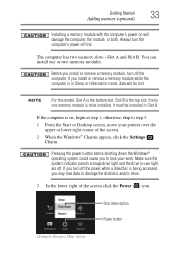
...) Shut down the Windows® operating system could cause you install or remove a memory module while the computer is to step 5. 1 From the Start or Desktop screen, move your work. Getting Started 33 Adding memory (optional) Installing a memory module with the computer's power on , begin at step 1; You can install one...
...) Shut down the Windows® operating system could cause you install or remove a memory module while the computer is to step 5. 1 From the Start or Desktop screen, move your work. Getting Started 33 Adding memory (optional) Installing a memory module with the computer's power on , begin at step 1; You can install one...

User Guide
Page 41
... information, see "Backing up to a new internal storage drive from your selection. When the Windows® Charms appear click the Search ( ) Charm and, in the Desktop, move your pointer over the upper or lower right corner of space required for storing the recovery files varies by computer model. When you create...
... information, see "Backing up to a new internal storage drive from your selection. When the Windows® Charms appear click the Search ( ) Charm and, in the Desktop, move your pointer over the upper or lower right corner of space required for storing the recovery files varies by computer model. When you create...
User Guide
Page 44
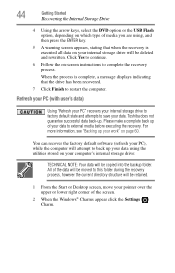
Toshiba does not guarantee successful data back-up your work" on page 60. Refresh your PC (with user's data) Using "Refresh your PC" recovers your internal ... continue. 6 Follow the on-screen instructions to this folder during the recovery process, however the current directory structure will be retained. 1 From the Start or Desktop screen, move your pointer over the upper or lower right corner of the screen. 2 When the Windows® Charms appear click the Settings ( ) Charm. 44...
Toshiba does not guarantee successful data back-up your work" on page 60. Refresh your PC (with user's data) Using "Refresh your PC" recovers your internal ... continue. 6 Follow the on-screen instructions to this folder during the recovery process, however the current directory structure will be retained. 1 From the Start or Desktop screen, move your pointer over the upper or lower right corner of the screen. 2 When the Windows® Charms appear click the Settings ( ) Charm. 44...

User Guide
Page 46
... Windows® Charms appear click the Settings ( ) Charm. The "Refreshing your PC The recovery process deletes information stored on page 60). 1 From the Start or Desktop screen, move your Windows® operating system. When the process is complete your system will restart. 46 Getting Started Recovering the Internal Storage Drive 6 Click...
... Windows® Charms appear click the Settings ( ) Charm. The "Refreshing your PC The recovery process deletes information stored on page 60). 1 From the Start or Desktop screen, move your Windows® operating system. When the process is complete your system will restart. 46 Getting Started Recovering the Internal Storage Drive 6 Click...
User Guide
Page 49
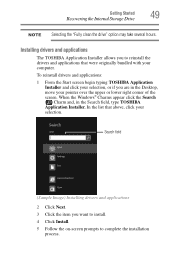
... and click your selection, or if you are in the Search field, type TOSHIBA Application Installer. When the Windows® Charms appear click the Search ( ) Charm and, in the Desktop, move your selection. Getting Started 49 Recovering the Internal Storage Drive NOTE Selecting ...the "Fully clean the drive" option may take several hours. Installing drivers and applications The TOSHIBA Application Installer allows you want to install. 4 Click...
... and click your selection, or if you are in the Search field, type TOSHIBA Application Installer. When the Windows® Charms appear click the Search ( ) Charm and, in the Desktop, move your selection. Getting Started 49 Recovering the Internal Storage Drive NOTE Selecting ...the "Fully clean the drive" option may take several hours. Installing drivers and applications The TOSHIBA Application Installer allows you want to install. 4 Click...
User Guide
Page 51
From the Start or Desktop screen, move your power usage settings. You may also wish to customize your pointer over the upper or lower right corner of the computer's keyboard, ...
From the Start or Desktop screen, move your power usage settings. You may also wish to customize your pointer over the upper or lower right corner of the computer's keyboard, ...

User Guide
Page 54
If you receive via external media, email, or download from or writing to a disk may be lost. The wireless receiver comes installed on your desktop setup, during its shutdown procedure. Scroll wheel Battery light (Sample Illustration) Mouse Using the wireless mouse Your computer comes with a wireless mouse. 54 Learning the ...
If you receive via external media, email, or download from or writing to a disk may be lost. The wireless receiver comes installed on your desktop setup, during its shutdown procedure. Scroll wheel Battery light (Sample Illustration) Mouse Using the wireless mouse Your computer comes with a wireless mouse. 54 Learning the ...
User Guide
Page 58
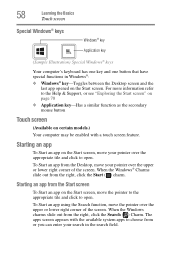
... enabled with the available system apps to choose from or you can enter your search in Windows®: ❖ Windows® key-Toggles between the Desktop screen and the last app opened on the Start screen. When the Windows® Charms slide out from the... Desktop, move the pointer to the appropriate tile and click to open . Starting an app from the right, click the Search ( ) Charm. The apps screen appears ...
... enabled with the available system apps to choose from or you can enter your search in Windows®: ❖ Windows® key-Toggles between the Desktop screen and the last app opened on the Start screen. When the Windows® Charms slide out from the... Desktop, move the pointer to the appropriate tile and click to open . Starting an app from the right, click the Search ( ) Charm. The apps screen appears ...
User Guide
Page 68
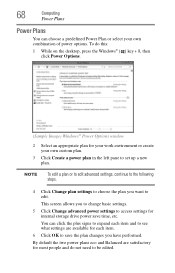
... plans eco and Balanced are available for each item and to see what settings are satisfactory for most people and do this: 1 While on the desktop, press the Windows® ( ) key + X, then click Power Options. (Sample Image) Windows® Power Options window 2 Select an appropriate plan for internal storage drive power...
... plans eco and Balanced are available for each item and to see what settings are satisfactory for most people and do this: 1 While on the desktop, press the Windows® ( ) key + X, then click Power Options. (Sample Image) Windows® Power Options window 2 Select an appropriate plan for internal storage drive power...

User Guide
Page 70
... you can do in the Windows® operating system, providing new and easy ways to your contacts and other important information. By clicking on the Desktop tile from your favorite apps and Web sites to access everything from the Start screen, you will find the Windows® settings and features you...
... you can do in the Windows® operating system, providing new and easy ways to your contacts and other important information. By clicking on the Desktop tile from your favorite apps and Web sites to access everything from the Start screen, you will find the Windows® settings and features you...

User Guide
Page 72
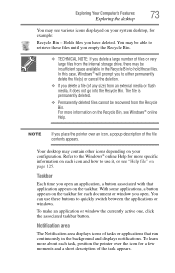
... screen tiles are not significant and do not indicate any folder, file, or program by your system. Exploring the desktop You can be quickly activated by double-clicking the icon. HINT: The illustrated examples in the functionality of your way around the... area, notifications, and background pattern. Icons Notifications Taskbar Notification area (Sample Image) Windows® Desktop screen Icons An icon represents a folder, file, or application that can create a new desktop icon for any change in this guide may appear slightly different from the screens displayed by dragging ...
... screen tiles are not significant and do not indicate any folder, file, or program by your system. Exploring the desktop You can be quickly activated by double-clicking the icon. HINT: The illustrated examples in the functionality of your way around the... area, notifications, and background pattern. Icons Notifications Taskbar Notification area (Sample Image) Windows® Desktop screen Icons An icon represents a folder, file, or application that can create a new desktop icon for any change in this guide may appear slightly different from the screens displayed by dragging ...
User Guide
Page 73
... moments and a short description of any size) from an external media or flash media, it , or see Windows® online Help. Your desktop may contain other icons depending on your configuration. You can use it does not go into the Recycle Bin. To make an application or window...you empty the Recycle Bin. ❖ TECHNICAL NOTE: If you have deleted. Exploring Your Computer's Features 73 Exploring the desktop You may see various icons displayed on your system desktop, for example: Recycle Bin - Holds files you delete a large number of the file contents appears. The file is ...
... moments and a short description of any size) from an external media or flash media, it , or see Windows® online Help. Your desktop may contain other icons depending on your configuration. You can use it does not go into the Recycle Bin. To make an application or window...you empty the Recycle Bin. ❖ TECHNICAL NOTE: If you have deleted. Exploring Your Computer's Features 73 Exploring the desktop You may see various icons displayed on your system desktop, for example: Recycle Bin - Holds files you delete a large number of the file contents appears. The file is ...

User Guide
Page 76
.... Using a microphone 1 If you are in the Search field, type Sound Recorder. When the Windows® Charms appear click the Search ( ) charm and, in the Desktop, move your pointer over the upper or lower right corner of external stereo speakers. Instead of using amplified speakers, use an external microphone, connect it...
.... Using a microphone 1 If you are in the Search field, type Sound Recorder. When the Windows® Charms appear click the Search ( ) charm and, in the Desktop, move your pointer over the upper or lower right corner of external stereo speakers. Instead of using amplified speakers, use an external microphone, connect it...
User Guide
Page 78
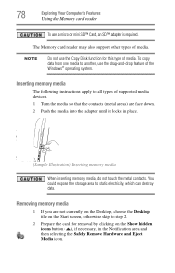
... 2. 2 Prepare the card for this type of supported media devices. 1 Turn the media so that the contacts (metal areas) are not currently on the Desktop, choose the Desktop tile on the Show hidden icons button ( ), if necessary, in place. (Sample Illustration) Inserting memory media When inserting memory media, do not touch the...
... 2. 2 Prepare the card for this type of supported media devices. 1 Turn the media so that the contacts (metal areas) are not currently on the Desktop, choose the Desktop tile on the Show hidden icons button ( ), if necessary, in place. (Sample Illustration) Inserting memory media When inserting memory media, do not touch the...
User Guide
Page 80
These utilities are applicable only if the related utility is available on your system. ❖ Desktop Assist ❖ eco Utility® ❖ Supervisor password ❖ User password ❖ System Settings ❖ Sleep and Charge ❖ TOSHIBA function key ❖ PC Diagnostic Tool Utility ❖ PC Health Monitor ❖ Recovery Media Creator 80 Chapter...
These utilities are applicable only if the related utility is available on your system. ❖ Desktop Assist ❖ eco Utility® ❖ Supervisor password ❖ User password ❖ System Settings ❖ Sleep and Charge ❖ TOSHIBA function key ❖ PC Diagnostic Tool Utility ❖ PC Health Monitor ❖ Recovery Media Creator 80 Chapter...