
Quick Start Guide
Page 1
... website. IK-WB16A IK-WB16A-W Refer to view PDF files. The application Adobe Reader is needed to the user's manual (PDF file) contained in the CD-ROM for settings, operations and other information. For information on our latest products and peripheral devices, refer to the following Website: n http://www.toshibasecurity.com If the URL changes, refer to the Toshiba website (http://www.toshiba.com). NETWORK CAMERA Model: IK-WB16A / IK-WB16A-W Quick Start Guide and...
... website. IK-WB16A IK-WB16A-W Refer to view PDF files. The application Adobe Reader is needed to the user's manual (PDF file) contained in the CD-ROM for settings, operations and other information. For information on our latest products and peripheral devices, refer to the following Website: n http://www.toshibasecurity.com If the URL changes, refer to the Toshiba website (http://www.toshiba.com). NETWORK CAMERA Model: IK-WB16A / IK-WB16A-W Quick Start Guide and...

Quick Start Guide
Page 2
... generates, uses and can be determined by turning the equipment off and on a circuit different from that interference will not occur in accordance with the instructions, may cause harmful interference to radio communications. USER-INSTALLER CAUTION: Your authority to operate this equipment does cause harmful interference to radio or television reception, which the receiver is connected. If this...
... generates, uses and can be determined by turning the equipment off and on a circuit different from that interference will not occur in accordance with the instructions, may cause harmful interference to radio communications. USER-INSTALLER CAUTION: Your authority to operate this equipment does cause harmful interference to radio or television reception, which the receiver is connected. If this...

Quick Start Guide
Page 3
...; are subject to ensure correct usage. The design, specifications, software, and quick start guide may be trademarks or registered trademarks of the network camera may vary depending on the network environment. 3 Windows 7®: Microsoft® Windows 7® Professional operating system l The formal name of Microsoft® Corporation in a convenient place for purchasing the IK-WB16A/IK-WB16A-W Network Camera. NOTE l The performance of their respective holders...
...; are subject to ensure correct usage. The design, specifications, software, and quick start guide may be trademarks or registered trademarks of the network camera may vary depending on the network environment. 3 Windows 7®: Microsoft® Windows 7® Professional operating system l The formal name of Microsoft® Corporation in a convenient place for purchasing the IK-WB16A/IK-WB16A-W Network Camera. NOTE l The performance of their respective holders...
Quick Start Guide
Page 4
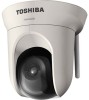
Table of Contents Introduction Introduction 2 Terms and Trademarks 3 Table of Contents 4 IMPORTANT SAFEGUARDS 5 NOTES ON USE AND INSTALLATION 10 Setting the Network Camera Environment 12 Items needed for network camera monitoring 12 Quick Start Guide Contents 13 Physical Description 14 Hardware Installation 15 Network Deployment 18 General Connection (without PoE 18 Power over Ethernet (PoE) (IK-WB16A only 19 Assigning IP Address 20 Retrieving Images 21 Configure the Wireless Connection (IK-WB16A-W only 22 4
Table of Contents Introduction Introduction 2 Terms and Trademarks 3 Table of Contents 4 IMPORTANT SAFEGUARDS 5 NOTES ON USE AND INSTALLATION 10 Setting the Network Camera Environment 12 Items needed for network camera monitoring 12 Quick Start Guide Contents 13 Physical Description 14 Hardware Installation 15 Network Deployment 18 General Connection (without PoE 18 Power over Ethernet (PoE) (IK-WB16A only 19 Assigning IP Address 20 Retrieving Images 21 Configure the Wireless Connection (IK-WB16A-W only 22 4

Quick Start Guide
Page 5
... laundry tub, in the user's manual. 4. Any mounting of the product should follow the manufacturer's instructions, and should never be placed near a swimming pool. 8. Ventilation This video product should use this video product from the power supply before operating the product. 2. Water and Moisture Do not use a mounting accessory recommended by the manufacturer. 9. Warnings Comply with stand, tripod,bracket,or table recommended by...
... laundry tub, in the user's manual. 4. Any mounting of the product should follow the manufacturer's instructions, and should never be placed near a swimming pool. 8. Ventilation This video product should use this video product from the power supply before operating the product. 2. Water and Moisture Do not use a mounting accessory recommended by the manufacturer. 9. Warnings Comply with stand, tripod,bracket,or table recommended by...

Quick Start Guide
Page 6
...wall. Refer all servicing to lightning and power-line surges. Lightning For additional protection on this video product on a secure part of any connected cables in a fire or electrical shock. Power Sources This video product should be routed so that could fall causing injury and damage. 13. Installation Install this video... unit or any kind on an unsecured location, the camera could result in order to avoid electric shock. 14. Servicing Do not attempt to be operated only from the type of time, unplug it from the wall outlet and disconnect the power supply and cable system...
...wall. Refer all servicing to lightning and power-line surges. Lightning For additional protection on this video product on a secure part of any connected cables in a fire or electrical shock. Power Sources This video product should be routed so that could fall causing injury and damage. 13. Installation Install this video... unit or any kind on an unsecured location, the camera could result in order to avoid electric shock. 14. Servicing Do not attempt to be operated only from the type of time, unplug it from the wall outlet and disconnect the power supply and cable system...

Quick Start Guide
Page 7
... which indicates a need for service. 18. When the power-supply cord or plug is in an accident. 7 Replacement Parts When replacing parts be sure the service technician uses parts specified by the manufacturer or have fallen into the video product. When using a wireless LAN function (IK-WB16A-W): • Do not use near people with electromagnetic signals. d. When the video product exhibiting a distinct change in places where the wireless LAN function could...
... which indicates a need for service. 18. When the power-supply cord or plug is in an accident. 7 Replacement Parts When replacing parts be sure the service technician uses parts specified by the manufacturer or have fallen into the video product. When using a wireless LAN function (IK-WB16A-W): • Do not use near people with electromagnetic signals. d. When the video product exhibiting a distinct change in places where the wireless LAN function could...

Quick Start Guide
Page 9
...USER SERVICEABLE PARTS INSIDE. The lightning flash with arrowhead symbol, within an equilateral triangle, is intended to alert the user to the presence of uninsulated "dangerous voltage" within an equilateral triangle is intended to alert the user to the presence of electric shock to constitute a risk of important operating and maintenance (servicing) instructions...magnitude to persons. REFER SERVICING TO QUALIFIED SERVICE PERSONNEL. FIELD INSTALLATION MARKING: WORDED: "THIS INSTALLATION SHOULD BE MADE BY A QUALIFIED SERVICE PERSON AND SHOULD CONFORM TO ALL LOCAL CODES." 9 WARNING: TO ...
...USER SERVICEABLE PARTS INSIDE. The lightning flash with arrowhead symbol, within an equilateral triangle, is intended to alert the user to the presence of uninsulated "dangerous voltage" within an equilateral triangle is intended to alert the user to the presence of electric shock to constitute a risk of important operating and maintenance (servicing) instructions...magnitude to persons. REFER SERVICING TO QUALIFIED SERVICE PERSONNEL. FIELD INSTALLATION MARKING: WORDED: "THIS INSTALLATION SHOULD BE MADE BY A QUALIFIED SERVICE PERSON AND SHOULD CONFORM TO ALL LOCAL CODES." 9 WARNING: TO ...
Quick Start Guide
Page 10
... trouble may get worse and an unpredictable problem may appear in images. l Never touch internal parts Do not touch the internal parts of the camera other than the specified operating range. If you are wired near the unit. l Do not shoot intense light Intense light such as an insect spray, near electric lighting wires or a TV set, noise may occur. 10 However, this event relocate cables...
... trouble may get worse and an unpredictable problem may appear in images. l Never touch internal parts Do not touch the internal parts of the camera other than the specified operating range. If you are wired near the unit. l Do not shoot intense light Intense light such as an insect spray, near electric lighting wires or a TV set, noise may occur. 10 However, this event relocate cables...
Quick Start Guide
Page 11
If there is not a fault. If this happens, check an area away from the current location that will not cause radio interference to medical, industrial and public equipment, and change to it, or stop using the 2.4 GHz waveband, or a microwave oven, the communication efficiency of this apparatus will be reduced, and may become unusable, but it is a similar wireless LAN in this unit uses the 2.4 GHz waveband. l Caution when using the wireless LAN functions (IK-WB16A-W) The Wireless LAN in the area, or a wireless device using the unit. 11
If there is not a fault. If this happens, check an area away from the current location that will not cause radio interference to medical, industrial and public equipment, and change to it, or stop using the 2.4 GHz waveband, or a microwave oven, the communication efficiency of this apparatus will be reduced, and may become unusable, but it is a similar wireless LAN in this unit uses the 2.4 GHz waveband. l Caution when using the wireless LAN functions (IK-WB16A-W) The Wireless LAN in the area, or a wireless device using the unit. 11

Quick Start Guide
Page 12
... supplied as Ethernet cables, and switch or router. -- l Camera search application "Installation Wizard" -- This application is called the "administrator's personal computer" in this guide. * The personal computer for viewing monitored images is the tool to discover the IP address of a camera. Internet Explorer Ver 8.0 -- Setting the Network Camera Environment Items needed for network camera monitoring l Administrator's personal computer The personal computer that allows setting, operating, monitoring and other functions with the network camera is called the "user...
... supplied as Ethernet cables, and switch or router. -- l Camera search application "Installation Wizard" -- This application is called the "administrator's personal computer" in this guide. * The personal computer for viewing monitored images is the tool to discover the IP address of a camera. Internet Explorer Ver 8.0 -- Setting the Network Camera Environment Items needed for network camera monitoring l Administrator's personal computer The personal computer that allows setting, operating, monitoring and other functions with the network camera is called the "user...

Quick Start Guide
Page 13
... URL changes, refer to the user's manual (PDF file) contained in the CD-ROM for settings, operations and other information. Contents l IK-WB16A/IK-WB16A-W l AC Adapter Cord length: 72 inches (1828 mm) Back Cover l Antenna (IK-WB16A-W only) l Screws / LAN cable and RJ45 Female/Female Coupler l Ceiling Mount Brackets / Alignment sticker IK-WB16A / IK-WB16A-W Alignment Sticker Drill hole Drill hole Drill hole (Drill hole) A B l Quick Start Guide and Important Safeguards NETWORK CAMERA Model: IK-WB16A / IK-WB16A-W Quick...
... URL changes, refer to the user's manual (PDF file) contained in the CD-ROM for settings, operations and other information. Contents l IK-WB16A/IK-WB16A-W l AC Adapter Cord length: 72 inches (1828 mm) Back Cover l Antenna (IK-WB16A-W only) l Screws / LAN cable and RJ45 Female/Female Coupler l Ceiling Mount Brackets / Alignment sticker IK-WB16A / IK-WB16A-W Alignment Sticker Drill hole Drill hole Drill hole (Drill hole) A B l Quick Start Guide and Important Safeguards NETWORK CAMERA Model: IK-WB16A / IK-WB16A-W Quick...

Quick Start Guide
Page 15
... the ceiling to the camera. 4. And connect the cables to feed the cables. Hardware Installation l Ceiling mount with a small screw. 6. Adjust the antenna to the Network Camera and secure it with two small screws. 2. Secure ceiling mount bracket A and B with supplied bracket 1. Attach ceiling mount bracket A to the appropriate position.(IK-WB16A-W only). then hammer the plastic anchors into ceiling mount bracket B. 5. Slide the Network Camera into the holes. 3. Attach the supplied alignment sticker to...
... the ceiling to the camera. 4. And connect the cables to feed the cables. Hardware Installation l Ceiling mount with a small screw. 6. Adjust the antenna to the Network Camera and secure it with two small screws. 2. Secure ceiling mount bracket A and B with supplied bracket 1. Attach ceiling mount bracket A to the appropriate position.(IK-WB16A-W only). then hammer the plastic anchors into ceiling mount bracket B. 5. Slide the Network Camera into the holes. 3. Attach the supplied alignment sticker to...

Quick Start Guide
Page 16
NOTE l When RJ45 plug is large and the back cover is not attached to the camera, use a right angle mini-plug cable. (Right angle plug is not attached to the appropriate position. 16 In this case, readjust to the camera, use an attached LAN cable and RJ45 female/female coupler. l The position of the back cover. l When Microphone plug and Audio out plug are large and the back cover is not included.) l When you do not lead the cable to the backside hole of the camera, cut out the knock out of an antenna may change by vibration after installation.
NOTE l When RJ45 plug is large and the back cover is not attached to the camera, use a right angle mini-plug cable. (Right angle plug is not attached to the appropriate position. 16 In this case, readjust to the camera, use an attached LAN cable and RJ45 female/female coupler. l The position of the back cover. l When Microphone plug and Audio out plug are large and the back cover is not included.) l When you do not lead the cable to the backside hole of the camera, cut out the knock out of an antenna may change by vibration after installation.

Quick Start Guide
Page 17
Drill four pilot holes into the holes. 3. Lead the cables through the hole, and connect the cable to the appropriate position. (IK-WB16A-W only) 2 3 1 6 5 17 Adjust the antenna to the camera. Drill a hole in the wall to the wall with JK-WM16 (JK-WM16 is not included.) 1. Fasten JK-WM16 to feed the cables. 2. hammer the plastic anchors into the wall; Attach the back cover and fasten with two screws. 6. Secure Network Camera with two screws. 5. l Wall Mount with four screws. 4.
Drill four pilot holes into the holes. 3. Lead the cables through the hole, and connect the cable to the appropriate position. (IK-WB16A-W only) 2 3 1 6 5 17 Adjust the antenna to the camera. Drill a hole in the wall to the wall with JK-WM16 (JK-WM16 is not included.) 1. Fasten JK-WM16 to feed the cables. 2. hammer the plastic anchors into the wall; Attach the back cover and fasten with two screws. 6. Secure Network Camera with two screws. 5. l Wall Mount with four screws. 4.

Quick Start Guide
Page 18
... falling and causing possible injury. Use Category 5 or equivalent Cable to connect the Network Camera to a PC. 3. Connect the AC adapter jack to the Network Camera before plugging in high locations, take caution to prevent unplugging of accidental electric shock. 1 1: 12V DC Output 2: Digital Output 3 3: Digital Input 4: Ground 4321 WPS/RESET microSD 2 POWER COLLISION 1 2 3 4 5 LINK RECEIVE PARTITION Ethernet switch (not supplied) NOTE l When installing in to the power socket. Network Deployment General Connection (without PoE) 1.
... falling and causing possible injury. Use Category 5 or equivalent Cable to connect the Network Camera to a PC. 3. Connect the AC adapter jack to the Network Camera before plugging in high locations, take caution to prevent unplugging of accidental electric shock. 1 1: 12V DC Output 2: Digital Output 3 3: Digital Input 4: Ground 4321 WPS/RESET microSD 2 POWER COLLISION 1 2 3 4 5 LINK RECEIVE PARTITION Ethernet switch (not supplied) NOTE l When installing in to the power socket. Network Deployment General Connection (without PoE) 1.

Quick Start Guide
Page 19
Power over Ethernet (PoE) (IK-WB16A only) l When using a PoE switch The Network Camera is not used . 4321 WPS/RESET microSD PoE power injector (not supplied) POWER COLLISION 1 2 3 4 5 LINK RECEIVE PARTITION Non-PoE switch (not supplied) 19 For this connection method, the AC adapter is not used . 4321 WPS/RESET microSD POWER COLLISION 1 2 3 4 5 LINK RECEIVE PARTITION PoE switch (not supplied) l When using a non-PoE switch Use a PoE power injector to connect between the Network Camera and a non-PoE switch. For this connection method, the AC adapter is PoE-...
Power over Ethernet (PoE) (IK-WB16A only) l When using a PoE switch The Network Camera is not used . 4321 WPS/RESET microSD PoE power injector (not supplied) POWER COLLISION 1 2 3 4 5 LINK RECEIVE PARTITION Non-PoE switch (not supplied) 19 For this connection method, the AC adapter is not used . 4321 WPS/RESET microSD POWER COLLISION 1 2 3 4 5 LINK RECEIVE PARTITION PoE switch (not supplied) l When using a non-PoE switch Use a PoE power injector to connect between the Network Camera and a non-PoE switch. For this connection method, the AC adapter is PoE-...
Quick Start Guide
Page 20
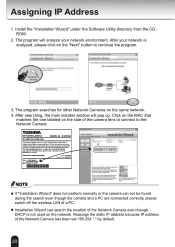
... connected correctly, please switch off the wireless LAN of the camera lens to connect to the following two conditions: (1) this device may not cause harmful interference, and (2) this device must accept any interference received, including interference that may cause undesired operation. MODEL No. IK-WB16A DC INPUT:12V 0.8A This device complies with Part 15 of the Network Camera has been set 169.254.*.* by default...
... connected correctly, please switch off the wireless LAN of the camera lens to connect to the following two conditions: (1) this device may not cause harmful interference, and (2) this device must accept any interference received, including interference that may cause undesired operation. MODEL No. IK-WB16A DC INPUT:12V 0.8A This device complies with Part 15 of the Network Camera has been set 169.254.*.* by default...

Quick Start Guide
Page 21
Retrieve live video through Internet Explorer®. 2010/09/01 10:33:11 For more information on camera configuration, please refer to the Network Camera from the network. 2. Access to user's manual on the CD-ROM. 21 Retrieving Images 1.
Retrieve live video through Internet Explorer®. 2010/09/01 10:33:11 For more information on camera configuration, please refer to the Network Camera from the network. 2. Access to user's manual on the CD-ROM. 21 Retrieving Images 1.

Quick Start Guide
Page 22
... power cable to the wireless network. ADSL/Cable/Switch 4321 WPS/RESET microSD AP POWER COLLISION 1 2 3 4 5 LINK RECEIVE PARTITION NOTE 1. SSID, abbreviated from the Network Camera. 7. For further setup, please refer to "default". 2. The Network Camera now operates in your AP. 4. Click Save. Wireless networking has many security issues. Set the SSID and wireless security consistent with the setting on your browser. Then, unplug the power cable and Ethernet cable from Service Set Identifier, is set on the CD-ROM. 22 The IK-WB16A-W's factory...
... power cable to the wireless network. ADSL/Cable/Switch 4321 WPS/RESET microSD AP POWER COLLISION 1 2 3 4 5 LINK RECEIVE PARTITION NOTE 1. SSID, abbreviated from the Network Camera. 7. For further setup, please refer to "default". 2. The Network Camera now operates in your AP. 4. Click Save. Wireless networking has many security issues. Set the SSID and wireless security consistent with the setting on your browser. Then, unplug the power cable and Ethernet cable from Service Set Identifier, is set on the CD-ROM. 22 The IK-WB16A-W's factory...

