Toshiba IK-WR01A Support and Manuals
Get Help and Manuals for this Toshiba item
View All Support Options Below
Free Toshiba IK-WR01A manuals!
Problems with Toshiba IK-WR01A?
Ask a Question
Free Toshiba IK-WR01A manuals!
Problems with Toshiba IK-WR01A?
Ask a Question
Popular Toshiba IK-WR01A Manual Pages
Operation Manual - Page 1

This User's Guide applies to the following Web page.
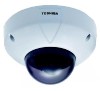
For information on the latest products and peripheral devices, refer to the firmware version R1.01 and later. If the URL changes, refer to change without prior notice. NETWORK CAMERA
Model: IK-WR01A
Operation Manual
To get started, read the separate "Safety Precautions" carefully. Ihttp://www.netcam.toshiba.com
The above URL...
Operation Manual - Page 3
... Features of Parts 5
Installation/Set up
GINSTALLATION ...8 G Adjust the Angle of Connection 22 G Connecting ...23 GUsing the Camera Search Application "Camera Finder 24 GChanging Administrator Login ID and Password 26 GSetting up Access Restriction 28 GConfiguring the Network Manually 30
3
Setting up
Viewing and Operation
Recording
INTRODUCTION
FEATURES & DESCRIPTION
IK-WR01A has the...
Operation Manual - Page 14
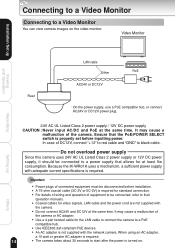
Because the IK-WR01A uses a mechanism, a sufficient power supply with the network camera. G A 75-ohm coaxial cable (3C-2V or 5C-2V) is turned on the video monitor. It may cause a malfunction of
the camera or AC adapter. G Use IEEE802.3af-compliant PoE devices. G An AC adapter is not supplied with adequate current specifications is properly set before installation. Setting up
Viewing ...
Operation Manual - Page 15

...
Recording
Setting up
About the POWER SELECT Switch
CAUTION : The IK-WR01A operates with one of the following power source: 12vDC, 24vAC or PoE.
LAN cable
PoE (IEEE802.3af) compatible hub, etc.
AC24V/ PoE DC12V
Switch the POWER SELECT switch to the correct power source before inputting power.
15
Others
Installation/Set up
POWER SELECT Switch
s When power is supplied from...
Operation Manual - Page 21
...read carefully the operating instructions of the network camera may no longer be updated by the DHCP server.
Installation/Set up
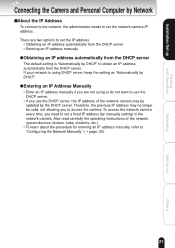
Others If your network is "Automatically by DHCP". GEntering an IP Address Manually
• Enter an IP address manually if you are two options to access the camera. To access the network camera every time, you to set the network camera IP address.
Operation Manual - Page 24
... "Setup.exe". Do not install
the application in the Network camera login fields.
24
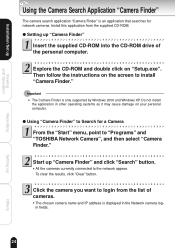
Setting up "Camera Finder"
Insert the supplied CD-ROM into the CD-ROM drive of cameras. G The chosen camera name and IP address is only supported by Windows 2000 and Windows XP. Then follow the instructions on the screen to the network appear. G All the cameras currently connected to install "Camera Finder...
Operation Manual - Page 30
... side of the screen.
30
Setting up
Viewing and Operation
Recording
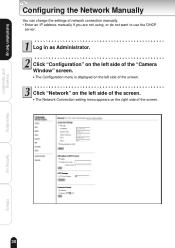
Configuring the Network Manually
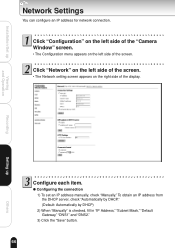
You can change the settings of the screen. Click "Network" on the left side of the "Camera Window" screen. Log in as Administrator.
G The Network Connection setting menu appears on the left side of network connection manually. • Enter an IP address manually if you are not using...
Operation Manual - Page 31
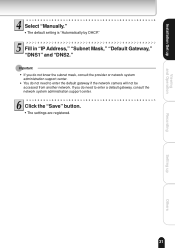
... if the network camera will not be
accessed from another network. Click the "Save" button. G You do not know the subnet mask, consult the provider or network system
administration support center.
G The settings are registered.
31
Setting up
Viewing and Operation
Recording
Select "Manually." G The default setting is "Automatically by DHCP."
Fill in "IP Address," "Subnet Mask...
Operation Manual - Page 66
...Default: Automatically by DHCP) 2) When "Manually" is checked, fill in "IP Address," "Subnet Mask," "Default Gateway," "DNS1" and "DNS2." 3) Click the "Save" button.
66
Setting up
Viewing and Operation
Recording
Network Settings
You can configure an IP address for network connection. G Configuring the connection 1) To set an IP address manually, check "Manually." Installation/Set up
Others
Operation Manual - Page 67

... or relevant network system
administration support center. Installation/Set up
Others G Framerate Control By setting framerate appropriate for the environment where the camera is installed or the purpose, you can access the camera with the domain name. 1) To set may not be obtained depending on all the communication (bandwidth) of images to confirm that the entered IP address and HTTP...
Operation Manual - Page 69
... operation from the mailbox. Installation/Set up
Viewing and Operation
Recording
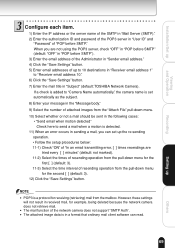
Configure each item.
1) Enter the IP address or the server name of the SMTP in "Mail Server (SMTP)." 2) Enter the authorization ID and password of the POP3 server in "User ID" and
"Password" of the network camera does not support "SMTP Auth". However, these settings
will not result in "Receiver...
Operation Manual - Page 72

...
Installation/Set up
Viewing and Operation
Recording
Updating the Firmware
Follow the procedures below to the following Toshiba Web page on the Internet. G Access to update the firmware. • When updating the firmware, all the settings are reset except IP addresses. Click "System" on the left side of the screen.
• The System setting screen appears on the left side of the "Camera...
Operation Manual - Page 78
...)
IP address is the protocol to assign IP address dynamically to manage.
D
Daylight Saving 58 DC IN (Power input terminal 6 DDNS 72 (Dynamic Domain Name System)
This is the technique to overwrite the information of Microsoft®'s Internet ExplorerTM
C Camera searching application "Camera Finder 24 Camera name 36 Camera Window 35 Changing password 26 Connection 22
Network devices...
Operation Manual - Page 80
... Protocol) and UDP (User Datagram Protocol). com/" is composed of network ID and host ID. Installation/Set up
T
TCP/IP 90
(Transmission Control Protocol/Internet Protocol)
This is the standard protocol of the Internet and at IP address of network device. It decides by itself to which relays data on the Internet and Intranet. Others
U
Updating firmware 72 URL 23...
Operation Manual - Page 90
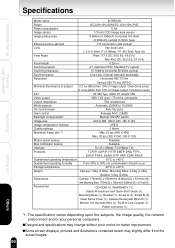
qDesigns and specifications may slightly differ from the actual images.
90
Setting up
Viewing and Operation
Recording
Model name
IK-WR01A
Power
AC 24V±10% 60Hz/DC 12V±10%/ PoE
Power consumption
5.5w
Image sensor
1/3 inch CCD image area sensor
Image pickup area
4.96mm (0.195inch) horizontal X 6.0mm
(0.236inch) vertical (1/3inch type)
Effective picture element
771 ...
Toshiba IK-WR01A Reviews
We have not received any reviews for Toshiba yet.