
Owners Manual
Page 7
...-6684] (for U.S.A.) or Toshiba Customer Support Department [(800) 268-3404] (for remote control AV cable Cradle (only with GSC-R30 for camera connection) Battery for Canada). Rechargeable battery (GSC-BT5) AC adapter (SQPH20W10P-02) Power cord Lens cap Remote control USB cable (only with GSC-R60 for cradle connection) USB cable (only with GSC-R60) CD-ROM Application...
...-6684] (for U.S.A.) or Toshiba Customer Support Department [(800) 268-3404] (for remote control AV cable Cradle (only with GSC-R30 for camera connection) Battery for Canada). Rechargeable battery (GSC-BT5) AC adapter (SQPH20W10P-02) Power cord Lens cap Remote control USB cable (only with GSC-R60 for cradle connection) USB cable (only with GSC-R60) CD-ROM Application...
Owners Manual
Page 9
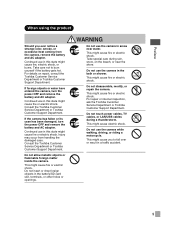
...This might cause fire or electric shock. Take special care during a thunderstorm. For repair or internal inspection, ask the Toshiba Customer Service Department or Toshiba Customer Support Department. Take care not to fall over or result in this state might cause fire or electric shock. ...inside the camera. This might cause electric shock. Do not touch power cables, TV cables, or LAN/USB cables during rain, snow, on repair, consult the Toshiba Customer Service Department or Toshiba Customer Support Department. Do not use in a traffic accident. 9 For details on the beach, or...
...This might cause fire or electric shock. Take special care during a thunderstorm. For repair or internal inspection, ask the Toshiba Customer Service Department or Toshiba Customer Support Department. Take care not to fall over or result in this state might cause fire or electric shock. ...inside the camera. This might cause electric shock. Do not touch power cables, TV cables, or LAN/USB cables during rain, snow, on repair, consult the Toshiba Customer Service Department or Toshiba Customer Support Department. Do not use in a traffic accident. 9 For details on the beach, or...

Owners Manual
Page 25
... shoot - Camera LEDs Mode LED Color Green STATUS LED Red Orange MEDIA LED Status At power OFF During shooting During playback In LAN mode In USB mode Lit - Blinking Blinking Charging error Hardware fault Hardware fault Hardware fault Hardware fault - Recording mode Playback mode Lit Charging completed - - - Use the OK button...
... shoot - Camera LEDs Mode LED Color Green STATUS LED Red Orange MEDIA LED Status At power OFF During shooting During playback In LAN mode In USB mode Lit - Blinking Blinking Charging error Hardware fault Hardware fault Hardware fault Hardware fault - Recording mode Playback mode Lit Charging completed - - - Use the OK button...

Owners Manual
Page 26
... is connected. The cradle LEDs also only operate when the AC adapter is connected. Media access In USB mode { - { - - - Cradle* (only with GSC-R60) LAN button USB button POWER button RELEASE button DC IN 10V terminal LAN terminal MEDIA LED CHARGE LED POWER LED LAN ...LED USB LED Cradle LEDs* A/V OUT terminal USB terminal Mode LED POWER LAN USB CHARGE MEDIA Status Lit Lit Lit Off Lit Blinking Lit ...
... is connected. The cradle LEDs also only operate when the AC adapter is connected. Media access In USB mode { - { - - - Cradle* (only with GSC-R60) LAN button USB button POWER button RELEASE button DC IN 10V terminal LAN terminal MEDIA LED CHARGE LED POWER LED LAN ...LED USB LED Cradle LEDs* A/V OUT terminal USB terminal Mode LED POWER LAN USB CHARGE MEDIA Status Lit Lit Lit Off Lit Blinking Lit ...
Owners Manual
Page 122
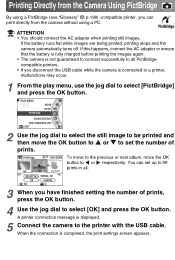
... the still image to be printed and then move the OK button to the printer with the USB cable. Printing Directly from the camera without using a PictBridge (see "Glossary" p.198) -compatible printer, you disconnect the USB cable while the camera is connected to a printer, malfunctions may occur. 1 From the play menu, use...
... the still image to be printed and then move the OK button to the printer with the USB cable. Printing Directly from the camera without using a PictBridge (see "Glossary" p.198) -compatible printer, you disconnect the USB cable while the camera is connected to a printer, malfunctions may occur. 1 From the play menu, use...

Owners Manual
Page 123
..., press the MENU button. Printing all Images in step 2 reappears. 6 Use the jog dial to print the photography date. When the [DISCONNECT USB CABLE.] message appears, disconnect the USB cable from the camera and printer. MEMO • You can be set differ depending on the hard disk drive and an SD card...
..., press the MENU button. Printing all Images in step 2 reappears. 6 Use the jog dial to print the photography date. When the [DISCONNECT USB CABLE.] message appears, disconnect the USB cable from the camera and printer. MEMO • You can be set differ depending on the hard disk drive and an SD card...
Owners Manual
Page 148
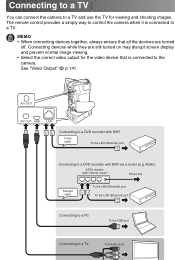
... (e.g. ADSL) ADSL modem (with internal router) Phone line Straight cable To the LAN (Ethernet) port To the LAN (Ethernet) port Connecting to a PC To the USB port Connecting to a DVD recorder with DVR Cross cable To the LAN (Ethernet) port Connecting to a TV To the AV ports Connecting to a TV You...
... (e.g. ADSL) ADSL modem (with internal router) Phone line Straight cable To the LAN (Ethernet) port To the LAN (Ethernet) port Connecting to a PC To the USB port Connecting to a DVD recorder with DVR Cross cable To the LAN (Ethernet) port Connecting to a TV To the AV ports Connecting to a TV You...
Owners Manual
Page 150
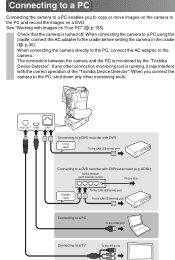
... ADSL) ADSL modem (with internal router) Phone line Straight cable To the LAN (Ethernet) port To the LAN (Ethernet) port Connecting to a PC To the USB port Connecting to the PC, shut down any other monitoring tools. When connecting the camera directly to the PC, connect the AC adapter to a DVD...the cradle, connect the AC adapter to the cradle before setting the camera in the cradle ( p.30). See "Working with the correct operation of the "Toshiba Device Detector". Connecting to a PC Connecting the camera to a PC enables you connect the camera to a TV To the AV ports
... ADSL) ADSL modem (with internal router) Phone line Straight cable To the LAN (Ethernet) port To the LAN (Ethernet) port Connecting to a PC To the USB port Connecting to the PC, shut down any other monitoring tools. When connecting the camera directly to the PC, connect the AC adapter to a DVD...the cradle, connect the AC adapter to the cradle before setting the camera in the cradle ( p.30). See "Working with the correct operation of the "Toshiba Device Detector". Connecting to a PC Connecting the camera to a PC enables you connect the camera to a TV To the AV ports
Owners Manual
Page 151
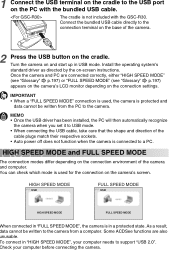
... MODE" (see "Glossary" p.197) appears on the camera's LCD monitor depending on -screen instructions. Check your computer needs to USB mode. • When connecting the USB cable, take care that the shape and direction of the camera and computer. Install the operating system's standard driver as directed by... screen. You can check which mode is used , the camera is connected to the camera from the PC to the USB port on the PC with the GSC-R30. 1 Connect the USB terminal on the cradle to the camera. As a result, data cannot be written from a computer. The cradle is...
... MODE" (see "Glossary" p.197) appears on the camera's LCD monitor depending on -screen instructions. Check your computer needs to USB mode. • When connecting the USB cable, take care that the shape and direction of the camera and computer. Install the operating system's standard driver as directed by... screen. You can check which mode is used , the camera is connected to the camera from the PC to the USB port on the PC with the GSC-R30. 1 Connect the USB terminal on the cradle to the camera. As a result, data cannot be written from a computer. The cradle is...

Owners Manual
Page 152
After completing the procedure, disconnect the USB cable from the PC 1 Click the " " icon in the task tray in the bottom right corner of the PC desktop. 2 Follow the disconnection procedure as directed by the on-screen messages. Disconnecting the Camera from the PC and camera.
After completing the procedure, disconnect the USB cable from the PC 1 Click the " " icon in the task tray in the bottom right corner of the PC desktop. 2 Follow the disconnection procedure as directed by the on-screen messages. Disconnecting the Camera from the PC and camera.
Owners Manual
Page 153
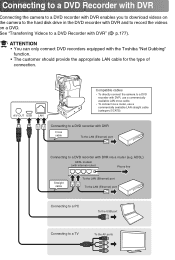
..." ( p.177). See "Transferring Videos to a DVD recorder with DVR, use a commercially available LAN cross cable. • To connect via a router (e.g. A/V OUT USB LAN Compatible cables • To directly connect the camera to a TV To the AV ports ADSL) ADSL modem (with internal router) Phone line Straight cable...connect DVD recorders equipped with DVR and to record the videos on the camera to the hard disk drive in the DVD recorder with the Toshiba "Net Dubbing" function. • The customer should provide the appropriate LAN cable for the type of connection. Connecting to a DVD ...
..." ( p.177). See "Transferring Videos to a DVD recorder with DVR, use a commercially available LAN cross cable. • To connect via a router (e.g. A/V OUT USB LAN Compatible cables • To directly connect the camera to a TV To the AV ports ADSL) ADSL modem (with internal router) Phone line Straight cable...connect DVD recorders equipped with DVR and to record the videos on the camera to the hard disk drive in the DVD recorder with the Toshiba "Net Dubbing" function. • The customer should provide the appropriate LAN cable for the type of connection. Connecting to a DVD ...
Owners Manual
Page 157
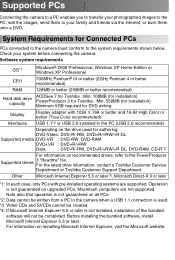
...with pre-installed operating systems are not supported. For the latest drive information, contact a Toshiba Customer Service Department or Toshiba Customer Support Department. Macintosh computers are supported. Other Microsoft Internet Explorer 5.5 or later*4, ...Microsoft Direct-X 9 or later *1: In each case, only PCs with 1024 ✕ 768 or better and 16-bit High Color or better (True Color recommended) Interfaces USB 1.1*2 or USB 2.0 installed in the PC (USB...
...with pre-installed operating systems are not supported. For the latest drive information, contact a Toshiba Customer Service Department or Toshiba Customer Support Department. Macintosh computers are supported. Other Microsoft Internet Explorer 5.5 or later*4, ...Microsoft Direct-X 9 or later *1: In each case, only PCs with 1024 ✕ 768 or better and 16-bit High Color or better (True Color recommended) Interfaces USB 1.1*2 or USB 2.0 installed in the PC (USB...
Owners Manual
Page 160
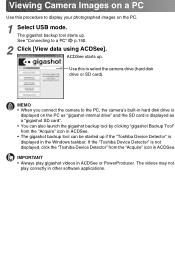
...PowerProducer. The gigashot backup tool starts up . Use this procedure to select the camera drive (hard disk drive or SD card). If the "Toshiba Device Detector" is displayed in other software applications. ACDSee starts up . See "Connecting to the PC, the camera's built-in hard disk ...drive is displayed on the PC. 1 Select USB mode. MEMO • When you connect the camera to a PC" p.150. 2 Click [View data using ACDSee]. IMPORTANT • Always play correctly ...
...PowerProducer. The gigashot backup tool starts up . Use this procedure to select the camera drive (hard disk drive or SD card). If the "Toshiba Device Detector" is displayed in other software applications. ACDSee starts up . See "Connecting to the PC, the camera's built-in hard disk ...drive is displayed on the PC. 1 Select USB mode. MEMO • When you connect the camera to a PC" p.150. 2 Click [View data using ACDSee]. IMPORTANT • Always play correctly ...
Owners Manual
Page 162
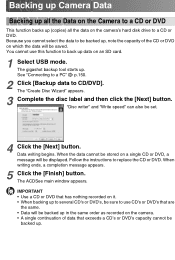
... CD or DVD. Follow the instructions to CD/DVD]. The ACDSee main window appears. When the data cannot be stored on an SD card. 1 Select USB mode. Data writing begins. Because you cannot select the data to be backed up, note the capacity of data that exceeds a CD's or DVD's capacity...
... CD or DVD. Follow the instructions to CD/DVD]. The ACDSee main window appears. When the data cannot be stored on an SD card. 1 Select USB mode. Data writing begins. Because you cannot select the data to be backed up, note the capacity of data that exceeds a CD's or DVD's capacity...
Owners Manual
Page 163
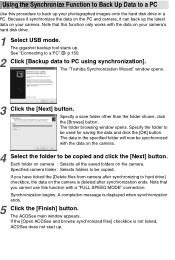
... data and click the [OK] button. Note that this procedure to back up . The folder browsing window opens. Specify the folder to be copied. The "Toshiba Synchronization Wizard" window opens. 3 Click the [Next] button. Synchronization begins. Note that you have ticked the [Delete files from camera after synchronizing to hard drive... function only works with the data on the camera. 4 Select the folder to be synchronized with the data on your camera's hard disk drive. 1 Select USB mode.
... data and click the [OK] button. Note that this procedure to back up . The folder browsing window opens. Specify the folder to be copied. The "Toshiba Synchronization Wizard" window opens. 3 Click the [Next] button. Synchronization begins. Note that you have ticked the [Delete files from camera after synchronizing to hard drive... function only works with the data on the camera. 4 Select the folder to be synchronized with the data on your camera's hard disk drive. 1 Select USB mode.
Owners Manual
Page 164
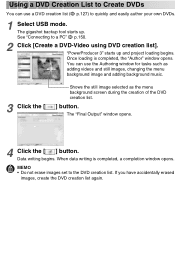
... creation list. Using a DVD Creation List to Create DVDs You can use a DVD creation list ( p.127) to quickly and easily author your own DVDs. 1 Select USB mode. The gigashot backup tool starts up and project loading begins.
... creation list. Using a DVD Creation List to Create DVDs You can use a DVD creation list ( p.127) to quickly and easily author your own DVDs. 1 Select USB mode. The gigashot backup tool starts up and project loading begins.
Owners Manual
Page 165
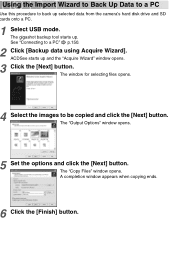
... window for selecting files opens. 4 Select the images to back up selected data from the camera's hard disk drive and SD cards onto a PC. 1 Select USB mode. A completion window appears when copying ends. 6 Click the [Finish] button. Using the Import Wizard to Back Up Data to a PC Use this procedure to...
... window for selecting files opens. 4 Select the images to back up selected data from the camera's hard disk drive and SD cards onto a PC. 1 Select USB mode. A completion window appears when copying ends. 6 Click the [Finish] button. Using the Import Wizard to Back Up Data to a PC Use this procedure to...
Owners Manual
Page 168
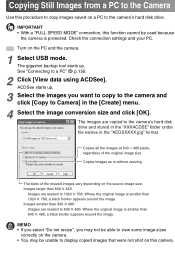
... around the image. Copying Still Images from a PC to the Camera Use this procedure to copy images saved on the PC and the camera. 1 Select USB mode. Images larger than 640 ✕ 480, a black border appears around the image. Where the original image is smaller than 640 ✕ 480 Images are...
... around the image. Copying Still Images from a PC to the Camera Use this procedure to copy images saved on the PC and the camera. 1 Select USB mode. Images larger than 640 ✕ 480, a black border appears around the image. Where the original image is smaller than 640 ✕ 480 Images are...
Owners Manual
Page 169
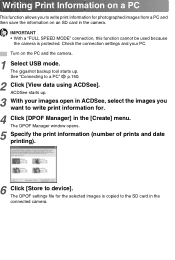
... camera. ACDSee starts up . The DPOF settings file for photographed images from a PC and then save the information on the PC and the camera. 1 Select USB mode. Turn on an SD card in ACDSee, select the images you to device]. IMPORTANT • With a "FULL SPEED MODE" connection, this function cannot be...
... camera. ACDSee starts up . The DPOF settings file for photographed images from a PC and then save the information on the PC and the camera. 1 Select USB mode. Turn on an SD card in ACDSee, select the images you to device]. IMPORTANT • With a "FULL SPEED MODE" connection, this function cannot be...
Owners Manual
Page 181
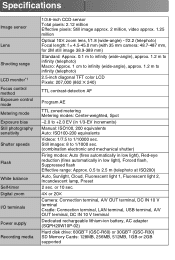
...; or 20✕ Camera: Connection terminal, A/V OUT terminal, DC IN 10 V terminal Cradle: Connection terminal, LAN terminal, USB terminal, A/V OUT terminal, DC IN 10 V terminal Dedicated rechargeable lithium-ion battery, AC adapter (SQPH20W10P-02) Hard disk drive: 60GB*2 (GSC-R60) or 30GB*2 (GSC-R30) SD Memory Cards: 128MB, 256MB, 512MB, 1GB or 2GB supported
...; or 20✕ Camera: Connection terminal, A/V OUT terminal, DC IN 10 V terminal Cradle: Connection terminal, LAN terminal, USB terminal, A/V OUT terminal, DC IN 10 V terminal Dedicated rechargeable lithium-ion battery, AC adapter (SQPH20W10P-02) Hard disk drive: 60GB*2 (GSC-R60) or 30GB*2 (GSC-R30) SD Memory Cards: 128MB, 256MB, 512MB, 1GB or 2GB supported
