Toshiba User's Guide for Qosmio G50/G55
Page 5
... page or on the first page of this computer. 5 Connection to party line service is subject to permanently disconnect your modem from its present line, please call the telephone company and let them to make any person to the fax software instructions installed on this change. If trouble is experienced with the FCC if you disconnect the equipment...
... page or on the first page of this computer. 5 Connection to party line service is subject to permanently disconnect your modem from its present line, please call the telephone company and let them to make any person to the fax software instructions installed on this change. If trouble is experienced with the FCC if you disconnect the equipment...

Toshiba User's Guide for Qosmio G50/G55
Page 29
... time 49 Opening the display panel 49 Your computer's features and specifications ....50 Turning on the power 50 Adding memory (optional 51 Installing a memory module 52 Removing a memory module 57 Checking total memory 59 Using the TouchPad 60 Scrolling with the TouchPad 60 Control buttons 60 Disabling or enabling the TouchPad 61 Using external display devices 61 Connecting the display device 61 Directing the display output when you turn on the computer 64 Adjusting the quality of the external display......65 Using an external keyboard 65 Using a mouse 65 Connecting a printer...
... time 49 Opening the display panel 49 Your computer's features and specifications ....50 Turning on the power 50 Adding memory (optional 51 Installing a memory module 52 Removing a memory module 57 Checking total memory 59 Using the TouchPad 60 Scrolling with the TouchPad 60 Control buttons 60 Disabling or enabling the TouchPad 61 Using external display devices 61 Connecting the display device 61 Directing the display output when you turn on the computer 64 Adjusting the quality of the external display......65 Using an external keyboard 65 Using a mouse 65 Connecting a printer...

Toshiba User's Guide for Qosmio G50/G55
Page 52
Installing a memory module with the computer's power on the base of the computer. If you install or remove a memory module, turn off the computer using the Start menu. The surrounding area may also be lost. Avoid touching the cover, the module, and the surrounding area before replacing it must be installed in the memory module slots on may be installed in slot A. NOTE For this procedure. The computer has two memory slots-Slot A and Slot B. You can...
Installing a memory module with the computer's power on the base of the computer. If you install or remove a memory module, turn off the computer using the Start menu. The surrounding area may also be lost. Avoid touching the cover, the module, and the surrounding area before replacing it must be installed in the memory module slots on may be installed in slot A. NOTE For this procedure. The computer has two memory slots-Slot A and Slot B. You can...

Toshiba User's Guide for Qosmio G50/G55
Page 57
... the operating system has loaded, you need to remove a memory module: 1 Complete steps 1-8 in "Installing a memory module" on page 52 to shut down the computer and open the memory module slot cover. Getting Started 57 Adding memory (optional) 14 Replace the memory module slot cover and secure it correctly as described in "Checking total memory" on page 59. For more information on inserting the main battery, see "Inserting a charged battery" on page 108. 16 Turn the...
... the operating system has loaded, you need to remove a memory module: 1 Complete steps 1-8 in "Installing a memory module" on page 52 to shut down the computer and open the memory module slot cover. Getting Started 57 Adding memory (optional) 14 Replace the memory module slot cover and secure it correctly as described in "Checking total memory" on page 59. For more information on inserting the main battery, see "Inserting a charged battery" on page 108. 16 Turn the...

Toshiba User's Guide for Qosmio G50/G55
Page 59
... memory configuration, turn off the computer and remove the memory module slot cover (complete steps 1-8 in "Installing a memory module" on page 108. 6 Turn the computer right side up. 7 Reconnect the cables. 8 Restart the computer. Getting Started 59 Adding memory (optional) 4 Replace the memory module slot cover and secure it using the screw. 5 Re-insert the main battery. The System window appears. 2 The total memory is a security feature to work. This is displayed below the System heading under Memory (RAM...
... memory configuration, turn off the computer and remove the memory module slot cover (complete steps 1-8 in "Installing a memory module" on page 108. 6 Turn the computer right side up. 7 Reconnect the cables. 8 Restart the computer. Getting Started 59 Adding memory (optional) 4 Replace the memory module slot cover and secure it using the screw. 5 Re-insert the main battery. The System window appears. 2 The total memory is a security feature to work. This is displayed below the System heading under Memory (RAM...

Toshiba User's Guide for Qosmio G50/G55
Page 61
... or VCR/DVD player" on page 62. If you must purchase an HDMI cable. Getting Started 61 Using external display devices Disabling or enabling the TouchPad™ The TouchPad™ is enabled by default. This hot key enables/disables the TouchPad. Selecting video cables To connect a device to the HDMI™ Out port, you are connecting a television or other video display device to the computer's HDMI™ Out port, refer to "Connecting an external monitor or projector" on page 201. To change the enable/disable TouchPad setting, press Fn...
... or VCR/DVD player" on page 62. If you must purchase an HDMI cable. Getting Started 61 Using external display devices Disabling or enabling the TouchPad™ The TouchPad™ is enabled by default. This hot key enables/disables the TouchPad. Selecting video cables To connect a device to the HDMI™ Out port, you are connecting a television or other video display device to the computer's HDMI™ Out port, refer to "Connecting an external monitor or projector" on page 201. To change the enable/disable TouchPad setting, press Fn...

Toshiba User's Guide for Qosmio G50/G55
Page 62
... cable to a TV using HDMI™-CEC (Available on certain models) HDMI™-CEC (Consumer Electronics Control) is selected using the Fn+F5 key. ❖ Switch the video output (HDMI or LCD) when executing certain desktop icons. ❖ Enable/Disable the HDMI-CEC function on the TV when the HDMI output is a standard in speakers. Connecting the sound to work together over an HDMI cable. Your computer will automatically detect the external display device and activate a screen...
... cable to a TV using HDMI™-CEC (Available on certain models) HDMI™-CEC (Consumer Electronics Control) is selected using the Fn+F5 key. ❖ Switch the video output (HDMI or LCD) when executing certain desktop icons. ❖ Enable/Disable the HDMI-CEC function on the TV when the HDMI output is a standard in speakers. Connecting the sound to work together over an HDMI cable. Your computer will automatically detect the external display device and activate a screen...
Toshiba User's Guide for Qosmio G50/G55
Page 138
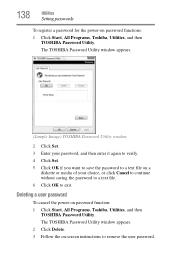
... -screen instructions to remove the user password. The TOSHIBA Password Utility window appears. 2 Click Delete. 3 Follow the on password function: 1 Click Start, All Programs, Toshiba, Utilities, and then TOSHIBA Password Utility. 138 Utilities Setting passwords To register a password for the power-on a diskette or media of your password, and then enter it again to verify. 4 Click Set. 5 Click OK if you want to save the password to a text file on password functions: 1 Click Start, All Programs, Toshiba, Utilities, and then TOSHIBA Password Utility. The TOSHIBA Password Utility window...
... -screen instructions to remove the user password. The TOSHIBA Password Utility window appears. 2 Click Delete. 3 Follow the on password function: 1 Click Start, All Programs, Toshiba, Utilities, and then TOSHIBA Password Utility. 138 Utilities Setting passwords To register a password for the power-on a diskette or media of your password, and then enter it again to verify. 4 Click Set. 5 Click OK if you want to save the password to a text file on password functions: 1 Click Start, All Programs, Toshiba, Utilities, and then TOSHIBA Password Utility. The TOSHIBA Password Utility window...

Toshiba User's Guide for Qosmio G50/G55
Page 145
...USB Sleep and Charge function Settings-The default setting is Enabled in TOSHIBA Hardware Setup, the "USB Wakeup function" does not work . Setting item: Enabled (Mode-1) -- Disables the function USB Wakeup function-This function restores the computer from Sleep Mode depending on the USB tab. To change the setting to the USB ports. Enables the function Disabled (Default) -- The "USB Wakeup function" will become default settings when you want to use , set the setting to Mode-2. Some external devices may not be disabled. By changing any of this function in Enabled...
...USB Sleep and Charge function Settings-The default setting is Enabled in TOSHIBA Hardware Setup, the "USB Wakeup function" does not work . Setting item: Enabled (Mode-1) -- Disables the function USB Wakeup function-This function restores the computer from Sleep Mode depending on the USB tab. To change the setting to the USB ports. Enables the function Disabled (Default) -- The "USB Wakeup function" will become default settings when you want to use , set the setting to Mode-2. Some external devices may not be disabled. By changing any of this function in Enabled...
Toshiba User's Guide for Qosmio G50/G55
Page 161
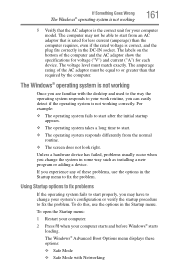
Using Startup options to fix problems If the operating system fails to start properly, you can easily detect if the operating system is not working 161 5 Verify that the AC adaptor is correct, and the plug fits correctly in the Startup menu to fix the problem. The Windows® Advanced Boot Options menu displays these problems, use the options in some way such as installing a new program or adding a device. The computer may have to...
Using Startup options to fix problems If the operating system fails to start properly, you can easily detect if the operating system is not working 161 5 Verify that the AC adaptor is correct, and the plug fits correctly in the Startup menu to fix the problem. The Windows® Advanced Boot Options menu displays these problems, use the options in some way such as installing a new program or adding a device. The computer may have to...

Toshiba User's Guide for Qosmio G50/G55
Page 165
... device to another. This tab also provides options for these first: 1 Click Start, and then click the arrow next to the Lock button in "Installing a memory module" on page 52, and making sure the module is causing a problem. If Something Goes Wrong Resolving a hardware conflict 165 ❖ The Resources tab, which lists resources assigned to the monitor, optional external optical drive, optional external diskette drive, and other power-using resources. ❖ The Driver...
... device to another. This tab also provides options for these first: 1 Click Start, and then click the arrow next to the Lock button in "Installing a memory module" on page 52, and making sure the module is causing a problem. If Something Goes Wrong Resolving a hardware conflict 165 ❖ The Resources tab, which lists resources assigned to the monitor, optional external optical drive, optional external diskette drive, and other power-using resources. ❖ The Driver...

Toshiba User's Guide for Qosmio G50/G55
Page 168
... a hardware conflict Display problems Here are some typical display problems and their solutions: The screen is registered, press any key to activate the screen. You may have registered a password, press any key, type the password and press Enter. If you have gone into a working . This opens the Personalization window. Click Display settings to the computer is firmly attached. ❖ Try adjusting the contrast and brightness controls on . ❖ Check that the monitor's power cord/cable...
... a hardware conflict Display problems Here are some typical display problems and their solutions: The screen is registered, press any key to activate the screen. You may have registered a password, press any key, type the password and press Enter. If you have gone into a working . This opens the Personalization window. Click Display settings to the computer is firmly attached. ❖ Try adjusting the contrast and brightness controls on . ❖ Check that the monitor's power cord/cable...
Toshiba User's Guide for Qosmio G50/G55
Page 176
... a dial tone. Try making a test transmission to check this. Connect a telephone handset to the line to someone else. 176 If Something Goes Wrong Resolving a hardware conflict Modem problems (Available on certain models) This section lists common modem problems. The modem will be lit). ❖ Verify that the Wireless antenna ON/OFF switch is ON (the wireless indicator light will not receive or...
... a dial tone. Try making a test transmission to check this. Connect a telephone handset to the line to someone else. 176 If Something Goes Wrong Resolving a hardware conflict Modem problems (Available on certain models) This section lists common modem problems. The modem will be lit). ❖ Verify that the Wireless antenna ON/OFF switch is ON (the wireless indicator light will not receive or...

Toshiba User's Guide for Qosmio G50/G55
Page 184
..., creating Restore Points immediately before connecting a new hardware item to the computer. Always carefully follow directions carefully! Change the setting to Enabled. ❖ Some external devices may not be able to use the "USB Sleep and Charge function." (Available on certain models). ❖ Do not guess-follow the installation instructions that the installation is often necessary to run an installation utility first-before each installation, even if the installation utility does not prompt you need...
..., creating Restore Points immediately before connecting a new hardware item to the computer. Always carefully follow directions carefully! Change the setting to Enabled. ❖ Some external devices may not be able to use the "USB Sleep and Charge function." (Available on certain models). ❖ Do not guess-follow the installation instructions that the installation is often necessary to run an installation utility first-before each installation, even if the installation utility does not prompt you need...

Toshiba User's Guide for Qosmio G50/G55
Page 213
... installed on the network. interlaced - Interlaced monitors take two passes to interact with the Fn key can set system options or control system parameters, such as a mouse. Compare non-interlaced. The decentralized, world-wide network of using a pointing device such as the battery save mode. (2) A key or combination of computers or other line of many Toshiba computers that enables any other services. See also World Wide Web. K keyboard...
... installed on the network. interlaced - Interlaced monitors take two passes to interact with the Fn key can set system options or control system parameters, such as a mouse. Compare non-interlaced. The decentralized, world-wide network of using a pointing device such as the battery save mode. (2) A key or combination of computers or other line of many Toshiba computers that enables any other services. See also World Wide Web. K keyboard...

Toshiba User's Guide for Qosmio G50/G55
Page 219
... battery changing 106 charge indicator light 48, 100 charge not lasting 167 charging 46, 48 conserving power 103 disposal 111 low charge 102 monitoring power 48, 100 not charging 166 notifications 102 power plan 195 power plan hot key 105 real-time clock (RTC) 97 removing 106 BIOS Setup see TOSHIBA Hardware Setup Bridge Media Adapter inserting memory media 125 removing memory media 126 button power 51 start 115 C CD, using 89 character keys 82 charging the battery 48 checking device properties 164 click 60 communications network connection 117 set...
... battery changing 106 charge indicator light 48, 100 charge not lasting 167 charging 46, 48 conserving power 103 disposal 111 low charge 102 monitoring power 48, 100 not charging 166 notifications 102 power plan 195 power plan hot key 105 real-time clock (RTC) 97 removing 106 BIOS Setup see TOSHIBA Hardware Setup Bridge Media Adapter inserting memory media 125 removing memory media 126 button power 51 start 115 C CD, using 89 character keys 82 charging the battery 48 checking device properties 164 click 60 communications network connection 117 set...

Toshiba User's Guide for Qosmio G50/G55
Page 220
... connecting to a power source 46 connection set up 117 control buttons 60 Ctrl keys 82 D desktop creating new icon 114 major features 114 desktop exploration 113 desktop icons 114 Device Manager 164 checking properties 164 devices keyboard 65 mouse 65 Disk Defragmenter 170 disk drive corrupted/damaged data files 171 missing files/trouble accessing a disk 170 running slow 170 diskette drive cannot insert a diskette 171 cannot read a diskette 171 connecting 67 external, connecting 67 display...
... connecting to a power source 46 connection set up 117 control buttons 60 Ctrl keys 82 D desktop creating new icon 114 major features 114 desktop exploration 113 desktop icons 114 Device Manager 164 checking properties 164 devices keyboard 65 mouse 65 Disk Defragmenter 170 disk drive corrupted/damaged data files 171 missing files/trouble accessing a disk 170 running slow 170 diskette drive cannot insert a diskette 171 cannot read a diskette 171 connecting 67 external, connecting 67 display...

Toshiba User's Guide for Qosmio G50/G55
Page 221
... configuring 72 starting again from 74 hot key display brightness 199 Hibernation mode 197 keyboard overlays 203 Lock (Instant security) 194 Output (Display switch) 198 power plan 195 Sleep mode 196 volume mute 193 Zoom (Display resolution) 202 zooming 203 Hot Key Cards 189 Hot key functions 193 hot key power plan 105 http 119 I i.LINK port 126 icon 114 desktop 114 moving to desktop 114 recycle bin 114 safety 38 installation memory module 52 installing memory modules 51 mouse 65 instant passwords, using 135 Internet...
... configuring 72 starting again from 74 hot key display brightness 199 Hibernation mode 197 keyboard overlays 203 Lock (Instant security) 194 Output (Display switch) 198 power plan 195 Sleep mode 196 volume mute 193 Zoom (Display resolution) 202 zooming 203 Hot Key Cards 189 Hot key functions 193 hot key power plan 105 http 119 I i.LINK port 126 icon 114 desktop 114 moving to desktop 114 recycle bin 114 safety 38 installation memory module 52 installing memory modules 51 mouse 65 instant passwords, using 135 Internet...
Toshiba User's Guide for Qosmio G50/G55
Page 222
...Index troubleshooting 167 using 82 keyboard, external 65 L lock computer, using 78 M main battery removing 106 memory adding 51 problem solving 165 removing memory module slot cover 54 memory module inserting 55 installation 52 removing 58 memory module slot 54 microphone 121 modem connecting to telephone line 117 problem solving 176 monitor 61 connecting 61, 63 not working 168 mouse installing 65 mouse utility 141 N network accessing 117 Connect to the Internet 117 networking wireless 116 Notification Area 115 O Opening the display panel 49 optical disc positioning 92 optical discs handling...
...Index troubleshooting 167 using 82 keyboard, external 65 L lock computer, using 78 M main battery removing 106 memory adding 51 problem solving 165 removing memory module slot cover 54 memory module inserting 55 installation 52 removing 58 memory module slot 54 microphone 121 modem connecting to telephone line 117 problem solving 176 monitor 61 connecting 61, 63 not working 168 mouse installing 65 mouse utility 141 N network accessing 117 Connect to the Internet 117 networking wireless 116 Notification Area 115 O Opening the display panel 49 optical disc positioning 92 optical discs handling...

Toshiba User's Guide for Qosmio G50/G55
Page 224
... connecting to modem 117 television adjusting display 65 connecting 61 Toshiba registering computer 45 worldwide offices 187 TOSHIBA Assist 130 TOSHIBA Hardware Setup 142 Toshiba online resources 95 Toshiba Quad Core HD Processor 127 traveling tips 112 troubleshooting DVD player general problems 179 external keyboard 167 keyboard 167 optical drive 171 turning on the computer 50 turning on the power 50 U user password, disabling 138 user password, setting 137 using 121 using a file extension 87 Utilities 129 V video cables 61 video display device connecting 61 video projector adjusting display...
... connecting to modem 117 television adjusting display 65 connecting 61 Toshiba registering computer 45 worldwide offices 187 TOSHIBA Assist 130 TOSHIBA Hardware Setup 142 Toshiba online resources 95 Toshiba Quad Core HD Processor 127 traveling tips 112 troubleshooting DVD player general problems 179 external keyboard 167 keyboard 167 optical drive 171 turning on the computer 50 turning on the power 50 U user password, disabling 138 user password, setting 137 using 121 using a file extension 87 Utilities 129 V video cables 61 video display device connecting 61 video projector adjusting display...


