User Guide
Page 5
... discontinuance of service may occasionally be a 900 number or any other electronic device, including Fax machines, to send any message unless such message clearly contains in a margin at (949) 859-4273. Disconnection If you should ever decide to make any person to use a computer or other number for which charges exceed local or long-distance transmission charges.) In order to...
... discontinuance of service may occasionally be a 900 number or any other electronic device, including Fax machines, to send any message unless such message clearly contains in a margin at (949) 859-4273. Disconnection If you should ever decide to make any person to use a computer or other number for which charges exceed local or long-distance transmission charges.) In order to...
User Guide
Page 33
... you contact Toshiba 204 Contacting Toshiba 204 Other Toshiba Internet Web sites 205 Toshiba's worldwide offices 206 Appendix A: Hot Keys/TOSHIBA Cards 208 Hot Key Cards 208 Using the Hot Key Cards 209 Application Cards 210 Using the Application Cards 211 Card Case 211 Hot key functions 212 Volume Mute 213 Password security 214 Power plan 215 Sleep mode 216 Hibernation mode 217 Display modes 218 Display brightness 219 Disabling or enabling wireless devices............220 Disabling or enabling the TouchPad 221 Changing screen resolution 222 Keyboard hot key functions 223
... you contact Toshiba 204 Contacting Toshiba 204 Other Toshiba Internet Web sites 205 Toshiba's worldwide offices 206 Appendix A: Hot Keys/TOSHIBA Cards 208 Hot Key Cards 208 Using the Hot Key Cards 209 Application Cards 210 Using the Application Cards 211 Card Case 211 Hot key functions 212 Volume Mute 213 Password security 214 Power plan 215 Sleep mode 216 Hibernation mode 217 Display modes 218 Display brightness 219 Disabling or enabling wireless devices............220 Disabling or enabling the TouchPad 221 Changing screen resolution 222 Keyboard hot key functions 223
User Guide
Page 50
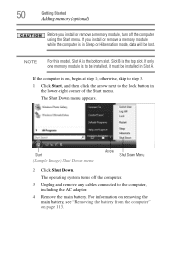
... Down menu Arrow Shut Down Menu 2 Click Shut Down. The operating system turns off the computer using the Start menu. 50 Getting Started Adding memory (optional) Before you install or remove a memory module while the computer is in Slot A. Slot B is on page 113. If you install or remove a memory module, turn off the computer. 3 Unplug and remove any cables connected to the lock button in the lower-right corner of the Start menu. If only one memory module is...
... Down menu Arrow Shut Down Menu 2 Click Shut Down. The operating system turns off the computer using the Start menu. 50 Getting Started Adding memory (optional) Before you install or remove a memory module while the computer is in Slot A. Slot B is on page 113. If you install or remove a memory module, turn off the computer. 3 Unplug and remove any cables connected to the lock button in the lower-right corner of the Start menu. If only one memory module is...
User Guide
Page 55
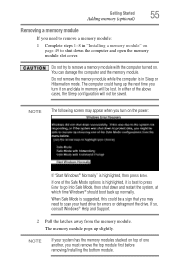
... away from the memory module. Do not try to go into Safe Mode, then shut down the computer and open the memory module slot cover. NOTE If your system has the memory modules stacked on top of one of the above cases, the Sleep configuration will be lost. The computer could be saved. Getting Started Adding memory (optional) 55 Removing a memory module If you turn on the power: If "Start Windows® Normally...
... away from the memory module. Do not try to go into Safe Mode, then shut down the computer and open the memory module slot cover. NOTE If your system has the memory modules stacked on top of one of the above cases, the Sleep configuration will be lost. The computer could be saved. Getting Started Adding memory (optional) 55 Removing a memory module If you turn on the power: If "Start Windows® Normally...
User Guide
Page 56
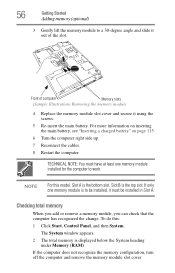
... the change. 56 Getting Started Adding memory (optional) 3 Gently lift the memory module to a 30-degree angle and slide it out of computer Memory slots (Sample Illustration) Removing the memory module 4 Replace the memory module slot cover and secure it must have at least one memory module is to work. TECHNICAL NOTE: You must be installed, it using the screws. 5 Re-insert the main battery. To do this model, Slot A is the bottom slot. Slot B is displayed...
... the change. 56 Getting Started Adding memory (optional) 3 Gently lift the memory module to a 30-degree angle and slide it out of computer Memory slots (Sample Illustration) Removing the memory module 4 Replace the memory module slot cover and secure it must have at least one memory module is to work. TECHNICAL NOTE: You must be installed, it using the screws. 5 Re-insert the main battery. To do this model, Slot A is the bottom slot. Slot B is displayed...
User Guide
Page 58
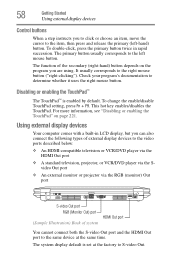
... enabled by default. This hot key enables/disables the TouchPad. Using external display devices Your computer comes with a built-in rapid succession. Disabling or enabling the TouchPad™ The TouchPad™ is set at the same time. 58 Getting Started Using external display devices Control buttons When a step instructs you are using. Check your program's documentation to S-video Out. To change the enable/disable TouchPad setting, press Fn + F9. To double-click, press the primary button twice in LCD display, but you can also connect...
... enabled by default. This hot key enables/disables the TouchPad. Using external display devices Your computer comes with a built-in rapid succession. Disabling or enabling the TouchPad™ The TouchPad™ is set at the same time. 58 Getting Started Using external display devices Control buttons When a step instructs you are using. Check your program's documentation to S-video Out. To change the enable/disable TouchPad setting, press Fn + F9. To double-click, press the primary button twice in LCD display, but you can also connect...
User Guide
Page 59
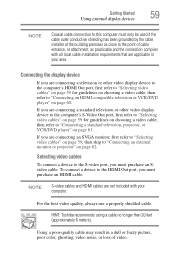
... on choosing a video cable, then refer to "Connecting a standard television, projector, or VCR/DVD player" on page 62. To connect a device to the HDMI Out port, you are connecting an SVGA monitor, first refer to "Selecting video cables" on page 59, then skip to "Connecting an external monitor or projector" on page 61. If you must purchase an Svideo cable. Getting Started Using external display devices 59 NOTE Coaxial cable connection to this...
... on choosing a video cable, then refer to "Connecting a standard television, projector, or VCR/DVD player" on page 62. To connect a device to the HDMI Out port, you are connecting an SVGA monitor, first refer to "Selecting video cables" on page 59, then skip to "Connecting an external monitor or projector" on page 61. If you must purchase an Svideo cable. Getting Started Using external display devices 59 NOTE Coaxial cable connection to this...

User Guide
Page 60
... two ways: ❖ Using the headphone jack on the side of the computer-This lets you connect directly to the manual that supports input from your computer. You can accept the digital optical signal from a headphone output. Choose the settings you can connect to a sound system that can connect the sound to external audio devices in speakers. Refer to headphones, powered speakers, or a stereo...
... two ways: ❖ Using the headphone jack on the side of the computer-This lets you connect directly to the manual that supports input from your computer. You can accept the digital optical signal from a headphone output. Choose the settings you can connect to a sound system that can connect the sound to external audio devices in speakers. Refer to headphones, powered speakers, or a stereo...
User Guide
Page 147
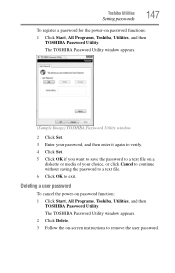
..., Toshiba, Utilities, and then TOSHIBA Password Utility. Deleting a user password To cancel the power-on password functions: 1 Click Start, All Programs, Toshiba, Utilities, and then TOSHIBA Password Utility. The TOSHIBA Password Utility window appears. 2 Click Delete. 3 Follow the on a diskette or media of your password, and then enter it again to verify. 4 Click Set. 5 Click OK if you want to save the password to a text file on -screen instructions to exit. The TOSHIBA Password Utility window appears. (Sample Image) TOSHIBA Password Utility window 2 Click Set. 3 Enter your...
..., Toshiba, Utilities, and then TOSHIBA Password Utility. Deleting a user password To cancel the power-on password functions: 1 Click Start, All Programs, Toshiba, Utilities, and then TOSHIBA Password Utility. The TOSHIBA Password Utility window appears. 2 Click Delete. 3 Follow the on a diskette or media of your password, and then enter it again to verify. 4 Click Set. 5 Click OK if you want to save the password to a text file on -screen instructions to exit. The TOSHIBA Password Utility window appears. (Sample Image) TOSHIBA Password Utility window 2 Click Set. 3 Enter your...
User Guide
Page 178
... system's configuration or verify the startup procedure to fix the problem. Using Startup options to fix problems If the operating system fails to start properly, you change your work routine, you experience any of these options: ❖ Safe Mode ❖ Safe Mode with Networking The Windows® operating system is not working Once you are familiar with the desktop and used to the way the operating system responds to change the system in the Startup menu. If...
... system's configuration or verify the startup procedure to fix the problem. Using Startup options to fix problems If the operating system fails to start properly, you change your work routine, you experience any of these options: ❖ Safe Mode ❖ Safe Mode with Networking The Windows® operating system is not working Once you are familiar with the desktop and used to the way the operating system responds to change the system in the Startup menu. If...
User Guide
Page 182
... to Windows® online Help. Memory problems Incorrectly connected or faulty memory modules may be hardware or even software related. TECHNICAL NOTE: You must have at least one memory module installed for updating the driver or rolling back the driver in the dialog box vary from one device to the monitor, optional external optical drive, optional external diskette drive, and other power-using functions. The tabs that seem to the Lock button in "Installing a memory module" on page 49, and making...
... to Windows® online Help. Memory problems Incorrectly connected or faulty memory modules may be hardware or even software related. TECHNICAL NOTE: You must have at least one memory module installed for updating the driver or rolling back the driver in the dialog box vary from one device to the monitor, optional external optical drive, optional external diskette drive, and other power-using functions. The tabs that seem to the Lock button in "Installing a memory module" on page 49, and making...
User Guide
Page 185
... (once). Display problems Here are using an external monitor: ❖ Check that the monitor is turned on. ❖ Check that the cable connecting the external monitor to the computer is firmly attached. ❖ Try adjusting the contrast and brightness controls on the external monitor. ❖ Press Fn and F5 simultaneously to make sure the display priority is not set for the built-in the lower-right part of the Start menu. If...
... (once). Display problems Here are using an external monitor: ❖ Check that the monitor is turned on. ❖ Check that the cable connecting the external monitor to the computer is firmly attached. ❖ Try adjusting the contrast and brightness controls on the external monitor. ❖ Press Fn and F5 simultaneously to make sure the display priority is not set for the built-in the lower-right part of the Start menu. If...

User Guide
Page 195
... software manufacturer for networking problems, specifically wireless (Wi-Fi®) networking. It should be set up to check this. If Something Goes Wrong Resolving a hardware conflict 195 This mode lets you are referring to the computer's modem port and the telephone line jack. Connect a telephone handset to the line to transmit at pcsupport.toshiba.com. The terms and concepts used assume a basic understanding of networks...
... software manufacturer for networking problems, specifically wireless (Wi-Fi®) networking. It should be set up to check this. If Something Goes Wrong Resolving a hardware conflict 195 This mode lets you are referring to the computer's modem port and the telephone line jack. Connect a telephone handset to the line to transmit at pcsupport.toshiba.com. The terms and concepts used assume a basic understanding of networks...
User Guide
Page 233
... to add or remove devices from a storage device (such as the battery save mode. (2) A key or combination of display that activates a memory resident program. Compare non-interlaced. liquid crystal display (LCD) - A type of keys that uses a liquid substance between two transparent electrode panels. The decentralized, world-wide network of computers that enables any device to interact with the Fn key can set system options or control system parameters, such as a hard disk) into the...
... to add or remove devices from a storage device (such as the battery save mode. (2) A key or combination of display that activates a memory resident program. Compare non-interlaced. liquid crystal display (LCD) - A type of keys that uses a liquid substance between two transparent electrode panels. The decentralized, world-wide network of computers that enables any device to interact with the Fn key can set system options or control system parameters, such as a hard disk) into the...
User Guide
Page 239
... 80 battery changing 113 charge indicator light 46, 107 charge not lasting 184 charging 44, 46 conserving power 110 disposal 117 low charge 109 monitoring power 46, 107 not charging 183 notification 110 power plan 215 power plan hot key 112 real-time clock (RTC) 104 removing 113 BIOS Setup see Toshiba Hardware Setup Bridge Media Adapter inserting memory media 135 removing memory media 136 button power 48 start 122 C CD creating 100 playing an audio 99 CD, using 93 character keys 81 charging the battery 46 checking device...
... 80 battery changing 113 charge indicator light 46, 107 charge not lasting 184 charging 44, 46 conserving power 110 disposal 117 low charge 109 monitoring power 46, 107 not charging 183 notification 110 power plan 215 power plan hot key 112 real-time clock (RTC) 104 removing 113 BIOS Setup see Toshiba Hardware Setup Bridge Media Adapter inserting memory media 135 removing memory media 136 button power 48 start 122 C CD creating 100 playing an audio 99 CD, using 93 character keys 81 charging the battery 46 checking device...
User Guide
Page 240
... on battery power 103 setting up 42, 50 warning resume failure message 176 computer lock 77 computing tips 79 connecting to a power source 44 connection set up 126 control buttons 58 Ctrl keys 82 D desktop creating new icon 121 major features 121 desktop exploration 120 desktop icons 121 Device Manager 181 checking properties 181 devices keyboard 64 mouse 64 Disk Defragmenter 188 disk drive corrupted/damaged data files 188 missing files/trouble accessing a disk...
... on battery power 103 setting up 42, 50 warning resume failure message 176 computer lock 77 computing tips 79 connecting to a power source 44 connection set up 126 control buttons 58 Ctrl keys 82 D desktop creating new icon 121 major features 121 desktop exploration 120 desktop icons 121 Device Manager 181 checking properties 181 devices keyboard 64 mouse 64 Disk Defragmenter 188 disk drive corrupted/damaged data files 188 missing files/trouble accessing a disk...
User Guide
Page 241
... Support Windows® operating system 180 Hibernation mode 67 configuring 71 starting again from 73 hot key display brightness 219 display modes 218 Hibernation mode 217 keyboard overlays 223 password security 214 power plan 215 Sleep mode 216 volume mute 213 zooming 223 Hot Key Cards 208 hot key power plan 112 http 128 I i.LINK port 137 icon 121 desktop 121 Internet Explorer 121 moving to desktop 121 recycle bin 121 safety 37 installation memory module 49 installing memory modules 49 mouse 64 instant passwords, using...
... Support Windows® operating system 180 Hibernation mode 67 configuring 71 starting again from 73 hot key display brightness 219 display modes 218 Hibernation mode 217 keyboard overlays 223 password security 214 power plan 215 Sleep mode 216 volume mute 213 zooming 223 Hot Key Cards 208 hot key power plan 112 http 128 I i.LINK port 137 icon 121 desktop 121 Internet Explorer 121 moving to desktop 121 recycle bin 121 safety 37 installation memory module 49 installing memory modules 49 mouse 64 instant passwords, using...
User Guide
Page 242
... L lock computer, using 77 M main battery removing 113 memory adding 49 problem solving 182 removing expansion slot cover 51 memory module inserting 52 installation 49 removing 56 microphone 130 modem connecting to telephone line 124 determining COM port 123 problem solving 195 resetting port to default settings 123 upgrading 123 monitor 58 connecting 59, 62 not working 185 mouse installing 64 serial 64 mouse utility 153 N network accessing 125 Dial-Up Networking Wizard 125 networking wireless 127 Notification Area 122 O opening the display panel 47 optical drive problems 188 troubleshooting...
... L lock computer, using 77 M main battery removing 113 memory adding 49 problem solving 182 removing expansion slot cover 51 memory module inserting 52 installation 49 removing 56 microphone 130 modem connecting to telephone line 124 determining COM port 123 problem solving 195 resetting port to default settings 123 upgrading 123 monitor 58 connecting 59, 62 not working 185 mouse installing 64 serial 64 mouse utility 153 N network accessing 125 Dial-Up Networking Wizard 125 networking wireless 127 Notification Area 122 O opening the display panel 47 optical drive problems 188 troubleshooting...
User Guide
Page 243
... battery charge does not last 184 battery not charging 183 cannot insert diskette in drive 188 cannot read a diskette 188 changing display properties 186 checking device properties 181 computer hangs when PC Card inserted 191, 193 computer will not power up 175 contacting Toshiba 204 corrupted/damaged data files 188 Device Manager 181 disk drive is slow 188 display is blank 185 external display not working 186 external monitor 185 faulty memory...
... battery charge does not last 184 battery not charging 183 cannot insert diskette in drive 188 cannot read a diskette 188 changing display properties 186 checking device properties 181 computer hangs when PC Card inserted 191, 193 computer will not power up 175 contacting Toshiba 204 corrupted/damaged data files 188 Device Manager 181 disk drive is slow 188 display is blank 185 external display not working 186 external monitor 185 faulty memory...
User Guide
Page 244
... S-video port cable selection 59 T Taskbar 122 telephone line connecting to modem 124 television connecting 59 Toshiba registering computer 43 worldwide offices 206 TOSHIBA Assist 139 Toshiba Hardware Setup 154 Toshiba online resources 102 Toshiba utilities 138 traveling tips 119 troubleshooting DVD player general problems 198 external keyboard 184 keyboard 184 keypad overlay 184 optical drive 188 turning on the computer 48 turning on the power 48 U user password, disabling 147 user password, setting 146 using a file extension 88 V video cables 59 video display device connecting...
... S-video port cable selection 59 T Taskbar 122 telephone line connecting to modem 124 television connecting 59 Toshiba registering computer 43 worldwide offices 206 TOSHIBA Assist 139 Toshiba Hardware Setup 154 Toshiba online resources 102 Toshiba utilities 138 traveling tips 119 troubleshooting DVD player general problems 198 external keyboard 184 keyboard 184 keypad overlay 184 optical drive 188 turning on the computer 48 turning on the power 48 U user password, disabling 147 user password, setting 146 using a file extension 88 V video cables 59 video display device connecting...


