User Guide
Page 12
...whether such product is under license. All other countries. Additional information may be obtained from a video provider licensed to preserving the environment, Toshiba supports various trade-in the United States and/or other countries. Blu-ray and Blu-ray Disc are registered trademarks of such marks ... Association. No license is a trademark of Sony Corporation. Bluetooth word mark and logos are trademarks or registered trademarks of Toshiba America Information Systems, Inc. Memory Stick, Memory Stick PRO, and Memory Stick PRO Duo are owned by the Bluetooth SIG, Inc.
...whether such product is under license. All other countries. Additional information may be obtained from a video provider licensed to preserving the environment, Toshiba supports various trade-in the United States and/or other countries. Blu-ray and Blu-ray Disc are registered trademarks of such marks ... Association. No license is a trademark of Sony Corporation. Bluetooth word mark and logos are trademarks or registered trademarks of Toshiba America Information Systems, Inc. Memory Stick, Memory Stick PRO, and Memory Stick PRO Duo are owned by the Bluetooth SIG, Inc.

User Guide
Page 14
14 Contents Adding optional external devices 30 Adding memory (optional 31 Installing a memory module 31 Removing a memory module 36 Checking total memory 38 Recovering the Internal Storage Drive 39 Recovering to out-of-box state (recommended recovery method 40 Recovering of factory default software with user's data ...
14 Contents Adding optional external devices 30 Adding memory (optional 31 Installing a memory module 31 Removing a memory module 36 Checking total memory 38 Recovering the Internal Storage Drive 39 Recovering to out-of-box state (recommended recovery method 40 Recovering of factory default software with user's data ...

User Guide
Page 16
... speakers or headphones..........100 Using the Web Camera 101 Using the Memory card reader 101 Inserting memory media 102 Removing memory media 103 Toshiba remote control 104 Using the Toshiba remote control 104 Chapter 5: Utilities 105 TOSHIBA Assist 106 Secure 107 Protect & Fix 108 Optimize 109 TOSHIBA Application Installer 110 Setting passwords 111 Using an instant password...
... speakers or headphones..........100 Using the Web Camera 101 Using the Memory card reader 101 Inserting memory media 102 Removing memory media 103 Toshiba remote control 104 Using the Toshiba remote control 104 Chapter 5: Utilities 105 TOSHIBA Assist 106 Secure 107 Protect & Fix 108 Optimize 109 TOSHIBA Application Installer 110 Setting passwords 111 Using an instant password...

User Guide
Page 17
.../Disabling USB Sleep and Charge......120 Power supply mode settings 120 USB Sleep and Music 121 TOSHIBA Button Support 122 TOSHIBA Accessibility 123 TOSHIBA eco Utility 124 TOSHIBA Service Station 125 TOSHIBA PC Health Monitor 125 Chapter 6: If Something Goes Wrong 127 Problems that are easy to ...problems 130 The Windows® operating system can help you 130 Fixing a problem with Device Manager 131 Checking device properties 131 Memory problems 132 Power and the battery 132 Keyboard problems 133 Display problems 133 Disk or storage drive problems 134 Error-checking 134...
.../Disabling USB Sleep and Charge......120 Power supply mode settings 120 USB Sleep and Music 121 TOSHIBA Button Support 122 TOSHIBA Accessibility 123 TOSHIBA eco Utility 124 TOSHIBA Service Station 125 TOSHIBA PC Health Monitor 125 Chapter 6: If Something Goes Wrong 127 Problems that are easy to ...problems 130 The Windows® operating system can help you 130 Fixing a problem with Device Manager 131 Checking device properties 131 Memory problems 132 Power and the battery 132 Keyboard problems 133 Display problems 133 Disk or storage drive problems 134 Error-checking 134...
User Guide
Page 26
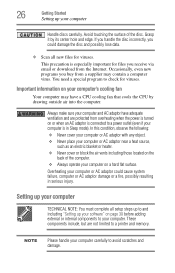
...). If you handle the disc incorrectly, you receive via email or download from a supplier may have adequate ventilation and are not limited to a printer and memory. In this condition, observe the following: ❖ Never cover your computer or AC adaptor with any object. ❖ Never place your computer or AC adaptor...
...). If you handle the disc incorrectly, you receive via email or download from a supplier may have adequate ventilation and are not limited to a printer and memory. In this condition, observe the following: ❖ Never cover your computer or AC adaptor with any object. ❖ Never place your computer or AC adaptor...

User Guide
Page 30
... according to your product. 30 Getting Started Registering your computer with Toshiba Product registration is strongly recommended, and allows Toshiba to send you through steps to set up the software. Product registration can be connected to : ❖ Add more memory (see "Adding memory (optional)" on page 31) ❖ Connect a local printer (see "Connecting a printer...
... according to your product. 30 Getting Started Registering your computer with Toshiba Product registration is strongly recommended, and allows Toshiba to send you through steps to set up the software. Product registration can be connected to : ❖ Add more memory (see "Adding memory (optional)" on page 31) ❖ Connect a local printer (see "Connecting a printer...

User Guide
Page 31
.... You will damage the computer, the module, or both. NOTE Before adding external devices, Toshiba recommends first setting up the software. The surrounding area may also be hot. Installing a memory module with your system or visit accessories.toshiba.com. Failure to run most of the computer. Always turn the computer's power off first...
.... You will damage the computer, the module, or both. NOTE Before adding external devices, Toshiba recommends first setting up the software. The surrounding area may also be hot. Installing a memory module with your system or visit accessories.toshiba.com. Failure to run most of the computer. Always turn the computer's power off first...
User Guide
Page 32
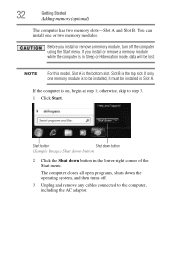
...2 Click the Shut down the operating system, and then turns off the computer using the Start menu. If only one or two memory modules. If you install or remove a memory module, turn off . 3 Unplug and remove any cables connected to step 3. 1 Click Start. Before you install or remove...computer is to be installed, it must be lost. otherwise, skip to the computer, including the AC adaptor. 32 Getting Started Adding memory (optional) The computer has two memory slots-Slot A and Slot B. The computer closes all open programs, shuts down button in Slot A. If the computer is on,...
...2 Click the Shut down the operating system, and then turns off the computer using the Start menu. If only one or two memory modules. If you install or remove a memory module, turn off . 3 Unplug and remove any cables connected to step 3. 1 Click Start. Before you install or remove...computer is to be installed, it must be lost. otherwise, skip to the computer, including the AC adaptor. 32 Getting Started Adding memory (optional) The computer has two memory slots-Slot A and Slot B. The computer closes all open programs, shuts down button in Slot A. If the computer is on,...

User Guide
Page 33
...installing the bottom module. Back of the computer. Grease or dust on page 36. NOTE If your system has the memory modules stacked on top of "Removing a memory module" on the connector may have built up. Before you handle the module, touch a grounded metal surface to ... without touching its connector. 8 Locate an empty memory module slot on the computer. Avoid touching the connector on the memory module or on the back of monitor Memory module slot cover (Sample Illustration) Removing the memory module slot cover 5 Remove the memory module slot cover. 6 Place the screw and ...
...installing the bottom module. Back of the computer. Grease or dust on page 36. NOTE If your system has the memory modules stacked on top of "Removing a memory module" on the connector may have built up. Before you handle the module, touch a grounded metal surface to ... without touching its connector. 8 Locate an empty memory module slot on the computer. Avoid touching the connector on the memory module or on the back of monitor Memory module slot cover (Sample Illustration) Removing the memory module slot cover 5 Remove the memory module slot cover. 6 Place the screw and ...

User Guide
Page 34
notch latch connector latch key (Sample Illustration) Aligning the memory module with the socket 10 Firmly press the memory module into the socket If only one memory module is to the horizontal surface of the computer). (Sample Illustration) Inserting the memory module into the memory slot's socket at approximately a 30-degree angle (to be installed...the module toward the socket, aligning the connector's notch with its sides, avoiding any contact with the matching key in Slot A. 9 Pick up the memory module by its connector. Slot B is the bottom slot. 34 Getting Started Adding...
notch latch connector latch key (Sample Illustration) Aligning the memory module with the socket 10 Firmly press the memory module into the socket If only one memory module is to the horizontal surface of the computer). (Sample Illustration) Inserting the memory module into the memory slot's socket at approximately a 30-degree angle (to be installed...the module toward the socket, aligning the connector's notch with its sides, avoiding any contact with the matching key in Slot A. 9 Pick up the memory module by its connector. Slot B is the bottom slot. 34 Getting Started Adding...

User Guide
Page 35
...completely inserted into the socket and level when secured in the side of the socket. The memory module should "snap" into the slot NOTE For this model, Slot A is the bottom slot. If only one memory module is to seat the module into the latches at the sides of the module. ...Slot B is the top slot. Slot B Slot A (Sample Illustration) Inserting the memory module into place securely with the corresponding cutouts in place. latch latch (Sample Illustration) Pressing down on the top edge of the module to be...
...completely inserted into the socket and level when secured in the side of the socket. The memory module should "snap" into the slot NOTE For this model, Slot A is the bottom slot. If only one memory module is to seat the module into the latches at the sides of the module. ...Slot B is the top slot. Slot B Slot A (Sample Illustration) Inserting the memory module into place securely with the corresponding cutouts in place. latch latch (Sample Illustration) Pressing down on the top edge of the module to be...

User Guide
Page 36
... you are protected from overheating when the power is turned on page 31 to shut down the computer and open the memory module slot cover. Do not try to remove a memory module with any object. ❖ Never place your computer or AC adaptor near a heat source, such as described in Sleep ... or block the air vents including those located on the back of the above cases, the Sleep configuration will be saved. Do not remove the memory module while the computer is in serious injury. 13 Reconnect the cables. 14 Restart the computer. TECHNICAL NOTE: You must have adequate ventilation and ...
... you are protected from overheating when the power is turned on page 31 to shut down the computer and open the memory module slot cover. Do not try to remove a memory module with any object. ❖ Never place your computer or AC adaptor near a heat source, such as described in Sleep ... or block the air vents including those located on the back of the above cases, the Sleep configuration will be saved. Do not remove the memory module while the computer is in serious injury. 13 Reconnect the cables. 14 Restart the computer. TECHNICAL NOTE: You must have adequate ventilation and ...
User Guide
Page 37
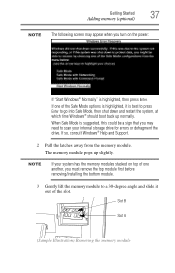
... the power: If "Start Windows® Normally" is best to press Enter to a 30-degree angle and slide it is highlighted, then press Enter. The memory module pops up normally. NOTE If your internal storage drive for errors or defragment the drive. If one another, you turn on top of one..., this could be a sign that you may appear when you must remove the top module first before removing/installing the bottom module. 3 Gently lift the memory module to go into Safe Mode, then shut down and restart the system, at which time Windows® should boot back up slightly.
... the power: If "Start Windows® Normally" is best to press Enter to a 30-degree angle and slide it is highlighted, then press Enter. The memory module pops up normally. NOTE If your internal storage drive for errors or defragment the drive. If one another, you turn on top of one..., this could be a sign that you may appear when you must remove the top module first before removing/installing the bottom module. 3 Gently lift the memory module to go into Safe Mode, then shut down and restart the system, at which time Windows® should boot back up slightly.
User Guide
Page 38
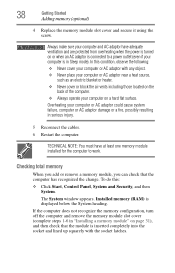
... your computer or AC adaptor could cause system failure, computer or AC adaptor damage or a fire, possibly resulting in Sleep mode). Installed memory (RAM) is inserted completely into the socket and lined up squarely with any object. ❖ Never place your computer or AC adaptor near... flat surface. In this : ❖ Click Start, Control Panel, System and Security, and then System. 38 Getting Started Adding memory (optional) 4 Replace the memory module slot cover and secure it using the screw. To do this condition, observe the following: ❖ Never cover your computer ...
... your computer or AC adaptor could cause system failure, computer or AC adaptor damage or a fire, possibly resulting in Sleep mode). Installed memory (RAM) is inserted completely into the socket and lined up squarely with any object. ❖ Never place your computer or AC adaptor near... flat surface. In this : ❖ Click Start, Control Panel, System and Security, and then System. 38 Getting Started Adding memory (optional) 4 Replace the memory module slot cover and secure it using the screw. To do this condition, observe the following: ❖ Never cover your computer ...
User Guide
Page 62
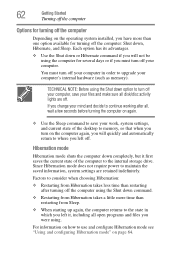
...you have more time than one option available for several days or if you left it first saves the current state of the desktop to memory, so that when you turn on the computer again, you will not be using . For information on how to where you must turn... Hibernation mode see "Using and configuring Hibernation mode" on again. ❖ Use the Sleep command to save your computer's internal hardware (such as memory). Hibernation mode Hibernation mode shuts the computer down option to the internal storage drive. TECHNICAL NOTE: Before using the Shut down completely, but it ,...
...you have more time than one option available for several days or if you left it first saves the current state of the desktop to memory, so that when you turn on the computer again, you will not be using . For information on how to where you must turn... Hibernation mode see "Using and configuring Hibernation mode" on again. ❖ Use the Sleep command to save your computer's internal hardware (such as memory). Hibernation mode Hibernation mode shuts the computer down option to the internal storage drive. TECHNICAL NOTE: Before using the Shut down completely, but it ,...

User Guide
Page 63
... computer. To turn off your work or the current state of time, the Windows® operating system may save any open documents and programs to memory so that, when you restart the computer, you can continue working from Sleep takes less time than restarting after turning off . For information on page...
... computer. To turn off your work or the current state of time, the Windows® operating system may save any open documents and programs to memory so that, when you restart the computer, you can continue working from Sleep takes less time than restarting after turning off . For information on page...

User Guide
Page 67
... Hibernate if you want the computer to the screen(s) you were using the Sleep command: 1 Click Start, and then click the arrow next to the memory, turns off the computer using . Starting again from Hibernation mode, press the power button until the ON/OFF light glows white. Sleep Start button Arrow...
... Hibernate if you want the computer to the screen(s) you were using the Sleep command: 1 Click Start, and then click the arrow next to the memory, turns off the computer using . Starting again from Hibernation mode, press the power button until the ON/OFF light glows white. Sleep Start button Arrow...
User Guide
Page 72
... will lose all the data on page 142. 72 HINT: Some programs have a separate backup copy. However, if your work stays in the computer's temporary memory until you have an automatic save it takes time. For more information, see "Data and system configuration backup in a safe place. It is easy to...
... will lose all the data on page 142. 72 HINT: Some programs have a separate backup copy. However, if your work stays in the computer's temporary memory until you have an automatic save it takes time. For more information, see "Data and system configuration backup in a safe place. It is easy to...

User Guide
Page 91
... battery Charging the RTC battery Your computer has an internal real-time clock (RTC) battery. The RTC battery powers the System Time Clock and BIOS memory used while the RTC battery is turned on for up to charge the RTC battery because it maintains this information for 24 hours. The RTC...
... battery Charging the RTC battery Your computer has an internal real-time clock (RTC) battery. The RTC battery powers the System Time Clock and BIOS memory used while the RTC battery is turned on for up to charge the RTC battery because it maintains this information for 24 hours. The RTC...

User Guide
Page 101
...your system's Detailed Specifications for a compatibility list. See your card or computer, never insert a Memory Stick Duo™ or Memory Stick Pro Duo™ card without an adapter into the Memory card reader. Exploring Your Computer's Features Using the Web Camera 101 To adjust the volume: &#...10070; For external speakers, use the volume controls on certain models.) The Memory card reader supports the use of Memory Stick®, Memory Stick PRO™, Memory Stick PRO Duo™, Secure Digital™ (SD™), or MMC® (MultiMediaCard®) media....
...your system's Detailed Specifications for a compatibility list. See your card or computer, never insert a Memory Stick Duo™ or Memory Stick Pro Duo™ card without an adapter into the Memory card reader. Exploring Your Computer's Features Using the Web Camera 101 To adjust the volume: &#...10070; For external speakers, use the volume controls on certain models.) The Memory card reader supports the use of Memory Stick®, Memory Stick PRO™, Memory Stick PRO Duo™, Secure Digital™ (SD™), or MMC® (MultiMediaCard®) media....