
Instruction Manual
Page 1
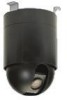
... IMPORTANT SAFEGUARDS 2 1. Cautions 4 3. Components 4 4. Part names and Locations 5 5. Record in space provided below the Model No. and the Serial Number as found on the label on the bottom of the camera. Features and description 4 2. Switch Setting 31 9. IK-DP30A Serial No. Retain this manual thoroughly before use, and keep it handy for future reference. Operation 7 7. DOME CAMERA IK-DP30A INSTRUCTION MANUAL ZEIM-4000008G A.1 Please read this...
... IMPORTANT SAFEGUARDS 2 1. Cautions 4 3. Components 4 4. Part names and Locations 5 5. Record in space provided below the Model No. and the Serial Number as found on the label on the bottom of the camera. Features and description 4 2. Switch Setting 31 9. IK-DP30A Serial No. Retain this manual thoroughly before use, and keep it handy for future reference. Operation 7 7. DOME CAMERA IK-DP30A INSTRUCTION MANUAL ZEIM-4000008G A.1 Please read this...

Instruction Manual
Page 6
... at least 35W consumption RS422 Pin Out RX - of the dome camera and TX- 5. RX+ RX - Dome Camera In the direct mode the communication line from www.Manualslib.com manuals search engine - 6 - Connections Basic connection (Direct mode) 24V AC UL Iisted class 2 power supply RS422 (twisted pair line) AC Adaptor Keyboard Monitor Make sure to connect to RX+ of the dome camera. RXTX - TX+ 2 wire controller TX-
... at least 35W consumption RS422 Pin Out RX - of the dome camera and TX- 5. RX+ RX - Dome Camera In the direct mode the communication line from www.Manualslib.com manuals search engine - 6 - Connections Basic connection (Direct mode) 24V AC UL Iisted class 2 power supply RS422 (twisted pair line) AC Adaptor Keyboard Monitor Make sure to connect to RX+ of the dome camera. RXTX - TX+ 2 wire controller TX-

Instruction Manual
Page 7
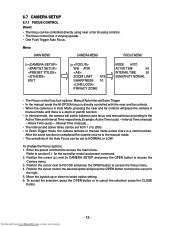
... MENU screen. Please refer to your model's instructions for information on the monitor. 6.1 ACCESSING THE MENU Accessing the menu varies with the model controller being used. Downloaded from www.Manualslib.com manuals search engine - 7 - JK-UC1 Input 95 using the numeric keypad. VLC485 Input 95# using the numeric keypad. 6. Several controllers are displayed on inputting commands. Operation (Power On display) TOSHIBA IK-DP30A VERSION*** PROTOCOL TOSHIBA-P ADDRESS 1 COMM 4800/N/8/1 When the dome camera powers...
... MENU screen. Please refer to your model's instructions for information on the monitor. 6.1 ACCESSING THE MENU Accessing the menu varies with the model controller being used. Downloaded from www.Manualslib.com manuals search engine - 7 - JK-UC1 Input 95 using the numeric keypad. VLC485 Input 95# using the numeric keypad. 6. Several controllers are displayed on inputting commands. Operation (Power On display) TOSHIBA IK-DP30A VERSION*** PROTOCOL TOSHIBA-P ADDRESS 1 COMM 4800/N/8/1 When the dome camera powers...

Instruction Manual
Page 8
... preset commands. The LED will light up. Downloaded from www.Manualslib.com manuals search engine - 8 - The following table lists the preset number and whether is can set (SET) or performed (GO). Refer to 0 pan position) Preset position 35-66 Begin Auto patrol Backlight compensation ON Backlight compensation OFF One push WB One push trigger AF Software version Display P/T Initialize Privacy Zone Setup menu mode Color Mode...
... preset commands. The LED will light up. Downloaded from www.Manualslib.com manuals search engine - 8 - The following table lists the preset number and whether is can set (SET) or performed (GO). Refer to 0 pan position) Preset position 35-66 Begin Auto patrol Backlight compensation ON Backlight compensation OFF One push WB One push trigger AF Software version Display P/T Initialize Privacy Zone Setup menu mode Color Mode...

Instruction Manual
Page 9
... dome camera can perform an auto scan operation during power-up , the tilt is performed from the keyboard. Scan limit stops ARE set : The dome camera will pan continuously between scan limit stops until a manual pan, tilt, or zoom operation is controlled from a keyboard and the speed ranges from a keyboard. Tilt At power-up or by the menu. In turbo mode the speed is ON. Manual TILT Manual...
... dome camera can perform an auto scan operation during power-up , the tilt is performed from the keyboard. Scan limit stops ARE set : The dome camera will pan continuously between scan limit stops until a manual pan, tilt, or zoom operation is controlled from a keyboard and the speed ranges from a keyboard. Tilt At power-up or by the menu. In turbo mode the speed is ON. Manual TILT Manual...

Instruction Manual
Page 10
... speed stop stop(stop time) stop D D D Right Limit Downloaded from the keyboard. See figure below . Operation of zoom and tilt is the same as in 45-degree increments (called stops) horizontally until a manual pan, tilt, or zoom operation is performed from the keyboard. FRAME SCAN The dome camera can perform a frame scan operation during power-up and by direct control from www.Manualslib...
... speed stop stop(stop time) stop D D D Right Limit Downloaded from the keyboard. See figure below . Operation of zoom and tilt is the same as in 45-degree increments (called stops) horizontally until a manual pan, tilt, or zoom operation is performed from the keyboard. FRAME SCAN The dome camera can perform a frame scan operation during power-up and by direct control from www.Manualslib...
Instruction Manual
Page 12
... the controller model and preset command. 2. Refer to cancel the selection, press the CLOSE button. Downloaded from 1 s to access the Focus menu. 4. Interval Time (manual) - After the zoom function is a zoom function. To change the Focus options: 1. Move the joystick up or down to NORMAL or LOW. Position the cursor next to FOCUS and press the OPEN button to 255s. • In Zoom Trigger mode, the camera remains in manual mode until...
... the controller model and preset command. 2. Refer to cancel the selection, press the CLOSE button. Downloaded from 1 s to access the Focus menu. 4. Interval Time (manual) - After the zoom function is a zoom function. To change the Focus options: 1. Move the joystick up or down to NORMAL or LOW. Position the cursor next to FOCUS and press the OPEN button to 255s. • In Zoom Trigger mode, the camera remains in manual mode until...

Instruction Manual
Page 13
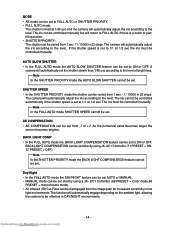
... can be set using OPEN or CLOSE controls. Menu MAIN MENU CAMERA MENU AE MENU EXIT WB ATW ZOOM LIMIT X18 SHARPNESS 10 PRIVACY ZONE MODE FULL AUTO AUTO SLOW SHUTTEROFF SHUTTER SPEED 1/60 AE COMPENSATION 0 BACK LIGHT COMP OFF DAY/NIGHT AUTO Downloaded from 3000K to 7500K. • ONE PUSH WB can be controlled directly using 73 PRESET from a controller. Refer to the right. 4. Position the cursor...
... can be set using OPEN or CLOSE controls. Menu MAIN MENU CAMERA MENU AE MENU EXIT WB ATW ZOOM LIMIT X18 SHARPNESS 10 PRIVACY ZONE MODE FULL AUTO AUTO SLOW SHUTTEROFF SHUTTER SPEED 1/60 AE COMPENSATION 0 BACK LIGHT COMP OFF DAY/NIGHT AUTO Downloaded from 3000K to 7500K. • ONE PUSH WB can be controlled directly using 73 PRESET from a controller. Refer to the right. 4. Position the cursor...
Instruction Manual
Page 14
... be controlled manually. AE COMPENSATION • AE COMPENSATION can be controlled manually. Day/Night • In the FULL AUTO mode the DAY/NIGHT feature can be set AUTO or MANUAL. • MANUAL mode can be set. Downloaded from 1 sec ?1 /10000 in low light environments. As the numerical value becomes larger the screen becomes brighter. Note In the SHUTTER PRIORITY mode the BACK LIGHT COMPENSATION feature cannot be set directly using JK-UC1 Controller (71...
... be controlled manually. AE COMPENSATION • AE COMPENSATION can be controlled manually. Day/Night • In the FULL AUTO mode the DAY/NIGHT feature can be set AUTO or MANUAL. • MANUAL mode can be set. Downloaded from 1 sec ?1 /10000 in low light environments. As the numerical value becomes larger the screen becomes brighter. Note In the SHUTTER PRIORITY mode the BACK LIGHT COMPENSATION feature cannot be set directly using JK-UC1 Controller (71...
Instruction Manual
Page 15
Note At the time of SHUTTER PRIORITY mode choice, DAY/NIGHT mode is x18, x36 to select option setting. 6. To change the AE options: 1. Refer to the right. 4. Position the cursor next to ZOOM LIMIT and press the OPEN button to move the cursor to access the AE menu. 4. To accept the selection, press the OPEN button or to section 6.1 for the controller model and preset command. 2. Refer...
Note At the time of SHUTTER PRIORITY mode choice, DAY/NIGHT mode is x18, x36 to select option setting. 6. To change the AE options: 1. Refer to the right. 4. Position the cursor next to ZOOM LIMIT and press the OPEN button to move the cursor to access the AE menu. 4. To accept the selection, press the OPEN button or to section 6.1 for the controller model and preset command. 2. Refer...

Instruction Manual
Page 16
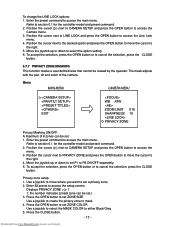
... the controller model and preset command. 2. Menu • Line Lock can be set from 40 to 250 degrees. MAIN MENU CAMERA MENU LINE LOCK EXIT WB ATW ZOOM LIMIT X18 SHARPNESS 10 PRIVACY ZONE MODE OFF LINE PHASE 180 Downloaded from 0-15, with the power supply frequency. Refer to access the main menu. To accept the selection, press the OPEN button or to...
... the controller model and preset command. 2. Menu • Line Lock can be set from 40 to 250 degrees. MAIN MENU CAMERA MENU LINE LOCK EXIT WB ATW ZOOM LIMIT X18 SHARPNESS 10 PRIVACY ZONE MODE OFF LINE PHASE 180 Downloaded from 0-15, with the power supply frequency. Refer to access the main menu. To accept the selection, press the OPEN button or to...
Instruction Manual
Page 17
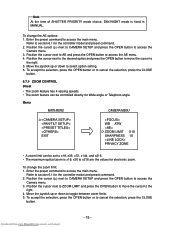
... controller model and preset command. 2. Position the cursor next to LINE LOCK and press the OPEN button to access the Camera menu. 3. Press the OPEN button to the right. 4. Press the CLOSE button. - 17 - To accept the selection, press the OPEN button or to cancel the selection, press the CLOSE button. 6.7.7 PRIVACY ZONE MASKING This function masks a user defined area that cannot be set ZONE COLOR Use...
... controller model and preset command. 2. Position the cursor next to LINE LOCK and press the OPEN button to access the Camera menu. 3. Press the OPEN button to the right. 4. Press the CLOSE button. - 17 - To accept the selection, press the OPEN button or to cancel the selection, press the CLOSE button. 6.7.7 PRIVACY ZONE MASKING This function masks a user defined area that cannot be set ZONE COLOR Use...

Instruction Manual
Page 18
... reposition itself for the controller model and preset command. 2. Position the cursor next to AUTO FLIP and press the OPEN button to move the cursor to access the Pan/ Tilt menu. 3. STOP TIME 10SEC MAX SPEED 400DEG/S To enable AUTO FLIP: 1. Position the cursor ( ) next to PAN/TILT SETUP and press the OPEN button to the right. 4. Enter the preset command to access the main menu. Downloaded from www.Manualslib...
... reposition itself for the controller model and preset command. 2. Position the cursor next to AUTO FLIP and press the OPEN button to move the cursor to access the Pan/ Tilt menu. 3. STOP TIME 10SEC MAX SPEED 400DEG/S To enable AUTO FLIP: 1. Position the cursor ( ) next to PAN/TILT SETUP and press the OPEN button to the right. 4. Enter the preset command to access the main menu. Downloaded from www.Manualslib...
Instruction Manual
Page 19
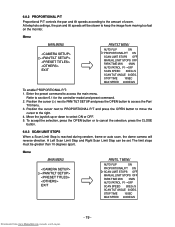
... to access the Pan/ Tilt menu. 3. STOP TIME 10SEC MAX SPEED 400DEG/S Downloaded from moving too fast on the monitor. Position the cursor ( ) next to PAN/TILT SETUP and press the OPEN button to the amount of zoom. The limit stops must be set. Position the cursor next to PROPORTIONAL P/T and press the OPEN button to move the cursor to section 6.1 for the controller model and preset command...
... to access the Pan/ Tilt menu. 3. STOP TIME 10SEC MAX SPEED 400DEG/S Downloaded from moving too fast on the monitor. Position the cursor ( ) next to PAN/TILT SETUP and press the OPEN button to the amount of zoom. The limit stops must be set. Position the cursor next to PROPORTIONAL P/T and press the OPEN button to move the cursor to section 6.1 for the controller model and preset command...

Instruction Manual
Page 20
... ANGLE 30DEG. Position the cursor ( ) next to PAN/TILT SETUP and press the OPEN button to the right. 4. Position the cursor next to MANUAL LIMIT STOPS and press the OPEN button to move the cursor to access the Pan/ Tilt menu. 3. To accept the selection, press the OPEN button or to ON and exit menu. 2. Position the camera for the controller model and preset command. 2. A Left Manual Limit Stop...
... ANGLE 30DEG. Position the cursor ( ) next to PAN/TILT SETUP and press the OPEN button to the right. 4. Position the cursor next to MANUAL LIMIT STOPS and press the OPEN button to move the cursor to access the Pan/ Tilt menu. 3. To accept the selection, press the OPEN button or to ON and exit menu. 2. Position the camera for the controller model and preset command. 2. A Left Manual Limit Stop...

Instruction Manual
Page 21
Position the camera for the controller model and preset command. 2. MANUAL RIGHT LIMIT will disable the feature. Enter the preset command to section 6.1 for the RIGHT LIMIT STOP. Refer to access the main menu. Limit stops are ignored during Auto Patrol. PAN/TILT MENU AUTO FLIP ON PROPORTIONALP/T ON SCAN LIMIT STOPS OFF MANUAL LIMIT STOPS OFF PARK TIME MIN 0MIN AUTO PATROL P1ˠOFF...
Position the camera for the controller model and preset command. 2. MANUAL RIGHT LIMIT will disable the feature. Enter the preset command to section 6.1 for the RIGHT LIMIT STOP. Refer to access the main menu. Limit stops are ignored during Auto Patrol. PAN/TILT MENU AUTO FLIP ON PROPORTIONALP/T ON SCAN LIMIT STOPS OFF MANUAL LIMIT STOPS OFF PARK TIME MIN 0MIN AUTO PATROL P1ˠOFF...

Instruction Manual
Page 26
... LOAD FACTORY DEFAULT TILT ANGLE OUTDOOR To set POWER UP MODE: 1. AUTO PATROL: The dome camera performs an auto patrol operation. Position the cursor next to POWER UP and press the OPEN button to move the cursor to set the power up or down to the right. 4. Move the joystick up mode. 5. PARK: The dome camera moves to the mechanical reset point. DEFAULT: The dome camera moves to Preset 1 position. Enter the preset command to start...
... LOAD FACTORY DEFAULT TILT ANGLE OUTDOOR To set POWER UP MODE: 1. AUTO PATROL: The dome camera performs an auto patrol operation. Position the cursor next to POWER UP and press the OPEN button to move the cursor to set the power up or down to the right. 4. Move the joystick up mode. 5. PARK: The dome camera moves to the mechanical reset point. DEFAULT: The dome camera moves to Preset 1 position. Enter the preset command to start...

Instruction Manual
Page 33
... Off Off On Off Off On On On (Dome base switch:S301) This is connected with three dome cameras in a figure. S301 ON OFF POWER TERMINAL BNC Connector Downloaded from the controller is turned ON. In daisy chain operation system, the farthest dome from www.Manualslib.com manuals search engine - 33 - For example, when the controller is RS422 termination switch located near the BNC...
... Off Off On Off Off On On On (Dome base switch:S301) This is connected with three dome cameras in a figure. S301 ON OFF POWER TERMINAL BNC Connector Downloaded from the controller is turned ON. In daisy chain operation system, the farthest dome from www.Manualslib.com manuals search engine - 33 - For example, when the controller is RS422 termination switch located near the BNC...

Instruction Manual
Page 36
... location of the installation label on the dome drive are directly inserted in the top of the dome (See 8.Switch setting), connect the support wire to the housing. Fig-8 Fig-6 (JK-H01A dome cover install) (16) To lock the dome cover, insert the support wire and turn to use the cable included in the dome accessories.] (12) Communication cables are aligned. (IK-DP30A dome base install) (11) Attach the video...
... location of the installation label on the dome drive are directly inserted in the top of the dome (See 8.Switch setting), connect the support wire to the housing. Fig-8 Fig-6 (JK-H01A dome cover install) (16) To lock the dome cover, insert the support wire and turn to use the cable included in the dome accessories.] (12) Communication cables are aligned. (IK-DP30A dome base install) (11) Attach the video...
Instruction Manual
Page 40
Instruction Manual (Owner's Manual): You should have other rights which an action must notify (877) 855 1349 within (30) days after you should : 1. Contact Toshiba at the time that the product does not perform in accordance with additional packing material before operating this Product. If technical support determines that this Limited Warranty in need of repair. You must provide the bill of...
Instruction Manual (Owner's Manual): You should have other rights which an action must notify (877) 855 1349 within (30) days after you should : 1. Contact Toshiba at the time that the product does not perform in accordance with additional packing material before operating this Product. If technical support determines that this Limited Warranty in need of repair. You must provide the bill of...


