

Owners Manual
Page 5
... rental or worn tapes can see a clear picture. • Playback picture may discolor the surface or damage the unit. DVDs created using Dolby Digital Recording will play back on recordable DVD discs. DivX®, DivX Certified®, and associated logos are compatible with a soft, slightly damp cloth. • Never use , or the usage of the discs. • Always store the disc in your dealer or an Authorized Service Center. Disc Handling •...
... rental or worn tapes can see a clear picture. • Playback picture may discolor the surface or damage the unit. DVDs created using Dolby Digital Recording will play back on recordable DVD discs. DivX®, DivX Certified®, and associated logos are compatible with a soft, slightly damp cloth. • Never use , or the usage of the discs. • Always store the disc in your dealer or an Authorized Service Center. Disc Handling •...

Owners Manual
Page 6
... Setup INITIAL SETTING 25 SETTING THE CLOCK 26 Clock Setting 26 SETTINGS FOR THE VIDEO INPUT 27 Disc Management FORMATTING A DISC 28 Choosing the Recording Format of a Brand-New DVD-RW 28 Reformatting a Disc Manually 29 SETTING A DISC TO PROTECT 30 PLAYING THE DISCS IN OTHER DVD PLAYERS . . . . . 31 Auto Finalizing 31 Finalizing a Disc 32 Recording INFORMATION ON DVD RECORDING 34 Recording Mode 34 Restrictions on Recording 34 SETTINGS FOR A RECORDING 35 Make Recording Compatible 35 Setting for Auto Chapter 35 Recording Audio Select (XP 36 Setting Aspect Ratio for Video Mode...
... Setup INITIAL SETTING 25 SETTING THE CLOCK 26 Clock Setting 26 SETTINGS FOR THE VIDEO INPUT 27 Disc Management FORMATTING A DISC 28 Choosing the Recording Format of a Brand-New DVD-RW 28 Reformatting a Disc Manually 29 SETTING A DISC TO PROTECT 30 PLAYING THE DISCS IN OTHER DVD PLAYERS . . . . . 31 Auto Finalizing 31 Finalizing a Disc 32 Recording INFORMATION ON DVD RECORDING 34 Recording Mode 34 Restrictions on Recording 34 SETTINGS FOR A RECORDING 35 Make Recording Compatible 35 Setting for Auto Chapter 35 Recording Audio Select (XP 36 Setting Aspect Ratio for Video Mode...

Owners Manual
Page 8
... discs with DivX® files If you set or clear chapter marks on titles. HDMI (High-Definition Multimedia Interface) You can easily set a recording time as you prefer. E9PKBUD_DKVR60KU_EN.indd 8 8/11/2009 3:59:44 PM Recording Editing DVD mode VCR mode This unit is compatible with this unit to watch using the search function. One-touch timer recording (OTR): You can enjoy clearer audio/video output when connecting this unit. Automatic title menu making : The unit creates a playlist automatically after recording VR mode DVD-RW. Quick...
... discs with DivX® files If you set or clear chapter marks on titles. HDMI (High-Definition Multimedia Interface) You can easily set a recording time as you prefer. E9PKBUD_DKVR60KU_EN.indd 8 8/11/2009 3:59:44 PM Recording Editing DVD mode VCR mode This unit is compatible with this unit to watch using the search function. One-touch timer recording (OTR): You can enjoy clearer audio/video output when connecting this unit. Automatic title menu making : The unit creates a playlist automatically after recording VR mode DVD-RW. Quick...

Owners Manual
Page 11
... cassette tape. • While playback is in the main menu. 14. TRACKING / buttons (VCR) • Press to start a recording. Display • Refer to "FRONT PANEL DISPLAY GUIDE" on the unit, or to this unit. • Unplug this cord from a distance. 17. Power indicator • This indicator lights up when the VCR/DVD output mode is selected. 12. AC Power Cord • Connect to a standard AC outlet to supply power to turn on page 18. 16. AUDIO input jacks (L2) (DVD/VCR) • Use...
... cassette tape. • While playback is in the main menu. 14. TRACKING / buttons (VCR) • Press to start a recording. Display • Refer to "FRONT PANEL DISPLAY GUIDE" on the unit, or to this unit. • Unplug this cord from a distance. 17. Power indicator • This indicator lights up when the VCR/DVD output mode is selected. 12. AC Power Cord • Connect to a standard AC outlet to supply power to turn on page 18. 16. AUDIO input jacks (L2) (DVD/VCR) • Use...

Owners Manual
Page 13
... menu. SEARCH button (VCR) • Press to confirm or select menu items. 25. VCR mode: • Press to fast forward the cassette tape in still mode, you set or release the Auto Repeat Playback. TIMER PROG. VCR mode: • During playback, press to view the picture rapidly in forward. • Press to set in a slightly faster/slower speed while keeping the sound output. 28. DVD mode: • Press to remove the cassette tape from the cassette compartment. 3. EN 13 Playback Editing Function Setup VCR...
... menu. SEARCH button (VCR) • Press to confirm or select menu items. 25. VCR mode: • Press to fast forward the cassette tape in still mode, you set or release the Auto Repeat Playback. TIMER PROG. VCR mode: • During playback, press to view the picture rapidly in forward. • Press to set in a slightly faster/slower speed while keeping the sound output. 28. DVD mode: • Press to remove the cassette tape from the cassette compartment. 3. EN 13 Playback Editing Function Setup VCR...
Owners Manual
Page 17
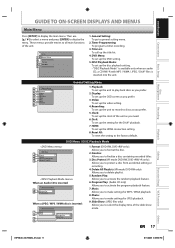
.... 5. Then use [K / L] to select a menu and press [ENTER] to general setting menu. 2. DISC Playback Mode: To set up the setting for the DivX® playback. 7. Recording: To set up the title list. 4. Reset All: To reset the setting to display the main menu. Format (DVD-RW, DVD+RW only): Allows you to format the disc. 2. Title List: To call up the unit to play back discs as you to protect a disc from accidental editing or recording. 4. Program Play: (Audio CD only) Allows you to make settings for JPEG playback. 9. EN 17 Playback Editing Function Setup VCR Function...
.... 5. Then use [K / L] to select a menu and press [ENTER] to general setting menu. 2. DISC Playback Mode: To set up the setting for the DivX® playback. 7. Recording: To set up the title list. 4. Reset All: To reset the setting to display the main menu. Format (DVD-RW, DVD+RW only): Allows you to format the disc. 2. Title List: To call up the unit to play back discs as you to protect a disc from accidental editing or recording. 4. Program Play: (Audio CD only) Allows you to make settings for JPEG playback. 9. EN 17 Playback Editing Function Setup VCR Function...
Owners Manual
Page 31
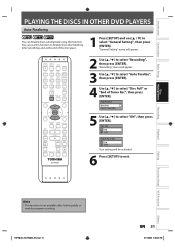
SETUP DISPLAY AUDIO DISC MENU TOP MENU CLEAR ENTER RETURN INSTANT 1.3x/0.8x SKIP PLAY TIME SLIP REV PLAY FWD SKIP STOP SKIP PAUSE VCR DVD DUBBING REC MODE REC REPEAT TIMER SET SEARCH ZOOM SE-R0295 2 Use [K / L] to select "General Setting", then press [ENTER]. E9PKBUD_DKVR60KU_EN.indd 31 EN 31 8/11/2009 4:00:23 PM Others OPEN/ INPUT CLOSE SELECT HDMI .@/: ABC DEF GHI JKL MNO TRACKING PQRS TUV WXYZ SAT.LINK SPACE TIMER PROG. Auto Finalize Disc Full End of Timer Rec", then press...
SETUP DISPLAY AUDIO DISC MENU TOP MENU CLEAR ENTER RETURN INSTANT 1.3x/0.8x SKIP PLAY TIME SLIP REV PLAY FWD SKIP STOP SKIP PAUSE VCR DVD DUBBING REC MODE REC REPEAT TIMER SET SEARCH ZOOM SE-R0295 2 Use [K / L] to select "General Setting", then press [ENTER]. E9PKBUD_DKVR60KU_EN.indd 31 EN 31 8/11/2009 4:00:23 PM Others OPEN/ INPUT CLOSE SELECT HDMI .@/: ABC DEF GHI JKL MNO TRACKING PQRS TUV WXYZ SAT.LINK SPACE TIMER PROG. Auto Finalize Disc Full End of Timer Rec", then press...

Owners Manual
Page 39
... not change pages. Timer program list 5. Recording mode and length of the program) 2. SETUP DISPLAY AUDIO DISC MENU TOP MENU CLEAR ENTER RETURN INSTANT 1.3x/0.8x SKIP PLAY TIME SLIP REV PLAY FWD SKIP STOP SKIP PAUSE VCR DVD DUBBING REC MODE REC REPEAT TIMER SET SEARCH ZOOM 1 Press [TIMER PROG.]. 2 Use [K / L] to Timer Programming Display 3 1 2 Timer Programming JAN/ 2/09 1:00 AM L1 SP SP (1:00) THU JAN/01 10:00AM Date JAN/02 Start End 1:00AM 2:00AM New Program L1/L2 L1 1/1 4 5 1. Recording Playback Editing Function Setup VCR Function...
... not change pages. Timer program list 5. Recording mode and length of the program) 2. SETUP DISPLAY AUDIO DISC MENU TOP MENU CLEAR ENTER RETURN INSTANT 1.3x/0.8x SKIP PLAY TIME SLIP REV PLAY FWD SKIP STOP SKIP PAUSE VCR DVD DUBBING REC MODE REC REPEAT TIMER SET SEARCH ZOOM 1 Press [TIMER PROG.]. 2 Use [K / L] to Timer Programming Display 3 1 2 Timer Programming JAN/ 2/09 1:00 AM L1 SP SP (1:00) THU JAN/01 10:00AM Date JAN/02 Start End 1:00AM 2:00AM New Program L1/L2 L1 1/1 4 5 1. Recording Playback Editing Function Setup VCR Function...

Owners Manual
Page 40
... Auto recording mode select (DVD only)... Press TIMER SET for VCR. • You can check the remaining recordable space of the disc is not available in the timer program list. • The recording may be displayed in blue. REC To DVD End - - : - Press TIMER SET to make a program whose recording time exceeds 12 hours. 5 Use [K / L] to select an appropriate external input (L1/L2) to complete recording the program. Ensure the external source is available on the front panel display, while this unit...
... Auto recording mode select (DVD only)... Press TIMER SET for VCR. • You can check the remaining recordable space of the disc is not available in the timer program list. • The recording may be displayed in blue. REC To DVD End - - : - Press TIMER SET to make a program whose recording time exceeds 12 hours. 5 Use [K / L] to select an appropriate external input (L1/L2) to complete recording the program. Ensure the external source is available on the front panel display, while this unit...

Owners Manual
Page 41
... [TIMER SET]. 2) Press [TIMER PROG.]. 3) Check the information on the remote control. Confirmation message will be cleared. *1 PCA is a disc's space reserved for Control E45 information E35 PCA full *1 E46 E36 Already finalized video format disc Some portion has not been recorded because of program overlapping. When the timer recording is displayed, or after canceling and setting again the timer standby mode, the program line(s) with the error number is grayed in progress 1) Press [STOP C] on...
... [TIMER SET]. 2) Press [TIMER PROG.]. 3) Check the information on the remote control. Confirmation message will be cleared. *1 PCA is a disc's space reserved for Control E45 information E35 PCA full *1 E46 E36 Already finalized video format disc Some portion has not been recorded because of program overlapping. When the timer recording is displayed, or after canceling and setting again the timer standby mode, the program line(s) with the error number is grayed in progress 1) Press [STOP C] on...

Owners Manual
Page 43
... tuner. OPEN/ INPUT CLOSE SELECT HDMI .@/: ABC DEF 1 Select whichever the component (DVD / VCR) you finish setting. Refer to the tuner's manual on how to set the timer. • Make sure to "SETTINGS FOR THE VIDEO INPUT" on page 27. GHI JKL MNO TRACKING PQRS TUV WXYZ SAT.LINK SPACE TIMER PROG. SETUP DISPLAY AUDIO DISC MENU TOP MENU CLEAR ENTER RETURN INSTANT 1.3x/0.8x SKIP PLAY TIME SLIP REV PLAY FWD SKIP STOP SKIP PAUSE VCR DVD DUBBING REC MODE REC REPEAT TIMER SET SEARCH ZOOM SE-R0295 Recording Playback Editing...
... tuner. OPEN/ INPUT CLOSE SELECT HDMI .@/: ABC DEF 1 Select whichever the component (DVD / VCR) you finish setting. Refer to the tuner's manual on how to set the timer. • Make sure to "SETTINGS FOR THE VIDEO INPUT" on page 27. GHI JKL MNO TRACKING PQRS TUV WXYZ SAT.LINK SPACE TIMER PROG. SETUP DISPLAY AUDIO DISC MENU TOP MENU CLEAR ENTER RETURN INSTANT 1.3x/0.8x SKIP PLAY TIME SLIP REV PLAY FWD SKIP STOP SKIP PAUSE VCR DVD DUBBING REC MODE REC REPEAT TIMER SET SEARCH ZOOM SE-R0295 Recording Playback Editing...

Owners Manual
Page 57
... stopped and error message will be displayed as MPEG4. • Files whose file size exceeds 2 GB cannot be played back. • If a large-sized DivX® file is selected, it back. "DivX Subtitle" must locate in the same folder. - EN 57 Playback Editing Function Setup VCR Function Others E9PKBUD_DKVR60KU_EN.indd 57 8/11/2009 4:00:56 PM with the limited playable times (you select "Photo" instead of "Video Files" on Title List, this unit...
... stopped and error message will be displayed as MPEG4. • Files whose file size exceeds 2 GB cannot be played back. • If a large-sized DivX® file is selected, it back. "DivX Subtitle" must locate in the same folder. - EN 57 Playback Editing Function Setup VCR Function Others E9PKBUD_DKVR60KU_EN.indd 57 8/11/2009 4:00:56 PM with the limited playable times (you select "Photo" instead of "Video Files" on Title List, this unit...

Owners Manual
Page 71
... Copyright Laws of the selected title. Arrow: Indicating there is displayed here. 11. Introduction Connections Basic Setup Disc Management Recording INFORMATION ON DISC EDITING Guide to a Title List Editing Discs Title list allows you to check the titles recorded on other DVD player - Title name (editable): If you do not name the title, the recorded date, time and the recording mode are possible only with DVD-RW/-R and DVD+RW/+R. Playback status: Indicating the current playback status of the United States and other countries...
... Copyright Laws of the selected title. Arrow: Indicating there is displayed here. 11. Introduction Connections Basic Setup Disc Management Recording INFORMATION ON DISC EDITING Guide to a Title List Editing Discs Title list allows you to check the titles recorded on other DVD player - Title name (editable): If you do not name the title, the recorded date, time and the recording mode are possible only with DVD-RW/-R and DVD+RW/+R. Playback status: Indicating the current playback status of the United States and other countries...

Owners Manual
Page 86
... display the angle icon or not. Set the viewing limitation according to US TV program ratings. Refer to 48kHz. Set the idling time before the screen saver starts. Set the language for subtitles. Set the viewing limitation according to US movie ratings. LIST OF THE DEFAULT SETTINGS The following table for useful operation. Set the type of sound signal which you can set and the default settings. Compressing the range of the front panel display. Set the type...
... display the angle icon or not. Set the viewing limitation according to US TV program ratings. Refer to 48kHz. Set the idling time before the screen saver starts. Set the language for subtitles. Set the viewing limitation according to US movie ratings. LIST OF THE DEFAULT SETTINGS The following table for useful operation. Set the type of sound signal which you can set and the default settings. Compressing the range of the front panel display. Set the type...

Owners Manual
Page 87
Change the password. Set to the progressive scan mode (set to "ON") or to the interlace scan mode (set to XP.) Set the unit to finalize the disc automatically. Set a picture size according to aspect ratio of Timer Rec ON OFF Aspect Ratio (Video mode) → page 36 Auto 4:3 16:9 Dubbing Mode → pages 50-51 VCR DVD DVD VCR Make Recording Compatible ON → page 35 OFF Clock Setting → page 26 DivX®VOD → page 96 DivX Subtitle → page 96 Format → page 97 OFF English French...
Change the password. Set to the progressive scan mode (set to "ON") or to the interlace scan mode (set to XP.) Set the unit to finalize the disc automatically. Set a picture size according to aspect ratio of Timer Rec ON OFF Aspect Ratio (Video mode) → page 36 Auto 4:3 16:9 Dubbing Mode → pages 50-51 VCR DVD DVD VCR Make Recording Compatible ON → page 35 OFF Clock Setting → page 26 DivX®VOD → page 96 DivX Subtitle → page 96 Format → page 97 OFF English French...

Owners Manual
Page 95
...-screen picture. Activate? Progressive ON OFF 2) Use [{ / B] to select a desired option, then press [ENTER]. TV Aspect 4:3 Letter Box 4:3 Pan & Scan 16:9 Wide If you have a widescreen TV: Select "16:9 Wide". SETUP DISPLAY AUDIO DISC MENU TOP MENU CLEAR ENTER RETURN INSTANT 1.3x/0.8x SKIP PLAY TIME SLIP REV PLAY FWD SKIP STOP SKIP PAUSE VCR DVD DUBBING REC MODE REC REPEAT TIMER SET SEARCH ZOOM Press [STOP C] if you are playing back a disc. 1 Press [SETUP] and use the HDMI cable (supplied) or component video cable (commercially available) to connect...
...-screen picture. Activate? Progressive ON OFF 2) Use [{ / B] to select a desired option, then press [ENTER]. TV Aspect 4:3 Letter Box 4:3 Pan & Scan 16:9 Wide If you have a widescreen TV: Select "16:9 Wide". SETUP DISPLAY AUDIO DISC MENU TOP MENU CLEAR ENTER RETURN INSTANT 1.3x/0.8x SKIP PLAY TIME SLIP REV PLAY FWD SKIP STOP SKIP PAUSE VCR DVD DUBBING REC MODE REC REPEAT TIMER SET SEARCH ZOOM Press [STOP C] if you are playing back a disc. 1 Press [SETUP] and use the HDMI cable (supplied) or component video cable (commercially available) to connect...

Owners Manual
Page 104
..., the recording audio signal can be operated with a cleaning cloth. • No disc is inserted. • A blank disc is inserted. • The disc is connected, the DV function will not output a video signal unless the other device supports HDCP.) • Check the setting of HDMI. • Check whether the output format of other DVD players. • If the setup menu appears on the type of 2 layered disc, picture may be switched. Remove the disc and leave the unit turned on for...
..., the recording audio signal can be operated with a cleaning cloth. • No disc is inserted. • A blank disc is inserted. • The disc is connected, the DV function will not output a video signal unless the other device supports HDCP.) • Check the setting of HDMI. • Check whether the output format of other DVD players. • If the setup menu appears on the type of 2 layered disc, picture may be switched. Remove the disc and leave the unit turned on for...

Owners Manual
Page 105
... VIDEO OUT / HDMI OUT jack, try connecting it is a power failure or unplugging during recording, finalizing, formatting or editing (even after "Repairing" disappears), a repairing process will be changed . After that, press [OPEN/CLOSE A] to "OFF". • Check the RCA audio cable connection. There is no sound or the sound is set to take several hours. • If you connect the cable to AUDIO / VIDEO OUT jack instead. The remote control does not function. • Check if a cassette tape is...
... VIDEO OUT / HDMI OUT jack, try connecting it is a power failure or unplugging during recording, finalizing, formatting or editing (even after "Repairing" disappears), a repairing process will be changed . After that, press [OPEN/CLOSE A] to "OFF". • Check the RCA audio cable connection. There is no sound or the sound is set to take several hours. • If you connect the cable to AUDIO / VIDEO OUT jack instead. The remote control does not function. • Check if a cassette tape is...

Owners Manual
Page 106
... I connect the unit to the maximum (254). • Insert the recordable disc with a cleaning cloth. • Replace the disc. Can I program a timer recording with region codes 1 or ALL. • Check "Parental Lock" setting in "DVD Menu" menu. Playback feature may come up to my PC? Region Error - Recording Error This disc is protected and not recordable. • You are trying to record the copy-once program onto the DVD-RW disc which is not allowed to rewrite the menu, after checking "TROUBLESHOOTING", write down . • Playback is already finalized...
... I connect the unit to the maximum (254). • Insert the recordable disc with a cleaning cloth. • Replace the disc. Can I program a timer recording with region codes 1 or ALL. • Check "Parental Lock" setting in "DVD Menu" menu. Playback feature may come up to my PC? Region Error - Recording Error This disc is protected and not recordable. • You are trying to record the copy-once program onto the DVD-RW disc which is not allowed to rewrite the menu, after checking "TROUBLESHOOTING", write down . • Playback is already finalized...

Owners Manual
Page 110
... Program, contact TACP's Consumer Solutions Center toll free at www.tacp.toshiba.com/service as soon as lightning or fluctuations in electric power), improper installation, improper maintenance, or use of original retail purchase and ends on -line at 1-800-631-3811. (2) You must retain your warranty rights. LIMITED WARRANTY Limited United States Warranty Digital Audio Video ("DAV") Product - Owner's Manual and Product Registration Card Read...
... Program, contact TACP's Consumer Solutions Center toll free at www.tacp.toshiba.com/service as soon as lightning or fluctuations in electric power), improper installation, improper maintenance, or use of original retail purchase and ends on -line at 1-800-631-3811. (2) You must retain your warranty rights. LIMITED WARRANTY Limited United States Warranty Digital Audio Video ("DAV") Product - Owner's Manual and Product Registration Card Read...


