

Owner's Manual - English
Page 1
Refer to these numbers in China 1VMN24693 / E7M70UD © 2008 Toshiba Corporation Owner's Record The model number and serial number are on the back of your Toshiba dealer about this DVD Recorder. Model number: Serial number: Others E7M70UD_D-R560KU_cover.indd 2-3 2007/12/19 21:38:30 TOSHIBA DVD VIDEO RECORDER D-R560KU D R560KU Introduction Connections DVD VIDEO RECORDER D-R560KU OWNER'S MANUAL Basic Setup Disc Management Recording Playback Editing Function Setup Printed in the spaces below. Record these numbers whenever you communicate with your DVD Recorder.
Refer to these numbers in China 1VMN24693 / E7M70UD © 2008 Toshiba Corporation Owner's Record The model number and serial number are on the back of your Toshiba dealer about this DVD Recorder. Model number: Serial number: Others E7M70UD_D-R560KU_cover.indd 2-3 2007/12/19 21:38:30 TOSHIBA DVD VIDEO RECORDER D-R560KU D R560KU Introduction Connections DVD VIDEO RECORDER D-R560KU OWNER'S MANUAL Basic Setup Disc Management Recording Playback Editing Function Setup Printed in the spaces below. Record these numbers whenever you communicate with your DVD Recorder.
Owner's Manual - English
Page 2
... LASER RADIATION WHEN OPEN AND INTERLOCK DEFEATED. Laser Safety This unit employs a laser. This equipment generates, uses, and can dispose of any materials in the manual. CAUTION RISK OF ELECTRIC SHOCK DO NOT OPEN CAUTION: TO REDUCE THE RISK OF ELECTRIC SHOCK, DO NOT REMOVE COVER (OR BACK). This equipment may...
... LASER RADIATION WHEN OPEN AND INTERLOCK DEFEATED. Laser Safety This unit employs a laser. This equipment generates, uses, and can dispose of any materials in the manual. CAUTION RISK OF ELECTRIC SHOCK DO NOT OPEN CAUTION: TO REDUCE THE RISK OF ELECTRIC SHOCK, DO NOT REMOVE COVER (OR BACK). This equipment may...

Owner's Manual - English
Page 4
... a cold place to be authorized by Macrovision. If there are fully compatible with this 480p DVD recorder, please contact Toshiba Customer Service. patents and other limited viewing uses only unless otherwise authorized by Macrovision, and is prohibited under the copyright laws ...or under conditions of high humidity. RCA audio/video cables Moisture Condensation Warning Moisture condensation may occur inside gets dry. owner's manual OWNER'S MANUAL About Copyright The unauthorized recording, use this unit at least for 2 hours until its inside the unit when it is prohibited...
... a cold place to be authorized by Macrovision. If there are fully compatible with this 480p DVD recorder, please contact Toshiba Customer Service. patents and other limited viewing uses only unless otherwise authorized by Macrovision, and is prohibited under the copyright laws ...or under conditions of high humidity. RCA audio/video cables Moisture Condensation Warning Moisture condensation may occur inside gets dry. owner's manual OWNER'S MANUAL About Copyright The unauthorized recording, use this unit at least for 2 hours until its inside the unit when it is prohibited...

Owner's Manual - English
Page 5
..., and be dirty. Dolby Digital Recording "Dolby® Digital Recording enables consumers to clean the unit. Recording Cleaning the Disc Lens • If this owner's manual, the laser optical pickup unit may discolor the surface or damage the unit.
..., and be dirty. Dolby Digital Recording "Dolby® Digital Recording enables consumers to clean the unit. Recording Cleaning the Disc Lens • If this owner's manual, the laser optical pickup unit may discolor the surface or damage the unit.

Owner's Manual - English
Page 6
... FRONT PANEL DISPLAY GUIDE ...17 Disc Management FORMATTING A DISC ...Choosing the Recording Format of a Brand-New DVD-RW ...Reformatting a Disc Manually ...SETTING A DISC TO PROTECT ...PLAYING THE DISCS IN OTHER DVD PLAYERS ...Auto Finalizing ...Finalizing a Disc ...37 37 38 39 40 ... 22 24 Basic Setup INITIAL SETTING ...CHANNEL SETTING ...Auto Channel Scan ...Adding/Deleting Channels ...SETTING THE CLOCK ...Auto Clock Setting ...Manual Clock Setting...Daylight Saving Time...TUNER SETTINGS ...Switching Analog Mode / Digital Mode ...Channel Selection ...Selecting TV Audio ...DTV Closed Caption ...
... FRONT PANEL DISPLAY GUIDE ...17 Disc Management FORMATTING A DISC ...Choosing the Recording Format of a Brand-New DVD-RW ...Reformatting a Disc Manually ...SETTING A DISC TO PROTECT ...PLAYING THE DISCS IN OTHER DVD PLAYERS ...Auto Finalizing ...Finalizing a Disc ...37 37 38 39 40 ... 22 24 Basic Setup INITIAL SETTING ...CHANNEL SETTING ...Auto Channel Scan ...Adding/Deleting Channels ...SETTING THE CLOCK ...Auto Clock Setting ...Manual Clock Setting...Daylight Saving Time...TUNER SETTINGS ...Switching Analog Mode / Digital Mode ...Channel Selection ...Selecting TV Audio ...DTV Closed Caption ...
Owner's Manual - English
Page 8
... Description refers to CD-RW/-R with JPEG files Description refers to You can enjoy MP3/WMA/JPEG/DivX® files which you set this Owner's Manual The unit creates a playlist automatically after that of a title. 8 EN 2007/12/17 11:11:23 E7M70UD_D-R560KU_EN.indd 8 You can enjoy clearer audio/video...
... Description refers to CD-RW/-R with JPEG files Description refers to You can enjoy MP3/WMA/JPEG/DivX® files which you set this Owner's Manual The unit creates a playlist automatically after that of a title. 8 EN 2007/12/17 11:11:23 E7M70UD_D-R560KU_EN.indd 8 You can enjoy clearer audio/video...

Owner's Manual - English
Page 14
... possible recording time left. 5. Program rating : Zoom : Surround 7. On-Screen Display / Menu The on -screen displays and menus to guide you the information on this manual, only one disc type is available with MP3/WMA/ JPEG/DivX® files is in playback) MP3/WMA Tag Information (only when a MP3 or WMA...
... possible recording time left. 5. Program rating : Zoom : Surround 7. On-Screen Display / Menu The on -screen displays and menus to guide you the information on this manual, only one disc type is available with MP3/WMA/ JPEG/DivX® files is in playback) MP3/WMA Tag Information (only when a MP3 or WMA...
Owner's Manual - English
Page 19
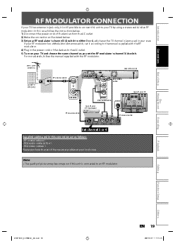
...become poor if this unit to your area. RF MODULATOR CONNECTION Introduction Connections If your TV has antenna in jack only, it according to the manual supplied with the RF modulator. If your RF modulator has a Modulator/Antenna switch, set the RF modulator's channel 3/4 switch. For more details, ...follow the manual supplied with the RF modulator. 4) Plug in the power cords of the devices to either 3 or 4, whichever the TV channel is connected to an...
...become poor if this unit to your area. RF MODULATOR CONNECTION Introduction Connections If your TV has antenna in jack only, it according to the manual supplied with the RF modulator. If your RF modulator has a Modulator/Antenna switch, set the RF modulator's channel 3/4 switch. For more details, ...follow the manual supplied with the RF modulator. 4) Plug in the power cords of the devices to either 3 or 4, whichever the TV channel is connected to an...

Owner's Manual - English
Page 21
... 21 2007/12/17 11:11:36 Method 1 analog audio TV standard picture Method 2 good picture Method 3 better picture Connections rear of your TV owner's manual for details. Check your TV AUDIO IN L R VIDEO IN S-VIDEO IN COMPONENT VIDEO IN Y PB/CB PR/CR Basic Setup RCA audio cable this unit...
... 21 2007/12/17 11:11:36 Method 1 analog audio TV standard picture Method 2 good picture Method 3 better picture Connections rear of your TV owner's manual for details. Check your TV AUDIO IN L R VIDEO IN S-VIDEO IN COMPONENT VIDEO IN Y PB/CB PR/CR Basic Setup RCA audio cable this unit...

Owner's Manual - English
Page 24
... reproduces the original sound as truthfully as possible. Multi-channel Surround System is encoded audio for both Dolby Digital and DTS, connect to the owner's manual accompanying external devices for more information. If output is developed by an MD or DAT deck. • By connecting this unit to the DTS decoder...
... reproduces the original sound as truthfully as possible. Multi-channel Surround System is encoded audio for both Dolby Digital and DTS, connect to the owner's manual accompanying external devices for more information. If output is developed by an MD or DAT deck. • By connecting this unit to the DTS decoder...

Owner's Manual - English
Page 25
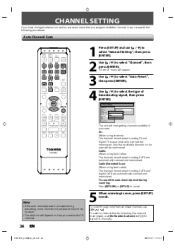
...-R560KU_EN.indd 25 Press [ENTER] to select the desired channel preset type then press [ENTER]. Initial Setting Function Setup Clock Setting Proceed to step 5 in "Manual Clock Setting" on page 30. • If a PBS (public broadcasting station) is used will start getting channels available in CATV are automatically scanned and memorized...
...-R560KU_EN.indd 25 Press [ENTER] to select the desired channel preset type then press [ENTER]. Initial Setting Function Setup Clock Setting Proceed to step 5 in "Manual Clock Setting" on page 30. • If a PBS (public broadcasting station) is used will start getting channels available in CATV are automatically scanned and memorized...
Owner's Manual - English
Page 26
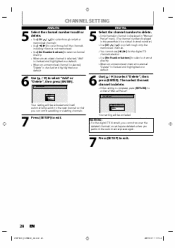
... "General Setting", then press [ENTER]. General Setting Playback Display Video Recording Clock Channel DivX HDMI Reset All SKIP REV FWD SKIP Auto Preset Auto Preset Manual Preset TV Audio Select Air Cable Cable (Extended Scan) PAUSE PLAY STOP TIME SLIP 1.3x / 0.8x PLAY INSTANT SKIP REPEAT REC MODE REC ZOOM SE...
... "General Setting", then press [ENTER]. General Setting Playback Display Video Recording Clock Channel DivX HDMI Reset All SKIP REV FWD SKIP Auto Preset Auto Preset Manual Preset TV Audio Select Air Cable Cable (Extended Scan) PAUSE PLAY STOP TIME SLIP 1.3x / 0.8x PLAY INSTANT SKIP REPEAT REC MODE REC ZOOM SE...

Owner's Manual - English
Page 27
.../12/17 11:11:43 Adding channels is only available for the analog TV channels. Connections Basic Setup Disc Management Use [K / L] to select "Manual Preset", then press [ENTER]. "Manual Preset" menu will appear. Make sure • You perform "Auto Channel Scan" before adding or deleting the channels. DTV/TV SETUP DISPLAY AUDIO...
.../12/17 11:11:43 Adding channels is only available for the analog TV channels. Connections Basic Setup Disc Management Use [K / L] to select "Manual Preset", then press [ENTER]. "Manual Preset" menu will appear. Make sure • You perform "Auto Channel Scan" before adding or deleting the channels. DTV/TV SETUP DISPLAY AUDIO...
Owner's Manual - English
Page 28
...; Use [the Number buttons] to select a channel directly. • When an unmemorized channel is selected "Delete" is complete, press [RETURN] to activate "Manual Preset". Press [SETUP] to select "Delete", then press [ENTER]. DTV 2 Add Delete (CH - - - ) Your setting will automatically switch to the ...setting is checked and highlighted as a default. 5 6 DIGITAL Select the channel number to delete. • Only the major channel is displayed in "Manual Preset" menu. (The channel number displayed in the parenthesis is a virtual channel number) • Use [CH / ] to cycle through all the ...
...; Use [the Number buttons] to select a channel directly. • When an unmemorized channel is selected "Delete" is complete, press [RETURN] to activate "Manual Preset". Press [SETUP] to select "Delete", then press [ENTER]. DTV 2 Add Delete (CH - - - ) Your setting will automatically switch to the ...setting is checked and highlighted as a default. 5 6 DIGITAL Select the channel number to delete. • Only the major channel is displayed in "Manual Preset" menu. (The channel number displayed in the parenthesis is a virtual channel number) • Use [CH / ] to cycle through all the ...

Owner's Manual - English
Page 29
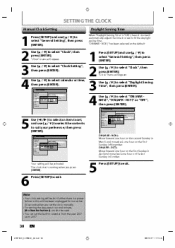
...Setting Playback Display Video Recording Clock Channel DivX HDMI Reset All Clock Setting Auto Clock Setting Auto Clock Setting Daylight Saving Time OFF Auto Manual Disc Management SPACE TIMER PROG. If a PBS (public broadcasting station) is available in the power cord. • Only the analog... to select "General Setting", then press [ENTER]. ENTER CLEAR RETURN SKIP REV FWD SKIP Press [I/y ON/STANDBY] to enter your area, follow "Manual Clock Setting" on them to a cable/satellite box, select the local PBS station on page 30. Playback This unit will appear. Use [the ...
...Setting Playback Display Video Recording Clock Channel DivX HDMI Reset All Clock Setting Auto Clock Setting Auto Clock Setting Daylight Saving Time OFF Auto Manual Disc Management SPACE TIMER PROG. If a PBS (public broadcasting station) is available in the power cord. • Only the analog... to select "General Setting", then press [ENTER]. ENTER CLEAR RETURN SKIP REV FWD SKIP Press [I/y ON/STANDBY] to enter your area, follow "Manual Clock Setting" on them to a cable/satellite box, select the local PBS station on page 30. Playback This unit will appear. Use [the ...
Owner's Manual - English
Page 30
... will be activated. ON (APR - Your setting will be lost if either there is "ON", the unit clock will appear. SETTING THE CLOCK Manual Clock Setting Daylight Saving Time When "Daylight Saving Time" is a power failure or this unit has been unplugged for more than 30 seconds when you... one hour on the last Sunday in November. Use [K / L] to suit your preference, then press [ENTER]. The clock start counting when you set the clock manually. • For setting the day, year, hour and minute, [the Number buttons] can also be used. • You can set , and use [K / L] to ...
... will be activated. ON (APR - Your setting will be lost if either there is "ON", the unit clock will appear. SETTING THE CLOCK Manual Clock Setting Daylight Saving Time When "Daylight Saving Time" is a power failure or this unit has been unplugged for more than 30 seconds when you... one hour on the last Sunday in November. Use [K / L] to suit your preference, then press [ENTER]. The clock start counting when you set the clock manually. • For setting the day, year, hour and minute, [the Number buttons] can also be used. • You can set , and use [K / L] to ...

Owner's Manual - English
Page 31
... . For 2-digit number e.g.) 25ch: [2] + [5] Enter the major and minor channel number with [the Number buttons] to select a channel you switch the analog mode to change manually by using [CH Others / ] EN E7M70UD_D-R560KU_EN.indd 31 31 2007/12/17 11:11:46 Basic Setup Disc Management Recording Playback Note • In...
... . For 2-digit number e.g.) 25ch: [2] + [5] Enter the major and minor channel number with [the Number buttons] to select a channel you switch the analog mode to change manually by using [CH Others / ] EN E7M70UD_D-R560KU_EN.indd 31 31 2007/12/17 11:11:46 Basic Setup Disc Management Recording Playback Note • In...

Owner's Manual - English
Page 33
General Setting Playback Display Video Recording Clock Channel DivX HDMI Reset All Disc Management ENTER CLEAR RETURN Auto Preset Manual Preset TV Audio Select TV Audio Select Stereo SAP SKIP REV FWD SKIP Recording PAUSE PLAY STOP TIME SLIP 1.3x / 0.8x PLAY INSTANT SKIP Stereo: ...
General Setting Playback Display Video Recording Clock Channel DivX HDMI Reset All Disc Management ENTER CLEAR RETURN Auto Preset Manual Preset TV Audio Select TV Audio Select Stereo SAP SKIP REV FWD SKIP Recording PAUSE PLAY STOP TIME SLIP 1.3x / 0.8x PLAY INSTANT SKIP Stereo: ...
Owner's Manual - English
Page 37
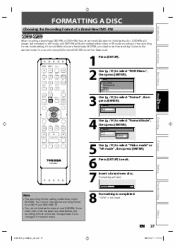
... a brand-new disc. DVD Menu Format Finalize TOP MENU MENU/LIST ENTER CLEAR RETURN Recording SKIP REV FWD SKIP Use [K / L] to exit. You can also manually format a DVD-RW once it in +VR mode, and DVD-RW will be changed even if you need to set the recording format to the...
... a brand-new disc. DVD Menu Format Finalize TOP MENU MENU/LIST ENTER CLEAR RETURN Recording SKIP REV FWD SKIP Use [K / L] to exit. You can also manually format a DVD-RW once it in +VR mode, and DVD-RW will be changed even if you need to set the recording format to the...
Owner's Manual - English
Page 38
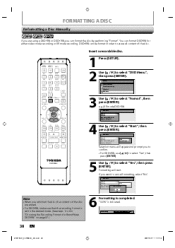
... Use [K / L] to select "Start", then press [ENTER]. Formatting 100% 38 EN 2007/12/17 11:11:54 E7M70UD_D-R560KU_EN.indd 38 FORMATTING A DISC Reformatting a Disc Manually If you are erased. • For DVD-RW, make sure that the recording format is indicated. Delete All Playlists Yes No Note • When you...
... Use [K / L] to select "Start", then press [ENTER]. Formatting 100% 38 EN 2007/12/17 11:11:54 E7M70UD_D-R560KU_EN.indd 38 FORMATTING A DISC Reformatting a Disc Manually If you are erased. • For DVD-RW, make sure that the recording format is indicated. Delete All Playlists Yes No Note • When you...


