
Owners Manual
Page 4
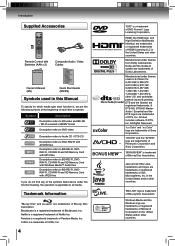
.... Product includes software. © DTS, Inc. Pandora is a registered trademark of HDMI Licensing LLC in the United States and/or other U.S. Introduction Supplied Accessories BONUSVIEW Remote Control with JPEG files If you do not find any of the symbols listed above under the function heading, the operation is applicable to operate...
.... Product includes software. © DTS, Inc. Pandora is a registered trademark of HDMI Licensing LLC in the United States and/or other U.S. Introduction Supplied Accessories BONUSVIEW Remote Control with JPEG files If you do not find any of the symbols listed above under the function heading, the operation is applicable to operate...
Owners Manual
Page 5
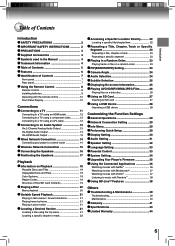
... Accessories 4 symbols used in the Manual 4 Trademark Information 4 Table of Contents 5 Features 6 Identification of Controls 7 Front panel 7 Rear panel 7 Using the Remote Control 8 Remote Control 8 Installing batteries 9 Operating with the remote control 10 Front Panel Display 10 Connections Connecting to a TV 11 Connecting to a TV using an HDMI cable 12 Connecting to a TV...
... Accessories 4 symbols used in the Manual 4 Trademark Information 4 Table of Contents 5 Features 6 Identification of Controls 7 Front panel 7 Rear panel 7 Using the Remote Control 8 Remote Control 8 Installing batteries 9 Operating with the remote control 10 Front Panel Display 10 Connections Connecting to a TV 11 Connecting to a TV using an HDMI cable 12 Connecting to a TV...
Owners Manual
Page 7
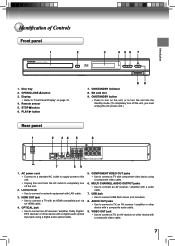
... Panel Display" on the unit, or to connect a TV, an AV receiver or other device with a digital audio optical input jack using a component video cable. 6. Remote sensor 5. Multi channel audio output jacks • Use to turn on page 10. 4. ON/STANDBY button • Press to connect an AV receiver / amplifier with...
... Panel Display" on the unit, or to connect a TV, an AV receiver or other device with a digital audio optical input jack using a component video cable. 6. Remote sensor 5. Multi channel audio output jacks • Use to turn on page 10. 4. ON/STANDBY button • Press to connect an AV receiver / amplifier with...

Owners Manual
Page 8
... SKIP / SKIP . Same as SKIP / SKIP . / For detailed operations, please 22 refer to select the audio mode. Press to the previous menu. Introduction Using the Remote control Remote control 1 2 3 4 BONUSVIEW 5 6 7 8 9 10 11 12 13 14 No. For more details, 21 see "PIP (BONUSVIEW) Setting" on the disc. 6 VOLUME + / - Press to adjust the...
... SKIP / SKIP . Same as SKIP / SKIP . / For detailed operations, please 22 refer to select the audio mode. Press to the previous menu. Introduction Using the Remote control Remote control 1 2 3 4 BONUSVIEW 5 6 7 8 9 10 11 12 13 14 No. For more details, 21 see "PIP (BONUSVIEW) Setting" on the disc. 6 VOLUME + / - Press to adjust the...
Owners Manual
Page 9
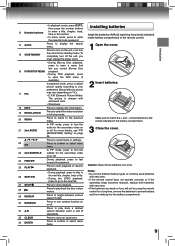
...; E.P.M (Ehanced Picture Mode): The picture is sharper with new ones. • If the batteries are dead or if you will not be using the remote control for the secondary video on or off . on or off. 31 A-B Press to play back the disc in slow motion. 29 REPEAT Press to... In PIP mode, press to confirm or select menu items. Installing batteries Install the batteries (AAAx2) matching the polarity indicated inside battery compartment of the remote control. 1 Open the cover. 2 Insert batteries. Notes: • Do not mix different battery types or combine used batteries with new ones. •...
...; E.P.M (Ehanced Picture Mode): The picture is sharper with new ones. • If the batteries are dead or if you will not be using the remote control for the secondary video on or off . on or off. 31 A-B Press to play back the disc in slow motion. 29 REPEAT Press to... In PIP mode, press to confirm or select menu items. Installing batteries Install the batteries (AAAx2) matching the polarity indicated inside battery compartment of the remote control. 1 Open the cover. 2 Insert batteries. Notes: • Do not mix different battery types or combine used batteries with new ones. •...

Owners Manual
Page 10
...MP3 disc is inserted Loading a disc 10 Angle: About 30° in fast forward / fast reverse mode. 11. Resolution indicator Shows resolution of the remote sensor. DVD indicator Lights when a DVD disc is inserted. 5. CD indicator Lights when a CD disc is inserted. 4. BONUSVIEW * Do not expose the... remote sensor of the current DVD/BD. 7. Audio Channel indicator Shows the audio channel of the Blu-ray disc player to a strong light source such...
...MP3 disc is inserted Loading a disc 10 Angle: About 30° in fast forward / fast reverse mode. 11. Resolution indicator Shows resolution of the remote sensor. DVD indicator Lights when a DVD disc is inserted. 5. CD indicator Lights when a CD disc is inserted. 4. BONUSVIEW * Do not expose the... remote sensor of the current DVD/BD. 7. Audio Channel indicator Shows the audio channel of the Blu-ray disc player to a strong light source such...
Owners Manual
Page 22
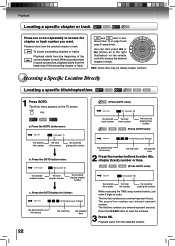
... the total title number the currently playing title number b. The first two numbers you want. and refer to item 26 and item 10 on the remote control to access the desired chapter or track. Note: Some titles may not display chapter numbers. Playback starts from the selected chapter or track. Playback...
... the total title number the currently playing title number b. The first two numbers you want. and refer to item 26 and item 10 on the remote control to access the desired chapter or track. Note: Some titles may not display chapter numbers. Playback starts from the selected chapter or track. Playback...
Owners Manual
Page 35
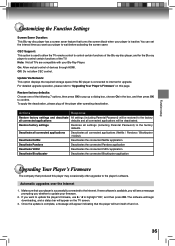
... of the Blu-ray disc player; CEC Support: This option is available, you will be deactivated. and for upgrade. Off: Do not allow the TV remote control to update your Blu-Ray Player. To apply the deactivation, please plug off and on. 35 If new software is used to allow CEC...
... of the Blu-ray disc player; CEC Support: This option is available, you will be deactivated. and for upgrade. Off: Do not allow the TV remote control to update your Blu-Ray Player. To apply the deactivation, please plug off and on. 35 If new software is used to allow CEC...
Owners Manual
Page 36
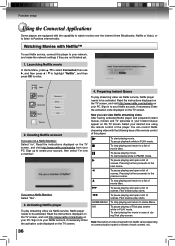
...Vudu 2. Read the instructions displayed on the TV screen. Enter the activation code displayed on the TV screen, and visit http://www.netfix.com/toshiba from your network, and make the network settings if they are not finished yet. 1. To start playing the movie in case of scenes. ... Watching Movies with Netflix™ To use , and then press / to highlight "Netflix", and then press OK to create your desired one using the remote control of movie titles. Creating Netflix account If you are not a Netfix Member: Select "no". Sign up to enter. If you are a Netfix Member...
...Vudu 2. Read the instructions displayed on the TV screen. Enter the activation code displayed on the TV screen, and visit http://www.netfix.com/toshiba from your network, and make the network settings if they are not finished yet. 1. To start playing the movie in case of scenes. ... Watching Movies with Netflix™ To use , and then press / to highlight "Netflix", and then press OK to create your desired one using the remote control of movie titles. Creating Netflix account If you are not a Netfix Member: Select "no". Sign up to enter. If you are a Netfix Member...

Owners Manual
Page 37
..., it . 37 Follow the instructions to select the Rent or Buy, then press OK. 9. Enter YOUR email address using the keyboard that appears on the remote control to enter the activation code that has been added to the Home page. 6. Vudu will then display a message on your player 1. In Home Menu...
..., it . 37 Follow the instructions to select the Rent or Buy, then press OK. 9. Enter YOUR email address using the keyboard that appears on the remote control to enter the activation code that has been added to the Home page. 6. Vudu will then display a message on your player 1. In Home Menu...
Owners Manual
Page 39
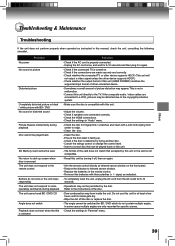
...video cables are connected correctly. - Make sure the disc is not compatible. - Check the HDMI connections. - Clean the disc. - Aim the remote control directly at least a few hours until its inside the unit. Re-insert the batteries with this manual, check the unit, consulting the following checklist... the connections are only recorded for 5-10 seconds. - Cancel the ratings control or change the control level. - Replace the batteries in the remote control. - To completely reset the unit, unplug the AC cord from center to infrared sensor window. - Check if the connected TV is ...
...video cables are connected correctly. - Make sure the disc is not compatible. - Check the HDMI connections. - Clean the disc. - Aim the remote control directly at least a few hours until its inside the unit. Re-insert the batteries with this manual, check the unit, consulting the following checklist... the connections are only recorded for 5-10 seconds. - Cancel the ratings control or change the control level. - Replace the batteries in the remote control. - To completely reset the unit, unplug the AC cord from center to infrared sensor window. - Check if the connected TV is ...
Owners Manual
Page 40
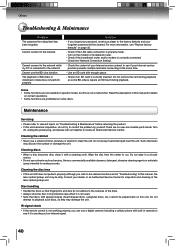
... disc lens • If this manual, the laser optical pickup unit may discolor the surface or damage the unit. IR signal check • If the remote control is not working properly, you forget your password, reset your dealer or an Authorized Service Center for analog records. Check the "Network Connection Setting...
... disc lens • If this manual, the laser optical pickup unit may discolor the surface or damage the unit. IR signal check • If the remote control is not working properly, you forget your password, reset your dealer or an Authorized Service Center for analog records. Check the "Network Connection Setting...
Service Manual
Page 3
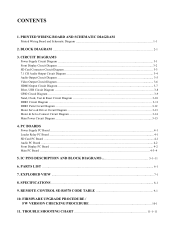
... ...4-1 Loader Relay PC Board ...4-1 SD Card PC Board ...4-1 Audio PC Board ...4-2 Front Display PC Board ...4-2 Main PC Board ...4-3~4 5. IC PINS DESCRIPTION AND BLOCK DIAGRAMS 5-1~11 6. REMOTE CONTROL SE-R0378 CODE TABLE 9-1 10. BLOCK DIAGRAM ...2-1 3. CIRCUIT DIAGRAMS Power Supply Circuit Diagram ...3-1 Front Display Circuit Diagram ...3-2 SD Card Connector Circuit Diagram 3-3 7.1 CH Audio...
... ...4-1 Loader Relay PC Board ...4-1 SD Card PC Board ...4-1 Audio PC Board ...4-2 Front Display PC Board ...4-2 Main PC Board ...4-3~4 5. IC PINS DESCRIPTION AND BLOCK DIAGRAMS 5-1~11 6. REMOTE CONTROL SE-R0378 CODE TABLE 9-1 10. BLOCK DIAGRAM ...2-1 3. CIRCUIT DIAGRAMS Power Supply Circuit Diagram ...3-1 Front Display Circuit Diagram ...3-2 SD Card Connector Circuit Diagram 3-3 7.1 CH Audio...
Service Manual
Page 36
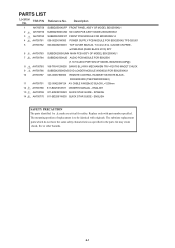
...SD CARD PCB ASS'Y MODEL BDX2500KU1 3 AH700760 SUBBDX2500FNT FRONT PCB MODULE FOR BDX2500KU14 4 AH700761 038-002001W000 POWER SUPPLY PCB MODULE FOR BDX2500KU TPS-020U01 5 AH700762 600-BD2520W001 TOP COVER BD25-20, T=0.4mm E.G. The mounting position of replacement is to be identical with...TRV412W000 SANYO BLU-RAY MECHANISM TRV-412VTH5 MAGET CHUCK 9 AH700766 SUBBDX2500KDVD DVD LOADER MODULE WXD9332i FOR BDX2500KU1 10 AH700767 043-000378W000 REMOTE CONTROL HANDSET SE-R0378 BLACK, FOR BDX2500 (TSB:P86D00000440) 11 AH700751 122-004220W124 AV CABLE AWG28x3C BLACK L=1200mm 12 AH700768...
...SD CARD PCB ASS'Y MODEL BDX2500KU1 3 AH700760 SUBBDX2500FNT FRONT PCB MODULE FOR BDX2500KU14 4 AH700761 038-002001W000 POWER SUPPLY PCB MODULE FOR BDX2500KU TPS-020U01 5 AH700762 600-BD2520W001 TOP COVER BD25-20, T=0.4mm E.G. The mounting position of replacement is to be identical with...TRV412W000 SANYO BLU-RAY MECHANISM TRV-412VTH5 MAGET CHUCK 9 AH700766 SUBBDX2500KDVD DVD LOADER MODULE WXD9332i FOR BDX2500KU1 10 AH700767 043-000378W000 REMOTE CONTROL HANDSET SE-R0378 BLACK, FOR BDX2500 (TSB:P86D00000440) 11 AH700751 122-004220W124 AV CABLE AWG28x3C BLACK L=1200mm 12 AH700768...
Service Manual
Page 39
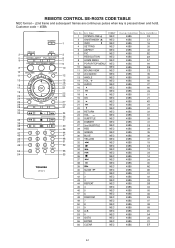
... 45B5 09 52 A-B NEC 45B5 2C 53 0 NEC 45B5 0A 54 GOTO NEC 45B5 26 55 ENTER NEC 45B5 21 56 CLEAR NEC 45B5 EF 9-1 REMOTE CONTROL SE-R0378 CODE TABLE NEC format -- (2nd frame and subsequent frames are continuous pulses when key is pressed down and hold).
... 45B5 09 52 A-B NEC 45B5 2C 53 0 NEC 45B5 0A 54 GOTO NEC 45B5 26 55 ENTER NEC 45B5 21 56 CLEAR NEC 45B5 EF 9-1 REMOTE CONTROL SE-R0378 CODE TABLE NEC format -- (2nd frame and subsequent frames are continuous pulses when key is pressed down and hold).
Service Manual
Page 40
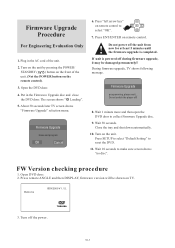
... select "OK". 7. About 30 seconds later TV screen shows "Firmware Upgrade" selection menu. Do not power off the power. 10-1 Turn on the remote control). 3. now for at least 5 minutes until the firmware upgrade is powered off ! 8. Turn off the unit from ! If unit is completed.... Firmware Upgrade Procedure For Engineering Evaluation Only 1. Press "left arrow key" on remote control to make sure screen shows "no disc". Welcome BDX2500 V1. 12. 3. Do not switch the player off during firmware upgrade, it may...
... select "OK". 7. About 30 seconds later TV screen shows "Firmware Upgrade" selection menu. Do not power off the power. 10-1 Turn on the remote control). 3. now for at least 5 minutes until the firmware upgrade is powered off ! 8. Turn off the unit from ! If unit is completed.... Firmware Upgrade Procedure For Engineering Evaluation Only 1. Press "left arrow key" on remote control to make sure screen shows "no disc". Welcome BDX2500 V1. 12. 3. Do not switch the player off during firmware upgrade, it may...

Service Manual
Page 49
...if there is output waveform from the first pin IR of the remote sensor after pressing button on pin G5 of IC4001. Yes Change IC4001 or replace Main PCB. Yes Use an oscilloscope to the remote sensor is insensitive or fails. Go Trouble shooting chart Check if ...the remote control works properly. No Check R103 or replace Front PCB. Remote reception is normal. No Correct connection. No Check battery. RC waveform) ...
...if there is output waveform from the first pin IR of the remote sensor after pressing button on pin G5 of IC4001. Yes Change IC4001 or replace Main PCB. Yes Use an oscilloscope to the remote sensor is insensitive or fails. Go Trouble shooting chart Check if ...the remote control works properly. No Check R103 or replace Front PCB. Remote reception is normal. No Correct connection. No Check battery. RC waveform) ...


