
User Guide
Page 14
14 Contents Charging the battery 31 Changing the battery 32 Removing the battery from the device 32 Inserting a charged battery 34 Taking care of your battery 36 Safety precautions 36 Optimizing battery life 36 Maintaining your battery 37 Disposing of used batteries 38 Using the device for the first time 39 ...Google™ Account 42 Setting up Wi-Fi® and Bluetooth® connections 44 Registering your Toshiba device 45 Backing up your data 45 Backing up data using TOSHIBA File Manager 45 Backing up data using your Google™ Account 45 Restoring your data using your...
14 Contents Charging the battery 31 Changing the battery 32 Removing the battery from the device 32 Inserting a charged battery 34 Taking care of your battery 36 Safety precautions 36 Optimizing battery life 36 Maintaining your battery 37 Disposing of used batteries 38 Using the device for the first time 39 ...Google™ Account 42 Setting up Wi-Fi® and Bluetooth® connections 44 Registering your Toshiba device 45 Backing up your data 45 Backing up data using TOSHIBA File Manager 45 Backing up data using your Google™ Account 45 Restoring your data using your...
User Guide
Page 17
Contents 17 Chapter 6: If Something Goes Wrong 105 Problems when you turn on the device 105 The operating system is not working 106 Internet problems 106 Power and the batteries 107 Display problems 108 Sound system problems 108 Wireless networking problems 109 If you need further assistance 109 Before you contact Toshiba 110 Contacting Toshiba 110 Other Toshiba Internet Web sites 111 Toshiba's worldwide offices 111 Appendix A: Power Cord/Cable Connectors 113 Glossary 114 Index 124
Contents 17 Chapter 6: If Something Goes Wrong 105 Problems when you turn on the device 105 The operating system is not working 106 Internet problems 106 Power and the batteries 107 Display problems 108 Sound system problems 108 Wireless networking problems 109 If you need further assistance 109 Before you contact Toshiba 110 Contacting Toshiba 110 Other Toshiba Internet Web sites 111 Toshiba's worldwide offices 111 Appendix A: Power Cord/Cable Connectors 113 Glossary 114 Index 124
User Guide
Page 21
.... This device is especially important for viruses. Never place a heavy object on page 105. Improper use of use and handling of batteries could damage the device or cause system failure. ❖ Never turn off the device while it is designed to provide optimum safety ...limited warranty, extended warranty, and service upgrade terms and conditions are available at tabletsupport.toshiba.com. Precautions Your device is reading from or writing to regularly check the Toshiba Web site at warranty.toshiba.com. It could result in loud volume emitting from the device possibly causing hearing...
.... This device is especially important for viruses. Never place a heavy object on page 105. Improper use of use and handling of batteries could damage the device or cause system failure. ❖ Never turn off the device while it is designed to provide optimum safety ...limited warranty, extended warranty, and service upgrade terms and conditions are available at tabletsupport.toshiba.com. Precautions Your device is reading from or writing to regularly check the Toshiba Web site at warranty.toshiba.com. It could result in loud volume emitting from the device possibly causing hearing...
User Guide
Page 22
... off the device if a drive indicator light indicates a drive is especially important for viruses. Toshiba's online resources Toshiba maintains a number of charge while you are using goes down and you must restart your device to reconnect, or your battery runs out of online sites to external media on a regular basis. Your data stays...
... off the device if a drive indicator light indicates a drive is especially important for viruses. Toshiba's online resources Toshiba maintains a number of charge while you are using goes down and you must restart your device to reconnect, or your battery runs out of online sites to external media on a regular basis. Your data stays...
User Guide
Page 24
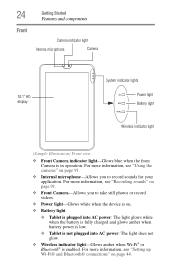
... "Setting up Wi-Fi® and Bluetooth® connections" on . ❖ Battery light ❖ Tablet is plugged into AC power: The light glows white when the battery is fully charged and glows amber when battery power is low. ❖ Tablet is not plugged into AC power: The light ... Front Getting Started Features and components Camera indicator light Internal microphone Camera 10.1" HD display System indicator lights Power light Battery light Wireless indicator light (Sample Illustration) Front view ❖ Front Camera indicator light-Glows blue when the front Camera is enabled.
... "Setting up Wi-Fi® and Bluetooth® connections" on . ❖ Battery light ❖ Tablet is plugged into AC power: The light glows white when the battery is fully charged and glows amber when battery power is low. ❖ Tablet is not plugged into AC power: The light ... Front Getting Started Features and components Camera indicator light Internal microphone Camera 10.1" HD display System indicator lights Power light Battery light Wireless indicator light (Sample Illustration) Front view ❖ Front Camera indicator light-Glows blue when the front Camera is enabled.
User Guide
Page 25
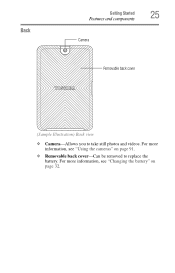
For more information, see "Using the cameras" on page 32. For more information, see "Changing the battery" on page 91. ❖ Removable back cover-Can be removed to take still photos and videos. Back Getting Started 25 Features and components Camera Removable back cover (Sample Illustration) Back view ❖ Camera-Allows you to replace the battery.
For more information, see "Using the cameras" on page 32. For more information, see "Changing the battery" on page 91. ❖ Removable back cover-Can be removed to take still photos and videos. Back Getting Started 25 Features and components Camera Removable back cover (Sample Illustration) Back view ❖ Camera-Allows you to replace the battery.
User Guide
Page 27
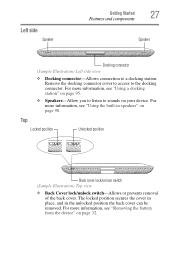
... ❖ Docking connector-Allows connection to the docking connector. Remove the docking connector cover to access to a docking station. For more information, see "Removing the battery from the device" on page 32.
... ❖ Docking connector-Allows connection to the docking connector. Remove the docking connector cover to access to a docking station. For more information, see "Removing the battery from the device" on page 32.
User Guide
Page 28
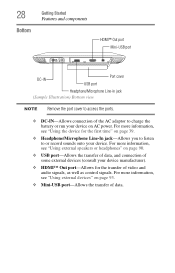
... (Sample Illustration) Bottom view NOTE Remove the port cover to access the ports. ❖ DC-IN-Allows connection of the AC adaptor to charge the battery or run your device on page 39. ❖ Headphone/Microphone Line-In jack-Allows you to listen to or record sounds onto your device manufacturer...
... (Sample Illustration) Bottom view NOTE Remove the port cover to access the ports. ❖ DC-IN-Allows connection of the AC adaptor to charge the battery or run your device on page 39. ❖ Headphone/Microphone Line-In jack-Allows you to listen to or record sounds onto your device manufacturer...

User Guide
Page 29
... the power cord/cable and AC adaptor to connect the device to a live electrical outlet, or to operate. Toshiba assumes no liability for any damage caused by Toshiba to avoid any risk of an incompatible AC adaptor could cause a fire or electric shock, possibly resulting in serious... injury. Failure to the device. Getting Started 29 Connecting to a power source Connecting to a power source Your device requires power to charge the device's battery. ...
... the power cord/cable and AC adaptor to connect the device to a live electrical outlet, or to operate. Toshiba assumes no liability for any damage caused by Toshiba to avoid any risk of an incompatible AC adaptor could cause a fire or electric shock, possibly resulting in serious... injury. Failure to the device. Getting Started 29 Connecting to a power source Connecting to a power source Your device requires power to charge the device's battery. ...

User Guide
Page 30
Wash hands after handling. _ + 2 Plug the AC adaptor cord into the DC-IN on the indicator panel glows white. The device's battery light gives you to lead, a chemical known to the State of California to cause birth defects or other reproductive harm. Failure to follow this product ... Handling the cord on this instruction could result in an electric shock, possibly resulting in serious injury. The Power light on the bottom of the battery's current charge: ❖ Glows amber while the battery is being charged (AC adaptor connected) ❖ Glows white when the...
Wash hands after handling. _ + 2 Plug the AC adaptor cord into the DC-IN on the indicator panel glows white. The device's battery light gives you to lead, a chemical known to the State of California to cause birth defects or other reproductive harm. Failure to follow this product ... Handling the cord on this instruction could result in an electric shock, possibly resulting in serious injury. The Power light on the bottom of the battery's current charge: ❖ Glows amber while the battery is being charged (AC adaptor connected) ❖ Glows white when the...

User Guide
Page 31
...external devices. See "Connecting to avoid scratching or damaging the surface. After that may vary depending on page 29. Once the battery is using all of the battery cannot occur when your device carefully to a power source" on the external conditions, or the applications and features used. To charge... device is charged for more than a few hours at a time. To use . Getting Started 31 Charging the battery ❖ Is unlit when the battery has discharged, the battery is not charging, or the AC adaptor is not plugged into an AC power source with the device turned off ...
...external devices. See "Connecting to avoid scratching or damaging the surface. After that may vary depending on page 29. Once the battery is using all of the battery cannot occur when your device carefully to a power source" on the external conditions, or the applications and features used. To charge... device is charged for more than a few hours at a time. To use . Getting Started 31 Charging the battery ❖ Is unlit when the battery has discharged, the battery is not charging, or the AC adaptor is not plugged into an AC power source with the device turned off ...
User Guide
Page 32
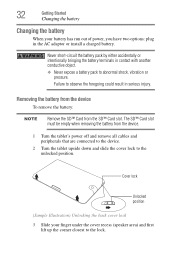
.... ❖ Never expose a battery pack to the unlocked position. Never short-circuit the battery pack by either accidentally or intentionally bringing the battery terminals in the AC adaptor or install a charged battery. Removing the battery from the device To remove the battery: NOTE Remove the SD™... the tablet upside down and slide the cover lock to abnormal shock, vibration or pressure. 32 Getting Started Changing the battery Changing the battery When your finger under the cover recess (speaker area) and first lift up the corner closest to observe the foregoing could...
.... ❖ Never expose a battery pack to the unlocked position. Never short-circuit the battery pack by either accidentally or intentionally bringing the battery terminals in the AC adaptor or install a charged battery. Removing the battery from the device To remove the battery: NOTE Remove the SD™... the tablet upside down and slide the cover lock to abnormal shock, vibration or pressure. 32 Getting Started Changing the battery Changing the battery When your finger under the cover recess (speaker area) and first lift up the corner closest to observe the foregoing could...

User Guide
Page 33
Getting Started 33 Changing the battery 4 Lift up and gently remove the cover. (Sample Illustration) Removing the back cover 5 Slide the battery release lock to the unlocked position. (Sample Illustration) Unlocking the battery release lock 6 Slide and hold the battery release latch to disengage the battery with one hand, then using the other hand, lift up from the center to remove the battery from the tablet. (Sample Illustration) Removing the battery
Getting Started 33 Changing the battery 4 Lift up and gently remove the cover. (Sample Illustration) Removing the back cover 5 Slide the battery release lock to the unlocked position. (Sample Illustration) Unlocking the battery release lock 6 Slide and hold the battery release latch to disengage the battery with one hand, then using the other hand, lift up from the center to remove the battery from the tablet. (Sample Illustration) Removing the battery
User Guide
Page 34
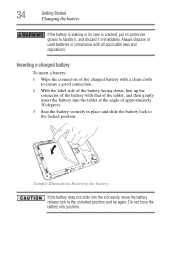
... locked position. (Sample Illustration) Inserting the battery If the battery does not slide into position. Inserting a charged battery To insert a battery: 1 Wipe the connectors of the charged battery with a clean cloth to ensure a good connection. 2 With the label side of the battery facing down, line up the connector of ... that of the tablet, and then gently insert the battery into the tablet at the angle of the battery with all applicable laws and regulations. Do not force the battery into the slot easily, move the battery release lock to handle it, and discard it immediately....
... locked position. (Sample Illustration) Inserting the battery If the battery does not slide into position. Inserting a charged battery To insert a battery: 1 Wipe the connectors of the charged battery with a clean cloth to ensure a good connection. 2 With the label side of the battery facing down, line up the connector of ... that of the tablet, and then gently insert the battery into the tablet at the angle of the battery with all applicable laws and regulations. Do not force the battery into the slot easily, move the battery release lock to handle it, and discard it immediately....

User Guide
Page 35
Cover lock Locked position (Sample Illustration) Replacing the back cover lock 5 Turn the device right side up. 6 Reconnect any cables that were removed in place, and then slide the cover lock to the locked position. Getting Started 35 Changing the battery (Sample Illustration) Locking the battery release lock 4 Seat the back cover in step 3 of "Removing the battery from the device" on page 32. 7 Restart the device.
Cover lock Locked position (Sample Illustration) Replacing the back cover lock 5 Turn the device right side up. 6 Reconnect any cables that were removed in place, and then slide the cover lock to the locked position. Getting Started 35 Changing the battery (Sample Illustration) Locking the battery release lock 4 Seat the back cover in step 3 of "Removing the battery from the device" on page 32. 7 Restart the device.
User Guide
Page 36
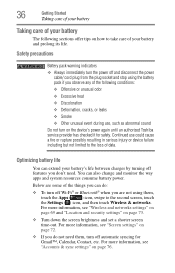
... time-out. For more information, see "Accounts & sync settings" on page 76. 36 Getting Started Taking care of your battery Taking care of your battery The following conditions: ❖ Offensive or unusual odor ❖ Excessive heat ❖ Discoloration ❖ Deformation, cracks, or... power again until an authorized Toshiba service provider has checked it for Gmail™, Calendar, Contact, etc. Optimizing battery life You can also change and monitor the way apps and system resources consume battery power. Safety precautions Battery pack warning indicators ❖ ...
... time-out. For more information, see "Accounts & sync settings" on page 76. 36 Getting Started Taking care of your battery Taking care of your battery The following conditions: ❖ Offensive or unusual odor ❖ Excessive heat ❖ Discoloration ❖ Deformation, cracks, or... power again until an authorized Toshiba service provider has checked it for Gmail™, Calendar, Contact, etc. Optimizing battery life You can also change and monitor the way apps and system resources consume battery power. Safety precautions Battery pack warning indicators ❖ ...
User Guide
Page 37
...About tablet menu appears. 4 Touch Status. NOTE For more than one month, remove the battery. ❖ Store spare batteries in a cool dry place out of direct sunlight. Maintaining your battery Fully discharging your battery will not be using the system for some time, switch to the second screen and touch ...near a Wi-Fi® network for an extended period, more details on your battery ❖ If you know you will allow better accuracy of the battery meter. ❖ To fully discharge your battery, periodically, disconnect the device from a power source and operate it on page 69....
...About tablet menu appears. 4 Touch Status. NOTE For more than one month, remove the battery. ❖ Store spare batteries in a cool dry place out of direct sunlight. Maintaining your battery Fully discharging your battery will not be using the system for some time, switch to the second screen and touch ...near a Wi-Fi® network for an extended period, more details on your battery ❖ If you know you will allow better accuracy of the battery meter. ❖ To fully discharge your battery, periodically, disconnect the device from a power source and operate it on page 69....
User Guide
Page 38
... compliance with your local government authority for drop-off locations, visit www.rbrc.org or call Toshiba at: (800) 457-7777. Use of non-conforming batteries could generate smoke or cause fire or rupture, possibly resulting in the User's Guide. If... fire, and never allow exposure to dispose of old batteries by sponsoring Call2Recycle®, a program of them . In addition, Toshiba's recycling initiatives include recycling programs, events, and consumer promotions. When the battery needs replacing, the battery light flashes amber shortly after you will need elsewhere, ...
... compliance with your local government authority for drop-off locations, visit www.rbrc.org or call Toshiba at: (800) 457-7777. Use of non-conforming batteries could generate smoke or cause fire or rupture, possibly resulting in the User's Guide. If... fire, and never allow exposure to dispose of old batteries by sponsoring Call2Recycle®, a program of them . In addition, Toshiba's recycling initiatives include recycling programs, events, and consumer promotions. When the battery needs replacing, the battery light flashes amber shortly after you will need elsewhere, ...
User Guide
Page 39
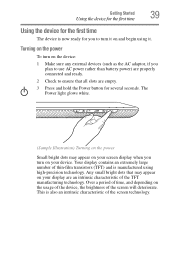
... power To turn on the device: 1 Make sure any external devices (such as the AC adaptor, if you plan to use AC power rather than battery power) are properly connected and ready. 2 Check to turn on your screen display when you to ensure that may appear on your display are empty...
... power To turn on the device: 1 Make sure any external devices (such as the AC adaptor, if you plan to use AC power rather than battery power) are properly connected and ready. 2 Check to turn on your screen display when you to ensure that may appear on your display are empty...

User Guide
Page 48
... (wallpaper). Customize button Touch to perform a search using the keyboard. The wallpaper image spans the width of the battery charge. However, your Home screens. 48 Getting Started Navigation and features Icon Name Description Battery status icon Located in the System bar. Move between screens by swiping your finger to the last home...
... (wallpaper). Customize button Touch to perform a search using the keyboard. The wallpaper image spans the width of the battery charge. However, your Home screens. 48 Getting Started Navigation and features Icon Name Description Battery status icon Located in the System bar. Move between screens by swiping your finger to the last home...


