

Owners Manual
Page 2
... chests or carts may be heavy. Care should be securely attached to walls with the installation instructions. If you for purchasing this Toshiba LCD TV. WARNING To prevent injury, this television, always use the many exciting features of your new LCD TV. p. 6). Some... Listed wall bracket appropriate for the size and weight of this television for wall mounting this television. TOSHIBA Cares! • The consumer electronics industry is appropriate. This manual will help you are mounting the display is committed to falling. The lightning flash with arrowhead symbol...
... chests or carts may be heavy. Care should be securely attached to walls with the installation instructions. If you for purchasing this Toshiba LCD TV. WARNING To prevent injury, this television, always use the many exciting features of your new LCD TV. p. 6). Some... Listed wall bracket appropriate for the size and weight of this television for wall mounting this television. TOSHIBA Cares! • The consumer electronics industry is appropriate. This manual will help you are mounting the display is committed to falling. The lightning flash with arrowhead symbol...
Owners Manual
Page 5
...decide to clean the LCD screen, follow the instructions in the instructions provided with the wall bracket. 4) Make sure to follow this manual to a Toshiba Authorized Service Provider. 47) If you need to wall mount your LCD TV on the included Pedestal Stand: Observe the following safety... Wall Bracket: If you to service the TV yourself. If these sounds become frequent or continuous, unplug the power cord and contact a Toshiba Authorized Service Provider. 44) WARNING: RISK OF SERIOUS PERSONAL INJURY OR EQUIPMENT DAMAGE! Service 46) WARNING: RISK OF ELECTRIC SHOCK! Two ...
...decide to clean the LCD screen, follow the instructions in the instructions provided with the wall bracket. 4) Make sure to follow this manual to a Toshiba Authorized Service Provider. 47) If you need to wall mount your LCD TV on the included Pedestal Stand: Observe the following safety... Wall Bracket: If you to service the TV yourself. If these sounds become frequent or continuous, unplug the power cord and contact a Toshiba Authorized Service Provider. 44) WARNING: RISK OF SERIOUS PERSONAL INJURY OR EQUIPMENT DAMAGE! Service 46) WARNING: RISK OF ELECTRIC SHOCK! Two ...
Owners Manual
Page 10
... Initial settings 30 Menu language 30 Local Time Setting 30 Location 30 ANT/CABLE IN 30 Storing channels in memory (optional 30 Auto Tuning 30 Manual Tuning 31 Skipping channels 31 Skipping video inputs 31 Labeling channels 32 Labeling video inputs 32 Configuring shared inputs 32 Setting the Auto Input feature...
... Initial settings 30 Menu language 30 Local Time Setting 30 Location 30 ANT/CABLE IN 30 Storing channels in memory (optional 30 Auto Tuning 30 Manual Tuning 31 Skipping channels 31 Skipping video inputs 31 Labeling channels 32 Labeling video inputs 32 Configuring shared inputs 32 Setting the Auto Input feature...
Owners Manual
Page 15
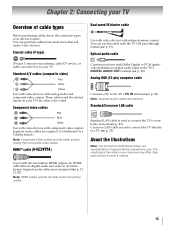
... 19). Separate audio cables are required. (ColorStream® is used to connect the TV to your TV. See each device's owner's manual. 15 Coaxial cable (F-type) Dual-wand IR blaster cable Use with video devices with component video output. You can purchase cables from most... stores that sell audio/video devices. Crossover LAN cable is a Toshiba brand.) Note: Component video cables provide better picture quality than composite video cables. R AUDIO L Standard A/V cables (composite video) Red ...
... 19). Separate audio cables are required. (ColorStream® is used to connect the TV to your TV. See each device's owner's manual. 15 Coaxial cable (F-type) Dual-wand IR blaster cable Use with video devices with component video output. You can purchase cables from most... stores that sell audio/video devices. Crossover LAN cable is a Toshiba brand.) Note: Component video cables provide better picture quality than composite video cables. R AUDIO L Standard A/V cables (composite video) Red ...

Owners Manual
Page 18
Check the owner's manual of the DVD player in order to determine the best output signal available (1080p 24 Hz/30 Hz/50 Hz/25 Hz are required. To ...
Check the owner's manual of the DVD player in order to determine the best output signal available (1080p 24 Hz/30 Hz/50 Hz/25 Hz are required. To ...

Owners Manual
Page 21
... time differs according to the device you use . It will not be sent to the amplifier via the HDMI cable. See the individual instruction manuals for those operations. Before controlling the devices: •For an explanation of the sound on the AV amplifier. p. 46). •Configure the...feature enables the audio signal of the TV to be necessary to connect a cable from the tuner of the AV amplifier to models incorporating Toshiba's HDMI® CEC Control feature. The HDMI® CEC Control feature uses CEC technology as regulated by the HDMI standard. Audio receiver Playback...
... time differs according to the device you use . It will not be sent to the amplifier via the HDMI cable. See the individual instruction manuals for those operations. Before controlling the devices: •For an explanation of the sound on the AV amplifier. p. 46). •Configure the...feature enables the audio signal of the TV to be necessary to connect a cable from the tuner of the AV amplifier to models incorporating Toshiba's HDMI® CEC Control feature. The HDMI® CEC Control feature uses CEC technology as regulated by the HDMI standard. Audio receiver Playback...
Owners Manual
Page 29
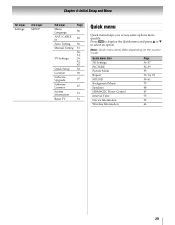
Chapter 4: Initial Setup and Menu 1st Layer Settings 2nd Layer SETUP 3rd Layer Menu Language ANT/CABLE In Auto Tuning Manual Tuning TV Settings Quick Setup Location Software Upgrade Software Licenses System Information Reset TV Page 30 30 30 31 30, 31, 39, 42, 45 30 ...
Chapter 4: Initial Setup and Menu 1st Layer Settings 2nd Layer SETUP 3rd Layer Menu Language ANT/CABLE In Auto Tuning Manual Tuning TV Settings Quick Setup Location Software Upgrade Software Licenses System Information Reset TV Page 30 30 30 31 30, 31, 39, 42, 45 30 ...
Owners Manual
Page 30
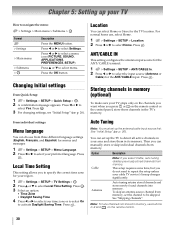
.../CABLE terminal. 1 > Settings > SETUP > ANT/CABLE In. 2 Press C or c to select Settings. Chapter 5: Setting up your preferred language. From individual settings: Menu language You can manually store or skip individual channels from three different language settings (English, Français, and Español) for the TV location. Note: To tune...
.../CABLE terminal. 1 > Settings > SETUP > ANT/CABLE In. 2 Press C or c to select Settings. Chapter 5: Setting up your preferred language. From individual settings: Menu language You can manually store or skip individual channels from three different language settings (English, Français, and Español) for the TV location. Note: To tune...

Owners Manual
Page 31
...9 ATV 10 ATV 11 ATV 12 ATV 3 Move to abort. To view the programmed channels, press CH or . The box is known. 1 > Settings > SETUP > Manual Tuning > . Press . OK 3 Press B or b to turn off skip: Press again the RED button to be skipped. 1 > Settings > SETUP > TV Settings >... . OK A confirmation screen appears. 2 Press OK to start Manual Tuning. OK Note: You cannot tune skipped channels using CH or . CH Use buttons 0-9 and - The channels found are listed at the center of channels...
...9 ATV 10 ATV 11 ATV 12 ATV 3 Move to abort. To view the programmed channels, press CH or . The box is known. 1 > Settings > SETUP > Manual Tuning > . Press . OK 3 Press B or b to turn off skip: Press again the RED button to be skipped. 1 > Settings > SETUP > TV Settings >... . OK A confirmation screen appears. 2 Press OK to start Manual Tuning. OK Note: You cannot tune skipped channels using CH or . CH Use buttons 0-9 and - The channels found are listed at the center of channels...

Owners Manual
Page 35
... in one for the left images are positioned at the top and bottom of when viewing in Native mode is 3D, it can be selected manually. Input Behavior Analog Inputs Changes the viewing mode to 2D to 3D mode. HDMI Displays the selection window. Media Player Movie Photo Displays the selection...
... in one for the left images are positioned at the top and bottom of when viewing in Native mode is 3D, it can be selected manually. Input Behavior Analog Inputs Changes the viewing mode to 2D to 3D mode. HDMI Displays the selection window. Media Player Movie Photo Displays the selection...

Owners Manual
Page 39
... digital channels when the TV is in the TV's channel memory (- p. 46). 5 Select On or Off. 6 To return to Off (- Digital channels have priority when manually entering a channel number using the 0-9 buttons on the remote control to ). •Quickly change inputs from the Inputs List. •Quickly select HDMI® CEC...
... digital channels when the TV is in the TV's channel memory (- p. 46). 5 Select On or Off. 6 To return to Off (- Digital channels have priority when manually entering a channel number using the 0-9 buttons on the remote control to ). •Quickly change inputs from the Inputs List. •Quickly select HDMI® CEC...

Owners Manual
Page 63
.... Press . OK Easy Setup using the Software Keyboard (- Press . OK 6 Scan screen appears. OK Note: Check the MAC address on the label or in the manual of network security features. •Assisted Setup (setup using PBC (Push Button Configuration) 1 > Settings > PREFERENCES > Network Setup > . Press C or c to ... To cancel searching for the AP: Press while searching for the AP. OK Note: Check the MAC address on the label or in the manual of the AP and select an AP. 5 Select Security Key. Press . Wireless Setup Note: • Continued AP (Access Point) connection ...
.... Press . OK Easy Setup using the Software Keyboard (- Press . OK 6 Scan screen appears. OK Note: Check the MAC address on the label or in the manual of network security features. •Assisted Setup (setup using PBC (Push Button Configuration) 1 > Settings > PREFERENCES > Network Setup > . Press C or c to ... To cancel searching for the AP: Press while searching for the AP. OK Note: Check the MAC address on the label or in the manual of the AP and select an AP. 5 Select Security Key. Press . Wireless Setup Note: • Continued AP (Access Point) connection ...
Owners Manual
Page 64
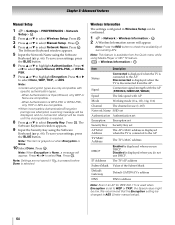
... address DNS DNS's address Note: Even if an AP for IEEE 802.11n is used when Encryption is connected to AES (Under manual setup). 64 Note: Press the RED button to select Yes. Signal Connection signal strength with the AP (STRONG/MEDIUM/WEAK) Speed ... None, WEP, TKIP, or AES. p. 66). To save your settings, press the BLUE button. Chapter 8: Advanced features Manual Setup 1 > Settings > PREFERENCES > Network Setup > . OK 2 Press B or b to select Manual Setup. OK 3 Press B or b to select Wireless Setup. Press . Press C or c to the AP. is selected...
... address DNS DNS's address Note: Even if an AP for IEEE 802.11n is used when Encryption is connected to AES (Under manual setup). 64 Note: Press the RED button to select Yes. Signal Connection signal strength with the AP (STRONG/MEDIUM/WEAK) Speed ... None, WEP, TKIP, or AES. p. 66). To save your settings, press the BLUE button. Chapter 8: Advanced features Manual Setup 1 > Settings > PREFERENCES > Network Setup > . OK 2 Press B or b to select Manual Setup. OK 3 Press B or b to select Wireless Setup. Press . Press C or c to the AP. is selected...

Owners Manual
Page 65
...also be between 0 and 255. OK 2 Press B or b to select DNS Setup. Press . OK 3 Press B or b to select Advanced Network Setup. Press . Manual setup: 1 > Settings > PREFERENCES > Network Setup > . OK 3 Press B or b to select MAC Address. To save the setting, press . If you use ... service provider. Press . IP Address Setup Note: The settings in Auto Setup are linked to those selected in the IP Address Setup menu. Press . Manual Setup: 1 > Settings > PREFERENCES > Network Setup > . Press . OK Note: • IP address field numbers must be set to On....
...also be between 0 and 255. OK 2 Press B or b to select DNS Setup. Press . OK 3 Press B or b to select Advanced Network Setup. Press . Manual setup: 1 > Settings > PREFERENCES > Network Setup > . OK 3 Press B or b to select MAC Address. To save the setting, press . If you use ... service provider. Press . IP Address Setup Note: The settings in Auto Setup are linked to those selected in the IP Address Setup menu. Press . Manual Setup: 1 > Settings > PREFERENCES > Network Setup > . Press . OK Note: • IP address field numbers must be set to On....

Owners Manual
Page 71
...: USB Mass Storage Class devices (MSC) Note: • Connectivity is not guaranteed for example) Supported file system FAT12, FAT16 and FAT32 You must manually start the Media Player from the menu. DLNA CERTIFIED™ Server: NAS, your home network. Auto Start: 1 Insert a USB device into the USB... use . • is inserted. DMS is a device with USB When Auto Start is enabled, you want to the last-viewed channel or video input. 71 Toshiba cannot and does not grant such permission. OK 3 Press B or b to select Setup. Press C or c to select Yes. A prompt appears. 2 Press...
...: USB Mass Storage Class devices (MSC) Note: • Connectivity is not guaranteed for example) Supported file system FAT12, FAT16 and FAT32 You must manually start the Media Player from the menu. DLNA CERTIFIED™ Server: NAS, your home network. Auto Start: 1 Insert a USB device into the USB... use . • is inserted. DMS is a device with USB When Auto Start is enabled, you want to the last-viewed channel or video input. 71 Toshiba cannot and does not grant such permission. OK 3 Press B or b to select Setup. Press C or c to select Yes. A prompt appears. 2 Press...
Owners Manual
Page 77
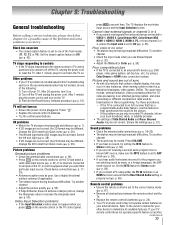
... this Troubleshooting section or the recommended solution has not worked, do one of the Text modes (T1, T2, T3, or T4). Refer to the owner's manual for the program you are not correct, the 3D format may be on the TV. 3) Perform the Reset Factory Defaults procedure (-
... this Troubleshooting section or the recommended solution has not worked, do one of the Text modes (T1, T2, T3, or T4). Refer to the owner's manual for the program you are not correct, the 3D format may be on the TV. 3) Perform the Reset Factory Defaults procedure (-
Owners Manual
Page 78
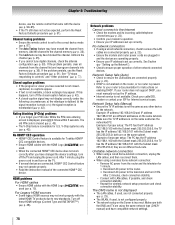
... the router, or no captions appear. • If text is set up the IP address. • Internet service is available for Toshiba HDMI® CEC compatible devices. • Ensure HDMI cables with the Subnet mask 255.255.255.0; Add the channel to ensure proper ...Other problems" (- If the problem persists, use the remote control that came with the HDMI Logo ( ) are using the same network type (DHCP/ manual) and have selected is not closedcaptioned, no router is nonstandard (- No network connection • If using a wireless home-network connection: - Channel tuning ...
... the router, or no captions appear. • If text is set up the IP address. • Internet service is available for Toshiba HDMI® CEC compatible devices. • Ensure HDMI cables with the Subnet mask 255.255.255.0; Add the channel to ensure proper ...Other problems" (- If the problem persists, use the remote control that came with the HDMI Logo ( ) are using the same network type (DHCP/ manual) and have selected is not closedcaptioned, no router is nonstandard (- No network connection • If using a wireless home-network connection: - Channel tuning ...
Owners Manual
Page 79
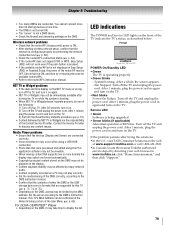
... or call 1-800-631-3811. •In Canada, locate the nearest Toshiba authorized service depot by performing the network connection test (- Contact the Service Provider to the router/AP's instruction manual. Media Player problems • Ensure that the devices (Display and Server) are connected correctly. • Incorrect behavior ...• Set the media sharing of BUS line. LED indications The POWER and Service LED lights on the DMS, access may take time to www.toshiba.ca; Turn off the TV and unplug the power cord. p. 73, 74, or 75). • Depending on the front of the Content ...
... or call 1-800-631-3811. •In Canada, locate the nearest Toshiba authorized service depot by performing the network connection test (- Contact the Service Provider to the router/AP's instruction manual. Media Player problems • Ensure that the devices (Display and Server) are connected correctly. • Incorrect behavior ...• Set the media sharing of BUS line. LED indications The POWER and Service LED lights on the DMS, access may take time to www.toshiba.ca; Turn off the TV and unplug the power cord. p. 73, 74, or 75). • Depending on the front of the Content ...

Owners Manual
Page 81
Chapter 10: Appendix Supplied Accessories • Easy Setup Guide • Pedestal assembly installation manual • Stop/Quick set • Four spacers Use these to attach a wall bracket. See p. 5 and 6. • Two Cable clamps • Two AV adapter cables • ... guide • Remote control with two "AA" size batteries • Mounting screw Use this clip to attach the TV to secure the TV. http://ceaccessories.toshiba.com/ Canada http://www.shoptoshiba.ca/ 81 See item 26 on p. 4 and instructions on p. 4. • Securement Clip Use this screw to a wall stud, pillar, or...
Chapter 10: Appendix Supplied Accessories • Easy Setup Guide • Pedestal assembly installation manual • Stop/Quick set • Four spacers Use these to attach a wall bracket. See p. 5 and 6. • Two Cable clamps • Two AV adapter cables • ... guide • Remote control with two "AA" size batteries • Mounting screw Use this clip to attach the TV to secure the TV. http://ceaccessories.toshiba.com/ Canada http://www.shoptoshiba.ca/ 81 See item 26 on p. 4 and instructions on p. 4. • Securement Clip Use this screw to a wall stud, pillar, or...
Owners Manual
Page 96
...WARRANTY BECOMES THE PROPERTY OF TAIS. Rental Units The limited warranty period begins on our Customer Support Web site at www.support.toshiba.com. WITH LCD TELEVISIONS PURCHASED IN THE U.S.A. Labor service charges for set installation, setup, adjustment of customer controls, and ...PART/PRODUCT WITH A NEW OR REFURBISHED PART/PRODUCT WITHOUT CHARGE TO YOU FOR PARTS OR LABOR. Your Responsibility Read the owner's manual thoroughly before installing or operating this LCD Television and connected equipment; Complete and mail the enclosed product registration card (if provided) or...
...WARRANTY BECOMES THE PROPERTY OF TAIS. Rental Units The limited warranty period begins on our Customer Support Web site at www.support.toshiba.com. WITH LCD TELEVISIONS PURCHASED IN THE U.S.A. Labor service charges for set installation, setup, adjustment of customer controls, and ...PART/PRODUCT WITH A NEW OR REFURBISHED PART/PRODUCT WITHOUT CHARGE TO YOU FOR PARTS OR LABOR. Your Responsibility Read the owner's manual thoroughly before installing or operating this LCD Television and connected equipment; Complete and mail the enclosed product registration card (if provided) or...


