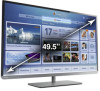
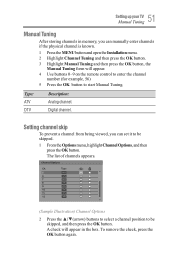
User's Guide for 40L3400U and 50L3400U Series TV's
Page 8
... Agency. ENERGY STAR and the ENERGY STAR mark are not visible when the picture is viewed from a normal viewing distance. therefore, Toshiba is not responsible for perceived issues resulting from the menu, select [Store / Home Mode], then select [Home]. The afterimage is not... operate properly (does not light, remains constantly lit, etc.). ENERGY STAR® User Information ENERGY STAR User Information Statement: the factory default settings of precision technology; This places the TV in [Standard] mode. [Standard] mode is recommended for a long period of malfunction; To ensure...
User's Guide for 40L3400U and 50L3400U Series TV's
Page 11
... effective range 40 Learning about the remote control 41 Chapter 4: Menu Layout and Navigation 44 Main menu layout 44 Navigating the menu system 46 Chapter 5: Setting up your TV 47 Initial Setup 47 Installation setup selection 48 Storing channels in memory (optional 49 Auto Tuning 49 Manual Tuning 51...
User's Guide for 40L3400U and 50L3400U Series TV's
Page 12
12 Contents Resetting Factory Defaults 53 Chapter 6: Setting up your TV 54 Selecting the video input source 54 Labeling the video input sources 56 Tuning to the next programmed channel............58 Tuning to a ... 65 Adjusting the picture 66 Selecting the picture mode 66 Adjusting the picture quality 67 Using closed captions 68 Base closed captions 68 Digital CC settings 69 Adjusting the audio 71 Muting the sound 71 Using the Digital Audio Selection 71 Selecting stereo/SAP broadcasts 72
User's Guide for 40L3400U and 50L3400U Series TV's
Page 13
... Viewing photo files and playing music files at the same time 89 Playing video files 89 During playback you can do the following 90 To set the repeat mode 90 DivX 91 To register your TV to a DivX® account 91 To unregister your device 91 To playback DivX HD content...
User's Guide for 40L3400U and 50L3400U Series TV's
Page 14
... information 98 Understanding the last mode memory feature..........99 Chapter 7: Using the TV's Advanced Features 100 Using the advanced picture settings 100 ColorMaster 100 Base Color Adjustment 100 Color Temperature 101 Static Gamma 101 DynaLightTM 102 Dynamic Contrast 102 Cinema Mode 102 Noise...104 When using a Wireless network connection...........105 Wireless LAN and your Health 105 Using the TV in a wireless LAN environment:...105 Setting up the Network 106 Wireless Setup 106 Easy Setup using PBC (Push button configuration 107 Easy Setup using PIN (Personal Identification ...
User's Guide for 40L3400U and 50L3400U Series TV's
Page 18
...CQ EngineTM-A powerful video processing engine with rich bass, high frequency detail and clear dialog. Eliminates the need for a separate digital converter set time expires. v Cinema Mode-Shows film-like quality movies, see "ColorMaster™" on page 29. v Digital Audio Out-Optical audio... connection with image synchronization to access your new Toshiba wide screen, integrated HD LED TV: v Integrated digital tuning (8VSB ATSC and QAM) - v GameTimerTM-Allows you to the HDMI®...
User's Guide for 40L3400U and 50L3400U Series TV's
Page 19
... intensity based on the content to create higher dynamic contrast, for your home network. v Smart TV-Connects you to online content and your desired picture settings and achieve a sharper picture, see "DynaLightTM" on page 102. You can access key media apps including Netflix®, Pandora®, and YouTubeTM, see "MediaShare (Videos...
User's Guide for 40L3400U and 50L3400U Series TV's
Page 20
... into the TV's channel memory, see "Auto Tuning" on page 49. Then press the POWER button on the TV control panel or remote control to set up your TV and begin using its many exciting features. 1 Carefully read the important safety, installation, care, and service information. 20 Introduction Overview of installation...
User's Guide for 40L3400U and 50L3400U Series TV's
Page 25
... audio and picture quality. Component video cables (red/green/blue) Component video cables (red/green/blue) Component video cables come in sets of component video). HDMI® cable (with analog audio and composite video output. An HDMI® cable delivers digital audio and video... of cable types (Sample Illustration) Standard AV cables Standard A/V cables (composite video) usually come in sets of three and connect with video devices with component video output. (ColorStreamTM is Toshiba's brand of three, and connect to video devices with HDMI Logo) (Sample Illustration) HDMI®...
User's Guide for 40L3400U and 50L3400U Series TV's
Page 27
...switch AV input mode appropriately. Select the ANT/CABLE video input source on the VCR or camcorder video. v Standard audio cable The menu setting may need to your VCR's audio out terminal using the white audio cable only. Composite and component video cannot be changed in order to ... Use the cable box controls to civil and criminal liability. When you use , distribution, or revision of the United States and other materials is set to watch the shared input between composite and component video. 27 Connecting Your TV Connecting a VCR, antenna, cable TV, or camcorder Items needed: ...
User's Guide for 40L3400U and 50L3400U Series TV's
Page 29
... video input source, press the INPUT button on the remote control, see "HDMI® signal formats" on page 54. compliant[1] consumer electronic devices (such as a set-top box or DVD player with HDMI® or DVI output). 29 Connecting Your TV Connecting an HDMI® or DVI device to the HDMI...
User's Guide for 40L3400U and 50L3400U Series TV's
Page 32
...is not liable for those operations. Refer to models incorporating Toshiba's HDMI® CEC. v The connected devices must also be configured. However, Toshiba is limited to the individual instruction manuals for each device..., etc.) Playback device (HDMI® CEC DVD Player, etc.) (Sample Illustration) 40/50L3400U-HDMI® CEC compatible audio receiver and playback device connections To connect an HDMI® ...device, you use an HDMI® cable with the desired settings, see the operation manual for compatibility information. v For proper operation, it is ...
User's Guide for 40L3400U and 50L3400U Series TV's
Page 42
..." on page 44. 18 The Arrow buttons select or adjust programming menus when a menu is on page 92. 6 The C. When the TV is present), see "Setting the sleep timer" on -screen. The (Dash 100) button allows you to enter two part channel numbers, see "Storing channels in memory (optional)" on page...
User's Guide for 40L3400U and 50L3400U Series TV's
Page 44
...To open the menus (illustrated below and on the remote control. Icon Picture Item Picture Mode Reset Backlight Contrast Brightness Color Tint Sharpness Advanced Picture Settings Display Settings Option Dynamic / Standard / Movie / Game / PC / Store NOTE Store Mode is only available if the TV is hidden in the Installation Menu..., the set to Store in the initial menu or Store in the Home Mode. Reverts to Store Picture Mode. NOTE When the TV is set will always reset to the factory defaults for the selected picture mode Adjusts...
User's Guide for 40L3400U and 50L3400U Series TV's
Page 46
.... 6 For information on how to contact Customer Support, press the MENU button > Get Help > System Information > OK button. This is set to save your TV's on-screen menu system. 1 Press the MENU button to open , use the buttons on the remote control to access... select a highlighted item. Picture Sound Options Installation Network Timers Picture Picture Mode Reset Backlight Contrast Brightness Color Tint Sharpness Advanced Picture Setting Display Setting Standard 55 95 0 0 0 0 Get Help (Sample Image) Navigating the menu system 2 When a menu is receiving. The menu background...
User's Guide for 40L3400U and 50L3400U Series TV's
Page 47
...) buttons to select your preferred language. 2 Press the ▲/▼(arrow) buttons to select Time Zone.Then set your TV Initial Setup When you can exit out of the Setup Menu. The Store / Home Mode settings window appears. 3 For normal home use, press the ◄/►(arrow) buttons to select Start Scan... input source (Cable or Antenna), and then press the OK button. 5 Press the OK button to select Home, and then press the OK button. Chapter 5 Setting up your desired time zone, using the ◄/►(arrow) buttons and press the OK button.
User's Guide for 40L3400U and 50L3400U Series TV's
Page 48
...241;ol (Sample Image) Selecting the menu language 3 Press the EXIT button to select your preferred language. ANT/CABLE IN This setting configures the input source for the on-screen display of menus and messages. Setup selection 48 SettingupyourTV Installation setup selection Installation setup ...selection Menu language You can choose from three different menu language settings (English, Français, and Español) for the ANT/CABLE terminal. 1 Press the MENU button and open the ...
User's Guide for 40L3400U and 50L3400U Series TV's
Page 49
...) 3 Open the Channel Tuning menu, highlight ANT/CABLE In, and then press the OK button. however, once channel programming is finished, you must set up the TV to a channel not programmed in the TV's memory. v You must use the Channel Number buttons on the remote control. This is...to select the input source (Cable or Antenna), and then press the OK button to repeat the programming process again unless your new settings. v Programming channels when the ANT/CABLE input is configured for Cable will erase channels that were previously programmed into the TV's memory. 49...
User's Guide for 40L3400U and 50L3400U Series TV's
Page 51
To remove the check, press the OK button again. Type: ATV DTV Description: Analog channel. Setting channel skip To prevent a channel from being viewed, you can set it to be skipped. 1 From the Options menu, highlight Channel Options, and then press the OK button. A check will appear in memory, you can manually.... (Sample Illustration) Channel Options 2 Press the ▲/▼(arrow) buttons to select a channel position to be skipped, and then press the OK button . 51 Setting up your TV SettinMgacnhuaanlnTeulnskinipg Manual Tuning After storing channels in the box.
User's Guide for 40L3400U and 50L3400U Series TV's
Page 52
... the shared AV input on the remote control to save your TV. This feature allows the TV status information to remove the check. 52 SettingupyourTV Setting the tAimVeinzopuntemode To add a channel to the channel memory: v Highlight the checked box next to the channel number you wish to add, and then... press the OK button to display the correct time zone information for either ColorStream HD or Video. You can set the time zone: 1 In the Installation menu, highlight Time Zone, and press the OK button. 2 Press the ▲/▼(arrow) buttons to the list...