User Manual
Page 11
p. 16). •HDMI capabilities ARC (Audio Return Channel) enables the audio signal of the TV to be sent to the AV amplifier via HDMI connection (- p. 18). •Built-in a proper location (- p. 7). •Place the TV in WLAN Allows the television to operate your home wireless network ...
p. 16). •HDMI capabilities ARC (Audio Return Channel) enables the audio signal of the TV to be sent to the AV amplifier via HDMI connection (- p. 18). •Built-in a proper location (- p. 7). •Place the TV in WLAN Allows the television to operate your home wireless network ...
User Manual
Page 15
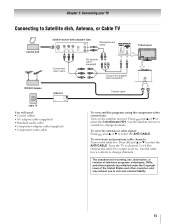
... dish Satellite receiver with component video Y PB PR AUDIO OUT L Satellite COMPONENT VIDEO VIDEO R IN OUT Standard audio cable Component video cable AV adapter cable (supplied) Component adapter cable (supplied) TV back panel VHF/UHF Antenna Cable TV Cable box CH 3 CH 4 IN OUT ...You will need: •Coaxial cables •AV adapter cable (supplied) •Standard audio cable •Component adapter cable (supplied) •Component video cable Coaxial cable To view satellite programs ...
... dish Satellite receiver with component video Y PB PR AUDIO OUT L Satellite COMPONENT VIDEO VIDEO R IN OUT Standard audio cable Component video cable AV adapter cable (supplied) Component adapter cable (supplied) TV back panel VHF/UHF Antenna Cable TV Cable box CH 3 CH 4 IN OUT ...You will need: •Coaxial cables •AV adapter cable (supplied) •Standard audio cable •Component adapter cable (supplied) •Component video cable Coaxial cable To view satellite programs ...
User Manual
Page 17
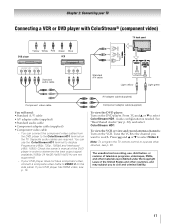
... panel R COMPONENT VIDEO Y PB PR AUDIO OUT L R G B R W R Standard audio cable VIDEO AUDIO L R Y W R Standard A/V cable Light yellow Light green R W AV adapter cable (supplied) R B Component video cable You will need: •Standard A/V cable •AV adapter cable (supplied) •Standard audio cable •Component adapter cable (supplied) •Component video cable - Press + and B or...
... panel R COMPONENT VIDEO Y PB PR AUDIO OUT L R G B R W R Standard audio cable VIDEO AUDIO L R Y W R Standard A/V cable Light yellow Light green R W AV adapter cable (supplied) R B Component video cable You will need: •Standard A/V cable •AV adapter cable (supplied) •Standard audio cable •Component adapter cable (supplied) •Component video cable - Press + and B or...
User Manual
Page 20
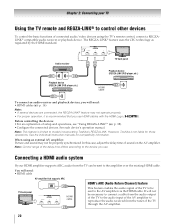
...8226;For an explanation of the delay time differs according to the device you use . See each device's operation manual. However, Toshiba is limited to models incorporating Toshiba's REGZA-LINK. See the individual instruction manuals for those operations. Note: Control range of setup and operations, see "Using REGZA-LINK...ARC HDMI's ARC (Audio Return Channel) feature TV back panel HDMI cable This feature enables the audio signal of the TV through the AV amplifier. 20 Connecting a HDMI audio system If your TV Using the TV remote and REGZA-LINK® to control other devices To ...
...8226;For an explanation of the delay time differs according to the device you use . See each device's operation manual. However, Toshiba is limited to models incorporating Toshiba's REGZA-LINK. See the individual instruction manuals for those operations. Note: Control range of setup and operations, see "Using REGZA-LINK...ARC HDMI's ARC (Audio Return Channel) feature TV back panel HDMI cable This feature enables the audio signal of the TV through the AV amplifier. 20 Connecting a HDMI audio system If your TV Using the TV remote and REGZA-LINK® to control other devices To ...

User Manual
Page 27
... Setup 56 Netflix Setup 62 VUDU Deactivation 62 Media Renderer Setup Photo Frame Setup Channel Browser Setup PIN Setting Parental Control and Locks Display Settings AV Connection Auto Input 66 74 31 35 35 41, 47 29, 30, 40, 41, 53 30 IR Control 18 Energy Saving Settings 43 Blue Screen...
... Setup 56 Netflix Setup 62 VUDU Deactivation 62 Media Renderer Setup Photo Frame Setup Channel Browser Setup PIN Setting Parental Control and Locks Display Settings AV Connection Auto Input 66 74 31 35 35 41, 47 29, 30, 40, 41, 53 30 IR Control 18 Energy Saving Settings 43 Blue Screen...

User Manual
Page 29
... B or b to select Input Labeling. See "Skipping channels". OK A confirmation screen appears. 2 Press OK to start Manual Tuning. OK 2 Use buttons 0-9 on skip: 1 Y > PREFERENCES > AV Connection > . OK 3 Press B or b to select the item you can manually enter channels if the physical channel is selected. OK 2 Press B or b to be skipped... b to select a channel to turn on the remote control. Press the RED button to skip. Press the RED button to turn off skip: 1 Y > PREFERENCES > AV Connection > . Chapter 5: Setting up your cable TV service's lineup changes significantly.
... B or b to select Input Labeling. See "Skipping channels". OK A confirmation screen appears. 2 Press OK to start Manual Tuning. OK 2 Use buttons 0-9 on skip: 1 Y > PREFERENCES > AV Connection > . OK 3 Press B or b to select the item you can manually enter channels if the physical channel is selected. OK 2 Press B or b to be skipped... b to select a channel to turn on the remote control. Press the RED button to skip. Press the RED button to turn off skip: 1 Y > PREFERENCES > AV Connection > . Chapter 5: Setting up your cable TV service's lineup changes significantly.

User Manual
Page 30
...Labeling video inputs The input labels are shown in the input selector, and in step 2. Side Shared Audio 1 Y > PREFERENCES > AV Connection > . To turn off Auto Input: Select Off in the Channel Browser and banner displays. Configuring shared inputs Rear Shared Audio 1 Y > ...setting an input for a specific MODE SELECT button, the TV automatically switches to the input when you want to the TV. 1 Y > PREFERENCES > AV Connection > . To reset Auto Input: Select Reset. Input the desired characters (10 characters or fewer) by pressing the GREEN button, the Software Keyboard...
...Labeling video inputs The input labels are shown in the input selector, and in step 2. Side Shared Audio 1 Y > PREFERENCES > AV Connection > . To turn off Auto Input: Select Off in the Channel Browser and banner displays. Configuring shared inputs Rear Shared Audio 1 Y > ...setting an input for a specific MODE SELECT button, the TV automatically switches to the input when you want to the TV. 1 Y > PREFERENCES > AV Connection > . To reset Auto Input: Select Reset. Input the desired characters (10 characters or fewer) by pressing the GREEN button, the Software Keyboard...

User Manual
Page 40
... suitable widescreen formats and picture preferences when the TV is set the following options (Content Type and INSTAPORT™) to a Toshiba PC compatible with REGZALINK®. Mode (default setting) Description Enable Content Type: On Adjusts the picture quality automatically by the ...item. 5 Press C or c to AutoView, this mode. 1 Select the appropriate HDMI input mode (HDMI 1, HDMI 2, HDMI 3, or HDMI 4). 2 Y > PREFERENCES > AV Connection > . OK 2 Press B or b to highlight Enable REGZA-LINK. 3 Press C or c to operate properly with this feature is capable of 1080p and/or your...
... suitable widescreen formats and picture preferences when the TV is set the following options (Content Type and INSTAPORT™) to a Toshiba PC compatible with REGZALINK®. Mode (default setting) Description Enable Content Type: On Adjusts the picture quality automatically by the ...item. 5 Press C or c to AutoView, this mode. 1 Select the appropriate HDMI input mode (HDMI 1, HDMI 2, HDMI 3, or HDMI 4). 2 Y > PREFERENCES > AV Connection > . OK 2 Press B or b to highlight Enable REGZA-LINK. 3 Press C or c to operate properly with this feature is capable of 1080p and/or your...

User Manual
Page 41
...10 from each input will be output. OK Setting the PC audio You can output sound from your PC with the TV 1 Y > PREFERENCES > AV Connection > . Digital When viewing the HDMI 3 input or HDMI 4 input, digital audio from center. Note: • HDMI 3 Audio is set ... Chapter 6: Basic features Setting the HDMI® audio mode Using your PC when connecting using the AUDIO IN terminal and PC audio cable. 1 Y > PREFERENCES > AV Connection > . p. 30). "Selecting the video input to reduce noise and minimize periodic vertical stripes on p. 33). 2 Y > PREFERENCES > Display Settings > ....
...10 from each input will be output. OK Setting the PC audio You can output sound from your PC with the TV 1 Y > PREFERENCES > AV Connection > . Digital When viewing the HDMI 3 input or HDMI 4 input, digital audio from center. Note: • HDMI 3 Audio is set ... Chapter 6: Basic features Setting the HDMI® audio mode Using your PC when connecting using the AUDIO IN terminal and PC audio cable. 1 Y > PREFERENCES > AV Connection > . p. 30). "Selecting the video input to reduce noise and minimize periodic vertical stripes on p. 33). 2 Y > PREFERENCES > Display Settings > ....
User Manual
Page 53
... program) broadcast, the word STEREO or SAP appears onscreen when is only available for the digital channel. To listen on the ANT/CABLE input. 2 Y > PREFERENCES > AV Connection > . If you select MUTE mode, the closed -captioned. Chapter 7: Picture and sound controls Adjusting the audio Muting the sound Press to select Stereo. Note...
... program) broadcast, the word STEREO or SAP appears onscreen when is only available for the digital channel. To listen on the ANT/CABLE input. 2 Y > PREFERENCES > AV Connection > . If you select MUTE mode, the closed -captioned. Chapter 7: Picture and sound controls Adjusting the audio Muting the sound Press to select Stereo. Note...
User Manual
Page 79
...5.725-5.850 GHz, 2.412-2.462 GHz • Security: WEP64/128, TKIP, AES, WPA/WPA2- See p. 5. • Two Cable clamps • AV adapter cable • Component adapter cable • Registration card TACP 79 See item 25 on p. 4 and instructions on p. 81. Chapter 10: Appendix Specifications ...(J through W) Hyper band (AA through ZZ, AAA, BBB) Ultra band (65 through 94, 100 through 135) Power Source 120 V AC, 60 Hz Power Consumption 46VX700U: 1.4 A (rms) (maximum current) 0.12 W in standby mode 55VX700U: 1.6 A (rms) (maximum current) 0.10 W in the future. Television System NTSC standard...
...5.725-5.850 GHz, 2.412-2.462 GHz • Security: WEP64/128, TKIP, AES, WPA/WPA2- See p. 5. • Two Cable clamps • AV adapter cable • Component adapter cable • Registration card TACP 79 See item 25 on p. 4 and instructions on p. 81. Chapter 10: Appendix Specifications ...(J through W) Hyper band (AA through ZZ, AAA, BBB) Ultra band (65 through 94, 100 through 135) Power Source 120 V AC, 60 Hz Power Consumption 46VX700U: 1.4 A (rms) (maximum current) 0.12 W in standby mode 55VX700U: 1.6 A (rms) (maximum current) 0.10 W in the future. Television System NTSC standard...


