

User Guide
Page 1
...Definition picture, the TV must be receiving a High Definition signal (such as an overthe-air High Definition TV broadcast, a High Definition digital cable program, or a High Definition digital satellite program). Record these numbers whenever you need assistance: Toshiba's Support Web site support.toshiba.com Call Toshiba Customer... High Definition LED Television User's Guide: 19L4200U 24L4200U 32L4200U 40L5200U 46L5200U 50L5200U If you communicate with your Toshiba dealer about this guide. Owner's Record The model number and serial number are on page 122 in the spaces below.
...Definition picture, the TV must be receiving a High Definition signal (such as an overthe-air High Definition TV broadcast, a High Definition digital cable program, or a High Definition digital satellite program). Record these numbers whenever you need assistance: Toshiba's Support Web site support.toshiba.com Call Toshiba Customer... High Definition LED Television User's Guide: 19L4200U 24L4200U 32L4200U 40L5200U 46L5200U 50L5200U If you communicate with your Toshiba dealer about this guide. Owner's Record The model number and serial number are on page 122 in the spaces below.
User Guide
Page 4
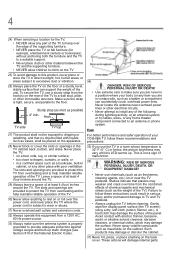
...the TV screen) using a dry, soft cloth (cotton, flannel, etc.). hot, humid areas; Make sure the strap is 32° F (0° C) or below, the picture brightness may damage or discolor the cabinet. 37) Never hit, press, or place anything to rest on the TV 25) To avoid damage to help... are provided to protect the TV from a 120V AC, 60 Hz power source. 33) Always make sure you are never in a position where your TOSHIBA TV, follow these recommendations and precautions: 35) If you use chemicals (such as a bookcase, built-in direct sunlight; This is properly grounded to provide...
...the TV screen) using a dry, soft cloth (cotton, flannel, etc.). hot, humid areas; Make sure the strap is 32° F (0° C) or below, the picture brightness may damage or discolor the cabinet. 37) Never hit, press, or place anything to rest on the TV 25) To avoid damage to help... are provided to protect the TV from a 120V AC, 60 Hz power source. 33) Always make sure you are never in a position where your TOSHIBA TV, follow these recommendations and precautions: 35) If you use chemicals (such as a bookcase, built-in direct sunlight; This is properly grounded to provide...
User Guide
Page 7
... The LCD panel contained in a residential installation. The party responsible for compliance to [Home] mode settings, select [Standard] picture mode. [Standard] mode is manufactured using an extremely high level of precision technology; ENERGY STAR® User Information ENERGY STAR ...User Information Statement: the factory default settings of this equipment. Changing Picture Settings may cause undesired operation. Environmental Protection Agency. therefore, Toshiba is not responsible for perceived issues resulting from these rules is no guarantee that may...
... The LCD panel contained in a residential installation. The party responsible for compliance to [Home] mode settings, select [Standard] picture mode. [Standard] mode is manufactured using an extremely high level of precision technology; ENERGY STAR® User Information ENERGY STAR ...User Information Statement: the factory default settings of this equipment. Changing Picture Settings may cause undesired operation. Environmental Protection Agency. therefore, Toshiba is not responsible for perceived issues resulting from these rules is no guarantee that may...
User Guide
Page 11
...channel (programmed or unprogrammed 70 Switching between two channels using Channel Return 70 Switching between two channels using SurfLock 70 Selecting the picture size 71 Full 72 TheaterWide 1 73 TheaterWide 2 73 TheaterWide 3 74 Native 74 4:3 75 Normal 75 Dot by Dot 75 Scrolling the...only 76 Using the Auto Aspect feature 77 Selecting the cinema mode 78 Using the FREEZE feature 78 Adjusting the picture 79 Selecting the picture mode 79 Adjusting the picture quality 80 Using closed captions 81 Base closed captions 81 Digital CC settings 82 CC Selector 83 Adjusting the ...
...channel (programmed or unprogrammed 70 Switching between two channels using Channel Return 70 Switching between two channels using SurfLock 70 Selecting the picture size 71 Full 72 TheaterWide 1 73 TheaterWide 2 73 TheaterWide 3 74 Native 74 4:3 75 Normal 75 Dot by Dot 75 Scrolling the...only 76 Using the Auto Aspect feature 77 Selecting the cinema mode 78 Using the FREEZE feature 78 Adjusting the picture 79 Selecting the picture mode 79 Adjusting the picture quality 80 Using closed captions 81 Base closed captions 81 Digital CC settings 82 CC Selector 83 Adjusting the ...
User Guide
Page 13
... information 114 Understanding the last mode memory feature ......115 Chapter 7: Using the TV's Advanced Features 116 Using the advanced picture settings 116 Dynamic Contrast 116 Static Gamma 117 Color temperature 117 ClearFrame™ (L5200U Series 118 Film Stabilization (L5200U Series... CableClear® digital Noise Reduction 120 MPEG Noise Reduction 120 Game Mode 121 Chapter 8: Troubleshooting 122 General troubleshooting 122 Picture problems 123 Sound problems 125 Remote control problems 125 Channel tuning problems 126 Closed caption problems 126 Rating blocking (V-Chip)...
... information 114 Understanding the last mode memory feature ......115 Chapter 7: Using the TV's Advanced Features 116 Using the advanced picture settings 116 Dynamic Contrast 116 Static Gamma 117 Color temperature 117 ClearFrame™ (L5200U Series 118 Film Stabilization (L5200U Series... CableClear® digital Noise Reduction 120 MPEG Noise Reduction 120 Game Mode 121 Chapter 8: Troubleshooting 122 General troubleshooting 122 Picture problems 123 Sound problems 125 Remote control problems 125 Channel tuning problems 126 Closed caption problems 126 Rating blocking (V-Chip)...
User Guide
Page 16
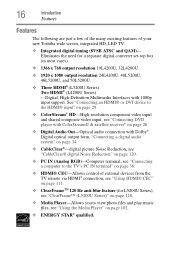
... an HDMI® or DVI device to the TV's PC IN terminal" on page 36. ❖ HDMI® CEC-Allows control of your new Toshiba wide screen, integrated HD, LED TV: ❖ Integrated digital tuning (8VSB ATSC and QAM)- "Connecting a digital audio system" on page 34 ❖...; CableClear®-digital picture Noise Reduction, see "CableClear® digital Noise Reduction" on page 120. ❖ PC IN (Analog RGB)-Computer terminal, see "Connecting a computer to the...
... an HDMI® or DVI device to the TV's PC IN terminal" on page 36. ❖ HDMI® CEC-Allows control of your new Toshiba wide screen, integrated HD, LED TV: ❖ Integrated digital tuning (8VSB ATSC and QAM)- "Connecting a digital audio system" on page 34 ❖...; CableClear®-digital picture Noise Reduction, see "CableClear® digital Noise Reduction" on page 120. ❖ PC IN (Analog RGB)-Computer terminal, see "Connecting a computer to the...

User Guide
Page 23
NOTE Component video cables provide better picture quality than composite video cables. HDMI® cable (with analog audio and composite video output. An HDMI® cable delivers digital audio and video in sets of three and connects with video devices with component video output. (ColorStream® is Toshiba's brand of three, and connects...
NOTE Component video cables provide better picture quality than composite video cables. HDMI® cable (with analog audio and composite video output. An HDMI® cable delivers digital audio and video in sets of three and connects with video devices with component video output. (ColorStream® is Toshiba's brand of three, and connects...
User Guide
Page 24
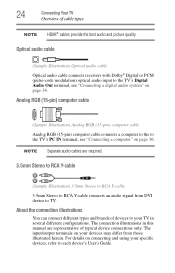
NOTE Separate audio cables are representative of cable types NOTE HDMI® cables provide the best audio and picture quality. The connection illustrations in several different configurations. Analog RGB (15-pin) computer cable (Sample Illustration) Analog RGB (15-pin) computer cable Analog RGB (15-...
NOTE Separate audio cables are representative of cable types NOTE HDMI® cables provide the best audio and picture quality. The connection illustrations in several different configurations. Analog RGB (15-pin) computer cable (Sample Illustration) Analog RGB (15-pin) computer cable Analog RGB (15-...
User Guide
Page 38
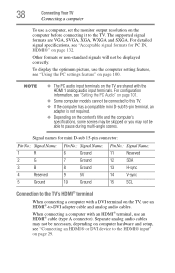
... to the TV's HDMI® terminal When connecting a computer with an HDMI® terminal, use an HDMI® cable (type A connector). To display the optimum picture, use an HDMI®-to the HDMI® input" on page 29. NOTE ❖ The PC audio input terminals on page 100. When connecting a computer...
... to the TV's HDMI® terminal When connecting a computer with an HDMI® terminal, use an HDMI® cable (type A connector). To display the optimum picture, use an HDMI®-to the HDMI® input" on page 29. NOTE ❖ The PC audio input terminals on page 100. When connecting a computer...

User Guide
Page 40
NOTE ❖ The edges of the picture may be hidden. ❖ If receiving a 480i (HDMI®), 480p (HDMI®), 720p, 1080i, or 1080p signal program, Native mode scales the video to display the entire picture within the borders of the screen (i.e. 40 Connecting Your TV Connecting a computer The supported signal formats are VGA, SVGA, XGA, WXGA, SXGA, 480i (60Hz), 480p (60Hz), 720p (60Hz), 1080i (60Hz), and 1080p (24Hz/60Hz). no overscanning). For signal specifications, see "Acceptable signal formats for PC IN, HDMI®" on page 132.
NOTE ❖ The edges of the picture may be hidden. ❖ If receiving a 480i (HDMI®), 480p (HDMI®), 720p, 1080i, or 1080p signal program, Native mode scales the video to display the entire picture within the borders of the screen (i.e. 40 Connecting Your TV Connecting a computer The supported signal formats are VGA, SVGA, XGA, WXGA, SXGA, 480i (60Hz), 480p (60Hz), 720p (60Hz), 1080i (60Hz), and 1080p (24Hz/60Hz). no overscanning). For signal specifications, see "Acceptable signal formats for PC IN, HDMI®" on page 132.

User Guide
Page 44
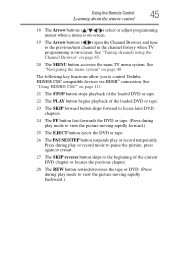
... the main menu system. 17 The CH RTN button returns to restore the moving picture, see "Switching between two channels using the Channel Browser" on page 109. 6 The FREEZE button freezes the picture. 44 Using the Remote Control Learning about the remote control 1 The POWER button...RECALL button displays TV status information. 10 The CH ( / arrow) buttons cycle through the picture sizes, see "Selecting the picture size" on page 71. 3 The PIC MODE button selects the picture mode, see "Selecting the picture mode" on page 79. 4 The INPUT button selects the video input source, see "Selecting...
... the main menu system. 17 The CH RTN button returns to restore the moving picture, see "Switching between two channels using the Channel Browser" on page 109. 6 The FREEZE button freezes the picture. 44 Using the Remote Control Learning about the remote control 1 The POWER button...RECALL button displays TV status information. 10 The CH ( / arrow) buttons cycle through the picture sizes, see "Selecting the picture size" on page 71. 3 The PIC MODE button selects the picture mode, see "Selecting the picture mode" on page 79. 4 The INPUT button selects the video input source, see "Selecting...
User Guide
Page 45
..." on -screen. 19 The Arrow buttons ( / ) open the Channel Browser and tune to control Toshiba HDMI® CEC compatible devices via HDMI® connection. Press during play mode to view the picture moving rapidly forward.) 25 The EJECT button ejects the DVD or tape. 26 The PAUSE/STEP button... current DVD chapter or locates the previous chapter. 28 The REW button rewinds/reverses the tape or DVD. (Press during play mode to pause the picture; Using the Remote Control 45 Learning about the remote control 18 The Arrow buttons ( / / / ) select or adjust programming menus when a menu is ...
..." on -screen. 19 The Arrow buttons ( / ) open the Channel Browser and tune to control Toshiba HDMI® CEC compatible devices via HDMI® connection. Press during play mode to view the picture moving rapidly forward.) 25 The EJECT button ejects the DVD or tape. 26 The PAUSE/STEP button... current DVD chapter or locates the previous chapter. 28 The REW button rewinds/reverses the tape or DVD. (Press during play mode to pause the picture; Using the Remote Control 45 Learning about the remote control 18 The Arrow buttons ( / / / ) select or adjust programming menus when a menu is ...

User Guide
Page 46
... Noise Reduction Game Mode Theater Settings Digital Audio Selector Audio Settings Audio Setup Option Dynamic/Standard/Movie/PC/Preference Opens the Picture Settings menu Opens the Noise Reduction menu Off/On Opens the Theater Settings menu Launches the temporary Audio Selector Opens the Audio Settings menu Opens ...
... Noise Reduction Game Mode Theater Settings Digital Audio Selector Audio Settings Audio Setup Option Dynamic/Standard/Movie/PC/Preference Opens the Picture Settings menu Opens the Noise Reduction menu Off/On Opens the Theater Settings menu Launches the temporary Audio Selector Opens the Audio Settings menu Opens ...

User Guide
Page 71
... than your TV. NOTE Using these functions to civil and criminal liability. Select the picture size that displays the current program in several picture sizes- To select the picture size: 1 Press the PIC SIZE button on the remote. 2 With the Picture Size menu displayed, do one time only. The channel has been programmed to... to the CH RTN button. 3 You can view many program formats in the way that are tuned.This feature also works for any of the picture sizes) depends on the format of the signal you to change channels repeatedly, and when you . The TV will be tuned.
... than your TV. NOTE Using these functions to civil and criminal liability. Select the picture size that displays the current program in several picture sizes- To select the picture size: 1 Press the PIC SIZE button on the remote. 2 With the Picture Size menu displayed, do one time only. The channel has been programmed to... to the CH RTN button. 3 You can view many program formats in the way that are tuned.This feature also works for any of the picture sizes) depends on the format of the signal you to change channels repeatedly, and when you . The TV will be tuned.

User Guide
Page 72
...United States and other countries, and may be grayed out in the Picture Size screen). Full 16:9 NOTE Using these edges, adjust the Picture Position or try viewing the program in 4:3 or Full, see "Scrolling the TheaterWide® picture (TheaterWide 2 and 3 only)" on the receiving signal format (those... 16:9 (480i, 480p) source programs. If receiving a squeezed 4:3 format program, the picture is for any purpose other than your private viewing may be prohibited under the Copyright Laws of the picture sizes may not be available depending on page 76. Full The Full 16:9 setting is ...
...United States and other countries, and may be grayed out in the Picture Size screen). Full 16:9 NOTE Using these edges, adjust the Picture Position or try viewing the program in 4:3 or Full, see "Scrolling the TheaterWide® picture (TheaterWide 2 and 3 only)" on the receiving signal format (those... 16:9 (480i, 480p) source programs. If receiving a squeezed 4:3 format program, the picture is for any purpose other than your private viewing may be prohibited under the Copyright Laws of the picture sizes may not be available depending on page 76. Full The Full 16:9 setting is ...

User Guide
Page 73
...720p program source. (Sample Illustration) Picture size - TheaterWide 1 The center of the picture may be hidden. TheaterWide 2 This setting is for viewing letter box programs. (Sample Illustration) Picture size - Using the TV's features 73 Selecting the picture size The Full setting is for viewing... in 4:3 format programs. (Sample Illustration) Picture size - Full The edges of the picture remains close to its original proportion, but...
...720p program source. (Sample Illustration) Picture size - TheaterWide 1 The center of the picture may be hidden. TheaterWide 2 This setting is for viewing letter box programs. (Sample Illustration) Picture size - Using the TV's features 73 Selecting the picture size The Full setting is for viewing... in 4:3 format programs. (Sample Illustration) Picture size - Full The edges of the picture remains close to its original proportion, but...

User Guide
Page 74
... 720p, 480i (HDMI®), or 480p (HDMI®) signal program, the video is supported only for viewing letter box programs with subtitles The picture's top and bottom edges are for external HD sources such as subtitles or captions), see "Scrolling the TheaterWide®... may be hidden, displayed in 480i (HDMI®), 480p (HDMI®), 720p, 1080i, and 1080p signal programs). (Sample Illustration) Picture size - 74 Using the TV's features Selecting the picture size TheaterWide 3 This setting is for HDMI® (1080i, 1080p, 720p, 480i, and 480p), ColorStream® (1080i and 720p), ...
... 720p, 480i (HDMI®), or 480p (HDMI®) signal program, the video is supported only for viewing letter box programs with subtitles The picture's top and bottom edges are for external HD sources such as subtitles or captions), see "Scrolling the TheaterWide®... may be hidden, displayed in 480i (HDMI®), 480p (HDMI®), 720p, 1080i, and 1080p signal programs). (Sample Illustration) Picture size - 74 Using the TV's features Selecting the picture size TheaterWide 3 This setting is for HDMI® (1080i, 1080p, 720p, 480i, and 480p), ColorStream® (1080i and 720p), ...

User Guide
Page 75
...and bottom. Dot by Dot Dot by Dot This setting is a non-scaling display. Using the TV's features 75 Selecting the picture size 4:3 (Sample Illustration) Picture size - 4:3 Some program formats will display with sidebars and/or bars at the top and bottom. Dot by Dot is for... viewing VGA, SVGA, XGA, WXGA, and SXGA sources. (Sample Illustration) Picture size - Normal This size is for viewing VGA, SVGA, XGA, WXGA, and SXGA sources. (Sample Illustration) Picture size - Normal This setting is a non-stretched display. Depending on the input signal format (VGA...
...and bottom. Dot by Dot Dot by Dot This setting is a non-scaling display. Using the TV's features 75 Selecting the picture size 4:3 (Sample Illustration) Picture size - 4:3 Some program formats will display with sidebars and/or bars at the top and bottom. Dot by Dot is for... viewing VGA, SVGA, XGA, WXGA, and SXGA sources. (Sample Illustration) Picture size - Normal This size is for viewing VGA, SVGA, XGA, WXGA, and SXGA sources. (Sample Illustration) Picture size - Normal This setting is a non-stretched display. Depending on the input signal format (VGA...

User Guide
Page 76
... 5 Press the ( / arrow) buttons to the factory defaults, highlight Reset and then press the ENTER button. To revert to scroll the picture up and down as needed. 6 To save the new settings, highlight Done, and then press the ENTER button. The adjustment range is from ...set separate scroll settings for the TheaterWide 2 and TheaterWide 3 modes for each input. 76 Using the TV's features Scrolling the TheaterWide® picture (TheaterWide 2 and 3 only) Scrolling the TheaterWide® picture (TheaterWide 2 and 3 only) You can set the scroll settings: 1 Press the MENU button and open the...
... 5 Press the ( / arrow) buttons to the factory defaults, highlight Reset and then press the ENTER button. To revert to scroll the picture up and down as needed. 6 To save the new settings, highlight Done, and then press the ENTER button. The adjustment range is from ...set separate scroll settings for the TheaterWide 2 and TheaterWide 3 modes for each input. 76 Using the TV's features Scrolling the TheaterWide® picture (TheaterWide 2 and 3 only) Scrolling the TheaterWide® picture (TheaterWide 2 and 3 only) You can set the scroll settings: 1 Press the MENU button and open the...

User Guide
Page 77
...features 77 Using the Auto Aspect feature Using the Auto Aspect feature When this feature is set to On, the TV will automatically select the picture size when one of Signal Source Automatic Aspect Size (automatically selected when Auto Aspect is On) 4:3 Normal 4:3 4:3 Letter Box TheaterWide 2 ...Full Full Not defined (no ID-1 data or HDMI® aspect data) The current picture size you selected, see "Selecting the picture size" on the auto aspect ratio feature: 1 Press the MENU button and open the Picture menu. 2 Highlight Theater Settings, and then press the ENTER button. 3 In the...
...features 77 Using the Auto Aspect feature Using the Auto Aspect feature When this feature is set to On, the TV will automatically select the picture size when one of Signal Source Automatic Aspect Size (automatically selected when Auto Aspect is On) 4:3 Normal 4:3 4:3 Letter Box TheaterWide 2 ...Full Full Not defined (no ID-1 data or HDMI® aspect data) The current picture size you selected, see "Selecting the picture size" on the auto aspect ratio feature: 1 Press the MENU button and open the Picture menu. 2 Highlight Theater Settings, and then press the ENTER button. 3 In the...


