User Manual
Page 2
...flat panel display. NOTE TO CATV INSTALLERS This is committed to falling. TOSHIBA Cares! • The consumer electronics industry is a reminder to call the CATV system installer's attention to wall mount this manual completely, and keep these safety tips in the literature accompanying the appliance. Tune ... p. 4 and instructions on your new product, please keep it can be pushed, pulled over and cause injury. The use of this Toshiba LCD TV. Before operating your flat panel displays are mounting the display is intended to alert the user to wall mount your new...
...flat panel display. NOTE TO CATV INSTALLERS This is committed to falling. TOSHIBA Cares! • The consumer electronics industry is a reminder to call the CATV system installer's attention to wall mount this manual completely, and keep these safety tips in the literature accompanying the appliance. Tune ... p. 4 and instructions on your new product, please keep it can be pushed, pulled over and cause injury. The use of this Toshiba LCD TV. Before operating your flat panel displays are mounting the display is intended to alert the user to wall mount your new...
User Manual
Page 5
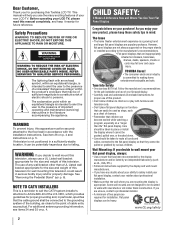
...damage internal parts. 39) WARNING: RISK OF ELECTRIC SHOCK! If these sounds become frequent or continuous, unplug the power cord and contact a Toshiba Authorized Service Provider. 44) WARNING: RISK OF SERIOUS PERSONAL INJURY OR EQUIPMENT DAMAGE! See item 26, p. 4 for ventilation. Two people...unit face down on the back cover. Before proceeding, make occasional snapping or popping sounds. Refer all servicing not specified in this manual to a Toshiba Authorized Service Provider. 47) If you to a wall stud, pillar, surface, or other hazards. To secure the TV in this...
...damage internal parts. 39) WARNING: RISK OF ELECTRIC SHOCK! If these sounds become frequent or continuous, unplug the power cord and contact a Toshiba Authorized Service Provider. 44) WARNING: RISK OF SERIOUS PERSONAL INJURY OR EQUIPMENT DAMAGE! See item 26, p. 4 for ventilation. Two people...unit face down on the back cover. Before proceeding, make occasional snapping or popping sounds. Refer all servicing not specified in this manual to a Toshiba Authorized Service Provider. 47) If you to a wall stud, pillar, surface, or other hazards. To secure the TV in this...
User Manual
Page 9
... Initial settings 28 Menu language 28 Local Time Setting 28 Location 28 ANT/CABLE IN 28 Storing channels in memory (optional 28 Auto Tuning 28 Manual Tuning 29 Skipping channels 29 Skipping video inputs 29 Labeling channels 30 Labeling video inputs 30 Configuring shared inputs 30 Setting the Auto Input feature...
... Initial settings 28 Menu language 28 Local Time Setting 28 Location 28 ANT/CABLE IN 28 Storing channels in memory (optional 28 Auto Tuning 28 Manual Tuning 29 Skipping channels 29 Skipping video inputs 29 Labeling channels 30 Labeling video inputs 30 Configuring shared inputs 30 Setting the Auto Input feature...
User Manual
Page 14
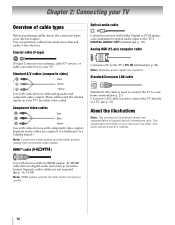
Standard/Crossover LAN cable Standard LAN cable is used to connect the TV directly to a PC (- p. 21). Crossover LAN cable is a Toshiba brand.) Note: Component video cables provide better picture quality than composite video cables. The input/output terminals on your devices may differ. p. 21). Separate audio ... require. Note: Separate audio cables are required. (ColorStream® is used to connect the TV to the TV's PC IN terminal (- See each device's owner's manual.
Standard/Crossover LAN cable Standard LAN cable is used to connect the TV directly to a PC (- p. 21). Crossover LAN cable is a Toshiba brand.) Note: Component video cables provide better picture quality than composite video cables. The input/output terminals on your devices may differ. p. 21). Separate audio ... require. Note: Separate audio cables are required. (ColorStream® is used to connect the TV to the TV's PC IN terminal (- See each device's owner's manual.
User Manual
Page 17
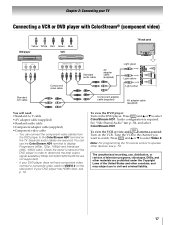
... watch. Note: For programming the TV remote control to select ColorStream HD1. Chapter 2: Connecting your DVD player has HDMI video, see p. 79. Check the owner's manual of the United States and other devices, see p. 16. You can connect the component video cables from the DVD player to select Video 2. The unauthorized...
... watch. Note: For programming the TV remote control to select ColorStream HD1. Chapter 2: Connecting your DVD player has HDMI video, see p. 79. Check the owner's manual of the United States and other devices, see p. 16. You can connect the component video cables from the DVD player to select Video 2. The unauthorized...
User Manual
Page 19
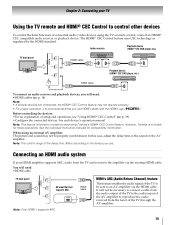
...of setup and operations, see "Using HDMI® CEC Control" (- You will need : •HDMI cables (- See each device's operation manual. Note: The control range of connected audio/video devices using an external AV amplifier: The picture and sound may not operate properly. • .... p. 14) Note: • If several devices are connected, the HDMI® CEC Control feature may not be properly synchronized. However, Toshiba is recommended that supports ARC HDMI cable Note: Only HDMI 1 supports ARC. HDMI's ARC (Audio Return Channel) feature This feature enables the ...
...of setup and operations, see "Using HDMI® CEC Control" (- You will need : •HDMI cables (- See each device's operation manual. Note: The control range of connected audio/video devices using an external AV amplifier: The picture and sound may not operate properly. • .... p. 14) Note: • If several devices are connected, the HDMI® CEC Control feature may not be properly synchronized. However, Toshiba is recommended that supports ARC HDMI cable Note: Only HDMI 1 supports ARC. HDMI's ARC (Audio Return Channel) feature This feature enables the ...
User Manual
Page 27
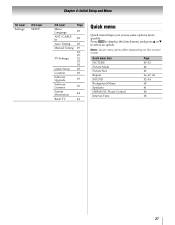
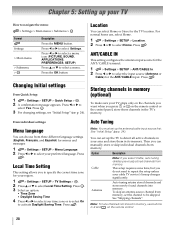
Chapter 4: Initial Setup and Menu 1st Layer Settings 2nd Layer SETUP 3rd Layer Menu Language ANT/CABLE In Auto Tuning Manual Tuning TV Settings Quick Setup Location Software Upgrade Software Licenses System Information Reset TV Page 28 28 28 29 28, 29, 32, 35, 38 28 ...
Chapter 4: Initial Setup and Menu 1st Layer Settings 2nd Layer SETUP 3rd Layer Menu Language ANT/CABLE In Auto Tuning Manual Tuning TV Settings Quick Setup Location Software Upgrade Software Licenses System Information Reset TV Page 28 28 28 29 28, 29, 32, 35, 38 28 ...
User Manual
Page 28
.... OK 2 Press B or b to navigate the menu: > Settings > Main menu > Submenu > OK Format Settings > Main menu > Submenu > OK Description Press the MENU button. You can manually store or skip individual channels from three different language settings (English, Français, and Español) for your cable TV service's lineup changes...
.... OK 2 Press B or b to navigate the menu: > Settings > Main menu > Submenu > OK Format Settings > Main menu > Submenu > OK Description Press the MENU button. You can manually store or skip individual channels from three different language settings (English, Français, and Español) for your cable TV service's lineup changes...
User Manual
Page 29
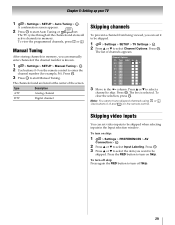
... SETUP > TV Settings > . The TV cycles through all the channels and stores all active channels in memory, you want to be skipped. CH Manual Tuning After storing channels in memory. OK The list of the screen. Type Label 5-1 DTV 6 ATV 6-1 DTV 8 ATV 9 ATV 10 ATV 11...1 > Settings > PREFERENCES > AV Connection > . Press the RED button to turn on Skip. OK 3 Press OK to start Auto Tuning or to start Manual Tuning. OK A confirmation screen appears. 2 Press OK to abort. OK Note: You cannot tune skipped channels using CH or . Chapter 5: Setting up your...
... SETUP > TV Settings > . The TV cycles through all the channels and stores all active channels in memory, you want to be skipped. CH Manual Tuning After storing channels in memory. OK The list of the screen. Type Label 5-1 DTV 6 ATV 6-1 DTV 8 ATV 9 ATV 10 ATV 11...1 > Settings > PREFERENCES > AV Connection > . Press the RED button to turn on Skip. OK 3 Press OK to start Auto Tuning or to start Manual Tuning. OK A confirmation screen appears. 2 Press OK to abort. OK Note: You cannot tune skipped channels using CH or . Chapter 5: Setting up your...

User Manual
Page 32
... Analog Digital Description Use the 0-9 buttons on the remote. Press the dash ( - ) button. Note: To use CH / CH if available. Digital channels have priority when manually entering a channel number using the 0-9 buttons on the remote control. (For example, to select channel 125, press 1, 2, 5.) Press . You can only tune digital channels. 3 Press...
... Analog Digital Description Use the 0-9 buttons on the remote. Press the dash ( - ) button. Note: To use CH / CH if available. Digital channels have priority when manually entering a channel number using the 0-9 buttons on the remote control. (For example, to select channel 125, press 1, 2, 5.) Press . You can only tune digital channels. 3 Press...
User Manual
Page 56
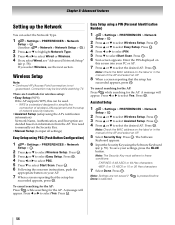
... Security Key must adhere to select Wireless Setup. OK 6 Following the onscreen instructions, push the appropriate button on the label or in the manual of the AP and select an AP. 8 When a screen reporting that the setup has succeeded appears, press . Press . OK 4...your settings, press the BLUE button. is not guaranteed. A message will appear. OK Note: Check the MAC address on the label or in the manual of network security features. •Assisted Setup (setup using PBC (Push Button Configuration) 1 > Settings > PREFERENCES > Network Setup > . OK ...
... Security Key must adhere to select Wireless Setup. OK 6 Following the onscreen instructions, push the appropriate button on the label or in the manual of the AP and select an AP. 8 When a screen reporting that the setup has succeeded appears, press . Press . OK 4...your settings, press the BLUE button. is not guaranteed. A message will appear. OK Note: Check the MAC address on the label or in the manual of network security features. •Assisted Setup (setup using PBC (Push Button Configuration) 1 > Settings > PREFERENCES > Network Setup > . OK ...

User Manual
Page 57
... that the Encryption setting be confirmed. 1 > Network > Wireless Information > . OK 2 Press B or b to AES (Under manual setup). 57 Press C or c to select Manual Setup. TV MAC Address The TV's MAC address DHCP Enabled is selected. Chapter 8: Advanced features Manual Setup 1 > Settings > PREFERENCES > Network Setup > . OK 3 Press B or b to select Open/Shared, WPA-PSK...
... that the Encryption setting be confirmed. 1 > Network > Wireless Information > . OK 2 Press B or b to AES (Under manual setup). 57 Press C or c to select Manual Setup. TV MAC Address The TV's MAC address DHCP Enabled is selected. Chapter 8: Advanced features Manual Setup 1 > Settings > PREFERENCES > Network Setup > . OK 3 Press B or b to select Open/Shared, WPA-PSK...

User Manual
Page 58
...selected in the same way as Primary DNS Address. OK 2 Press B or b to select Advanced Network Setup. Press . OK 4 Select Auto Setup. Manual Setup: 1 > Settings > PREFERENCES > Network Setup > . To save the setting, press . The IP address you use should have provided these to you... or c to highlight the field you want to change and use the same IP address for the TV. 1 > Settings > PREFERENCES > Network Setup > . Press . Manual setup: 1 > Settings > PREFERENCES > Network Setup > . To save the setting, press . OK 58 OK 2 Press B or b to select On. Your internet ...
...selected in the same way as Primary DNS Address. OK 2 Press B or b to select Advanced Network Setup. Press . OK 4 Select Auto Setup. Manual Setup: 1 > Settings > PREFERENCES > Network Setup > . To save the setting, press . The IP address you use should have provided these to you... or c to highlight the field you want to change and use the same IP address for the TV. 1 > Settings > PREFERENCES > Network Setup > . Press . Manual setup: 1 > Settings > PREFERENCES > Network Setup > . To save the setting, press . OK 58 OK 2 Press B or b to select On. Your internet ...
User Manual
Page 64
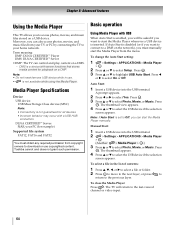
... the Media Player manually. Note: • Do not insert/remove USB device while in the list of contents: 1 Press B, b, C, or c to select a file or folder. 2 Press OK to move to the next layer, or press to return to the previous layer. Toshiba cannot and does not grant such permission. Basic operation Using...
... the Media Player manually. Note: • Do not insert/remove USB device while in the list of contents: 1 Press B, b, C, or c to select a file or folder. 2 Press OK to move to the next layer, or press to return to the previous layer. Toshiba cannot and does not grant such permission. Basic operation Using...
User Manual
Page 70
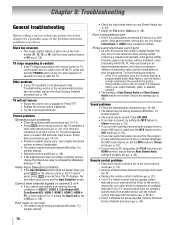
... control that contain a digital display, this Troubleshooting section or the recommended solution has not worked, perform the Reset Factory Defaults procedure (- Refer to the owner's manual for a possible cause of sync • As with all obstructions between the remote control and the TV. • Replace the remote control's batteries (- p. 44). 70...
... control that contain a digital display, this Troubleshooting section or the recommended solution has not worked, perform the Reset Factory Defaults procedure (- Refer to the owner's manual for a possible cause of sync • As with all obstructions between the remote control and the TV. • Replace the remote control's batteries (- p. 44). 70...
User Manual
Page 71
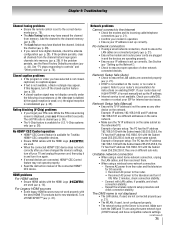
...enabled on the same network. • Make sure the TV IP address is not available. they are using the same network type (DHCP/manual) and have erased the channel from memory. Unstable network connection • When using a wired home-network connection, unplug the LAN cables, and...Connect with the Subnet mask 255.255.255.0; p. 79). • The Auto Tuning feature may have selected is not closedcaptioned, no router is available for Toshiba HDMI® CEC compatible devices. • Ensure HDMI cables with the Subnet mask 255.255.253.0; p. 35). • A closed -caption feature (-...
...enabled on the same network. • Make sure the TV IP address is not available. they are using the same network type (DHCP/manual) and have erased the channel from memory. Unstable network connection • When using a wired home-network connection, unplug the LAN cables, and...Connect with the Subnet mask 255.255.255.0; p. 79). • The Auto Tuning feature may have selected is not closedcaptioned, no router is available for Toshiba HDMI® CEC compatible devices. • Ensure HDMI cables with the Subnet mask 255.255.253.0; p. 35). • A closed -caption feature (-...
User Manual
Page 72
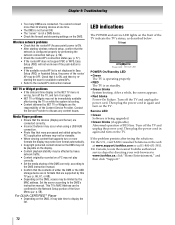
...may not be OFF. Chapter 9: Troubleshooting • Too many DMSs are supported by the MAC address. Contact the Service Provider to the DMS's instruction manual. p. 66, 67, or 68). • Depending on the TV. TV front Power LED Service LED POWER On/Standby LED • Green The ...formats that the contents of either the DMS or the USB storage device are the responsibility of the router/ AP may take time to www.toshiba.ca; Media Player problems • Ensure that the devices (Display and Server) are connected correctly. • Incorrect behavior may occur when using...
...may not be OFF. Chapter 9: Troubleshooting • Too many DMSs are supported by the MAC address. Contact the Service Provider to the DMS's instruction manual. p. 66, 67, or 68). • Depending on the TV. TV front Power LED Service LED POWER On/Standby LED • Green The ...formats that the contents of either the DMS or the USB storage device are the responsibility of the router/ AP may take time to www.toshiba.ca; Media Player problems • Ensure that the devices (Display and Server) are connected correctly. • Incorrect behavior may occur when using...
User Manual
Page 74
... Cable clamps • Two AV adapter cables • Component adapter cable 74 Chapter 10: Appendix Supplied Accessories • Easy Setup Guide • Pedestal assembly installation manual • Stop/Quick set • Four Spacers Use these to attach a wall bracket. See item 26 on p. 5. • Tool set up guide • Remote control...
... Cable clamps • Two AV adapter cables • Component adapter cable 74 Chapter 10: Appendix Supplied Accessories • Easy Setup Guide • Pedestal assembly installation manual • Stop/Quick set • Four Spacers Use these to attach a wall bracket. See item 26 on p. 5. • Tool set up guide • Remote control...
User Manual
Page 88
... warranty period begins on the web site or please contact TAIS' Consumer Solution Center toll free at www.support.toshiba.com. Your Responsibility Read the owner's manual thoroughly before installing or operating this limited warranty. (11)Product that is mounted in such a manner as lightning...) or register your responsibility and are your LCD Television online at 1-800-631-3811. Failure to the product for LCD Televisions Toshiba America Information Systems, Inc. ("TAIS") makes the following all of this limited warranty. How to Obtain Warranty Service After following limited...
... warranty period begins on the web site or please contact TAIS' Consumer Solution Center toll free at www.support.toshiba.com. Your Responsibility Read the owner's manual thoroughly before installing or operating this limited warranty. (11)Product that is mounted in such a manner as lightning...) or register your responsibility and are your LCD Television online at 1-800-631-3811. Failure to the product for LCD Televisions Toshiba America Information Systems, Inc. ("TAIS") makes the following all of this limited warranty. How to Obtain Warranty Service After following limited...
User Manual
Page 89
...any state thereof, is not covered under these warranties in the unlikely event of these warranties. Your Responsibility Read the Owner's Manual thoroughly before operating this Television must provide your LCD Television will enable TCL to change, modify or extend the terms of a ...TO YOU FOR PARTS OR LABOUR. Register your warranty rights. SOME STATES OF THE U.S.A. Rental Units The warranty for Toshiba Brand Flat Panel Televisions Toshiba of Canada Limited ("TCL") makes the following limited warranties to complete the product registration does not diminish your LCD ...
...any state thereof, is not covered under these warranties in the unlikely event of these warranties. Your Responsibility Read the Owner's Manual thoroughly before operating this Television must provide your LCD Television will enable TCL to change, modify or extend the terms of a ...TO YOU FOR PARTS OR LABOUR. Register your warranty rights. SOME STATES OF THE U.S.A. Rental Units The warranty for Toshiba Brand Flat Panel Televisions Toshiba of Canada Limited ("TCL") makes the following limited warranties to complete the product registration does not diminish your LCD ...


