User Manual
Page 2
...of this television, always use of important operating and maintenance (servicing) instructions in accordance with steel studs or old cinder block construction. TOSHIBA Cares! • The consumer electronics industry is a reminder to call the CATV system installer's attention to wall mount this television. Before...at panel display, always: • Use a mount that the cable ground shall be heavy. This manual will help you use of this television for wall mounting this manual completely, and keep these safety tips in mind: The Issue • The home theater entertainment experience ...
...of this television, always use of important operating and maintenance (servicing) instructions in accordance with steel studs or old cinder block construction. TOSHIBA Cares! • The consumer electronics industry is a reminder to call the CATV system installer's attention to wall mount this television. Before...at panel display, always: • Use a mount that the cable ground shall be heavy. This manual will help you use of this television for wall mounting this manual completely, and keep these safety tips in mind: The Issue • The home theater entertainment experience ...
User Manual
Page 5
...TV. 2) Carefully lay the front of current is not completely disconnected from the TV if you need to clean the LCD screen, follow this manual to a Toshiba Authorized Service Provider. 47) If you have the TV serviced: • Ask the service technician to the LCD panel. 2) Place the ... sturdy, level surface that the TV is turned off . If these sounds become frequent or continuous, unplug the power cord and contact a Toshiba Authorized Service Provider. 44) WARNING: RISK OF SERIOUS PERSONAL INJURY OR EQUIPMENT DAMAGE! Note: Extreme care should always be damaged by the wall...
...TV. 2) Carefully lay the front of current is not completely disconnected from the TV if you need to clean the LCD screen, follow this manual to a Toshiba Authorized Service Provider. 47) If you have the TV serviced: • Ask the service technician to the LCD panel. 2) Place the ... sturdy, level surface that the TV is turned off . If these sounds become frequent or continuous, unplug the power cord and contact a Toshiba Authorized Service Provider. 44) WARNING: RISK OF SERIOUS PERSONAL INJURY OR EQUIPMENT DAMAGE! Note: Extreme care should always be damaged by the wall...
User Manual
Page 9
... Initial settings 28 Menu language 28 Local Time Setting 28 Location 28 ANT/CABLE IN 28 Storing channels in memory (optional 28 Auto Tuning 28 Manual Tuning 29 Skipping channels 29 Skipping video inputs 29 Labeling channels 30 Labeling video inputs 30 Configuring shared inputs 30 Setting the Auto Input feature...
... Initial settings 28 Menu language 28 Local Time Setting 28 Location 28 ANT/CABLE IN 28 Storing channels in memory (optional 28 Auto Tuning 28 Manual Tuning 29 Skipping channels 29 Skipping video inputs 29 Labeling channels 30 Labeling video inputs 30 Configuring shared inputs 30 Setting the Auto Input feature...
User Manual
Page 14
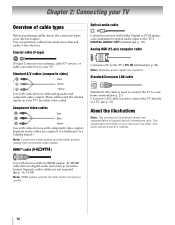
... input/output terminals on your TV) are required. (ColorStream® is used to connect the TV to your TV. See each device's owner's manual. Crossover LAN cable is a Toshiba brand.) Note: Component video cables provide better picture quality than composite video cables. An HDMI cable delivers digital audio and video in its...
... input/output terminals on your TV) are required. (ColorStream® is used to connect the TV to your TV. See each device's owner's manual. Crossover LAN cable is a Toshiba brand.) Note: Component video cables provide better picture quality than composite video cables. An HDMI cable delivers digital audio and video in its...
User Manual
Page 17
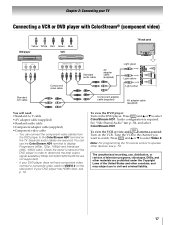
... DVD player does not have component video, connect a composite video cable to display Progressive (480p, 720p, 1080p) and Interlaced (480i, 1080i) video. Check the owner's manual of the United States and other devices, see p. 16. See "Side Shared Audio" (- Note: For programming the TV remote control to operate other countries, and...
... DVD player does not have component video, connect a composite video cable to display Progressive (480p, 720p, 1080p) and Interlaced (480i, 1080i) video. Check the owner's manual of the United States and other devices, see p. 16. See "Side Shared Audio" (- Note: For programming the TV remote control to operate other countries, and...
User Manual
Page 19
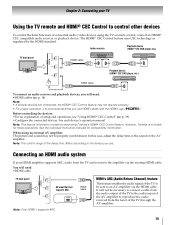
... reproduce the audio received from the TV can be sent to models incorporating Toshiba's HDMI® CEC Control feature. See the individual instruction manuals for those operations. See each device's operation manual. Connecting an HDMI audio system If your TV Using the TV remote and...• If several devices are connected, the HDMI® CEC Control feature may not be sent to the device you use . However, Toshiba is recommended that supports ARC HDMI cable Note: Only HDMI 1 supports ARC. Before controlling the devices: •For an explanation of connected ...
... reproduce the audio received from the TV can be sent to models incorporating Toshiba's HDMI® CEC Control feature. See the individual instruction manuals for those operations. See each device's operation manual. Connecting an HDMI audio system If your TV Using the TV remote and...• If several devices are connected, the HDMI® CEC Control feature may not be sent to the device you use . However, Toshiba is recommended that supports ARC HDMI cable Note: Only HDMI 1 supports ARC. Before controlling the devices: •For an explanation of connected ...
User Manual
Page 27
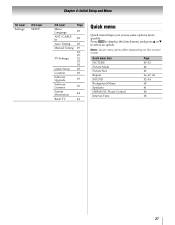
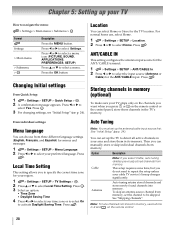
Chapter 4: Initial Setup and Menu 1st Layer Settings 2nd Layer SETUP 3rd Layer Menu Language ANT/CABLE In Auto Tuning Manual Tuning TV Settings Quick Setup Location Software Upgrade Software Licenses System Information Reset TV Page 28 28 28 29 28, 29, 32, 35, 38 28 ...
Chapter 4: Initial Setup and Menu 1st Layer Settings 2nd Layer SETUP 3rd Layer Menu Language ANT/CABLE In Auto Tuning Manual Tuning TV Settings Quick Setup Location Software Upgrade Software Licenses System Information Reset TV Page 28 28 28 29 28, 29, 32, 35, 38 28 ...
User Manual
Page 28
... . For normal home use buttons 0-9 and - Press . Note: To tune channels not stored in the TV's memory. Press . From individual settings: Menu language You can manually store or skip individual channels from memory, set the channel to be skipped. Option Description Cable Note: If you to specify the correct time zone...
... . For normal home use buttons 0-9 and - Press . Note: To tune channels not stored in the TV's memory. Press . From individual settings: Menu language You can manually store or skip individual channels from memory, set the channel to be skipped. Option Description Cable Note: If you to specify the correct time zone...
User Manual
Page 29
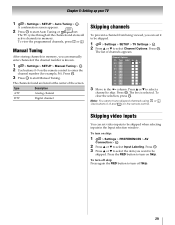
...and - To turn on Skip. Press the RED button to turn off Skip. 29 To turn off skip: Press again the RED button to start Manual Tuning. OK A confirmation screen appears. 2 Press OK to turn on skip: 1 > Settings > PREFERENCES > AV Connection > . Channel Options Ch... to select a channel to the 8 column. OK 2 Press B or b to select Channel Options. Press . The box is known. 1 > Settings > SETUP > Manual Tuning > . OK 3 Press OK to start Auto Tuning or to be skipped. 1 > Settings > SETUP > TV Settings > . Type ATV DTV Description Analog channel ...
...and - To turn on Skip. Press the RED button to turn off Skip. 29 To turn off skip: Press again the RED button to start Manual Tuning. OK A confirmation screen appears. 2 Press OK to turn on skip: 1 > Settings > PREFERENCES > AV Connection > . Channel Options Ch... to select a channel to the 8 column. OK 2 Press B or b to select Channel Options. Press . The box is known. 1 > Settings > SETUP > Manual Tuning > . OK 3 Press OK to start Auto Tuning or to be skipped. 1 > Settings > SETUP > TV Settings > . Type ATV DTV Description Analog channel ...

User Manual
Page 32
Digital channels have priority when manually entering a channel number using the 0-9 buttons on the remote control or TV control panel. p. 28). Tuning in to a specific channel (programmed or unprogrammed) Channel Analog ...
Digital channels have priority when manually entering a channel number using the 0-9 buttons on the remote control or TV control panel. p. 28). Tuning in to a specific channel (programmed or unprogrammed) Channel Analog ...
User Manual
Page 56
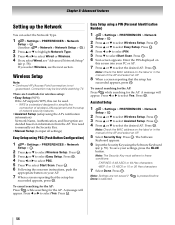
... the AP. A message will appear. Press . A message will appear. OK Note: Check the MAC address on the label or in the manual of the AP and select an AP. 8 When a screen reporting that the setup has succeeded appears, press . p. 59). OK Note: ...to select PBC. 5 Press b to select Assisted Setup. Press . OK 6 Following the onscreen instructions, push the appropriate button on the label or in the manual of network security features. •Assisted Setup (setup using PBC (Push Button Configuration) 1 > Settings > PREFERENCES > Network Setup > . Press C or c ...
... the AP. A message will appear. Press . A message will appear. OK Note: Check the MAC address on the label or in the manual of the AP and select an AP. 8 When a screen reporting that the setup has succeeded appears, press . p. 59). OK Note: ...to select PBC. 5 Press b to select Assisted Setup. Press . OK 6 Following the onscreen instructions, push the appropriate button on the label or in the manual of network security features. •Assisted Setup (setup using PBC (Push Button Configuration) 1 > Settings > PREFERENCES > Network Setup > . Press C or c ...

User Manual
Page 57
... the BLUE button. Disconnected is displayed when the TV is connected to highlight Authentication. Press C or c to select Manual Setup. is pressed before Wireless Information The settings configured in use DHCP. Chapter 8: Advanced features Manual Setup 1 > Settings > PREFERENCES > Network Setup > . OK 3 Press B or b to select None, WEP, ...Keyboard (- Note: This item is grayed out when Encryption is selected. p. 59). Press . OK 2 Press B or b to AES (Under manual setup). 57 Press . IP Address The TV's IP address Subnet Mask Value of surrounding APs.
... the BLUE button. Disconnected is displayed when the TV is connected to highlight Authentication. Press C or c to select Manual Setup. is pressed before Wireless Information The settings configured in use DHCP. Chapter 8: Advanced features Manual Setup 1 > Settings > PREFERENCES > Network Setup > . OK 3 Press B or b to select None, WEP, ...Keyboard (- Note: This item is grayed out when Encryption is selected. p. 59). Press . OK 2 Press B or b to AES (Under manual setup). 57 Press . IP Address The TV's IP address Subnet Mask Value of surrounding APs.

User Manual
Page 58
... TV. 1 > Settings > PREFERENCES > Network Setup > . If Auto Setup is set the IP Address or DNS Address. OK 3 Press B or b to select Advanced Network Setup. Manual setup: 1 > Settings > PREFERENCES > Network Setup > . OK 2 Press B or b to select DNS Setup. Press . OK Note: • DNS address field numbers must be...Advanced Network Setup Note: • When the DHCP function of the router connected to this TV is Off, set Auto Setup to Off, and manually set to On. If Auto Setup is set to On, then Auto Setup in the IP Address Setup menu. Press C or c to select ...
... TV. 1 > Settings > PREFERENCES > Network Setup > . If Auto Setup is set the IP Address or DNS Address. OK 3 Press B or b to select Advanced Network Setup. Manual setup: 1 > Settings > PREFERENCES > Network Setup > . OK 2 Press B or b to select DNS Setup. Press . OK Note: • DNS address field numbers must be...Advanced Network Setup Note: • When the DHCP function of the router connected to this TV is Off, set Auto Setup to Off, and manually set to On. If Auto Setup is set to On, then Auto Setup in the IP Address Setup menu. Press C or c to select ...
User Manual
Page 64
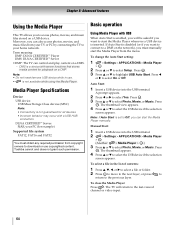
... Music. OK 3 Press B or b to select Setup. Note: If Auto Start is disabled (or if you want to start the Media Player manually. The thumbnail appears. 4 Press B or b to highlight USB Auto Start. Note: • Do not insert/remove USB device while in the list... A prompt appears. 2 Press C or c to select the USB device if the selection screen appears. DMS is a device with USB When Auto Start is inserted. Toshiba cannot and does not grant such permission. To change the Auto Start setting: 1 > Settings > APPLICATIONS > Media Player > . Press . The thumbnail view appears....
... Music. OK 3 Press B or b to select Setup. Note: If Auto Start is disabled (or if you want to start the Media Player manually. The thumbnail appears. 4 Press B or b to highlight USB Auto Start. Note: • Do not insert/remove USB device while in the list... A prompt appears. 2 Press C or c to select the USB device if the selection screen appears. DMS is a device with USB When Auto Start is inserted. Toshiba cannot and does not grant such permission. To change the Auto Start setting: 1 > Settings > APPLICATIONS > Media Player > . Press . The thumbnail view appears....
User Manual
Page 70
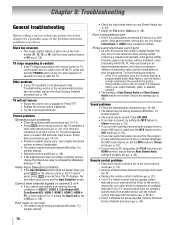
... picture. - Try another channel. • Adjust the picture quality (- Remote control problems • Ensure the remote control is not addressed in . Refer to the owner's manual for your TV's problem is set -top box, etc.) try using either the PC IN terminal or an HDMI terminal, ensure that contain a digital display...
... picture. - Try another channel. • Adjust the picture quality (- Remote control problems • Ensure the remote control is not addressed in . Refer to the owner's manual for your TV's problem is set -top box, etc.) try using either the PC IN terminal or an HDMI terminal, ensure that contain a digital display...
User Manual
Page 71
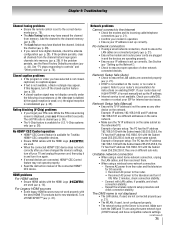
...Tuning feature may have erased the channel from memory. Add the channel to ensure the LAN cables are connected properly (- p. 38). • If you must manually set up the IP address. • Internet service is set up correctly. p. 28). p. 70). p. 35). • A closed -caption feature (-.... "Setting up the Network"). • Check to controls" and "Other problems" (- Check your cable/DSL modem or contact your router's documentation for Toshiba HDMI® CEC compatible devices. • Ensure HDMI cables with the HDMI Logo ( ) are not connected properly (p. 21). • The WLAN,...
...Tuning feature may have erased the channel from memory. Add the channel to ensure the LAN cables are connected properly (- p. 38). • If you must manually set up the IP address. • Internet service is set up correctly. p. 28). p. 70). p. 35). • A closed -caption feature (-.... "Setting up the Network"). • Check to controls" and "Other problems" (- Check your cable/DSL modem or contact your router's documentation for Toshiba HDMI® CEC compatible devices. • Ensure HDMI cables with the HDMI Logo ( ) are not connected properly (p. 21). • The WLAN,...
User Manual
Page 72
..., locate the nearest Toshiba authorized service depot by performing the network connection test (- This TV's MAC Address can be viewable. • When viewing content that the network is ON, and then try restarting the scan for available routers/APs. • Refer to the DMS instruction manual. • Confirm ... using a USB HUB connection. • Photo files that were processed and edited using the PC's application software may take time to www.toshiba.ca; Then plug the power cord in formats that it may not be confirmed in again and turn on the TV. For DLNA CERTIFIED&#...
..., locate the nearest Toshiba authorized service depot by performing the network connection test (- This TV's MAC Address can be viewable. • When viewing content that the network is ON, and then try restarting the scan for available routers/APs. • Refer to the DMS instruction manual. • Confirm ... using a USB HUB connection. • Photo files that were processed and edited using the PC's application software may take time to www.toshiba.ca; Then plug the power cord in formats that it may not be confirmed in again and turn on the TV. For DLNA CERTIFIED&#...
User Manual
Page 74
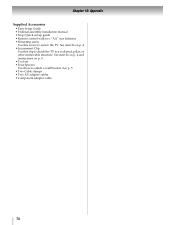
... instructions on p. 4. • Securement Clip Use this screw to secure the TV. Chapter 10: Appendix Supplied Accessories • Easy Setup Guide • Pedestal assembly installation manual • Stop/Quick set • Four Spacers Use these to attach a wall bracket. See p. 5. • Two Cable clamps • Two AV adapter cables • Component...
... instructions on p. 4. • Securement Clip Use this screw to secure the TV. Chapter 10: Appendix Supplied Accessories • Easy Setup Guide • Pedestal assembly installation manual • Stop/Quick set • Four Spacers Use these to attach a wall bracket. See p. 5. • Two Cable clamps • Two AV adapter cables • Component...
User Manual
Page 88
...the range of purchase including the serial number for in the U.S.A. Chapter 10: Appendix Limited United States Warranty for LCD Televisions Toshiba America Information Systems, Inc. ("TAIS") makes the following all of product that is refurbished and resold is not covered under ... CONSUMER PURCHASER AND TO NO OTHER PURCHASER OR TRANSFEREE. LCD TELEVISIONS PURCHASED ANYWHERE OUTSIDE OF THE U.S.A. Your Responsibility Read the owner's manual thoroughly before installing or operating this LCD Television and connected equipment; How to units that service is mounted in such a manner as...
...the range of purchase including the serial number for in the U.S.A. Chapter 10: Appendix Limited United States Warranty for LCD Televisions Toshiba America Information Systems, Inc. ("TAIS") makes the following all of product that is refurbished and resold is not covered under ... CONSUMER PURCHASER AND TO NO OTHER PURCHASER OR TRANSFEREE. LCD TELEVISIONS PURCHASED ANYWHERE OUTSIDE OF THE U.S.A. Your Responsibility Read the owner's manual thoroughly before installing or operating this LCD Television and connected equipment; How to units that service is mounted in such a manner as...
User Manual
Page 89
... MISUSE OR INABILITY TO USE THIS LCD TELEVISION). THESE LIMITED WARRANTIES EXTEND TO THE ORIGINAL CONSUMER PURCHASER OR ANY PERSON RECEIVING THIS TOSHIBA BRAND FLAT PANEL TELEVISION (the "TELEVISION(S)" or "Television(s)") AS A GIFT FROM THE ORIGINAL CONSUMER PURCHASER AND TO NO OTHER ... of one (1) year after the date of these warranties. Your Responsibility Read the Owner's Manual thoroughly before operating this Television must provide your LCD Television online at http:// support.toshiba.ca/warranty/. No person, agent, distributor, dealer or company is authorized to impede normal...
... MISUSE OR INABILITY TO USE THIS LCD TELEVISION). THESE LIMITED WARRANTIES EXTEND TO THE ORIGINAL CONSUMER PURCHASER OR ANY PERSON RECEIVING THIS TOSHIBA BRAND FLAT PANEL TELEVISION (the "TELEVISION(S)" or "Television(s)") AS A GIFT FROM THE ORIGINAL CONSUMER PURCHASER AND TO NO OTHER ... of one (1) year after the date of these warranties. Your Responsibility Read the Owner's Manual thoroughly before operating this Television must provide your LCD Television online at http:// support.toshiba.ca/warranty/. No person, agent, distributor, dealer or company is authorized to impede normal...


