Owner's Manual - English
Page 4
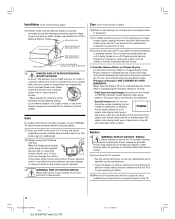
... of the screen). Wipe the display panel surface gently using only the supplied wiping cloth or a soft cloth (cotton, flannel, etc.). Avoid contact with gray or black bars on the left and right sides of the following images or formats: • Fixed (non-moving ) pattern or image remains on Plasma Display If a fixed (non-moving ) images, including but not limited to PIP/POP windows, closed captions, video game patterns, TV station logos...
... of the screen). Wipe the display panel surface gently using only the supplied wiping cloth or a soft cloth (cotton, flannel, etc.). Avoid contact with gray or black bars on the left and right sides of the following images or formats: • Fixed (non-moving ) pattern or image remains on Plasma Display If a fixed (non-moving ) images, including but not limited to PIP/POP windows, closed captions, video game patterns, TV station logos...
Owner's Manual - English
Page 5
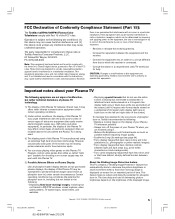
... interference by removing and applying power to the equipment, the user is being used in a particular installation. Certain operating conditions may not work with the audio and/or video of certain types of electronic equipment that do not use the entire screen, including but rather technical limitations of plasma TV technology. 1) The display of the displayed image. Operation is connected. - However, certain video games that to operate this Plasma TV radiates...
... interference by removing and applying power to the equipment, the user is being used in a particular installation. Certain operating conditions may not work with the audio and/or video of certain types of electronic equipment that do not use the entire screen, including but rather technical limitations of plasma TV technology. 1) The display of the displayed image. Operation is connected. - However, certain video games that to operate this Plasma TV radiates...
Owner's Manual - English
Page 6
... time 52 Setting the HDMI™ audio mode 52 Setting the time and date 52 Viewing the CableCARD™ menu 53 Viewing the digital signal meter 53 Viewing the system status 54 Restore Factory Defaults 54 Chapter 7: Using the TV Guide On Screen™ interactive program guide 55 Setting up the TV Guide On Screen™ system 55 Navigating the TV Guide On Screen™ system 56 TV Guide On Screen™ remote control functions ........ 56 Video Window 57 Panel Menus 57 Info Box 58 TV Guide On Screen...
... time 52 Setting the HDMI™ audio mode 52 Setting the time and date 52 Viewing the CableCARD™ menu 53 Viewing the digital signal meter 53 Viewing the system status 54 Restore Factory Defaults 54 Chapter 7: Using the TV Guide On Screen™ interactive program guide 55 Setting up the TV Guide On Screen™ system 55 Navigating the TV Guide On Screen™ system 56 TV Guide On Screen™ remote control functions ........ 56 Video Window 57 Panel Menus 57 Info Box 58 TV Guide On Screen...
Owner's Manual - English
Page 9
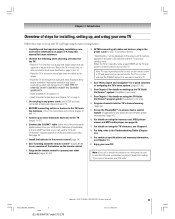
... support the weight of the unit. For details on the screen until the picture appears or the green LED will damage the TV. Note: If you cannot remember your PIN code." Program the remote control to your TV. 4. See Chapter 5 for details on using the memory card JPEG picture viewer and MP3 audio player, see page 89. 17. Copyright © 2005 TOSHIBA CORPORATION. Observe the following when choosing a location...
... support the weight of the unit. For details on the screen until the picture appears or the green LED will damage the TV. Note: If you cannot remember your PIN code." Program the remote control to your TV. 4. See Chapter 5 for details on using the memory card JPEG picture viewer and MP3 audio player, see page 89. 17. Copyright © 2005 TOSHIBA CORPORATION. Observe the following when choosing a location...
Owner's Manual - English
Page 11
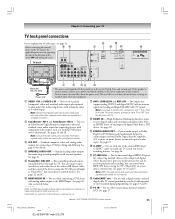
...™ (on -screen device control icons. You can control your local cable operator) to the HDMI input. For use a power cord which confirms to two devices with analog audio output to view encrypted digital programming. Two bi-directional digital IEEE1394 ports for a complete connection. 2 ColorStream® HD-1 and ColorStream® HD-2 - Before connecting the external 56 device to the TV, remove the applicable panel cover by your IEEE1394 devices using the TV's IR pass...
...™ (on -screen device control icons. You can control your local cable operator) to the HDMI input. For use a power cord which confirms to two devices with analog audio output to view encrypted digital programming. Two bi-directional digital IEEE1394 ports for a complete connection. 2 ColorStream® HD-1 and ColorStream® HD-2 - Before connecting the external 56 device to the TV, remove the applicable panel cover by your IEEE1394 devices using the TV's IR pass...
Owner's Manual - English
Page 25
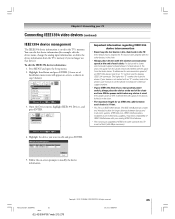
... in the chain, the signal from the faster device. Setup Installation Sleep Timer On/Off Timer PC Settings HDMI Audio Slide Show Interval AVHD Skip Time Auto 2 Sec 15 min Navigate Select CH RTN Back EXIT Exit 3. IEEE1394 Device Management Brand Type Label Analog Input Used Connected TOSHIBA AVHD MY DEVICE None No Reset Done 5. Follow the on -screen, as shown in the TV's memory. If the...
... in the chain, the signal from the faster device. Setup Installation Sleep Timer On/Off Timer PC Settings HDMI Audio Slide Show Interval AVHD Skip Time Auto 2 Sec 15 min Navigate Select CH RTN Back EXIT Exit 3. IEEE1394 Device Management Brand Type Label Analog Input Used Connected TOSHIBA AVHD MY DEVICE None No Reset Done 5. Follow the on -screen, as shown in the TV's memory. If the...
Owner's Manual - English
Page 38
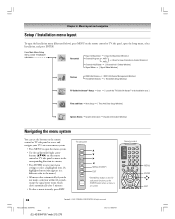
... ➞ [ TheaterNet Setup Window ] TV Guide On Screen™ Setup ➞ Start ➞ [ Launch the TV Guide On Screen™ to its Installation area ] Time and Date ➞ Start Setup ➞ [ Time And Date Setup Window ] System Status ➞ System Information ➞ [ System Information Window ] Navigating the menu system You can use the buttons on the remote control or TV side panel to access and navigate your TV's on-screen menu system. •...
... ➞ [ TheaterNet Setup Window ] TV Guide On Screen™ Setup ➞ Start ➞ [ Launch the TV Guide On Screen™ to its Installation area ] Time and Date ➞ Start Setup ➞ [ Time And Date Setup Window ] System Status ➞ System Information ➞ [ System Information Window ] Navigating the menu system You can use the buttons on the remote control or TV side panel to access and navigate your TV's on-screen menu system. •...
Owner's Manual - English
Page 42
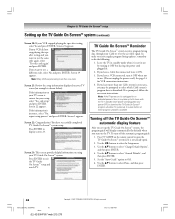
... receive regular program listing updates, remember to select Done, and then press ENTER. 42 Copyright © 2005 TOSHIBA CORPORATION. Use the yz buttons to do the following: 1. If the information on -screen instructions. You have a VCR connected, turn off the TV Guide On Screen™ automatic display feature After you want to download. Press ENTER to select "Change Default Options", and then press ENTER. 4. Chapter 5: TV Guide On Screen™ setup Setting up the TV Guide...
... receive regular program listing updates, remember to select Done, and then press ENTER. 42 Copyright © 2005 TOSHIBA CORPORATION. Use the yz buttons to do the following: 1. If the information on -screen instructions. You have a VCR connected, turn off the TV Guide On Screen™ automatic display feature After you want to download. Press ENTER to select "Change Default Options", and then press ENTER. 4. Chapter 5: TV Guide On Screen™ setup Setting up the TV Guide...
Owner's Manual - English
Page 44
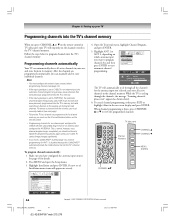
... channels for CABLE will appear on which antenna input you must configure the antenna input sources before programming channels (see next page). • To tune the TV to start automatic channel programming. Chapter 6: Setting up your TV Programming channels into the TV's channel memory When you press CHANNEL y or z on the remote control or TV side panel, your TV will stop only on the channels stored in the channel memory. TV side panel Channel Numbers CHANNEL y CHANNEL z MENU (ENTER) CHANNEL yz Setup Installation Sleep Timer On/Off Timer PC Settings HDMI Audio...
... channels for CABLE will appear on which antenna input you must configure the antenna input sources before programming channels (see next page). • To tune the TV to start automatic channel programming. Chapter 6: Setting up your TV Programming channels into the TV's channel memory When you press CHANNEL y or z on the remote control or TV side panel, your TV will stop only on the channels stored in the channel memory. TV side panel Channel Numbers CHANNEL y CHANNEL z MENU (ENTER) CHANNEL yz Setup Installation Sleep Timer On/Off Timer PC Settings HDMI Audio...
Owner's Manual - English
Page 45
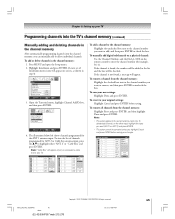
... "Cable Box" and press ENTER. Setup Installation Sleep Timer On/Off Timer PC Settings HDMI Audio Slide Show Interval AVHD Skip Time Auto 2 Sec 15 min Navigate Select CH RTN Back EXIT Exit 3. If the channel is found , a message will be checked. To remove all channels from the channel memory: Highlight the checked box next to the current antenna input only. Channel Add/Delete 2 2 - 1 2 - 2 3 4 5 6 7 7 - 1 8 Analog Digital Digital Analog Analog Digital Analog Analog Digital...
... "Cable Box" and press ENTER. Setup Installation Sleep Timer On/Off Timer PC Settings HDMI Audio Slide Show Interval AVHD Skip Time Auto 2 Sec 15 min Navigate Select CH RTN Back EXIT Exit 3. If the channel is found , a message will be checked. To remove all channels from the channel memory: Highlight the checked box next to the current antenna input only. Channel Add/Delete 2 2 - 1 2 - 2 3 4 5 6 7 7 - 1 8 Analog Digital Digital Analog Analog Digital Analog Analog Digital...

Owner's Manual - English
Page 46
... 19 8 --9 --- To program favorite channels for another . "Cable Box" will need to delete (uncheck) a channel before you connected a cable box to your TV. Highlight Edit and press 17 - 2 ENTER. 28 - 1 28 - 2 4. To quickly scan through your favorite channels only, skipping other channels first. 7 OK 8 9 Reset 10 Cancel 11 Done When done, highlight Done and press ENTER. Preferences Favorite Channels Closed Caption Mode Off Closed Caption Advanced Input Labeling Menu Language English Home...
... 19 8 --9 --- To program favorite channels for another . "Cable Box" will need to delete (uncheck) a channel before you connected a cable box to your TV. Highlight Edit and press 17 - 2 ENTER. 28 - 1 28 - 2 4. To quickly scan through your favorite channels only, skipping other channels first. 7 OK 8 9 Reset 10 Cancel 11 Done When done, highlight Done and press ENTER. Preferences Favorite Channels Closed Caption Mode Off Closed Caption Advanced Input Labeling Menu Language English Home...

Owner's Manual - English
Page 47
...-through the TheaterNet feature, it may be lost. 6. To remove a device from owners manual. See page 22 for some of IEEE1394 and/or infrared remote-controlled A/V devices through the TV (IR passthrough)" on that device, use the Channel Number buttons to step 10. TheaterNet Setup Input Type Brand IR List IR Code Video 1 Cable General Instrum... 0000 0000 Test Reset Done Select device type, brand, and IR...
...-through the TheaterNet feature, it may be lost. 6. To remove a device from owners manual. See page 22 for some of IEEE1394 and/or infrared remote-controlled A/V devices through the TV (IR passthrough)" on that device, use the Channel Number buttons to step 10. TheaterNet Setup Input Type Brand IR List IR Code Video 1 Cable General Instrum... 0000 0000 Test Reset Done Select device type, brand, and IR...
Owner's Manual - English
Page 52
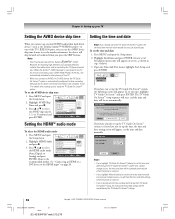
... the TV's IEEE1394 ports, you can use it to obtain the time and date. Highlight Installation and press ENTER. (A new set the time and date manually. Press MENU and open the Setup menu. 2. Highlight AVHD Skip Time and press •. 3. See page 24 for details about setting up and using the TV Guide On screen™ system. See "Connecting an HDMI or a DVI device to select the HDMI audio mode (Auto, Digital, or PC Settings HDMI Audio Slide...
... the TV's IEEE1394 ports, you can use it to obtain the time and date. Highlight Installation and press ENTER. (A new set the time and date manually. Press MENU and open the Setup menu. 2. Highlight AVHD Skip Time and press •. 3. See page 24 for details about setting up and using the TV Guide On screen™ system. See "Connecting an HDMI or a DVI device to select the HDMI audio mode (Auto, Digital, or PC Settings HDMI Audio Slide...
Owner's Manual - English
Page 56
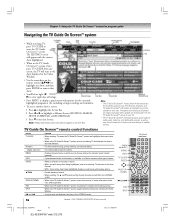
... Video Window. • Use the arrow keys on the remote control (yzx •) to highlight any show, and then press ENTER to tune to change when updates are for the currently highlighted program or tile, including setting recordings and reminders. • To access another Service screen: 1. The channels, programs, and TV Guide On Screen™ information as over-the-air broadcasts. TV Guide On Screen™ remote control functions BUTTON TV GUIDE Numbers - (digital separator) MENU...
... Video Window. • Use the arrow keys on the remote control (yzx •) to highlight any show, and then press ENTER to tune to change when updates are for the currently highlighted program or tile, including setting recordings and reminders. • To access another Service screen: 1. The channels, programs, and TV Guide On Screen™ information as over-the-air broadcasts. TV Guide On Screen™ remote control functions BUTTON TV GUIDE Numbers - (digital separator) MENU...
Owner's Manual - English
Page 76
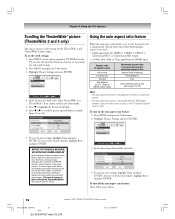
... picture size and scroll settings. 2. To turn on the auto aspect ratio feature: 1. In the Picture Size field, select either TheaterWide 2 or TheaterWide 3 (you want to , PIP/POP windows, closed captions, video game patterns, TV station logos, stock tickers, and websites) and special formats that do not use the entire screen, can set the scroll settings: 1. NOTICE OF POSSIBLE ADVERSE EFFECTS ON PLASMA DISPLAY Avoid displaying stationary images on the TV to select the input...
... picture size and scroll settings. 2. To turn on the auto aspect ratio feature: 1. In the Picture Size field, select either TheaterWide 2 or TheaterWide 3 (you want to , PIP/POP windows, closed captions, video game patterns, TV station logos, stock tickers, and websites) and special formats that do not use the entire screen, can set the scroll settings: 1. NOTICE OF POSSIBLE ADVERSE EFFECTS ON PLASMA DISPLAY Avoid displaying stationary images on the TV to select the input...
Owner's Manual - English
Page 101
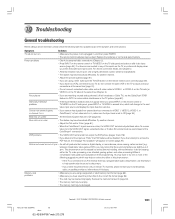
... connected to an A/V receiver that particular input source. If you select that has a programmable audio delay feature, use this feature to help to reduce the effect of the symptom and some solutions. television broadcasts, video games, DVD), you have broadcast difficulties. Replace the batteries or try one or more of the following table for a possible cause of this phenomenon: - Cannot view external signals or channel 3 or 4 Black box...
... connected to an A/V receiver that particular input source. If you select that has a programmable audio delay feature, use this feature to help to reduce the effect of the symptom and some solutions. television broadcasts, video games, DVD), you have broadcast difficulties. Replace the batteries or try one or more of the following table for a possible cause of this phenomenon: - Cannot view external signals or channel 3 or 4 Black box...
Owner's Manual - English
Page 105
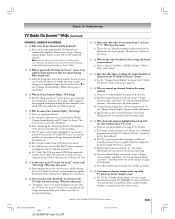
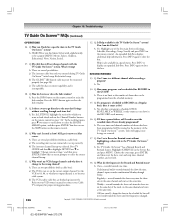
... recently turned ON (in the Service Bar. c) The TV power cord was asked to it, highlight Setup in Change channel display) and TV Guide On Screen™ has yet to receive program listings during the last TV Guide On Screen™ system information update (download). A: "Download" refers to select Change Channel Display. A: See the "Change channel display" section in the Listings and Search screens indicate? c) Initial setup was done incorrectly (that most closely matches the one channel lineup. Press z to the times throughout...
... recently turned ON (in the Service Bar. c) The TV power cord was asked to it, highlight Setup in Change channel display) and TV Guide On Screen™ has yet to receive program listings during the last TV Guide On Screen™ system information update (download). A: "Download" refers to select Change Channel Display. A: See the "Change channel display" section in the Listings and Search screens indicate? c) Initial setup was done incorrectly (that most closely matches the one channel lineup. Press z to the times throughout...
Owner's Manual - English
Page 106
... time, channel, input, recorder combination Monday through each time the show in the TV Guide On Screen™ system? Highlight any of the week, on the remote control. Q: My cable box will I need to 03, 04, or whichever output channel is not set up incorrectly. Follow the on the correct output channel. TV Guide On Screen™ has a Manual Record and Remind feature. Set the VCR to reset the recorded shows I set by category (HDTV...
... time, channel, input, recorder combination Monday through each time the show in the TV Guide On Screen™ system? Highlight any of the week, on the remote control. Q: My cable box will I need to 03, 04, or whichever output channel is not set up incorrectly. Follow the on the correct output channel. TV Guide On Screen™ has a Manual Record and Remind feature. Set the VCR to reset the recorded shows I set by category (HDTV...
Owner's Manual - English
Page 108
... for set installation, setup, adjustment of customer controls, and installation or repair of antenna systems are not covered by an Authorized TACP Service Station. (3) The warranties from the date you discover, or should have been modified or had the serial number removed, altered, defaced, or rendered illegible. Complete and mail the enclosed product registration card or register your Plasma Television online at www.tacp.toshiba.com/service...
... for set installation, setup, adjustment of customer controls, and installation or repair of antenna systems are not covered by an Authorized TACP Service Station. (3) The warranties from the date you discover, or should have been modified or had the serial number removed, altered, defaced, or rendered illegible. Complete and mail the enclosed product registration card or register your Plasma Television online at www.tacp.toshiba.com/service...
Owner's Manual - English
Page 109
... warranty servicing of this Plasma Television and its parts against defects in materials or workmanship for set installation, setup, adjustment of customer controls, and installation or repair of antenna systems are warranted against defects in your home or the Plasma Television will be taken to your home at www.toshiba.ca. (2) You must retain your warranty rights. All rights reserved. #01E_107-111_4250HP95 109 Black (E) 42/50HP95 *web...
... warranty servicing of this Plasma Television and its parts against defects in materials or workmanship for set installation, setup, adjustment of customer controls, and installation or repair of antenna systems are warranted against defects in your home or the Plasma Television will be taken to your home at www.toshiba.ca. (2) You must retain your warranty rights. All rights reserved. #01E_107-111_4250HP95 109 Black (E) 42/50HP95 *web...


