User Manual
Page 5
...Panel face down on or off using a Wall Bracket: If you decide to service the TV yourself. If these sounds become frequent or continuous, unplug the power cord and contact a Toshiba Authorized Service Center. 42) DANGER: RISK OF SERIOUS PERSONAL INJURY OR DEATH! CAUTION: Before beginning pedestal assembly, ... periods of time. 40) ALWAYS unplug the TV to determine that can be exposed to clean the LCD screen, follow this manual to a Toshiba Authorized Service Center. 45) If you have the TV serviced: • Ask the service technician to use a UL listed wall bracket appropriate ...
...Panel face down on or off using a Wall Bracket: If you decide to service the TV yourself. If these sounds become frequent or continuous, unplug the power cord and contact a Toshiba Authorized Service Center. 42) DANGER: RISK OF SERIOUS PERSONAL INJURY OR DEATH! CAUTION: Before beginning pedestal assembly, ... periods of time. 40) ALWAYS unplug the TV to determine that can be exposed to clean the LCD screen, follow this manual to a Toshiba Authorized Service Center. 45) If you have the TV serviced: • Ask the service technician to use a UL listed wall bracket appropriate ...

User Manual
Page 9
... quality 46 Using the closed caption mode 46 Base closed captions 46 Digital CC Settings 47 CC Selector 47 Adjusting the audio 47 Muting the sound 47 Using the digital audio selector 47 Selecting stereo/SAP broadcasts 48 Adjusting the audio quality 48 Selecting the optical audio output format 49 Using...
... quality 46 Using the closed caption mode 46 Base closed captions 46 Digital CC Settings 47 CC Selector 47 Adjusting the audio 47 Muting the sound 47 Using the digital audio selector 47 Selecting stereo/SAP broadcasts 48 Adjusting the audio quality 48 Selecting the optical audio output format 49 Using...
User Manual
Page 10
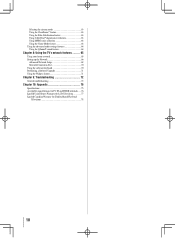
... noise reduction 63 Using MPEG noise reduction 64 Using the Game Mode feature 64 Using the advanced audio settings features 64 Using the QSound® sound feature 64 Chapter 8: Using the TV's network features......... 65 Using your home network 65 Setting up the Network 66 Advanced Network Setup 69 Network Connection... 75 Specifications 75 Acceptable signal formats for PC IN and HDMI terminals......76 Limited United States Warranty for LCD Televisions 77 Limited Canadian Warranty for Toshiba Brand Flat Panel Televisions 78 10
... noise reduction 63 Using MPEG noise reduction 64 Using the Game Mode feature 64 Using the advanced audio settings features 64 Using the QSound® sound feature 64 Chapter 8: Using the TV's network features......... 65 Using your home network 65 Setting up the Network 66 Advanced Network Setup 69 Network Connection... 75 Specifications 75 Acceptable signal formats for PC IN and HDMI terminals......76 Limited United States Warranty for LCD Televisions 77 Limited Canadian Warranty for Toshiba Brand Flat Panel Televisions 78 10
User Manual
Page 20
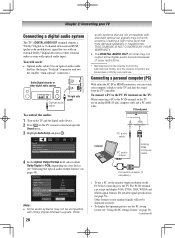
... setting feature ( "Using the PC settings feature" on the PC before connecting it to the PC IN terminal on the TV and hear the sound from Dolby Laboratories. To connect a PC to the PC IN terminal on the TV: When connecting a PC to the TV. The PC IN terminal can... panel To control the audio: 1無 Turn on the TV and the digital audio device. 2無 Press on the TV's remote control and open the Sound menu. 3無 Highlight Audio Setup and press . 4無 In the Optical Output Format field, select either the PC IN or HDMI connection, you can accept...
... setting feature ( "Using the PC settings feature" on the PC before connecting it to the PC IN terminal on the TV and hear the sound from Dolby Laboratories. To connect a PC to the PC IN terminal on the TV: When connecting a PC to the TV. The PC IN terminal can... panel To control the audio: 1無 Turn on the TV and the digital audio device. 2無 Press on the TV's remote control and open the Sound menu. 3無 Highlight Audio Setup and press . 4無 In the Optical Output Format field, select either the PC IN or HDMI connection, you can accept...
User Manual
Page 25
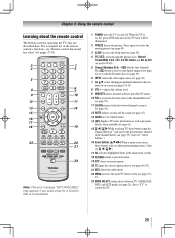
... ( pages 34-35). 8無 VOL + - The button is used for a function that is not available. 1無 POWER turns the TV on and off the sound ( page 47). 13無 QUICK accesses Quick menu. 14無 INFO displays TV status information as well as program details, when available ( page...
... ( pages 34-35). 8無 VOL + - The button is used for a function that is not available. 1無 POWER turns the TV on and off the sound ( page 47). 13無 QUICK accesses Quick menu. 14無 INFO displays TV status information as well as program details, when available ( page...
User Manual
Page 31
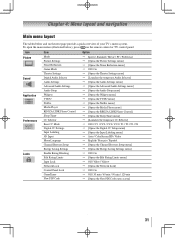
Icon Picture Sound Application Preferences Locks Item Mode Picture Settings Noise Reduction Game Mode Theater Settings Digital Audio Selector Audio Settings Advanced Audio Settings Audio Setup Widgets VUDU ...
Icon Picture Sound Application Preferences Locks Item Mode Picture Settings Noise Reduction Game Mode Theater Settings Digital Audio Selector Audio Settings Advanced Audio Settings Audio Setup Widgets VUDU ...

User Manual
Page 33
... / Movie / PC / Preference Picture Size Natural / TheaterWide 1 / TheaterWide 2 / TheaterWide 3 / Full / 4:3 HD / Native / Dot by Dot Media Player [Opens the Media Player menu] Sort Sound Title / New / Old [Opens the Audio Settings menu] Interval Time 3 sec / 5 sec / 10 sec / 15 sec / 30 sec / 60 sec / 90 sec...
... / Movie / PC / Preference Picture Size Natural / TheaterWide 1 / TheaterWide 2 / TheaterWide 3 / Full / 4:3 HD / Native / Dot by Dot Media Player [Opens the Media Player menu] Sort Sound Title / New / Old [Opens the Audio Settings menu] Interval Time 3 sec / 5 sec / 10 sec / 15 sec / 30 sec / 60 sec / 90 sec...
User Manual
Page 36
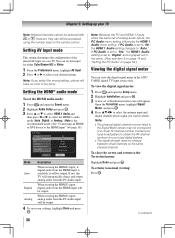
... menu. 2無 Highlight Installation and press . 3無 A new set to a virtual TV channel number. To view the digital signal meter: 1無 Press and open the Sound menu. 2無 Highlight Audio Setup and press . 3無 Press p or q to select HDMI 1 Audio and then press t or u to select the HDMI 1 audio mode (Auto...
... menu. 2無 Highlight Installation and press . 3無 A new set to a virtual TV channel number. To view the digital signal meter: 1無 Press and open the Sound menu. 2無 Highlight Audio Setup and press . 3無 Press p or q to select HDMI 1 Audio and then press t or u to select the HDMI 1 audio mode (Auto...

User Manual
Page 46
... the closed caption mode Base closed captions The closed caption mode has two options: • Captions-An on-screen display of the dialogue, narration, and sound effects of TV programs and videos that you selected is not closed captioned (usually marked "CC" in the following situations: ••When a videotape has...
... the closed caption mode Base closed captions The closed caption mode has two options: • Captions-An on-screen display of the dialogue, narration, and sound effects of TV programs and videos that you selected is not closed captioned (usually marked "CC" in the following situations: ••When a videotape has...
User Manual
Page 47
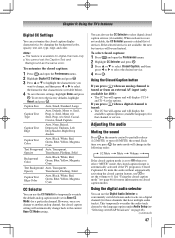
... Edge Color Auto, Black, White, Red, Green, Blue, Yellow, Magenta, Cyan CC Selector You can use the CC Selector to 0. Adjusting the audio Muting the sound Press on closed caption modes. Note: ••This feature is Closed Captioned. To mute the audio without automatically activating the closed caption services (if... the characteristic you press , the mute mode will automatically change , and then press or to partially reduce (1/2 MUTE) or turn off (MUTE) the sound.
... Edge Color Auto, Black, White, Red, Green, Blue, Yellow, Magenta, Cyan CC Selector You can use the CC Selector to 0. Adjusting the audio Muting the sound Press on closed caption modes. Note: ••This feature is Closed Captioned. To mute the audio without automatically activating the closed caption services (if... the characteristic you press , the mute mode will automatically change , and then press or to partially reduce (1/2 MUTE) or turn off (MUTE) the sound.
User Manual
Page 48
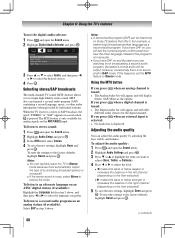
.... Adjusting the audio quality You can typically leave the TV in Stereo mode because it . Selecting stereo/SAP broadcasts The multi-channel TV sound (MTS) feature allows you prefer. To reset the settings to Stereo mode. To listen to reduce the noise. Using the MTS button ...you to select the desired service. 4無 Press . Chapter 6: Using the TV's features To use the digital audio selector: 1無 Press and open the Sound menu. 2無 Highlight Audio Setup and press . 3無 In the MTS field, select Stereo. 4無 To save the new settings, highlight Done and ...
.... Adjusting the audio quality You can typically leave the TV in Stereo mode because it . Selecting stereo/SAP broadcasts The multi-channel TV sound (MTS) feature allows you prefer. To reset the settings to Stereo mode. To listen to reduce the noise. Using the MTS button ...you to select the desired service. 4無 Press . Chapter 6: Using the TV's features To use the digital audio selector: 1無 Press and open the Sound menu. 2無 Highlight Audio Setup and press . 3無 In the MTS field, select Stereo. 4無 To save the new settings, highlight Done and ...

User Manual
Page 49
... and press . 5無 Press the Number buttons to "0000". To use the Dolby Digital Dynamic Range Control: 1無 Press and open the Sound menu. 2無 Highlight Audio Setup and press . 3無 In the Optical Output Format field, select either Dolby Digital or PCM, depending on page...from ATSC to the factory defaults, highlight Reset and press . appears. To select the optical audio output format: 1無 Press and open the Sound menu. 2無 Highlight Audio Setup and press . 3無 In the Dolby Digital Dynamic Range Control field, select Compressed. Using the Dolby®...
... and press . 5無 Press the Number buttons to "0000". To use the Dolby Digital Dynamic Range Control: 1無 Press and open the Sound menu. 2無 Highlight Audio Setup and press . 3無 In the Optical Output Format field, select either Dolby Digital or PCM, depending on page...from ATSC to the factory defaults, highlight Reset and press . appears. To select the optical audio output format: 1無 Press and open the Sound menu. 2無 Highlight Audio Setup and press . 3無 In the Dolby Digital Dynamic Range Control field, select Compressed. Using the Dolby®...

User Manual
Page 54
..., it may not appear. 2無 Press or to select Yes, and then press . Toshiba cannot and does not grant such permission. ••Depending on a USB storage device. Automatically open the Sound menu. 2無 Highlight Audio Setup and press . 3無 Press or to select PC ...for all devices. ••Connect the USB device to 320 kbps Maximum number of the TV. Note: If you to output or mute the sound from 8 to the TV directly. ••Do not use copyright content. To open the Media Player. Note: The prompt will display on...
..., it may not appear. 2無 Press or to select Yes, and then press . Toshiba cannot and does not grant such permission. ••Depending on a USB storage device. Automatically open the Sound menu. 2無 Highlight Audio Setup and press . 3無 Press or to select PC ...for all devices. ••Connect the USB device to 320 kbps Maximum number of the TV. Note: If you to output or mute the sound from 8 to the TV directly. ••Do not use copyright content. To open the Media Player. Note: The prompt will display on...

User Manual
Page 56
... Player specifications: File format: MP3 , LPCM Sampling frequency: 32 kHz, 44.1 kHz, 48 kHz Bit rate: from the QUICK menu. This TV can adjust the SOUND menu functions from 32 to the next layer. Chapter 6: Using the TV's features 2無 When you can play digital content stored on the file size...
... Player specifications: File format: MP3 , LPCM Sampling frequency: 32 kHz, 44.1 kHz, 48 kHz Bit rate: from the QUICK menu. This TV can adjust the SOUND menu functions from 32 to the next layer. Chapter 6: Using the TV's features 2無 When you can play digital content stored on the file size...
User Manual
Page 58
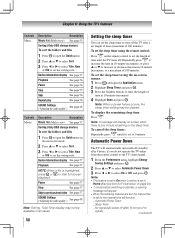
... display See page 57 Playback See page 56 Pause See page 56 Stop See page 55 Skip See page 56 Repeat play See page 56 SOUND Settings ("Adjusting the audio quality") See page 48 Contents Movie Description Description Movie list (Multi view) See page 57. Note: When a power failure occurs, ... select Title, New or Old to set the length of time until it is set the sleep timer to previous/next video See page 57 SOUND Settings ("Adjusting the audio quality") See page 48 Note: Sorting, Total Time display may be available in 10-minute increments. 4無 Highlight Done and ...
... display See page 57 Playback See page 56 Pause See page 56 Stop See page 55 Skip See page 56 Repeat play See page 56 SOUND Settings ("Adjusting the audio quality") See page 48 Contents Movie Description Description Movie list (Multi view) See page 57. Note: When a power failure occurs, ... select Title, New or Old to set the length of time until it is set the sleep timer to previous/next video See page 57 SOUND Settings ("Adjusting the audio quality") See page 48 Note: Sorting, Total Time display may be available in 10-minute increments. 4無 Highlight Done and ...

User Manual
Page 60
... a digital audio input mode on the Audio Receiver. ••These functions depend on the Audio Receiver, change its input source, or adjust the sound volume, the sound will send a message to turn on the device connected. 60 Other REGZA-LINK® functions When the Enable REGZA-LINK and each item in... the REGZA-LINK Setup menu. −− Confirm that is turned off the sound. In this item, you can be output from the TV speakers. Turn the TV off and on the remote control to TV. • adjust ...
... a digital audio input mode on the Audio Receiver. ••These functions depend on the Audio Receiver, change its input source, or adjust the sound volume, the sound will send a message to turn on the device connected. 60 Other REGZA-LINK® functions When the Enable REGZA-LINK and each item in... the REGZA-LINK Setup menu. −− Confirm that is turned off the sound. In this item, you can be output from the TV speakers. Turn the TV off and on the remote control to TV. • adjust ...
User Manual
Page 64
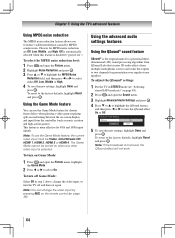
...turned on -screen display and input from multiple monophonic sources and sums the outputs to two channels for a positional threedimensional (3D) sound processing algorithm from QSound Labs that creates 3D audio effects from the controller (such as music creation and high-action games). Note:...MPEG noise reduction The MPEG noise reduction feature allows you to reduce visible interference caused by pressing on page 48). 2無 Press and open the Sound menu. 3無 Highlight Advanced Audio Settings and press . 4無 Press or to highlight the QSound feature, and then...
...turned on -screen display and input from multiple monophonic sources and sums the outputs to two channels for a positional threedimensional (3D) sound processing algorithm from QSound Labs that creates 3D audio effects from the controller (such as music creation and high-action games). Note:...MPEG noise reduction The MPEG noise reduction feature allows you to reduce visible interference caused by pressing on page 48). 2無 Press and open the Sound menu. 3無 Highlight Advanced Audio Settings and press . 4無 Press or to highlight the QSound feature, and then...

User Manual
Page 72
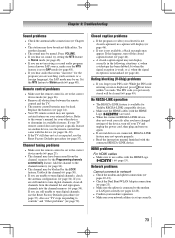
...to a particular input on certain TV channels, please contact your TV's problem is plugged in the TV picture ( page 63). Picture and sound are out of the problem and some solutions you cannot view signals from external devices connected to VIDEO, ColorStream® HD, HDMI 1, HDMI ...page 46). Replace the batteries or try . Use a highly directional outdoor antenna (if applicable). •• The station may help synchronize the sound to Off ( page 52). Video Input Selection problems •• If the Input Selection window does not appear when you may be poor...
...to a particular input on certain TV channels, please contact your TV's problem is plugged in the TV picture ( page 63). Picture and sound are out of the problem and some solutions you cannot view signals from external devices connected to VIDEO, ColorStream® HD, HDMI 1, HDMI ...page 46). Replace the batteries or try . Use a highly directional outdoor antenna (if applicable). •• The station may help synchronize the sound to Off ( page 52). Video Input Selection problems •• If the Input Selection window does not appear when you may be poor...
User Manual
Page 73
...72). Refer to determine its available features. If your TV remote control does not operate a specific feature on another channel. •• The sound may appear. If this happens, turn off your TV and unplug the power cord, then plug and turn off the closed caption feature (...device ( pages 26-30). •• If the TV still does not act as expected, use the remote control that seems "incorrect" for Toshiba REGZA-LINK compatible devices. •• Make sure the HDMI cables with the HDMI Logo ( ) ( page 15). Remote control problems •...
...72). Refer to determine its available features. If your TV remote control does not operate a specific feature on another channel. •• The sound may appear. If this happens, turn off your TV and unplug the power cord, then plug and turn off the closed caption feature (...device ( pages 26-30). •• If the TV still does not act as expected, use the remote control that seems "incorrect" for Toshiba REGZA-LINK compatible devices. •• Make sure the HDMI cables with the HDMI Logo ( ) ( page 15). Remote control problems •...


