

User Guide
Page 1
...picture, the TV must be receiving a High Definition signal (such as an overthe-air High Definition digital cable program, or a High Definition Satellite program). Refer to these numbers in this TV. Record these numbers whenever you need assistance: Toshiba's Support Web site support.toshiba.com Call Toshiba... back and side of your TV. GMA300014012 7/12 Integrated High Definition LED Television User's Guide: 32L2200U 40L2200U 50L2200U If you communicate with your Toshiba dealer about this guide. For details, contact your TV antenna installer, cable provider, or satellite provider....
...picture, the TV must be receiving a High Definition signal (such as an overthe-air High Definition digital cable program, or a High Definition Satellite program). Refer to these numbers in this TV. Record these numbers whenever you need assistance: Toshiba's Support Web site support.toshiba.com Call Toshiba... back and side of your TV. GMA300014012 7/12 Integrated High Definition LED Television User's Guide: 32L2200U 40L2200U 50L2200U If you communicate with your Toshiba dealer about this guide. For details, contact your TV antenna installer, cable provider, or satellite provider....
User Guide
Page 4
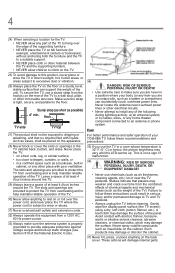
... PERSONAL INJURY, DEATH, OR EQUIPMENT DAMAGE! • Never use the TV in a room whose temperature is 32° F (0° C) or below, the picture brightness may vary until the LED warms up static charges (see Section 810 of the National Electric Code). 34) DANGER: RISK OF SERIOUS PERSONAL INJURY... OR DEATH! • Use extreme care to make sure you are never in a position where your TOSHIBA TV, follow these recommendations and precautions: 35) If you use chemicals (such as vases, shall be exposed to dripping or splashing, and that no...
... PERSONAL INJURY, DEATH, OR EQUIPMENT DAMAGE! • Never use the TV in a room whose temperature is 32° F (0° C) or below, the picture brightness may vary until the LED warms up static charges (see Section 810 of the National Electric Code). 34) DANGER: RISK OF SERIOUS PERSONAL INJURY... OR DEATH! • Use extreme care to make sure you are never in a position where your TOSHIBA TV, follow these recommendations and precautions: 35) If you use chemicals (such as vases, shall be exposed to dripping or splashing, and that no...
User Guide
Page 7
...interference by the U.S. ENERGY STAR® User Information ENERGY STAR User Information Statement: the factory default settings of this equipment. Changing Picture Settings may cause harmful interference to radio communications. Products that involve shooting a "gun" type of joystick at optimal energy efficiency, ... found to comply with Part 15 of the FCC Rules. 7 FCC Declaration of Conformity Compliance Statement (Part 15): Toshiba 32L2200U, 40L2200U, and 50L2200U Television models comply with the limits for a Class B digital device, pursuant to Part 15 of the FCC Rules...
...interference by the U.S. ENERGY STAR® User Information ENERGY STAR User Information Statement: the factory default settings of this equipment. Changing Picture Settings may cause harmful interference to radio communications. Products that involve shooting a "gun" type of joystick at optimal energy efficiency, ... found to comply with Part 15 of the FCC Rules. 7 FCC Declaration of Conformity Compliance Statement (Part 15): Toshiba 32L2200U, 40L2200U, and 50L2200U Television models comply with the limits for a Class B digital device, pursuant to Part 15 of the FCC Rules...
User Guide
Page 11
...channel (programmed or unprogrammed 70 Switching between two channels using Channel Return 70 Switching between two channels using SurfLock 70 Selecting the picture size 71 Full 72 TheaterWide 1 73 TheaterWide 2 73 TheaterWide 3 74 Native 74 4:3 75 Normal 75 Dot by Dot 75 Scrolling the...only 76 Using the Auto Aspect feature 77 Selecting the Cinema Mode 78 Using the FREEZE feature 78 Adjusting the picture 79 Selecting the picture mode 79 Adjusting the picture quality 80 Using closed captions 81 Base closed captions 81 Digital CC settings 82 CC Selector 83 Adjusting the ...
...channel (programmed or unprogrammed 70 Switching between two channels using Channel Return 70 Switching between two channels using SurfLock 70 Selecting the picture size 71 Full 72 TheaterWide 1 73 TheaterWide 2 73 TheaterWide 3 74 Native 74 4:3 75 Normal 75 Dot by Dot 75 Scrolling the...only 76 Using the Auto Aspect feature 77 Selecting the Cinema Mode 78 Using the FREEZE feature 78 Adjusting the picture 79 Selecting the picture mode 79 Adjusting the picture quality 80 Using closed captions 81 Base closed captions 81 Digital CC settings 82 CC Selector 83 Adjusting the ...
User Guide
Page 13
... information 114 Understanding the Last Mode Memory feature .....115 Chapter 7: Using the TV's Advanced Features 116 Using the advanced picture settings 116 Dynamic Contrast 116 Static Gamma 117 Color Temperature 117 CableClear® digital Noise Reduction 118 MPEG Noise Reduction 119... Game Mode 119 Chapter 8: Troubleshooting 121 General troubleshooting 121 Picture problems 122 Sound problems 123 Remote control problems 124 Channel tuning problems 124 Closed caption problems 125 Rating blocking (V-Chip) ...
... information 114 Understanding the Last Mode Memory feature .....115 Chapter 7: Using the TV's Advanced Features 116 Using the advanced picture settings 116 Dynamic Contrast 116 Static Gamma 117 Color Temperature 117 CableClear® digital Noise Reduction 118 MPEG Noise Reduction 119... Game Mode 119 Chapter 8: Troubleshooting 121 General troubleshooting 121 Picture problems 122 Sound problems 123 Remote control problems 124 Channel tuning problems 124 Closed caption problems 125 Rating blocking (V-Chip) ...
User Guide
Page 16
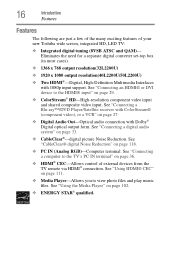
... set-top box (in most cases). ❖ 1366 x 768 output resolution(32L2200U) ❖ 1920 x 1080 output resolution(40L2200U/50L2200U) ❖ Two HDMI®-Digital, High-Definition Multimedia Interfaces with Dolby® Digital optical output form. See "Connecting ...a digital audio system" on page 36. ❖ HDMI® CEC-Allows control of your new Toshiba wide screen, integrated HD, LED TV: ❖ Integrated digital tuning (8VSB ATSC and QAM)- See "Using the Media... PC IN terminal" on page 33. ❖ CableClear®-digital picture Noise Reduction.
... set-top box (in most cases). ❖ 1366 x 768 output resolution(32L2200U) ❖ 1920 x 1080 output resolution(40L2200U/50L2200U) ❖ Two HDMI®-Digital, High-Definition Multimedia Interfaces with Dolby® Digital optical output form. See "Connecting ...a digital audio system" on page 36. ❖ HDMI® CEC-Allows control of your new Toshiba wide screen, integrated HD, LED TV: ❖ Integrated digital tuning (8VSB ATSC and QAM)- See "Using the Media... PC IN terminal" on page 33. ❖ CableClear®-digital picture Noise Reduction.
User Guide
Page 23
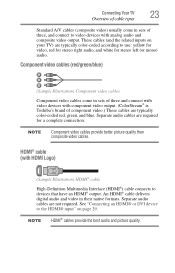
...left (or mono) audio. An HDMI® cable delivers digital audio and video in their native formats. NOTE Component video cables provide better picture quality than composite video cables. Separate audio cables are typically color-coded red, green, and blue. These cables (and the related inputs on...cable types Standard A/V cables (composite video) usually come in sets of three and connect with video devices with component video output. (ColorStream® is Toshiba's brand of three, and connect to the HDMI® input" on your TV) are not required. HDMI® cable (with HDMI Logo) (...
...left (or mono) audio. An HDMI® cable delivers digital audio and video in their native formats. NOTE Component video cables provide better picture quality than composite video cables. Separate audio cables are typically color-coded red, green, and blue. These cables (and the related inputs on...cable types Standard A/V cables (composite video) usually come in sets of three and connect with video devices with component video output. (ColorStream® is Toshiba's brand of three, and connect to the HDMI® input" on your TV) are not required. HDMI® cable (with HDMI Logo) (...

User Guide
Page 38
... "Connecting an HDMI® or DVI device to the HDMI® input" on page 100. 38 Connecting Your TV Connecting a computer To display the optimum picture, use an HDMI®-to-DVI adapter cable and analog audio cables.
... "Connecting an HDMI® or DVI device to the HDMI® input" on page 100. 38 Connecting Your TV Connecting a computer To display the optimum picture, use an HDMI®-to-DVI adapter cable and analog audio cables.

User Guide
Page 40
no overscanning). 40 Connecting Your TV Connecting a computer NOTE ❖ The edges of the picture may be hidden. ❖ If receiving a 480i (HDMI®), 480p (HDMI®), 720p, 1080i, or 1080p signal program, Native mode scales the video to display the entire picture within the borders of the screen (i.e.
no overscanning). 40 Connecting Your TV Connecting a computer NOTE ❖ The edges of the picture may be hidden. ❖ If receiving a 480i (HDMI®), 480p (HDMI®), 720p, 1080i, or 1080p signal program, Native mode scales the video to display the entire picture within the borders of the screen (i.e.
User Guide
Page 45
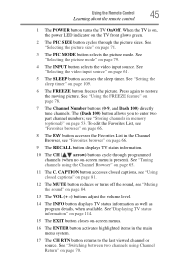
... Number buttons (0-9, and Dash 100) directly tune channels. See "Tuning channels using Channel Return" on page 71. 3 The PIC MODE button selects the picture mode. CAPTION button accesses closed captions, see "Using closed captions" on page 81. 12 The MUTE button reduces or turns off the sound, see "...Favorites browser" on page 66. 8 The FAV button accesses the Favorites List in memory (optional)" on page 65. 11 The C. See "Selecting the picture mode" on page 84. 13 The VOL (+ -) buttons adjust the volume level. 14 The INFO button displays TV status information as well as program ...
... Number buttons (0-9, and Dash 100) directly tune channels. See "Tuning channels using Channel Return" on page 71. 3 The PIC MODE button selects the picture mode. CAPTION button accesses closed captions, see "Using closed captions" on page 81. 12 The MUTE button reduces or turns off the sound, see "...Favorites browser" on page 66. 8 The FAV button accesses the Favorites List in memory (optional)" on page 65. 11 The C. See "Selecting the picture mode" on page 84. 13 The VOL (+ -) buttons adjust the volume level. 14 The INFO button displays TV status information as well as program ...
User Guide
Page 46
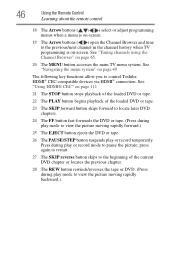
... chapter or locates the previous chapter. 28 The REW button rewinds/reverses the tape or DVD. (Press during play mode to pause the picture; See "Navigating the menu system" on page 49 The following key functions allow you to the previous/next channel in the channel history ...when TV programming is on-screen. 19 The Arrow buttons ( / ) open the Channel Browser and tune to control Toshiba HDMI® CEC-compatible devices via HDMI® connection. 46 Using the Remote Control Learning about the remote control 18 The Arrow buttons ( / / /...
... chapter or locates the previous chapter. 28 The REW button rewinds/reverses the tape or DVD. (Press during play mode to pause the picture; See "Navigating the menu system" on page 49 The following key functions allow you to the previous/next channel in the channel history ...when TV programming is on-screen. 19 The Arrow buttons ( / ) open the Channel Browser and tune to control Toshiba HDMI® CEC-compatible devices via HDMI® connection. 46 Using the Remote Control Learning about the remote control 18 The Arrow buttons ( / / /...
User Guide
Page 47
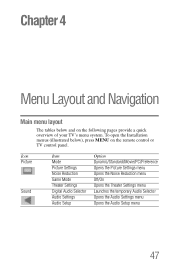
... Noise Reduction Game Mode Theater Settings Digital Audio Selector Audio Settings Audio Setup Option Dynamic/Standard/Movie/PC/Preference Opens the Picture Settings menu Opens the Noise Reduction menu Off/On Opens the Theater Settings menu Launches the temporary Audio Selector Opens the Audio Settings menu Opens ...
... Noise Reduction Game Mode Theater Settings Digital Audio Selector Audio Settings Audio Setup Option Dynamic/Standard/Movie/PC/Preference Opens the Picture Settings menu Opens the Noise Reduction menu Off/On Opens the Theater Settings menu Launches the temporary Audio Selector Opens the Audio Settings menu Opens ...
User Guide
Page 71
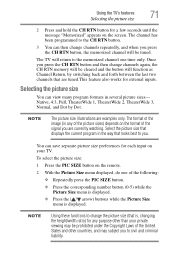
... of the signal you press the CH RTN button, the memorized channel will return to change the picture size (that is displayed. Selecting the picture size You can save separate picture size preferences for external inputs. Native, 4:3, Full, TheaterWide 1, TheaterWide 2, TheaterWide 3, Normal, and...❖ Repeatedly press the PIC SIZE button. ❖ Press the corresponding number button (0-5) while the Picture Size menu is displayed. ❖ Press the ( / arrow) buttons while the Picture Size menu is , changing the height/width ratio) for a few seconds until the message "Memorized"...
... of the signal you press the CH RTN button, the memorized channel will return to change the picture size (that is displayed. Selecting the picture size You can save separate picture size preferences for external inputs. Native, 4:3, Full, TheaterWide 1, TheaterWide 2, TheaterWide 3, Normal, and...❖ Repeatedly press the PIC SIZE button. ❖ Press the corresponding number button (0-5) while the Picture Size menu is displayed. ❖ Press the ( / arrow) buttons while the Picture Size menu is , changing the height/width ratio) for a few seconds until the message "Memorized"...

User Guide
Page 72
... to fill the width of the screen but not stretched vertically. (Sample Illustration) Picture size - To view these functions to change the picture size (that is stretched horizontally to select the desired picture size setting. 3 Highlight Done, and then press the ENTER button. 72 Using ...the TV's features Selecting the picture size To select the picture size using the menus: 1 Select Picture Size in 4:3 or Full, see "Scrolling the TheaterWide® picture (TheaterWide 2 and 3 only)" on the receiving signal format (those will be...
... to fill the width of the screen but not stretched vertically. (Sample Illustration) Picture size - To view these functions to change the picture size (that is stretched horizontally to select the desired picture size setting. 3 Highlight Done, and then press the ENTER button. 72 Using ...the TV's features Selecting the picture size To select the picture size using the menus: 1 Select Picture Size in 4:3 or Full, see "Scrolling the TheaterWide® picture (TheaterWide 2 and 3 only)" on the receiving signal format (those will be...

User Guide
Page 73
... left and right edges are stretched horizontally to fill the screen. TheaterWide 1 The center of the picture may be hidden. TheaterWide 2 This setting is for viewing in 4:3 format programs. (Sample Illustration) Picture size - Using the TV's features 73 Selecting the picture size The Full setting is for viewing letter box programs. (Sample Illustration...
... left and right edges are stretched horizontally to fill the screen. TheaterWide 1 The center of the picture may be hidden. TheaterWide 2 This setting is for viewing in 4:3 format programs. (Sample Illustration) Picture size - Using the TV's features 73 Selecting the picture size The Full setting is for viewing letter box programs. (Sample Illustration...

User Guide
Page 74
... hidden*. * To view the hidden areas (such as DVD movies, Video Games, or computer graphics. TheaterWide 3, letter box with subtitles. (Sample Illustration) Picture size - Native ❖ If receiving a 1080i, 1080p, 720p, 480i (HDMI®), or 480p (HDMI®) signal program, the video is scaled to... display the entire picture within the borders of the screen (that is, no over-scanning occurs). ❖ This is especially useful for external HD sources such as subtitles...
... hidden*. * To view the hidden areas (such as DVD movies, Video Games, or computer graphics. TheaterWide 3, letter box with subtitles. (Sample Illustration) Picture size - Native ❖ If receiving a 1080i, 1080p, 720p, 480i (HDMI®), or 480p (HDMI®) signal program, the video is scaled to... display the entire picture within the borders of the screen (that is, no over-scanning occurs). ❖ This is especially useful for external HD sources such as subtitles...

User Guide
Page 75
...Normal This size is for viewing VGA, SVGA, XGA, WXGA, and SXGA sources. (Sample Illustration) Picture size - Depending on the input signal format (VGA, for viewing VGA, SVGA, XGA, WXGA, and SXGA sources. (Sample Illustration) Picture size - Some input signal formats will display with sidebars and/or bars at the top and... bottom. Dot by Dot is for example) the picture may appear with sidebars and/or bars at the top and bottom. Normal This setting is a non-stretched display. Dot by Dot Dot by Dot...
...Normal This size is for viewing VGA, SVGA, XGA, WXGA, and SXGA sources. (Sample Illustration) Picture size - Depending on the input signal format (VGA, for viewing VGA, SVGA, XGA, WXGA, and SXGA sources. (Sample Illustration) Picture size - Some input signal formats will display with sidebars and/or bars at the top and... bottom. Dot by Dot is for example) the picture may appear with sidebars and/or bars at the top and bottom. Normal This setting is a non-stretched display. Dot by Dot Dot by Dot...
User Guide
Page 76
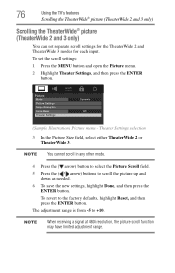
...then press the ENTER button. Theater Settings selection 3 In the Picture Size field, select either TheaterWide 2 or TheaterWide 3. 76 Using the TV's features Scrolling the TheaterWide® picture (TheaterWide 2 and 3 only) Scrolling the TheaterWide® picture (TheaterWide 2 and 3 only) You can set the scroll ...settings: 1 Press the MENU button and open the Picture menu. 2 Highlight Theater Settings, and then press the ENTER button. (Sample Illustration) Picture menu - To revert to the factory defaults, highlight Reset, and then press the ENTER ...
...then press the ENTER button. Theater Settings selection 3 In the Picture Size field, select either TheaterWide 2 or TheaterWide 3. 76 Using the TV's features Scrolling the TheaterWide® picture (TheaterWide 2 and 3 only) Scrolling the TheaterWide® picture (TheaterWide 2 and 3 only) You can set the scroll ...settings: 1 Press the MENU button and open the Picture menu. 2 Highlight Theater Settings, and then press the ENTER button. (Sample Illustration) Picture menu - To revert to the factory defaults, highlight Reset, and then press the ENTER ...
User Guide
Page 77
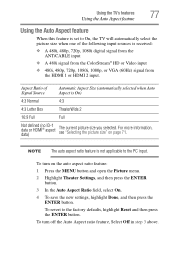
...features 77 Using the Auto Aspect feature Using the Auto Aspect feature When this feature is set to On, the TV will automatically select the picture size when one of Signal Source Automatic Aspect Size (automatically selected when Auto Aspect is On) 4:3 Normal 4:3 4:3 Letter Box TheaterWide 2... 16:9 Full Full Not defined (no ID-1 data or HDMI® aspect data) The current picture size you selected. Aspect Ratio of the following input sources is not applicable to the factory defaults, highlight Reset and then press the ENTER button...
...features 77 Using the Auto Aspect feature Using the Auto Aspect feature When this feature is set to On, the TV will automatically select the picture size when one of Signal Source Automatic Aspect Size (automatically selected when Auto Aspect is On) 4:3 Normal 4:3 4:3 Letter Box TheaterWide 2... 16:9 Full Full Not defined (no ID-1 data or HDMI® aspect data) The current picture size you selected. Aspect Ratio of the following input sources is not applicable to the factory defaults, highlight Reset and then press the ENTER button...

User Guide
Page 78
... above. To revert to Film: (available for 480i and 1080i signals) 1 Press the MENU button and open the Picture menu. 2 Highlight Picture Settings, and then press the ENTER button. 3 Highlight Advanced Picture Settings, and then press the ENTER button. 4 In the Cinema Mode field, select Film. 5 To save the...button. Using the FREEZE feature To use the FREEZE feature: 1 When watching the TV, press the FREEZE button to freeze the picture. 2 To unfreeze the picture, press the FREEZE button again (or any purpose other than 15 minutes, the FREEZE mode will automatically release and the TV ...
... above. To revert to Film: (available for 480i and 1080i signals) 1 Press the MENU button and open the Picture menu. 2 Highlight Picture Settings, and then press the ENTER button. 3 Highlight Advanced Picture Settings, and then press the ENTER button. 4 In the Cinema Mode field, select Film. 5 To save the...button. Using the FREEZE feature To use the FREEZE feature: 1 When watching the TV, press the FREEZE button to freeze the picture. 2 To unfreeze the picture, press the FREEZE button again (or any purpose other than 15 minutes, the FREEZE mode will automatically release and the TV ...


