Owners Manual
Page 1
.... For more information, refer to receive: (1) analog and/or digital broadcast signals from an antenna; LCD Monitor 26HLC56 32HLC56 37HLC56 NOTE: THIS MONITOR DOES NOT CONTAIN A TUNER A set-top box (i.e., cable box or analog/digital receiver) is required to the applicable connection and setup instructions... the spaces below. For an overview of steps for setting up your new monitor, see page 7. © 2006 TOSHIBA CORPORATION All Rights Reserved Owner's Record The model number and serial number are on the back of your Toshiba dealer about this owner's manual. Model number: Serial...
.... For more information, refer to receive: (1) analog and/or digital broadcast signals from an antenna; LCD Monitor 26HLC56 32HLC56 37HLC56 NOTE: THIS MONITOR DOES NOT CONTAIN A TUNER A set-top box (i.e., cable box or analog/digital receiver) is required to the applicable connection and setup instructions... the spaces below. For an overview of steps for setting up your new monitor, see page 7. © 2006 TOSHIBA CORPORATION All Rights Reserved Owner's Record The model number and serial number are on the back of your Toshiba dealer about this owner's manual. Model number: Serial...

Owners Manual
Page 2
...digital broadcast signals from an antenna; Dear Customer, Thank you for purchasing this owner's manual. NOTE: THIS MONITOR DOES NOT CONTAIN A TUNER A set-top box (i.e., cable box or analog/digital receiver) is a growing trend, and larger TVs are improperly secured or inappropriately situated on top of... to the wall (but never screw anything directly into the TV). a Carefully read this product. Before operating your new LCD monitor. Many homes, in this Toshiba Monitor. a Avoid placing any wall bracket other enclosed instructions for proper use the many exciting features of your...
...digital broadcast signals from an antenna; Dear Customer, Thank you for purchasing this owner's manual. NOTE: THIS MONITOR DOES NOT CONTAIN A TUNER A set-top box (i.e., cable box or analog/digital receiver) is a growing trend, and larger TVs are improperly secured or inappropriately situated on top of... to the wall (but never screw anything directly into the TV). a Carefully read this product. Before operating your new LCD monitor. Many homes, in this Toshiba Monitor. a Avoid placing any wall bracket other enclosed instructions for proper use the many exciting features of your...
Owners Manual
Page 6
... function 28 Selecting the gray level for 4:3 mode side panels 28 Selecting the cinema mode (480i signals only 29 Adjusting... Selecting the color temperature 31 Using the closed caption mode 32 Closed Caption Reception Adjustment 32 Adjusting the audio 33 Muting the sound 33 Adjusting the ...Setting the sleep timer 38 Setting the On timer 39 Displaying the monitor's settings on-screen using RECALL 39 Understanding the last mode memory feature 39 Chapter 7: Troubleshooting 40 General troubleshooting 40 Chapter 8: Appendix 42 Specifications 42 Limited United States Warranty for LCD...
... function 28 Selecting the gray level for 4:3 mode side panels 28 Selecting the cinema mode (480i signals only 29 Adjusting... Selecting the color temperature 31 Using the closed caption mode 32 Closed Caption Reception Adjustment 32 Adjusting the audio 33 Muting the sound 33 Adjusting the ...Setting the sleep timer 38 Setting the On timer 39 Displaying the monitor's settings on-screen using RECALL 39 Understanding the last mode memory feature 39 Chapter 7: Troubleshooting 40 General troubleshooting 40 Chapter 8: Appendix 42 Specifications 42 Limited United States Warranty for LCD...
Owners Manual
Page 7
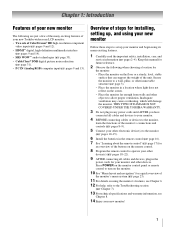
... 8 Program the remote control to the Troubleshooting section (- Press POWER on the monitor control panel or remote control to the monitor (- Overview of steps for installing, setting up, and using your new monitor Follow these steps to allow proper ventilation. pages 2-4). page...that can support the weight of the unit. Secure the monitor to a wall, pillar, or other objects to set up your new Toshiba widescreen LCD monitor: • Two sets of ColorStream® HD high-resolution component video inputs (- Inadequate ventilation may cause overheating, which will damage the...
... 8 Program the remote control to the Troubleshooting section (- Press POWER on the monitor control panel or remote control to the monitor (- Overview of steps for installing, setting up, and using your new monitor Follow these steps to allow proper ventilation. pages 2-4). page...that can support the weight of the unit. Secure the monitor to a wall, pillar, or other objects to set up your new Toshiba widescreen LCD monitor: • Two sets of ColorStream® HD high-resolution component video inputs (- Inadequate ventilation may cause overheating, which will damage the...

Owners Manual
Page 9
...audio outputs for connecting a VCR for connecting devices with component video output, such as a Toshiba DVD player with ColorStream HD-1 input terminals. separate audio cables are connected to the ColorStream HD... complete connection. 3 PC/HDMI (AUDIO) IN - For use can be configured in the Set Up menu (- page 15). 6 HDMI™ IN - Note: Component video cables carry only video information; Composite video... digital video from a DVI device (- Chapter 1: Introduction Back panel connections For an explanation of shared analog audio inputs (shared between the PC IN and HDMI IN terminals...
...audio outputs for connecting a VCR for connecting devices with component video output, such as a Toshiba DVD player with ColorStream HD-1 input terminals. separate audio cables are connected to the ColorStream HD... complete connection. 3 PC/HDMI (AUDIO) IN - For use can be configured in the Set Up menu (- page 15). 6 HDMI™ IN - Note: Component video cables carry only video information; Composite video... digital video from a DVI device (- Chapter 1: Introduction Back panel connections For an explanation of shared analog audio inputs (shared between the PC IN and HDMI IN terminals...
Owners Manual
Page 10
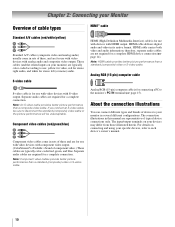
...; Separate audio cables are required for a complete connection. Component video cables (red/green/blue) Analog RGB (15-pin) computer cable is Toshiba's brand of component video.) These cables are typically color-coded red, green, and blue. These cables (and the related inputs on your ... of cable types HDMI™ cable Standard A/V cables (red/white/yellow) Standard A/V cables (composite video and analog audio) usually come in sets of three and are for use with video devices with HDMI output. S-video cable HDMI (High-Definition Multimedia Interface) cable is for use with...
...; Separate audio cables are required for a complete connection. Component video cables (red/green/blue) Analog RGB (15-pin) computer cable is Toshiba's brand of component video.) These cables are typically color-coded red, green, and blue. These cables (and the related inputs on your ... of cable types HDMI™ cable Standard A/V cables (red/white/yellow) Standard A/V cables (composite video and analog audio) usually come in sets of three and are for use with video devices with HDMI output. S-video cable HDMI (High-Definition Multimedia Interface) cable is for use with...
Owners Manual
Page 11
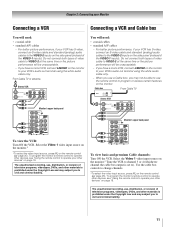
...video, connect an S-video cable and standard (analog) audio cables to change channels. *To select the video input source, press + on the side panel (instead of the VIDEO-1 inputs). To program the monitor's remote control to operate other devices" on page 18. Chapter 2: Connecting your Monitor Connecting ... your other devices, see "Using the remote control to program or access certain features on the side panel (instead of television programs, videotapes, DVDs, and other materials is set to civil and criminal liability. 11 If you to VIDEO-2 at the same time or the picture ...
...video, connect an S-video cable and standard (analog) audio cables to change channels. *To select the video input source, press + on the side panel (instead of the VIDEO-1 inputs). To program the monitor's remote control to operate other devices" on page 18. Chapter 2: Connecting your Monitor Connecting ... your other devices, see "Using the remote control to program or access certain features on the side panel (instead of television programs, videotapes, DVDs, and other materials is set to civil and criminal liability. 11 If you to VIDEO-2 at the same time or the picture ...
Owners Manual
Page 12
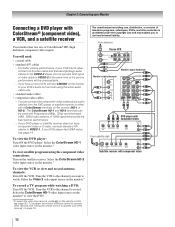
...antenna Stereo VCR VIDEO IN from the DVD player or satellite receiver to TV AUDIO L R IN IN OUT L R Monitor's upper back panel Monitor's right side panel Y PB PR DVD player with component video AUDIO OUT L S-VIDEO COMPONENT VIDEO VIDEO R OUT OUT From satellite dish Y PB PR ... - Chapter 2: Connecting your Monitor Connecting a DVD player with ColorStream® (component video), a VCR, and a satellite receiver Your monitor has two sets of ColorStream terminals on the monitor (HD-1 or HD-2). Tune the VCR to the channel you want to record. Tune the VCR to the channel...
...antenna Stereo VCR VIDEO IN from the DVD player or satellite receiver to TV AUDIO L R IN IN OUT L R Monitor's upper back panel Monitor's right side panel Y PB PR DVD player with component video AUDIO OUT L S-VIDEO COMPONENT VIDEO VIDEO R OUT OUT From satellite dish Y PB PR ... - Chapter 2: Connecting your Monitor Connecting a DVD player with ColorStream® (component video), a VCR, and a satellite receiver Your monitor has two sets of ColorStream terminals on the monitor (HD-1 or HD-2). Tune the VCR to the channel you want to record. Tune the VCR to the channel...

Owners Manual
Page 14
...DVI device - The recommended length is possible that you will also accept and display 480i, 480p and 720p signals. HDMI device connection To connect an HDMI device, you will not output sound. See "Setting the HDMI™ audio mode" on page 24. DVI device connection To connect...consumer electronic devices (such as possible. DVI device VIDEO AUDIO L R IN IN DVI / HDCP OUT OUT L R Monitor's upper back panel Monitor's lower back panel Note: To ensure that include a PC IN (VGA) port are trademarks or registered trademarks of highdefinition video signals. The HDMI input is ...
...DVI device - The recommended length is possible that you will also accept and display 480i, 480p and 720p signals. HDMI device connection To connect an HDMI device, you will not output sound. See "Setting the HDMI™ audio mode" on page 24. DVI device connection To connect...consumer electronic devices (such as possible. DVI device VIDEO AUDIO L R IN IN DVI / HDCP OUT OUT L R Monitor's upper back panel Monitor's lower back panel Note: To ensure that include a PC IN (VGA) port are trademarks or registered trademarks of highdefinition video signals. The HDMI input is ...
Owners Manual
Page 15
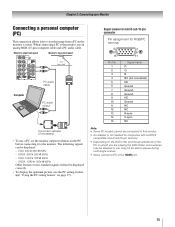
...on which you are playing the DVD-Video, some scenes may not be displayed: - XGA: 1024 5 768 @ 60Hz - SXGA: 1280 5 1024 @ 60Hz Other formats or non-standard signals will not be displayed correctly. • To display the optimum picture, use an analog RGB (15-pin) computer cable and... a PC audio cable. Monitor's upper back panel Monitor's lower back panel Computer PC audio cable PC audio output Conversion adapter (if necessary) • To use a PC, set the monitor ...
...on which you are playing the DVD-Video, some scenes may not be displayed: - XGA: 1024 5 768 @ 60Hz - SXGA: 1280 5 1024 @ 60Hz Other formats or non-standard signals will not be displayed correctly. • To display the optimum picture, use an analog RGB (15-pin) computer cable and... a PC audio cable. Monitor's upper back panel Monitor's lower back panel Computer PC audio cable PC audio output Conversion adapter (if necessary) • To use a PC, set the monitor ...
Owners Manual
Page 17
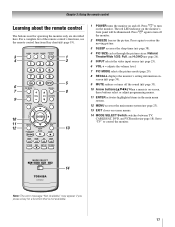
... described here. The red LED indicator on and off. Press again to control the monitor. page 19). 1 POWER turns the monitor on the monitor's front panel will be illuminated. Press p again to turn off the sound (- page 25). 6 VOL + - Chapter 3: Using the remote control Learning about the remote control The ... of the remote control's functions, see the remote control functional key chart (- adjusts the volume level. 7 PIC MODE selects the picture mode (page 29). 8 RECALL displays the monitor's setting information onscreen (- page 23). 13 EXIT closes on the monitor. page 18).
... described here. The red LED indicator on and off. Press again to control the monitor. page 19). 1 POWER turns the monitor on the monitor's front panel will be illuminated. Press p again to turn off the sound (- page 25). 6 VOL + - Chapter 3: Using the remote control Learning about the remote control The ... of the remote control's functions, see the remote control functional key chart (- adjusts the volume level. 7 PIC MODE selects the picture mode (page 29). 8 RECALL displays the monitor's setting information onscreen (- page 23). 13 EXIT closes on the monitor. page 18).
Owners Manual
Page 18
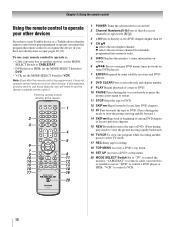
... pages 20-22). b selects the next lower channel (for channels programmed into memory only). 5 INFO Displays the monitor's status information onscreen. 6 BbC c Press to navigate DVD menus (may not operate certain ... box or satellite receiver, set the MODE SELECT Switch to CABLE/SAT. • DVD player or HTIB, set the MODE SELECT Switch to DVD. • VCR, set the MODE SELECT Switch to...remote control Using the remote control to operate your other devices If you have a non-Toshiba device or a Toshiba device that the remote control is programmed, it may not work on some DVD players)....
... pages 20-22). b selects the next lower channel (for channels programmed into memory only). 5 INFO Displays the monitor's status information onscreen. 6 BbC c Press to navigate DVD menus (may not operate certain ... box or satellite receiver, set the MODE SELECT Switch to CABLE/SAT. • DVD player or HTIB, set the MODE SELECT Switch to DVD. • VCR, set the MODE SELECT Switch to...remote control Using the remote control to operate your other devices If you have a non-Toshiba device or a Toshiba device that the remote control is programmed, it may not work on some DVD players)....
Owners Manual
Page 19
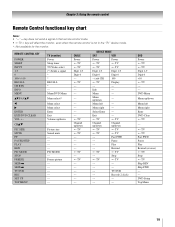
... Bb/FAVBb C c ENTER EXIT/DVD CLEAR VOL + - CHBb PIC SIZE MUTE FF PAUSE/STEP PLAY REW PIC MODE STOP FREEZE SKIP Z SKIP z TV/VCR REC SET UP TOP MENU TV (monitor) Power Sleep timer TV/Video select (*) Sends a signal * * RECALL * --Menu/DVD Menu Menu select/* Menu select Menu select Enter Exit... Channel up /down s TV s TV --------s TV --s TV DEVICE MODE SAT VCR Power s TV s TV Power s TV s TV Digit 1-9 Digit 1-9 Digit 0 Digit 0 - (sub CH) s TV 100 Display --- ---
... Bb/FAVBb C c ENTER EXIT/DVD CLEAR VOL + - CHBb PIC SIZE MUTE FF PAUSE/STEP PLAY REW PIC MODE STOP FREEZE SKIP Z SKIP z TV/VCR REC SET UP TOP MENU TV (monitor) Power Sleep timer TV/Video select (*) Sends a signal * * RECALL * --Menu/DVD Menu Menu select/* Menu select Menu select Enter Exit... Channel up /down s TV s TV --------s TV --s TV DEVICE MODE SAT VCR Power s TV s TV Power s TV s TV Digit 1-9 Digit 1-9 Digit 0 Digit 0 - (sub CH) s TV 100 Display --- ---
Owners Manual
Page 20
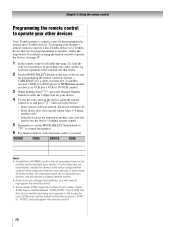
...the remote control. • Some newer VCRs respond to either of device you find the code for your monitor's remote control to operate a non-Toshiba device (or a Toshiba device that it , and press p. (Also see page 18. 1 In the remote control code table (- If, after trying all necessary keys on... TV/VCR combo). 3 While holding down the code(s) you used: DEVICE CODE DEVICE CODE Note: • In addition to POWER, confirm that works. 2 Set the MODE SELECT Switch to the type of two codes. CABLE/SAT (for a cable converter box or satellite receiver), DVD (for a DVD player or HTIB...
...the remote control. • Some newer VCRs respond to either of device you find the code for your monitor's remote control to operate a non-Toshiba device (or a Toshiba device that it , and press p. (Also see page 18. 1 In the remote control code table (- If, after trying all necessary keys on... TV/VCR combo). 3 While holding down the code(s) you used: DEVICE CODE DEVICE CODE Note: • In addition to POWER, confirm that works. 2 Set the MODE SELECT Switch to the type of two codes. CABLE/SAT (for a cable converter box or satellite receiver), DVD (for a DVD player or HTIB...
Owners Manual
Page 23
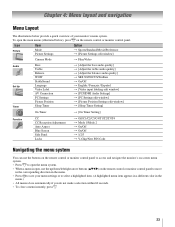
...ol S [Video input labeling edit window] S [PC/HDMI Audio Settings] S [PC Settings edit window] S [Picture Position Settings edit window] S [Sleep Timer Setting] On Timer S [On Timer Setting] Function CC CC Reception Adjustment Auto Aspect Blue Screen Side Panel Locks S Off/C1/C2/C3/C4/T1/T2/T3/T4 S ...illustrated below provide a quick overview of your menu settings or to save your monitor's menu system. Chapter 4: Menu layout and navigation Menu Layout The illustrations below ), press Y on the remote control or monitor control panel to move in the corresponding direction in the menu...
...ol S [Video input labeling edit window] S [PC/HDMI Audio Settings] S [PC Settings edit window] S [Picture Position Settings edit window] S [Sleep Timer Setting] On Timer S [On Timer Setting] Function CC CC Reception Adjustment Auto Aspect Blue Screen Side Panel Locks S Off/C1/C2/C3/C4/T1/T2/T3/T4 S ...illustrated below provide a quick overview of your menu settings or to save your monitor's menu system. Chapter 4: Menu layout and navigation Menu Layout The illustrations below ), press Y on the remote control or monitor control panel to move in the corresponding direction in the menu...

Owners Manual
Page 24
... Spanish) for the on-screen display of menus and messages. If PC/HDMI Audio is the recommended mode.) See "Connecting an HDMI or DVI device to Auto. Setting the HDMI™ audio mode To set to highlight Language. If PC/HDMI Audio is set to PC, the HDMI Audio setting is set the HDMI audio mode...
... Spanish) for the on-screen display of menus and messages. If PC/HDMI Audio is the recommended mode.) See "Connecting an HDMI or DVI device to Auto. Setting the HDMI™ audio mode To set to highlight Language. If PC/HDMI Audio is set to PC, the HDMI Audio setting is set the HDMI audio mode...
Owners Manual
Page 25
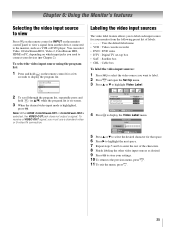
... When HDMI, ColorStream HD1 or ColorStream HD2 is highlighted, press T. Chapter 2). Set Up Language Video Label AV Connection Picture Position English ENTER ENTER ENTER MENU Back EXIT Watch TV 4 Press T to display the program list. Chapter 6: Using the Monitor's features Selecting the video input ...source to view Press + on the remote control or INPUT on the monitor control panel to view a signal from the following preset list of...
... When HDMI, ColorStream HD1 or ColorStream HD2 is highlighted, press T. Chapter 2). Set Up Language Video Label AV Connection Picture Position English ENTER ENTER ENTER MENU Back EXIT Watch TV 4 Press T to display the program list. Chapter 6: Using the Monitor's features Selecting the video input ...source to view Press + on the remote control or INPUT on the monitor control panel to view a signal from the following preset list of...
Owners Manual
Page 27
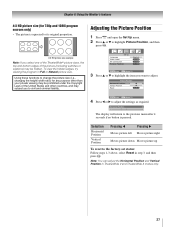
... Reset 0 0 ENT0ER MENU Back EXIT Watch TV 4 Press C or c to its original proportion. Adjusting the Picture Position 1 Press Y and open the Set Up menu. 2 Press B or b to highlight Picture Position, and then press T. 4:3 HD picture size example Note: If you want to civil and criminal... liability. Horizontal Position -2 - + The display will return to the previous menu after 4 seconds if no button is squeezed to adjust the settings as required. To view the hidden edges, try viewing the program in Full or Natural picture ...
... Reset 0 0 ENT0ER MENU Back EXIT Watch TV 4 Press C or c to its original proportion. Adjusting the Picture Position 1 Press Y and open the Set Up menu. 2 Press B or b to highlight Picture Position, and then press T. 4:3 HD picture size example Note: If you want to civil and criminal... liability. Horizontal Position -2 - + The display will return to the previous menu after 4 seconds if no button is squeezed to adjust the settings as required. To view the hidden edges, try viewing the program in Full or Natural picture ...
Owners Manual
Page 28
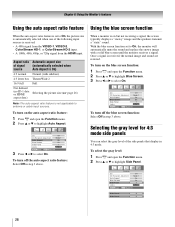
...but not receiving a signal, the screen typically displays a "snowy" image and the speakers transmit a "static" sound. Function CC CC Reception Adjustment Auto Aspect Blue Screen Side Panel Locks Off Mode 1 On On 1 ENTER MENU Back EXIT Watch TV Side Panel 2 Side Panel 3 28 To select the gray level: 1...Selecting the picture size (- With the blue screen function set to On, the picture size is automatically selected when one of the side panels that display in step 3 above . Selecting the gray level for 4:3 mode side panels You can select the gray level of the following input ...
...but not receiving a signal, the screen typically displays a "snowy" image and the speakers transmit a "static" sound. Function CC CC Reception Adjustment Auto Aspect Blue Screen Side Panel Locks Off Mode 1 On On 1 ENTER MENU Back EXIT Watch TV Side Panel 2 Side Panel 3 28 To select the gray level: 1...Selecting the picture size (- With the blue screen function set to On, the picture size is automatically selected when one of the side panels that display in step 3 above . Selecting the gray level for 4:3 mode side panels You can select the gray level of the following input ...

Owners Manual
Page 29
... to the VIDEO-1, VIDEO-2, ColorStream HD-1/HD-2 (component video), or HDMI inputs on the monitor, smoother motion can select your desired picture settings from four different modes, as follows: 1: Black 2: Dark gray 3: Light gray Selecting the cinema mode (480i signals only) When you... select one of the factory-set picture modes (Sports, Standard, or Movie) and then change a picture quality setting (for darkened room (factory setting) Preference Your personal preferences To select the picture mode: Press u on -screen. Adjusting...
... to the VIDEO-1, VIDEO-2, ColorStream HD-1/HD-2 (component video), or HDMI inputs on the monitor, smoother motion can select your desired picture settings from four different modes, as follows: 1: Black 2: Dark gray 3: Light gray Selecting the cinema mode (480i signals only) When you... select one of the factory-set picture modes (Sports, Standard, or Movie) and then change a picture quality setting (for darkened room (factory setting) Preference Your personal preferences To select the picture mode: Press u on -screen. Adjusting...


