Owner's Manual - English
Page 1
... below. For details, please contact your TV antenna installer, cable provider, or satellite provider. © 2008 TOSHIBA CORPORATION All Rights Reserved Owner's Record The model number and serial number are on the back of steps for setting up your new TV, see page 9. Note: To display a High Definition picture, the TV must... Definition digital cable program, or a High Definition digital satellite program). Integrated High Definition LCD Television HIGH-DEFINITION TELEVISION 32CV510U 37CV510U For an overview of your Toshiba dealer about this TV.
... below. For details, please contact your TV antenna installer, cable provider, or satellite provider. © 2008 TOSHIBA CORPORATION All Rights Reserved Owner's Record The model number and serial number are on the back of steps for setting up your new TV, see page 9. Note: To display a High Definition picture, the TV must... Definition digital cable program, or a High Definition digital satellite program). Integrated High Definition LCD Television HIGH-DEFINITION TELEVISION 32CV510U 37CV510U For an overview of your Toshiba dealer about this TV.
Owner's Manual - English
Page 2
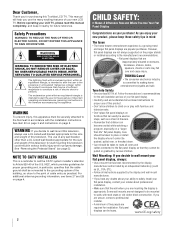
... 4. 2 CHILD SAFETY: It Makes A Difference How and Where You Use Your Flat Panel Display Congratulations on your new LCD TV. TOSHIBA Cares! • The consumer electronics industry is intended to alert the user to the presence of uninsulated "dangerous voltage" within an equilateral...a UL Listed wall bracket appropriate for the size and weight of this product. • Don't allow children to walls with furniture and television sets. • Don't place flat panel displays on page 5. Follow the manufacturer's recommendations for the safe installation and use of the U.S. WARNING ...
... 4. 2 CHILD SAFETY: It Makes A Difference How and Where You Use Your Flat Panel Display Congratulations on your new LCD TV. TOSHIBA Cares! • The consumer electronics industry is intended to alert the user to the presence of uninsulated "dangerous voltage" within an equilateral...a UL Listed wall bracket appropriate for the size and weight of this product. • Don't allow children to walls with furniture and television sets. • Don't place flat panel displays on page 5. Follow the manufacturer's recommendations for the safe installation and use of the U.S. WARNING ...

Owner's Manual - English
Page 7
...Selecting the video input source to view 34 Labeling the video input sources 34 Tuning channels 35 Tuning channels using the Channel Browser 35 Setting the Channel Tuning Mode 37 Tuning to the next programmed channel 37 Tuning to a specific channel (programmed or unprogrammed 37 Switching between two...47 Unlocking programs temporarily 47 Using the input lock feature 48 Using the control panel lock feature 48 Using the PC settings feature 49 Setting the PC Audio 49 Setting the sleep timer 50 Using REGZA-LINK 50 REGZA-LINK playback device (HD DVD player, etc.) control 50 REGZA-LINK...
...Selecting the video input source to view 34 Labeling the video input sources 34 Tuning channels 35 Tuning channels using the Channel Browser 35 Setting the Channel Tuning Mode 37 Tuning to the next programmed channel 37 Tuning to a specific channel (programmed or unprogrammed 37 Switching between two...47 Unlocking programs temporarily 47 Using the input lock feature 48 Using the control panel lock feature 48 Using the PC settings feature 49 Setting the PC Audio 49 Setting the sleep timer 50 Using REGZA-LINK 50 REGZA-LINK playback device (HD DVD player, etc.) control 50 REGZA-LINK...

Owner's Manual - English
Page 8
Chapter 7: Using the TV's advanced features 54 Using the advanced picture settings features 54 Using dynamic contrast 54 Using the static gamma feature 54 Selecting the color temperature 55 Using CableClear® digital noise reduction 55 Using ... Acceptable signal formats for PC IN and HDMI terminals 61 Limited United States Warranty for LCD Televisions 26" and Larger 62 Limited Canadian Warranty for Toshiba Brand Flat Panel Televisions 63 Index 66 8
Chapter 7: Using the TV's advanced features 54 Using the advanced picture settings features 54 Using dynamic contrast 54 Using the static gamma feature 54 Selecting the color temperature 55 Using CableClear® digital noise reduction 55 Using ... Acceptable signal formats for PC IN and HDMI terminals 61 Limited United States Warranty for LCD Televisions 26" and Larger 62 Limited Canadian Warranty for Toshiba Brand Flat Panel Televisions 63 Index 66 8

Owner's Manual - English
Page 9
...activates an auto audio/video display timing adjustment function that allows HDMI source devices to adjust the TV's standard colors. page 50). • Two sets of external devices from the TV remote via HDMI connection (- page 55). • PC IN (Analog RGB) computer terminal (- Chapter 1: ... to operate your other device(s). 6 AFTER connecting all cables and devices to your new Toshiba widescreen, integrated HD, LCD TV: • Integrated digital tuning (8VSB ATSC and QAM) eliminates the need for installing, setting up, and using the TV's features, see Chapters 6 and 7. 10 For help,...
...activates an auto audio/video display timing adjustment function that allows HDMI source devices to adjust the TV's standard colors. page 50). • Two sets of external devices from the TV remote via HDMI connection (- page 55). • PC IN (Analog RGB) computer terminal (- Chapter 1: ... to operate your other device(s). 6 AFTER connecting all cables and devices to your new Toshiba widescreen, integrated HD, LCD TV: • Integrated digital tuning (8VSB ATSC and QAM) eliminates the need for installing, setting up, and using the TV's features, see Chapters 6 and 7. 10 For help,...
Owner's Manual - English
Page 11
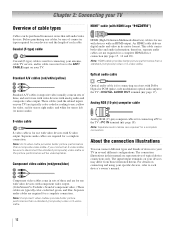
Two sets of Dolby Laboratories. 11 separate audio cables are required for connecting devices with ColorStream®. Standard (composite) video and standard audio inputs plus optional S-video inputs for a complete connection. 7 VARIABLE AUDIO OUT - separate audio cables are required for connecting devices with component video output, such as a Toshiba DVD player with composite...
Two sets of Dolby Laboratories. 11 separate audio cables are required for connecting devices with ColorStream®. Standard (composite) video and standard audio inputs plus optional S-video inputs for a complete connection. 7 VARIABLE AUDIO OUT - separate audio cables are required for connecting devices with component video output, such as a Toshiba DVD player with composite...
Owner's Manual - English
Page 12
An HDMI cable delivers digital audio and video in sets of three and are for use with devices with component video output. (ColorStream® is for a complete connection. Separate audio cables are required for use ... Note: An S-video cable provides better picture performance than a composite video cable. Component video cables (red/green/blue) Analog RGB (15-pin) computer cable is Toshiba's brand of cable types Cables can connect different types and brands of typical device connections only. Note: Separate audio cables are required for connecting a PC...
An HDMI cable delivers digital audio and video in sets of three and are for use with devices with component video output. (ColorStream® is for a complete connection. Separate audio cables are required for use ... Note: An S-video cable provides better picture performance than a composite video cable. Component video cables (red/green/blue) Analog RGB (15-pin) computer cable is Toshiba's brand of cable types Cables can connect different types and brands of typical device connections only. Note: Separate audio cables are required for connecting a PC...
Owner's Manual - English
Page 13
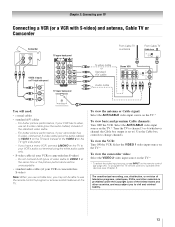
... TV.* * To select the video input source, press INPUT on the TV.* Tune the TV to channel 3 or 4 (whichever channel the Cable box output is set to operate other materials is prohibited under the Copyright Laws of the standard video cable. - The unauthorized recording, use a Cable box, you have a mono VCR...
... TV.* * To select the video input source, press INPUT on the TV.* Tune the TV to channel 3 or 4 (whichever channel the Cable box output is set to operate other materials is prohibited under the Copyright Laws of the standard video cable. - The unauthorized recording, use a Cable box, you have a mono VCR...

Owner's Manual - English
Page 14
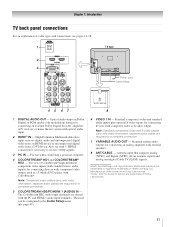
... VIDEO S-VIDEO VIDEO R IN OUT OUT Satellite receiver with ColorStream® (component video), a VCR, and a satellite receiver Your TV has two sets of ColorStream® (component video) inputs. Tune the VCR to the channel to operate other materials is not supported). - If your DVD player ...satellite receiver. Chapter 2: Connecting your TV Connecting a DVD player with component video TV lower back panel You will be used to either set of ColorStream terminals on the TV (HD1 or HD2). If your DVD player has HDMI video, see Chapter 3. Select the ColorStream HD1 ...
... VIDEO S-VIDEO VIDEO R IN OUT OUT Satellite receiver with ColorStream® (component video), a VCR, and a satellite receiver Your TV has two sets of ColorStream® (component video) inputs. Tune the VCR to the channel to operate other materials is not supported). - If your DVD player ...satellite receiver. Chapter 2: Connecting your TV Connecting a DVD player with component video TV lower back panel You will be used to either set of ColorStream terminals on the TV (HD1 or HD2). If your DVD player has HDMI video, see Chapter 3. Select the ColorStream HD1 ...

Owner's Manual - English
Page 15
... an 1080p/60Hz signal format, you will need : • one HDMI-to-DVI adapter cable (HDMI type A connector) per DVI device - See "Setting the HDMI™ audio mode" (- page 31). Separate analog audio cables are trademarks or registered trademarks of an HDMI-to-DVI adapter cable should not...an HDMI source device, or uncompressed digital video from EIA/CEA-861-D-compliant[1] consumer electronic devices (such as a set-top box or DVD player with HDMI or DVI output). See "Setting the HDMI™ audio mode" (- Chapter 2: Connecting your TV Connecting an HDMI™ or DVI device to...
... an 1080p/60Hz signal format, you will need : • one HDMI-to-DVI adapter cable (HDMI type A connector) per DVI device - See "Setting the HDMI™ audio mode" (- page 31). Separate analog audio cables are trademarks or registered trademarks of an HDMI-to-DVI adapter cable should not...an HDMI source device, or uncompressed digital video from EIA/CEA-861-D-compliant[1] consumer electronic devices (such as a set-top box or DVD player with HDMI or DVI output). See "Setting the HDMI™ audio mode" (- Chapter 2: Connecting your TV Connecting an HDMI™ or DVI device to...
Owner's Manual - English
Page 16
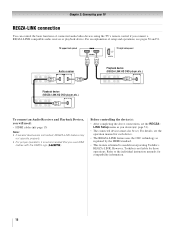
... audio receiver or playback device. For details, see pages 50 and 51. page 51). • The connected devices must also be set the REGZALINK Setup menu as regulated by the HDMI standard. • This feature is recommended that you use HDMI cables with the HDMI...operation, it is limited to the individual instruction manuals for those operations. However, Toshiba is not liable for compatibility information. 16 Before controlling the device(s): • After completing the above connections, set . For an explanation of connected audio/video devices using the TV's remote control ...
... audio receiver or playback device. For details, see pages 50 and 51. page 51). • The connected devices must also be set the REGZALINK Setup menu as regulated by the HDMI standard. • This feature is recommended that you use HDMI cables with the HDMI...operation, it is limited to the individual instruction manuals for those operations. However, Toshiba is not liable for compatibility information. 16 Before controlling the device(s): • After completing the above connections, set . For an explanation of connected audio/video devices using the TV's remote control ...

Owner's Manual - English
Page 17
...OUT terminal may not work properly, creating a high noise level that are trademarks of Dolby Laboratories. Older audio systems that may not be set to use with Dolby Digital bitstream signals. page 44). Note: To hear sound when using an external audio amplifier, the volume of copy ...restrictions. * Manufactured under license from Dolby Laboratories. LINE IN LR TV upper back panel Audio Digital Audio Selector Audio Settings Audio Setup 4 In the Optical Output Format field, select either Dolby Digital or PCM, depending on the TV's remote control and open...
...OUT terminal may not work properly, creating a high noise level that are trademarks of Dolby Laboratories. Older audio systems that may not be set to use with Dolby Digital bitstream signals. page 44). Note: To hear sound when using an external audio amplifier, the volume of copy ...restrictions. * Manufactured under license from Dolby Laboratories. LINE IN LR TV upper back panel Audio Digital Audio Selector Audio Settings Audio Setup 4 In the Optical Output Format field, select either Dolby Digital or PCM, depending on the TV's remote control and open...
Owner's Manual - English
Page 18
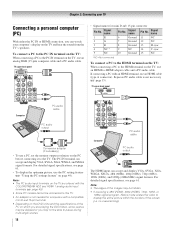
... B 4 NC * 5 NC Pin No. TV upper back panel Computer PC audio cable PC audio output Conversion adapter (if necessary) • To use a PC, set the monitor output resolution on the TV, use an analog RGB (15-pin) computer cable and a PC audio cable. For detailed signal specifications, see page ... TV. • An adapter is not necessary (- TV upper back panel • Signal names for computers with an HDMI terminal, use the PC setting feature (- Signal name 6 Ground 7 Ground 8 Ground 9 NC 10 Ground Pin No. The PC IN terminal can watch your TV Connecting a personal...
... B 4 NC * 5 NC Pin No. TV upper back panel Computer PC audio cable PC audio output Conversion adapter (if necessary) • To use a PC, set the monitor output resolution on the TV, use an analog RGB (15-pin) computer cable and a PC audio cable. For detailed signal specifications, see page ... TV. • An adapter is not necessary (- TV upper back panel • Signal names for computers with an HDMI terminal, use the PC setting feature (- Signal name 6 Ground 7 Ground 8 Ground 9 NC 10 Ground Pin No. The PC IN terminal can watch your TV Connecting a personal...
Owner's Manual - English
Page 20
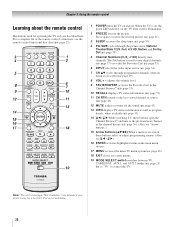
When the TV is not available. 20 page 53). 11 CH RTN returns to control the TV. Set to "TV" to the last viewed channel or source (- Press again to tune digital channels (- The = button is used for a function that is on, the ...
When the TV is not available. 20 page 53). 11 CH RTN returns to control the TV. Set to "TV" to the last viewed channel or source (- Press again to tune digital channels (- The = button is used for a function that is on, the ...

Owner's Manual - English
Page 21
...moving rapidly backward.) 18 TV/VCR To view one program while recording another, press to pause the picture; page 37): B selects the next higher channel. SET UP Accesses a DVD's setup menu in the CABLE/SAT mode. "CABLE/SAT" to control a DVD player or HTIB. 21 Point the remote control ...directly at the device. 16 17 18 19 1 POWER Turns the selected device on any other devices If you have a non-Toshiba device or a Toshiba device that the remote control is programmed, it may not work on some DVD players). 9 ENTER Required by some satellite receivers and DVD players...
...moving rapidly backward.) 18 TV/VCR To view one program while recording another, press to pause the picture; page 37): B selects the next higher channel. SET UP Accesses a DVD's setup menu in the CABLE/SAT mode. "CABLE/SAT" to control a DVD player or HTIB. 21 Point the remote control ...directly at the device. 16 17 18 19 1 POWER Turns the selected device on any other devices If you have a non-Toshiba device or a Toshiba device that the remote control is programmed, it may not work on some DVD players). 9 ENTER Required by some satellite receivers and DVD players...
Owner's Manual - English
Page 22
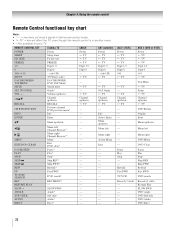
... Setup s TV Channel up/down s TV DVD Return Display Enter Menu up /down --- Menu right MENU Menu --- Exit PAUSE/STEP Pause* --- --- REMOTE CONTROL KEY Toshiba TV CABLE SAT (satellite) POWER SLEEP PIC SIZE FREEZE Power Sleep timer Picture size FREEZE Power s TV s TV s TV Power s TV s TV s TV 1-9 ... CH) TV/Video select --s TV - (sub CH) s TV FAV BROWSER/ TOP MENU MUTE FAV BROWSER DVD TOP Menu* Sound mute --s TV --s TV SET UP/GUIDE VOL + - REW Rewind* --- --- Select, Enter Bb C 3 Menu up/down Menu left / Channel Browser™ --- INFO Info ---
... Setup s TV Channel up/down s TV DVD Return Display Enter Menu up /down --- Menu right MENU Menu --- Exit PAUSE/STEP Pause* --- --- REMOTE CONTROL KEY Toshiba TV CABLE SAT (satellite) POWER SLEEP PIC SIZE FREEZE Power Sleep timer Picture size FREEZE Power s TV s TV s TV Power s TV s TV s TV 1-9 ... CH) TV/Video select --s TV - (sub CH) s TV FAV BROWSER/ TOP MENU MUTE FAV BROWSER DVD TOP Menu* Sound mute --s TV --s TV SET UP/GUIDE VOL + - REW Rewind* --- --- Select, Enter Bb C 3 Menu up/down Menu left / Channel Browser™ --- INFO Info ---

Owner's Manual - English
Page 23
... (or a Toshiba device that it , and press p. If more than one code is listed, try each one separately until you used: DEVICE CODE DEVICE CODE Note: • In addition to POWER, confirm that works. 2 Set the MODE SELECT switch to the type of switch and does not respond to the codes for... your device, use the remote control that came with the device. 5 Remember to set the switch to the other codes are listed for your TV remote control to enter the 3-digit code for your device. 4 To test the code...
... (or a Toshiba device that it , and press p. If more than one code is listed, try each one separately until you used: DEVICE CODE DEVICE CODE Note: • In addition to POWER, confirm that works. 2 Set the MODE SELECT switch to the type of switch and does not respond to the codes for... your device, use the remote control that came with the device. 5 Remember to set the switch to the other codes are listed for your TV remote control to enter the 3-digit code for your device. 4 To test the code...
Owner's Manual - English
Page 26
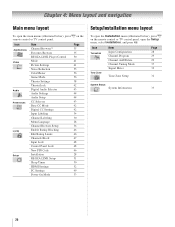
...Setup Item Channel Browser™ Favorites Browser REGZA-LINK Player Control Mode Picture Settings Noise Reduction ColorMaster Game Mode Theater Settings TheaterLock Digital Audio Selector Audio Settings Audio Setup CC Selector Base CC Mode Digital CC Settings Input Labeling Channel Labeling Menu Language Channel Browser Setup Enable Rating Blocking Edit... Rating Limits Channels Block Input Lock Control Panel Lock New PIN Code Installation REGZA-LINK Setup Sleep Timer HDMI Settings PC Settings Power-On Mode Page 35 35 50 41 41 55 56 56 38 42 43 44 44 43 42 42 34 30 ...
...Setup Item Channel Browser™ Favorites Browser REGZA-LINK Player Control Mode Picture Settings Noise Reduction ColorMaster Game Mode Theater Settings TheaterLock Digital Audio Selector Audio Settings Audio Setup CC Selector Base CC Mode Digital CC Settings Input Labeling Channel Labeling Menu Language Channel Browser Setup Enable Rating Blocking Edit... Rating Limits Channels Block Input Lock Control Panel Lock New PIN Code Installation REGZA-LINK Setup Sleep Timer HDMI Settings PC Settings Power-On Mode Page 35 35 50 41 41 55 56 56 38 42 43 44 44 43 42 42 34 30 ...

Owner's Manual - English
Page 28
...Input Configuration, and press T. Input Configuration ANT/CABLE In Cancel Cable Done 5 To save your preferred menu language and press T. A new set of menus and messages. To revert to select the input source (Cable or Antenna) for the ANT/CABLE input on -screen display of... Configuration Channel Program Channel Add/Delete Channel Tuning Mode Signal Meter Auto 4 Press B and C c to your original settings, highlight Cancel and press T. 28 Chapter 5: Setting up your TV Selecting the menu language You can choose from three different languages (English, French and Spanish) for the...
...Input Configuration, and press T. Input Configuration ANT/CABLE In Cancel Cable Done 5 To save your preferred menu language and press T. A new set of menus and messages. To revert to select the input source (Cable or Antenna) for the ANT/CABLE input on -screen display of... Configuration Channel Program Channel Add/Delete Channel Tuning Mode Signal Meter Auto 4 Press B and C c to your original settings, highlight Cancel and press T. 28 Chapter 5: Setting up your TV Selecting the menu language You can choose from three different languages (English, French and Spanish) for the...
Owner's Manual - English
Page 29
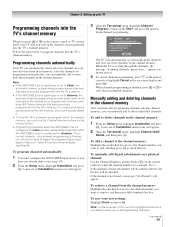
...the TV's memory. • If the ANT/CABLE input signal type is finished, you press < or , on -screen display and press T). Chapter 5: Setting up the Start, and press T again to begin channel programming. page 28). 2 From the Setup menu, highlight Installation and press T. appears (as shown ...an Antenna source channel from the channel memory: Highlight the checked box next to the channel number you have to bring up your new settings: Highlight Done and press T. Note: A video preview of Installation menu icons will appear. 3 Open the Terrestrial menu, highlight Channel Program...
...the TV's memory. • If the ANT/CABLE input signal type is finished, you press < or , on -screen display and press T). Chapter 5: Setting up the Start, and press T again to begin channel programming. page 28). 2 From the Setup menu, highlight Installation and press T. appears (as shown ...an Antenna source channel from the channel memory: Highlight the checked box next to the channel number you have to bring up your new settings: Highlight Done and press T. Note: A video preview of Installation menu icons will appear. 3 Open the Terrestrial menu, highlight Channel Program...


