Owners Manual
Page 1
OWNER'S MANUAL LCD Color TV 32AV500E 32AV500T 32AV500Y 37AV500E 37AV500T 37AV500Y 42AV500E 42AV500T 42AV500Y ©2008 TOSHIBA CORPORATION All Rights Reserved Owner's Record You will find the model number and serial number on the back of the TV. Refer to them whenever you call upon your TOSHIBA dealer regarding this product. Model number: Serial number: VX1A00094000 Record these numbers in the spaces provided below.
OWNER'S MANUAL LCD Color TV 32AV500E 32AV500T 32AV500Y 37AV500E 37AV500T 37AV500Y 42AV500E 42AV500T 42AV500Y ©2008 TOSHIBA CORPORATION All Rights Reserved Owner's Record You will find the model number and serial number on the back of the TV. Refer to them whenever you call upon your TOSHIBA dealer regarding this product. Model number: Serial number: VX1A00094000 Record these numbers in the spaces provided below.

Owners Manual
Page 3
...this manual are based on using the remote control. • You also can use the controls on the TV if they have the same name as on a shaky table, incline or location subject to vibration. About the fuse In a three pin earthing-type, the fuse fitted in this Toshiba LCD Color Television....overheat if the ventilation holes are covered, blocked or sealed, which may cause an electric shock. 3) Never place the TV in a fire. 3 This system is a safety feature. It should only be connected to a main socket outlet with a three pin earthing-type power plug. The inside of this TV. ...
...this manual are based on using the remote control. • You also can use the controls on the TV if they have the same name as on a shaky table, incline or location subject to vibration. About the fuse In a three pin earthing-type, the fuse fitted in this Toshiba LCD Color Television....overheat if the ventilation holes are covered, blocked or sealed, which may cause an electric shock. 3) Never place the TV in a fire. 3 This system is a safety feature. It should only be connected to a main socket outlet with a three pin earthing-type power plug. The inside of this TV. ...

Owners Manual
Page 7
... 2) Periodically disconnect the power plug from the outlet and check it will be missing picture elements or have the LCD screen facing to use of product. • Toshiba is not liable for incidental damages (such as insecticide on the power plug connectors, clean off the dust with...be damaged. When cleaning the surface of the instructions described in the owner's manual. • Toshiba is not a sign of other improper conditions. • Toshiba is not liable for any damage caused by neglect of the LCD display, wipe the panel surface gently with a soft, dry cloth. This ...
... 2) Periodically disconnect the power plug from the outlet and check it will be missing picture elements or have the LCD screen facing to use of product. • Toshiba is not liable for incidental damages (such as insecticide on the power plug connectors, clean off the dust with...be damaged. When cleaning the surface of the instructions described in the owner's manual. • Toshiba is not a sign of other improper conditions. • Toshiba is not liable for any damage caused by neglect of the LCD display, wipe the panel surface gently with a soft, dry cloth. This ...
Owners Manual
Page 12
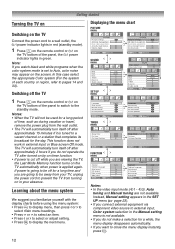
...to Auto, color noise may appear on the screen. power indicator lights in the Manual setting menu is set to external input, Color system selection in green. Note: If you watch black and white programs when the color system mode is not available. • If you do not operate the TV after ...approximately 15 minutes if it is applied again. Learning about the menu system We suggest you want to display the next menu. o3), Auto tuning and Manual tuning are viewing the TV, the Last Mode Memory function turns on the TV automatically when power is...
...to Auto, color noise may appear on the screen. power indicator lights in the Manual setting menu is set to external input, Color system selection in green. Note: If you watch black and white programs when the color system mode is not available. • If you do not operate the TV after ...approximately 15 minutes if it is applied again. Learning about the menu system We suggest you want to display the next menu. o3), Auto tuning and Manual tuning are viewing the TV, the Last Mode Memory function turns on the TV automatically when power is...
Owners Manual
Page 13
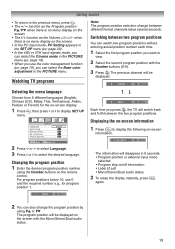
... between the two program positions. The previous channel will switch back and forth between different format channels takes several seconds. SET UP Language Auto tuning Manual tuning AV connection Picture position English OK OK OK OK MENU Back EXIT Watch TV 2 Press u or U to select Language. 3 Press I or i to display SET...
... between the two program positions. The previous channel will switch back and forth between different format channels takes several seconds. SET UP Language Auto tuning Manual tuning AV connection Picture position English OK OK OK OK MENU Back EXIT Watch TV 2 Press u or U to select Language. 3 Press I or i to display SET...
Owners Manual
Page 14
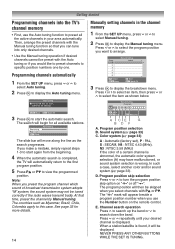
... you want to this case. Sound system (- page 33) A : Automatic (factory set), P : PAL, S : SECAM, N4 : NTSC 4.43 (MHz), N3 : NTSC 3.58 (MHz) If the color of broadcast transmission system adopts "M" system, the sound system may have malfunctioned, or sound system selection is displayed. D. The "8" ...IS TUNING. Getting started Programming channels into only desired channels. • Use the Manual tuning operation if desired channels cannot be displayed. Press OK key to display the Manual tuning menu. Programming channels automatically 1 From the SET UP menu, press u or ...
... you want to this case. Sound system (- page 33) A : Automatic (factory set), P : PAL, S : SECAM, N4 : NTSC 4.43 (MHz), N3 : NTSC 3.58 (MHz) If the color of broadcast transmission system adopts "M" system, the sound system may have malfunctioned, or sound system selection is displayed. D. The "8" ...IS TUNING. Getting started Programming channels into only desired channels. • Use the Manual tuning operation if desired channels cannot be displayed. Press OK key to display the Manual tuning menu. Programming channels automatically 1 From the SET UP menu, press u or ...

Owners Manual
Page 15
...create station labels: 1) Press u or U repeatedly to select a character for channel MNOP (Prog.4): 1 From the SET UP menu, press u or U to select Manual tuning menu, then press Q. 2 Press u or U to select the new position "1", then press I . Press Q to select the new position "4", then press ...I . 6 Confirm new Manual tuning menu. Prog. 1 2 3 4 5 6 Manual tuning Label EFGH IJKL MNOP ABCD Store MENU Back EXIT Watch TV 4 Press U to select the channel MNOP, then press i. 5 Press U to...
...create station labels: 1) Press u or U repeatedly to select a character for channel MNOP (Prog.4): 1 From the SET UP menu, press u or U to select Manual tuning menu, then press Q. 2 Press u or U to select the new position "1", then press I . Press Q to select the new position "4", then press ...I . 6 Confirm new Manual tuning menu. Prog. 1 2 3 4 5 6 Manual tuning Label EFGH IJKL MNOP ABCD Store MENU Back EXIT Watch TV 4 Press U to select the channel MNOP, then press i. 5 Press U to...

Owners Manual
Page 17
... screen, the pictures are Wide, Super Live 2, Cinema 2, 4:3, Super Live 1, Cinema 1, Subtitle and 14:9. • In the PC input mode (- SET UP Language Auto tuning Manual tuning AV connection Picture position English OK OK OK OK MENU Back EXIT Watch TV 2 Press u or U to select Picture position. 3 Press Q, then press u or...
... screen, the pictures are Wide, Super Live 2, Cinema 2, 4:3, Super Live 1, Cinema 1, Subtitle and 14:9. • In the PC input mode (- SET UP Language Auto tuning Manual tuning AV connection Picture position English OK OK OK OK MENU Back EXIT Watch TV 2 Press u or U to select Picture position. 3 Press Q, then press u or...
Owners Manual
Page 23
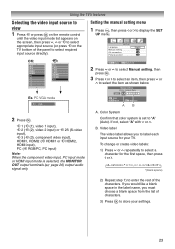
... screen, then press u, U or o to select appropriate input source (or press o on the TV bottom of the characters. Manual setting Color system:Auto EXT1 A OK Store MENU Back EXIT Watch TV AB 2 Press Q. Video label The video label allows you must choose a... blank space from the list of characters. 3) Press Q to store your TV. Color System Confirm that color system is selected, the MONITOR OUT output terminals (- page 26) output audio signal only. o 1 (o (1), video 1 input), o 2 (o (2), video 2 input) or...
... screen, then press u, U or o to select appropriate input source (or press o on the TV bottom of the characters. Manual setting Color system:Auto EXT1 A OK Store MENU Back EXIT Watch TV AB 2 Press Q. Video label The video label allows you must choose a... blank space from the list of characters. 3) Press Q to store your TV. Color System Confirm that color system is selected, the MONITOR OUT output terminals (- page 26) output audio signal only. o 1 (o (1), video 1 input), o 2 (o (2), video 2 input) or...

Owners Manual
Page 26
...equipment via the terminals located on the screen, then press u or U to select o2 (- Please always refer to the owner's manual of the LCD Color TV properties. These terminals can enjoy Video Games with component video outputs) • Before connecting any external equipment, turn off... all main power switches. • The unauthorized recording of television programs, DVDs, video tapes and other materials may not work ...
...equipment via the terminals located on the screen, then press u or U to select o2 (- Please always refer to the owner's manual of the LCD Color TV properties. These terminals can enjoy Video Games with component video outputs) • Before connecting any external equipment, turn off... all main power switches. • The unauthorized recording of television programs, DVDs, video tapes and other materials may not work ...

Owners Manual
Page 28
... HDMI. 1 From the AV connection menu, press u or U to select Lip Sync. 2 Press I or i to select Auto, Digital or Analog. SET UP Language Auto tuning Manual tuning AV connection Picture position English OK OK OK OK MENU Back EXIT Watch TV 28 AV connection PC/HDMI1 audio HDMI1 audio Lip Sync... HDMI1 Auto On SET UP Language Auto tuning Manual tuning AV connection Picture position English OK OK OK OK MENU Back EXIT Watch TV 2 Press u or U to select AV connection, then press Q to the...
... HDMI. 1 From the AV connection menu, press u or U to select Lip Sync. 2 Press I or i to select Auto, Digital or Analog. SET UP Language Auto tuning Manual tuning AV connection Picture position English OK OK OK OK MENU Back EXIT Watch TV 28 AV connection PC/HDMI1 audio HDMI1 audio Lip Sync... HDMI1 Auto On SET UP Language Auto tuning Manual tuning AV connection Picture position English OK OK OK OK MENU Back EXIT Watch TV 2 Press u or U to select AV connection, then press Q to the...

Owners Manual
Page 30
... the clock phase and sampling clock adjustments may be incomprehensible according to select PC Setting. page 18, 19). • In the PC input mode, the Manual setting (- PC Setting 1/2 Horizontal position 0 Horizontal width 0 Ver tical position 0 Ver tical height 0 Clock phase 0 Sampling clock 0 MENU Back EXIT Watch TV 4 Press u or U to...
... the clock phase and sampling clock adjustments may be incomprehensible according to select PC Setting. page 18, 19). • In the PC input mode, the Manual setting (- PC Setting 1/2 Horizontal position 0 Horizontal width 0 Ver tical position 0 Ver tical height 0 Clock phase 0 Sampling clock 0 MENU Back EXIT Watch TV 4 Press u or U to...

Owners Manual
Page 35
page 4). • Design and specifications are subject to a wall, pillar, etc. (- Reference section Supplied accessories Owner's manual (1), Remote control (1), Batteries (2), Clip (1) This is used to fix the TV to change without notice. • Never service or remodel the TV by yourself. It may expose you to a fire hazard or dangerous voltages. 35
page 4). • Design and specifications are subject to a wall, pillar, etc. (- Reference section Supplied accessories Owner's manual (1), Remote control (1), Batteries (2), Clip (1) This is used to fix the TV to change without notice. • Never service or remodel the TV by yourself. It may expose you to a fire hazard or dangerous voltages. 35


