User Manual
Page 1
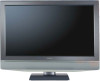
Record these numbers whenever you communicate with your TV. Refer to these numbers in the spaces below. Model number: 27HL85 Serial number: Index OWNER'S MANUAL LCD Color Television E: ENGLISH E F: FRANÇAIS F S: ESPAÑOL S Introduction Connecting your TV Using the remote control Setting up your TV Using the TV's Features Appendix 27HL85 Owner's Record The model number and serial number are on the back of your Toshiba dealer about this TV.
Record these numbers whenever you communicate with your TV. Refer to these numbers in the spaces below. Model number: 27HL85 Serial number: Index OWNER'S MANUAL LCD Color Television E: ENGLISH E F: FRANÇAIS F S: ESPAÑOL S Introduction Connecting your TV Using the remote control Setting up your TV Using the TV's Features Appendix 27HL85 Owner's Record The model number and serial number are on the back of your Toshiba dealer about this TV.
User Manual
Page 6
...Toshiba 7 Supplied accessories 7 Exploring your new TV 8 Connecting your TV 9 Connecting an antenna or cable TV 9 Connecting a VCR 10 Connecting a cable converter box and VCR 10 Connecting a DVD player or satellite receiver and a VCR 11 Connecting a DVD player with ColorStream® (component video) and a VCR 12 Connecting a DTV receiver/set...Adding and erasing channels manually 25 Changing channels 25 Using the TV's features 26 Adjusting the channel settings 26 Switching between two channels using Channel Return 26 Programming your favorite channels 26 Labeling channels 28 ...
...Toshiba 7 Supplied accessories 7 Exploring your new TV 8 Connecting your TV 9 Connecting an antenna or cable TV 9 Connecting a VCR 10 Connecting a cable converter box and VCR 10 Connecting a DVD player or satellite receiver and a VCR 11 Connecting a DVD player with ColorStream® (component video) and a VCR 12 Connecting a DTV receiver/set...Adding and erasing channels manually 25 Changing channels 25 Using the TV's features 26 Adjusting the channel settings 26 Switching between two channels using Channel Return 26 Programming your favorite channels 26 Labeling channels 28 ...
User Manual
Page 7
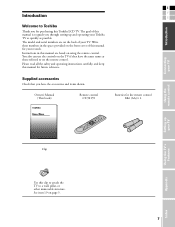
...Please read all the safety and operating instructions carefully, and keep this Toshiba LCD TV. The goal of this manual for the remote control LR6 (AA) × 2 Connecting your TV Using the remote control Setting up and operating your TV. See item 19 on using the remote ...control. Instructions in the space provided on the remote control. E F Introduction S Introduction Welcome to Toshiba Thank you through setting up your records.
...Please read all the safety and operating instructions carefully, and keep this Toshiba LCD TV. The goal of this manual for the remote control LR6 (AA) × 2 Connecting your TV Using the remote control Setting up and operating your TV. See item 19 on using the remote ...control. Instructions in the space provided on the remote control. E F Introduction S Introduction Welcome to Toshiba Thank you through setting up your records.

User Manual
Page 9
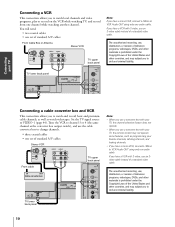
... S-video output. Note: HDMI cable provides better picture performance than a standard (composite) video or S-video cable. Using the remote control Setting up your TV Using the TV's Features Appendix Index 9 From Antenna or Cable TV lower back panel NOTE: NEVER CONNECT THIS TV TO...standard audio and standard (composite) video output. Coaxial (antenna) cable Standard A/V cables (red/white/yellow) ● S-video cable is Toshiba's brand of three and are required for a complete connection. Connecting an antenna or cable TV This connection allows you have finished connecting all ...
... S-video output. Note: HDMI cable provides better picture performance than a standard (composite) video or S-video cable. Using the remote control Setting up your TV Using the TV's Features Appendix Index 9 From Antenna or Cable TV lower back panel NOTE: NEVER CONNECT THIS TV TO...standard audio and standard (composite) video output. Coaxial (antenna) cable Standard A/V cables (red/white/yellow) ● S-video cable is Toshiba's brand of three and are required for a complete connection. Connecting an antenna or cable TV This connection allows you have finished connecting all ...
User Manual
Page 10
... 4 VIDEO AUDIO L R IN OUT TV upper back panel Note: If you have a mono VCR, connect L/Mono to VCR Audio OUT using only one set of a standard video cable. TV lower back panel Connecting your TV Connecting a cable converter box and VCR This connection allows you have a VCR with S-video...cable. The unauthorized recording, use an S-video cable instead of the United States and other countries, and may subject you to civil and criminal liability. Set the TV signal source to VIDEO-1 (page 44). Tune the VCR to channel 3 or 4 (the same channel as programming your TV, the ...
... 4 VIDEO AUDIO L R IN OUT TV upper back panel Note: If you have a mono VCR, connect L/Mono to VCR Audio OUT using only one set of a standard video cable. TV lower back panel Connecting your TV Connecting a cable converter box and VCR This connection allows you have a VCR with S-video...cable. The unauthorized recording, use an S-video cable instead of the United States and other countries, and may subject you to civil and criminal liability. Set the TV signal source to VIDEO-1 (page 44). Tune the VCR to channel 3 or 4 (the same channel as programming your TV, the ...
User Manual
Page 11
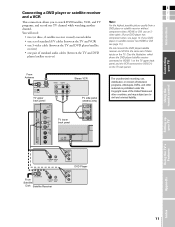
...HDMI, or DVI, use , distribution, or revision of television programs, videotapes, DVDs, and other materials is used) coaxial cables • one set of standard A/V cables (between the TV and VCR) • one S-video cable (between the TV and DVD player/satellite receiver) Note: For...the highest possible picture quality from ANT From Satellite S-VIDEO VIDEO OUT OUT Dish Satellite Receiver AUDIO OUT L R DVD Player AUDIO OUT L R Setting up your TV Using the remote control E Connecting a DVD player or satellite receiver F and a VCR S Introduction This connection allows you to ...
...HDMI, or DVI, use , distribution, or revision of television programs, videotapes, DVDs, and other materials is used) coaxial cables • one set of standard A/V cables (between the TV and VCR) • one S-video cable (between the TV and DVD player/satellite receiver) Note: For...the highest possible picture quality from ANT From Satellite S-VIDEO VIDEO OUT OUT Dish Satellite Receiver AUDIO OUT L R DVD Player AUDIO OUT L R Setting up your TV Using the remote control E Connecting a DVD player or satellite receiver F and a VCR S Introduction This connection allows you to ...
User Manual
Page 12
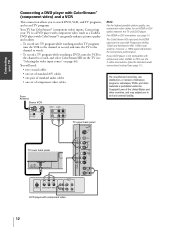
Connecting your TV to a DVD player with component video (such as a Toshiba DVD player with Progressive (480p, 720p) and Interlaced (480i, 1080i) ... on the TV (see page 15. however, a 1080i signal will need: • two coaxial cables • one set of component video cables From Antenna Stereo VCR IN from ANT OUT to TV CH 3 CH 4 VIDEO AUDIO L R IN..., or revision of the United States and other countries, and may subject you to watch . - To record one set of standard A/V cables • one pair of standard audio cables • one TV program while watching another TV ...
Connecting your TV to a DVD player with component video (such as a Toshiba DVD player with Progressive (480p, 720p) and Interlaced (480i, 1080i) ... on the TV (see page 15. however, a 1080i signal will need: • two coaxial cables • one set of component video cables From Antenna Stereo VCR IN from ANT OUT to TV CH 3 CH 4 VIDEO AUDIO L R IN..., or revision of the United States and other countries, and may subject you to watch . - To record one set of standard A/V cables • one pair of standard audio cables • one TV program while watching another TV ...
User Manual
Page 13
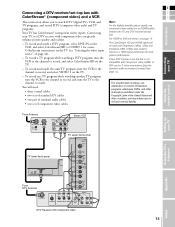
...and other materials is not compatible with component video can be used with component video 13 Index Connecting your TV E Connecting a DTV receiver/set-top box with F ColorStream® (component video) and a VCR S Introduction This connection allows you to civil and criminal liability. ...(plus the standard audio connections) instead (see page 15. however, a 1080i signal will need: • three coaxial cables • two sets of standard A/V cables • one pair of component video cables The unauthorized recording, use component video cables (or an HDMI cable) between...
...and other materials is not compatible with component video can be used with component video 13 Index Connecting your TV E Connecting a DTV receiver/set-top box with F ColorStream® (component video) and a VCR S Introduction This connection allows you to civil and criminal liability. ...(plus the standard audio connections) instead (see page 15. however, a 1080i signal will need: • three coaxial cables • two sets of standard A/V cables • one pair of component video cables The unauthorized recording, use component video cables (or an HDMI cable) between...

User Manual
Page 14
... an S-video cable instead of a standard video cable for better picture performance. You will need : • two coaxial cables • two sets of standard video cables for better picture performance. Do not connect the same VCR to civil and criminal liability. The unauthorized recording, use S-video... This connection allows you to VCR2 while watching a videotape. Connecting your TV Connecting two VCRs This connection allows you can record from one set of the inputs on the side panel. 14 Plug the S-video and standard audio cables into the "VIDEO-1 IN" inputs on the upper...
... an S-video cable instead of a standard video cable for better picture performance. You will need : • two coaxial cables • two sets of standard video cables for better picture performance. Do not connect the same VCR to civil and criminal liability. The unauthorized recording, use S-video... This connection allows you to VCR2 while watching a videotape. Connecting your TV Connecting two VCRs This connection allows you can record from one set of the inputs on the side panel. 14 Plug the S-video and standard audio cables into the "VIDEO-1 IN" inputs on the upper...

User Manual
Page 15
... IN OUT HDMI OUT DVI device VIDEO AUDIO LR IN DVI OUT OUT TV lower back panel TV upper back panel TV lower back panel Setting up your TV Using the TV's Features Appendix HDMI, the HDMI logo, and High-Definition Multimedia Interface are required (see illustration below ). Separate analog audio...
... IN OUT HDMI OUT DVI device VIDEO AUDIO LR IN DVI OUT OUT TV lower back panel TV upper back panel TV lower back panel Setting up your TV Using the TV's Features Appendix HDMI, the HDMI logo, and High-Definition Multimedia Interface are required (see illustration below ). Separate analog audio...
User Manual
Page 17
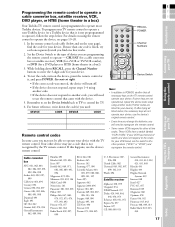
..., repeat steps 1-4 using the remote control to operate the device, see pages 19-20. 1. To program your TV remote control to operate a non-Toshiba device (or a Toshiba device that works. 2. Electronics: 087, 096, 098 United Cable: 082 Universal: 065, 092, 097, 099, 102, 103 Wards: 096 Satellite receiver...: 022, 023, 030 17 Index If some cases you find the code for your device with the device. 5. Using the remote control Setting up your VCR has this happens, use the remote control that is not preprogrammed to either of two codes. Connecting your TV E Programming ...
..., repeat steps 1-4 using the remote control to operate the device, see pages 19-20. 1. To program your TV remote control to operate a non-Toshiba device (or a Toshiba device that works. 2. Electronics: 087, 096, 098 United Cable: 082 Universal: 065, 092, 097, 099, 102, 103 Wards: 096 Satellite receiver...: 022, 023, 030 17 Index If some cases you find the code for your device with the device. 5. Using the remote control Setting up your VCR has this happens, use the remote control that is not preprogrammed to either of two codes. Connecting your TV E Programming ...
User Manual
Page 19
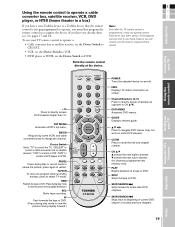
...AR E PIC SIZE POWER Turns the selected device on your TV Using the TV's Features Index 19 STOP Stops the tape or DVD. Appendix Setting up your other device. See pages 17 and 18. ENTER Required by some DVD players). PAUSE Press during play mode to pause the picture... Press to directly access channels (as opposed to locate later DVD chapters. Device Switch Set to "TV" to control a cable converter box or satellite receiver; To use those features, you have a non-Toshiba device or a Toshiba device that the remote control is programmed, it may not work on some VCRs and...
...AR E PIC SIZE POWER Turns the selected device on your TV Using the TV's Features Index 19 STOP Stops the tape or DVD. Appendix Setting up your other device. See pages 17 and 18. ENTER Required by some DVD players). PAUSE Press during play mode to pause the picture... Press to directly access channels (as opposed to locate later DVD chapters. Device Switch Set to "TV" to control a cable converter box or satellite receiver; To use those features, you have a non-Toshiba device or a Toshiba device that the remote control is programmed, it may not work on some VCRs and...
User Manual
Page 21
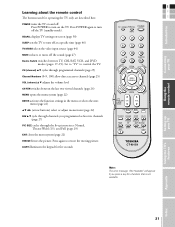
... sound (page 47) Device Switch switches between the last two viewed channels (page 26) MENU opens the menu system (page 22) ENTER activates the function settings in the menu or selects the next menu (page 22) ENTER ER FAV EXIT CLE TV CBL/SAT CH VCR DVD VOL y z x • (arrow buttons... REW FF SKIP / SEARCH CH SCAN SWAP REC POP CH LIGHT FREEZE freezes the picture. S Introduction POWER turns the TV on -screen (page 50) SLEEP sets the TV to channels (page 25) VOL (volume) y z adjusts the volume level TOP TV / VIDEO RECALL POWER INFO 123 456 78 +10 100 0 MFAEVNORUITE FAV...
... sound (page 47) Device Switch switches between the last two viewed channels (page 26) MENU opens the menu system (page 22) ENTER activates the function settings in the menu or selects the next menu (page 22) ENTER ER FAV EXIT CLE TV CBL/SAT CH VCR DVD VOL y z x • (arrow buttons... REW FF SKIP / SEARCH CH SCAN SWAP REC POP CH LIGHT FREEZE freezes the picture. S Introduction POWER turns the TV on -screen (page 50) SLEEP sets the TV to channels (page 25) VOL (volume) y z adjusts the volume level TOP TV / VIDEO RECALL POWER INFO 123 456 78 +10 100 0 MFAEVNORUITE FAV...
User Manual
Page 22
... have installed the batteries and programmed the remote control, you do not make a selection within 60 seconds, the menu display will need to activate the settings or display the next menu. 6. GRAY SCREEN ON SIDE PANEL 3 5 1 13 1 8 LOCKS MENU BACK EX-I2-TVC-2W-HCAHLTOCI1P-CH2-KT-5VENTE--RL...PLAY FREEZE SOURCE SPLIT REW FF SKIP / SEARCH CH SCAN SWAP REC POP CH LIGHT MENU yzx • EXIT ENTER Setting up your TV TOP AR 22 SET UP 1/2 LANGUAGE ENGLISH TV/CABLE TV CH PROGRAM ENTER ADD/ERASE Add CH LABELHINDGMI AUDIO ENTER VIDEO LABPIECLTURE POSITION MENU BACK...
... have installed the batteries and programmed the remote control, you do not make a selection within 60 seconds, the menu display will need to activate the settings or display the next menu. 6. GRAY SCREEN ON SIDE PANEL 3 5 1 13 1 8 LOCKS MENU BACK EX-I2-TVC-2W-HCAHLTOCI1P-CH2-KT-5VENTE--RL...PLAY FREEZE SOURCE SPLIT REW FF SKIP / SEARCH CH SCAN SWAP REC POP CH LIGHT MENU yzx • EXIT ENTER Setting up your TV TOP AR 22 SET UP 1/2 LANGUAGE ENGLISH TV/CABLE TV CH PROGRAM ENTER ADD/ERASE Add CH LABELHINDGMI AUDIO ENTER VIDEO LABPIECLTURE POSITION MENU BACK...
User Manual
Page 23
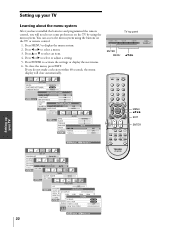
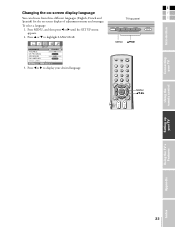
Press MENU, and then press x or • until the SET UP menu appears. 2. MENU yzx • Introduction SET UP 1/2 LANGUAGE TV/CABLE CH PROGRAM ADD/ERASE CH LABELING VIDEO LABEL ENGLISH TV ENTER ADD ENTER MENU BACK EXIT WATCH TV 3. Press x or • ... MUTE SLEEP TV/VCR PAUSE STOP PLAY FREEZE SOURCE SPLIT REW FF SKIP / SEARCH CH SCAN SWAP REC POP CH LIGHT Using the remote control Setting up your TV E Changing the on-screen display language F You can choose from three different languages (English, French and TV top panel S Spanish) for the...
Press MENU, and then press x or • until the SET UP menu appears. 2. MENU yzx • Introduction SET UP 1/2 LANGUAGE TV/CABLE CH PROGRAM ADD/ERASE CH LABELING VIDEO LABEL ENGLISH TV ENTER ADD ENTER MENU BACK EXIT WATCH TV 3. Press x or • ... MUTE SLEEP TV/VCR PAUSE STOP PLAY FREEZE SOURCE SPLIT REW FF SKIP / SEARCH CH SCAN SWAP REC POP CH LIGHT Using the remote control Setting up your TV E Changing the on-screen display language F You can choose from three different languages (English, French and TV top panel S Spanish) for the...
User Manual
Page 24
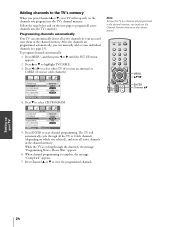
...the TV or Cable channels (depending on the channels you must use cable channels). Press MENU, and then press x or • until the SET UP menu appears. 2. Follow the steps below and on the remote control. To program channels automatically: 1. Press ENTER to select CH PROGRAM. ...CH LIGHT E PIC SIZE MENU yzx • ENTER Channel yz ENTEERNT 24 While the TV is complete, the message "Completed" appears. 7. Setting up your TV FAVOTRIOTPE EXIT AR Adding channels to highlight TV/CABLE. 3. After the channels are programmed automatically, you selected), and store all ...
...the TV or Cable channels (depending on the channels you must use cable channels). Press MENU, and then press x or • until the SET UP menu appears. 2. Follow the steps below and on the remote control. To program channels automatically: 1. Press ENTER to select CH PROGRAM. ...CH LIGHT E PIC SIZE MENU yzx • ENTER Channel yz ENTEERNT 24 While the TV is complete, the message "Completed" appears. 7. Setting up your TV FAVOTRIOTPE EXIT AR Adding channels to highlight TV/CABLE. 3. After the channels are programmed automatically, you selected), and store all ...
User Manual
Page 25
... on the function you can manually add or erase specific TV/VIDEO RECALL POWER channels. Press MENU, and then press x or • until the SET UP menu appears. 3. Press y or z to select channel 125, press 100, 2, 5. To change to a specific programmed channel (or video mode... or erase. When the desired channel number (or video mode) is highlighted, press ENTER. 11 9 7 6 2 HDMI ColorStreamHD VIDEO 2 VIDEO 1 Setting up your TV Using the remote control E Adding and erasing channels manually F After you have automatically programmed the active channels into the S TV's channel memory...
... on the function you can manually add or erase specific TV/VIDEO RECALL POWER channels. Press MENU, and then press x or • until the SET UP menu appears. 3. Press y or z to select channel 125, press 100, 2, 5. To change to a specific programmed channel (or video mode... or erase. When the desired channel number (or video mode) is highlighted, press ENTER. 11 9 7 6 2 HDMI ColorStreamHD VIDEO 2 VIDEO 1 Setting up your TV Using the remote control E Adding and erasing channels manually F After you have automatically programmed the active channels into the S TV's channel memory...

User Manual
Page 26
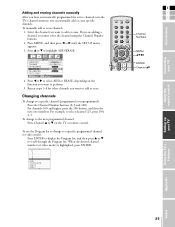
Press ENTER to switch between two channels without entering an actual channel number each time. Using the TV's features Adjusting the channel settings Switching between two channels using Channel Return The Channel Return feature allows you to display the FAVORITE CH menu. To program your favorite channels, it ... PANEL LOCKS OFF ENTER ON ON 1 ENTER MENU BACK EXIT WATCH TV 3. CH INPUT will be displayed. CLEAR ALL TV CABLE ENTER 100 0 - 9 SELECT ENTER SET MENU BACK EXIT WATCH TV 4. Press ENTER. 6.
Press ENTER to switch between two channels without entering an actual channel number each time. Using the TV's features Adjusting the channel settings Switching between two channels using Channel Return The Channel Return feature allows you to display the FAVORITE CH menu. To program your favorite channels, it ... PANEL LOCKS OFF ENTER ON ON 1 ENTER MENU BACK EXIT WATCH TV 3. CH INPUT will be displayed. CLEAR ALL TV CABLE ENTER 100 0 - 9 SELECT ENTER SET MENU BACK EXIT WATCH TV 4. Press ENTER. 6.
User Manual
Page 27
...- - - - - - - - - - - - - - - - - - FAVORITE CH CH INPUT - - - 2 3 4 5 6 7 8 9 10 11 1 2 1 3 CLEAR ALL TV CABLE ENTER 100 0 - 9 SELECT ENTER SET MENU BACK EXIT WATCH TV 4. CLEAR ALL - - - - - - - - - - - - - - - - - - - - - TV CABLE ENTER MENU BACK EXIT WATCH TV Using the remote control... Setting up your favorite channels: Note: F Press FAV y or z. FAVORITE CH CH INPUT - - - 2 3 4 5 6 7 8 9 10 11 1 2 1 3 CLEAR ALL...
...- - - - - - - - - - - - - - - - - - FAVORITE CH CH INPUT - - - 2 3 4 5 6 7 8 9 10 11 1 2 1 3 CLEAR ALL TV CABLE ENTER 100 0 - 9 SELECT ENTER SET MENU BACK EXIT WATCH TV 4. CLEAR ALL - - - - - - - - - - - - - - - - - - - - - TV CABLE ENTER MENU BACK EXIT WATCH TV Using the remote control... Setting up your favorite channels: Note: F Press FAV y or z. FAVORITE CH CH INPUT - - - 2 3 4 5 6 7 8 9 10 11 1 2 1 3 CLEAR ALL...

User Manual
Page 28
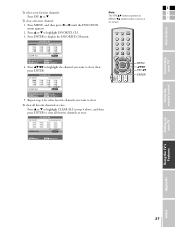
... to highlight CH LABELING. CH LABELING LABEL 013 A - - - - - - Repeat step 5 to label. Press MENU, and then press x or • until the SET UP menu appears. 2. Press y or z or Channel Number buttons to select a channel you turn on -screen channel number display each time you want to enter... Select blanks in that space. 7. CH LABELING CH INPUT 013 ENTER STORE MENU BACK EXIT WATCH TV 5. Repeat steps 4-6 to store your settings. SET UP 1/2 LANGUAGE TV/CABLE CH PROGRAM ADD/ERASE CH LABELING VIDEO LABEL ENGLISH TV ENTER ADD ENTER MENU BACK EXIT WATCH TV 3. Press •...
... to highlight CH LABELING. CH LABELING LABEL 013 A - - - - - - Repeat step 5 to label. Press MENU, and then press x or • until the SET UP menu appears. 2. Press y or z or Channel Number buttons to select a channel you turn on -screen channel number display each time you want to enter... Select blanks in that space. 7. CH LABELING CH INPUT 013 ENTER STORE MENU BACK EXIT WATCH TV 5. Repeat steps 4-6 to store your settings. SET UP 1/2 LANGUAGE TV/CABLE CH PROGRAM ADD/ERASE CH LABELING VIDEO LABEL ENGLISH TV ENTER ADD ENTER MENU BACK EXIT WATCH TV 3. Press •...


