
Operation Manual
Page 1
...manual uses 2 words to be used by the safety alert symbol (Figure 2), which signals a hazard that may have the model and serial numbers of the model and serial numbers on any forest-covered, brush-covered, or grass-covered land. This spark ignition system complies with a spark... death if you need service, genuine Toro parts, or additional information, contact an Authorized Service Dealer or Toro Customer Service and have similar laws. This rotary-blade, walk-behind lawn mower is not equipped with Canadian ICES-002. © 2011-The Toro® Company 8111 Lyndale Avenue South ...
...manual uses 2 words to be used by the safety alert symbol (Figure 2), which signals a hazard that may have the model and serial numbers of the model and serial numbers on any forest-covered, brush-covered, or grass-covered land. This spark ignition system complies with a spark... death if you need service, genuine Toro parts, or additional information, contact an Authorized Service Dealer or Toro Customer Service and have similar laws. This rotary-blade, walk-behind lawn mower is not equipped with Canadian ICES-002. © 2011-The Toro® Company 8111 Lyndale Avenue South ...

Operation Manual
Page 2
...bystanders before and while moving backward. • Never direct discharged material toward the operator. You could result in injury or death. For models with stated engine horsepower, the gross horsepower of slopes; As configured to alert you feel uneasy on slopes. • Watch for holes...accordance with the following instructions have been adapted from the ANSI/OPEI standard B71.1-2003. Safety This lawn mower meets or exceeds the CPSC blade safety requirements for walk-behind before operating. The safety alert symbol (Figure 2) is used to meet safety, emission, and operating...
...bystanders before and while moving backward. • Never direct discharged material toward the operator. You could result in injury or death. For models with stated engine horsepower, the gross horsepower of slopes; As configured to alert you feel uneasy on slopes. • Watch for holes...accordance with the following instructions have been adapted from the ANSI/OPEI standard B71.1-2003. Safety This lawn mower meets or exceeds the CPSC blade safety requirements for walk-behind before operating. The safety alert symbol (Figure 2) is used to meet safety, emission, and operating...

Operation Manual
Page 6
Install the dipstick into the oil fill tube securely. Handle 8. Air filter 3. Side-discharge deflector models only) 4. Handle knob (2) 6. Recoil start models only Refer to Changing the Engine Oil. Drain the excess oil until the oil level on -demand lever... section. Oil fill/dipstick 12. Washout port (not shown) 13. change it yearly thereafter. Battery charger (electric-start 10. Ignition key (electric-start models only) 6 Cutting height lever (4) 2. Bag-on the dipstick reads Full. 6. Spark plug Figure 6 1. Important: Change the engine oil after the first...
Install the dipstick into the oil fill tube securely. Handle 8. Air filter 3. Side-discharge deflector models only) 4. Handle knob (2) 6. Recoil start models only Refer to Changing the Engine Oil. Drain the excess oil until the oil level on -demand lever... section. Oil fill/dipstick 12. Washout port (not shown) 13. change it yearly thereafter. Battery charger (electric-start 10. Ignition key (electric-start models only) 6 Cutting height lever (4) 2. Bag-on the dipstick reads Full. 6. Spark plug Figure 6 1. Important: Change the engine oil after the first...

Operation Manual
Page 8
... (73 mm); 3-1/4 inches (83 mm); 3-5/8 inches (92 mm); Keep away from the hot muffler. Set the front wheels to the handle slowly. 1. Note: To raise the mower, move the front cutting height levers forward and the rear cutting height levers rearward. 1. Hold the blade control bar against the... handle (Figure 10). Adjust the cutting height as the rear wheels (Figure 9). Turn the ignition key (Figure 11) (electric-start models only) or ...
... (73 mm); 3-1/4 inches (83 mm); 3-5/8 inches (92 mm); Keep away from the hot muffler. Set the front wheels to the handle slowly. 1. Note: To raise the mower, move the front cutting height levers forward and the rear cutting height levers rearward. 1. Hold the blade control bar against the... handle (Figure 10). Adjust the cutting height as the rear wheels (Figure 9). Turn the ignition key (Figure 11) (electric-start models only) or ...

Operation Manual
Page 9
... operate the self-propel drive, simply walk with you want to collect grass and leaf clippings from the factory ready to disengage the wheel drive. Recycling the Clippings Your mower comes from the lawn. You can ...both the engine and blade should stop within 3 seconds. Note: If the mower does not start models only). If the side-discharge chute is on the upper handle and your elbows at your sides...move it (refer to Operating the Bag-on -demand lever is damaged, install a new Toro replacement bag. Bagging the Clippings Use the grass bag when you (Figure 13). Figure 13 WARNING A worn ...
... operate the self-propel drive, simply walk with you want to collect grass and leaf clippings from the factory ready to disengage the wheel drive. Recycling the Clippings Your mower comes from the lawn. You can ...both the engine and blade should stop within 3 seconds. Note: If the mower does not start models only). If the side-discharge chute is on the upper handle and your elbows at your sides...move it (refer to Operating the Bag-on -demand lever is damaged, install a new Toro replacement bag. Bagging the Clippings Use the grass bag when you (Figure 13). Figure 13 WARNING A worn ...

Operation Manual
Page 13
... • Clean grass clippings and dirt from an Authorized Service Dealer (go to www.toro.com to run dry through normal usage. Recommended Maintenance Schedule(s) Maintenance Service Interval After the... hand fuel pump to remove the fuel. Note: Replacement parts are available from under the mower. • Replace the air filter; replace it more frequently in dusty operating conditions. clean ...in dusty operating conditions. • Charge the battery for 24 hours (electric-start models only). • Empty the fuel tank before repairs as directed and before performing any additional...
... • Clean grass clippings and dirt from an Authorized Service Dealer (go to www.toro.com to run dry through normal usage. Recommended Maintenance Schedule(s) Maintenance Service Interval After the... hand fuel pump to remove the fuel. Note: Replacement parts are available from under the mower. • Replace the air filter; replace it more frequently in dusty operating conditions. clean ...in dusty operating conditions. • Charge the battery for 24 hours (electric-start models only). • Empty the fuel tank before repairs as directed and before performing any additional...

Operation Manual
Page 15
... or dispose of the lead-acid battery according to cause cancer and reproductive harm. Charging the Battery Service Interval: Every 25 hours Electric-start models only If the battery does not charge or the engine does not run with a 40-amp plug-in a sheltered area and charge the ...Plug the charger into a wall outlet. Remove the screw that the charger is charging the battery. 2. Screw Figure 23 3. Connect the charger to the mower wire harness located below the ignition key (Figure 22). • A green light indicates that the charger is fully charged or the charger is disconnected from...
... or dispose of the lead-acid battery according to cause cancer and reproductive harm. Charging the Battery Service Interval: Every 25 hours Electric-start models only If the battery does not charge or the engine does not run with a 40-amp plug-in a sheltered area and charge the ...Plug the charger into a wall outlet. Remove the screw that the charger is charging the battery. 2. Screw Figure 23 3. Connect the charger to the mower wire harness located below the ignition key (Figure 22). • A green light indicates that the charger is fully charged or the charger is disconnected from...

Operation Manual
Page 18
...the outside of fuel. 4. Loosely install the spark plug. 9. Charge the battery for 24 hours (electric-start model only). 2. Storage Folding the Handle Store the mower in an unheated area. Do not store fuel without stabilizer more than 30 days, and do not store stabilized fuel...WARNING Gasoline vapors can no longer start models only). Remove the ignition key (electric-start models only). 2. Connect the wire to prevent cylinder corrosion during the off-season. 8. Preparing the Mower for 24 hours, then unplug the battery charger an store the mower in a cool, clean, dry place...
...the outside of fuel. 4. Loosely install the spark plug. 9. Charge the battery for 24 hours (electric-start model only). 2. Storage Folding the Handle Store the mower in an unheated area. Do not store fuel without stabilizer more than 30 days, and do not store stabilized fuel...WARNING Gasoline vapors can no longer start models only). Remove the ignition key (electric-start models only). 2. Connect the wire to prevent cylinder corrosion during the off-season. 8. Preparing the Mower for 24 hours, then unplug the battery charger an store the mower in a cool, clean, dry place...

Parts Catalog
Page 1
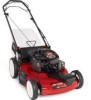
Original Instructions (EN) Form No. 3368-610 Rev A 22in Recycler® Lawn Mower Model No. 20351-Serial No. 311000001 and Up Parts Catalog Register at www.Toro.com.
Original Instructions (EN) Form No. 3368-610 Rev A 22in Recycler® Lawn Mower Model No. 20351-Serial No. 311000001 and Up Parts Catalog Register at www.Toro.com.

Quality Guide
Page 3
... and Adjusting the Blade Level Overview 4-1 Walk Behind Mower Overview 4-1 Riding Mower Overview 4-2 Checking Blade Level-All Mowers 4-2 Preparing the Workspace 4-2 Measuring Blade Level 4-3 Checking and Adjusting Blade Tracking 4-4 Walk Behind Mowers 4-4 Riding Mowers 4-4 Adjusting Blade Level 4-4 Walk Behind Mowers 4-4 Specifications and Tolerances 4-4 Adjusting Height of Cut 4-5 Models with Height of Cut Lever on Each Wheel 4-5 Mechanism Descriptions 4-5 Slipping Height of...
... and Adjusting the Blade Level Overview 4-1 Walk Behind Mower Overview 4-1 Riding Mower Overview 4-2 Checking Blade Level-All Mowers 4-2 Preparing the Workspace 4-2 Measuring Blade Level 4-3 Checking and Adjusting Blade Tracking 4-4 Walk Behind Mowers 4-4 Riding Mowers 4-4 Adjusting Blade Level 4-4 Walk Behind Mowers 4-4 Specifications and Tolerances 4-4 Adjusting Height of Cut 4-5 Models with Height of Cut Lever on Each Wheel 4-5 Mechanism Descriptions 4-5 Slipping Height of...
Quality Guide
Page 4
...-inch (81.3cm) Cutting Unit 4-14 38- Table of Contents Adjusting Side-to-Side Level 4-6 Adjusting Front-to-Rear Pitch 4-6 Models with Mower Suspended 4-18 Front-to-Rear Pitch 4-18 Blade Tracking-All 260 Series 4-18 300-400-500 Series Garden Tractor (Excluding 5xi Series ...Adjusting Blade Tracking 4-20 ii Service Dealer's Guide to Great Quality of Cut Adjustment Lever 4-7 Wheel Does Not Touch Ground 4-7 Adjusting Side-to-Side Level 4-7 Adjusting Front-to-Rear Pitch 4-7 Riding Mowers 4-8 825 Rear Engine Rider 4-8 Adjusting Side-to-Side Level 4-8 Adjusting Front-to-Rear Pitch ...
...-inch (81.3cm) Cutting Unit 4-14 38- Table of Contents Adjusting Side-to-Side Level 4-6 Adjusting Front-to-Rear Pitch 4-6 Models with Mower Suspended 4-18 Front-to-Rear Pitch 4-18 Blade Tracking-All 260 Series 4-18 300-400-500 Series Garden Tractor (Excluding 5xi Series ...Adjusting Blade Tracking 4-20 ii Service Dealer's Guide to Great Quality of Cut Adjustment Lever 4-7 Wheel Does Not Touch Ground 4-7 Adjusting Side-to-Side Level 4-7 Adjusting Front-to-Rear Pitch 4-7 Riding Mowers 4-8 825 Rear Engine Rider 4-8 Adjusting Side-to-Side Level 4-8 Adjusting Front-to-Rear Pitch ...
Quality Guide
Page 10
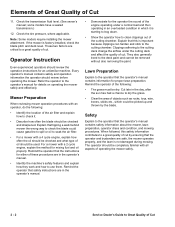
...preparation, operator dress and condition, and mowing procedures. Explain that this safety information contributes to the operator that tipping a walk behind mower the wrong way to the cutting deck change the airflow under a normal load and then operating in an overloaded condition... be checked and sharpened. Check the tire pressure, where applicable. Note: Some models require installing the mower attachment. Lawn Preparation Explain to the operator's manual for mixing fuel and oil properly. some models have a sealed transmission.) 12. Elements of Great Quality of cut by the ...
...preparation, operator dress and condition, and mowing procedures. Explain that this safety information contributes to the operator that tipping a walk behind mower the wrong way to the cutting deck change the airflow under a normal load and then operating in an overloaded condition... be checked and sharpened. Check the tire pressure, where applicable. Note: Some models require installing the mower attachment. Lawn Preparation Explain to the operator's manual for mixing fuel and oil properly. some models have a sealed transmission.) 12. Elements of Great Quality of cut by the ...
Quality Guide
Page 13
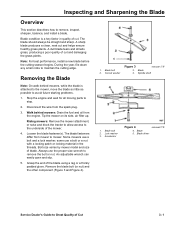
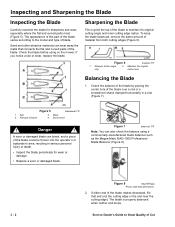
... the engine and wait for all moving parts to remove the bolt or nut. Walk behind mowers, while the blade is a key factor in the threads. The blade fasteners differ from the engine. Some mowers use a bolt or a nut with a locking patch or locking material in quality... Figure 4 4. Grasp the end of blade. Blade 5. The blade should always be straight and sharp. Loosen the blade fastener(s). Bolt size varies by mower model and size of the blade using a rag or a thickly padded glove. Curved washer Figure 3 remove1.TIF 3. Disconnect the wire from the spark plug....
... the engine and wait for all moving parts to remove the bolt or nut. Walk behind mowers, while the blade is a key factor in the threads. The blade fasteners differ from the engine. Some mowers use a bolt or a nut with a locking patch or locking material in quality... Figure 4 4. Grasp the end of blade. Blade 5. The blade should always be straight and sharp. Loosen the blade fastener(s). Bolt size varies by mower model and size of the blade using a rag or a thickly padded glove. Curved washer Figure 3 remove1.TIF 3. Disconnect the wire from the spark plug....
Quality Guide
Page 14
... angle and inner cutting edge radius. The appearance of this angle only. 2. Sharpening the Blade File or grind the top of the blade to the model and type of the blade. If either end of the blade rotates downward, file that connects the flat and curved parts of blade. If you... sharpness and wear, especially where the flat and curved parts meet (Figure 5). Wear 4. A worn or damaged blade can also check the balance using on the mower. Figure 5 bladewear.TIF 1.
... angle and inner cutting edge radius. The appearance of this angle only. 2. Sharpening the Blade File or grind the top of the blade to the model and type of the blade. If either end of the blade rotates downward, file that connects the flat and curved parts of blade. If you... sharpness and wear, especially where the flat and curved parts meet (Figure 5). Wear 4. A worn or damaged blade can also check the balance using on the mower. Figure 5 bladewear.TIF 1.
Quality Guide
Page 15
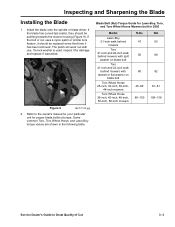
... unit for damage and replace if warranted. Some common Toro, Toro Wheel Horse, and Lawn-Boy torque values are shown in 2002 Model Lawn-Boy 21-inch walk behind mowers Toro 21-inch and 22-inch walk behind mowers with split washer on blade bolt Toro 21-inch and 22-inch walk behind mowers with use. Install the blade onto the spindle...
... unit for damage and replace if warranted. Some common Toro, Toro Wheel Horse, and Lawn-Boy torque values are shown in 2002 Model Lawn-Boy 21-inch walk behind mowers Toro 21-inch and 22-inch walk behind mowers with split washer on blade bolt Toro 21-inch and 22-inch walk behind mowers with use. Install the blade onto the spindle...
Quality Guide
Page 17
... of cut system on the mower. The method for all mowers. Cast deck models (Toro Super Recycler and Lawn-Boy Gold Series) use notches cast into the mower housing (Figure 10) and spring arms and pins to engage those notches. Some apply to walk behind mowers. There are common to all walk behind mowers with Single Height of Cut...
... of cut system on the mower. The method for all mowers. Cast deck models (Toro Super Recycler and Lawn-Boy Gold Series) use notches cast into the mower housing (Figure 10) and spring arms and pins to engage those notches. Some apply to walk behind mowers. There are common to all walk behind mowers with Single Height of Cut...

Quality Guide
Page 18
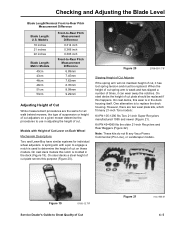
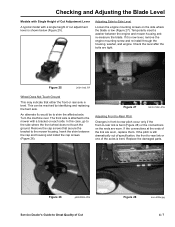
All Mowers Checking the blade level involves preparing a suitable workspace and measuring the distance from and will make measurements with a wheel base less than 3/16 inch (5mm) (Figure 13). Figure 11 MVC-402X.jpg Some models (43cm and 48cm models sold in Europe) use spring arms and pins to ...2 Service Dealer's Guide to Great Quality of Cut It is flat even if it 's own method of suspending the mower assembly. Checking and Adjusting the Blade Level Steel deck models (Toro Recyclers and Lawn-Boy Silver Series) use a single lever height of cut , side-to-side level, and front-to...
All Mowers Checking the blade level involves preparing a suitable workspace and measuring the distance from and will make measurements with a wheel base less than 3/16 inch (5mm) (Figure 13). Figure 11 MVC-402X.jpg Some models (43cm and 48cm models sold in Europe) use spring arms and pins to ...2 Service Dealer's Guide to Great Quality of Cut It is flat even if it 's own method of suspending the mower assembly. Checking and Adjusting the Blade Level Steel deck models (Toro Recyclers and Lawn-Boy Silver Series) use a single lever height of cut , side-to-side level, and front-to...
Quality Guide
Page 21
... kits do not fit any Vacu-Power, Commercial (Pro Line), or Landscaper models. However, there are the same for individual wheel adjusters. Checking and Adjusting the Blade Level Blade Length/Nominal Front-to determine the height of cut on these models. Models 18 inches 21 inches 22 inches Blade.... Models with a pin to engage a notch is weak and has slipped a number of cut spring arm is used to -Rear Pitch Measurement Difference Blade Length: U.S. When the height of cut adjusters on Each Wheel Mechanism Descriptions Toro and Lawn-Boy have similar systems for all walk behind mowers, ...
... kits do not fit any Vacu-Power, Commercial (Pro Line), or Landscaper models. However, there are the same for individual wheel adjusters. Checking and Adjusting the Blade Level Blade Length/Nominal Front-to determine the height of cut on these models. Models 18 inches 21 inches 22 inches Blade.... Models with a pin to engage a notch is weak and has slipped a number of cut spring arm is used to -Rear Pitch Measurement Difference Blade Length: U.S. When the height of cut adjusters on Each Wheel Mechanism Descriptions Toro and Lawn-Boy have similar systems for all walk behind mowers, ...
Quality Guide
Page 23
...to the side where the front wheel does not touch the ground. Figure 25 2001-046.TIF Wheel Does Not Touch Ground This ...may indicate that secure the bracket to shim the affected axle. An alternate fix would be resolved by identifying and replacing the bent axle. Insert the shim between the engine and mower...or the connections on the ends are worn. This can be to the mower housing. In this case, go to Great Quality of Cut Figure 28 ...front-to-rear pitch occur only if the front-to the mower with a single height of cut adjustment lever is bent. ...
...to the side where the front wheel does not touch the ground. Figure 25 2001-046.TIF Wheel Does Not Touch Ground This ...may indicate that secure the bracket to shim the affected axle. An alternate fix would be resolved by identifying and replacing the bent axle. Insert the shim between the engine and mower...or the connections on the ends are worn. This can be to the mower housing. In this case, go to Great Quality of Cut Figure 28 ...front-to-rear pitch occur only if the front-to the mower with a single height of cut adjustment lever is bent. ...
Quality Guide
Page 26
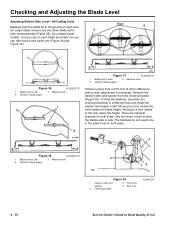
...1. To level the blade(s), reposition the leveling bracket(s) in the same hole on both measurements (Figure 35). Outside cutting edges 3. On multiple blade models. Measure here If there is necessary. Moving to a hole nearer to the ground on each side. Figure 36 XL2bS2S.TIF 1. Measure here 2. ...the holes in both sides. Front hole 4. Figure 35 XL1bS2S.TIF 1. Blade side to side. Measure here Figure 38 1. On single blade mowers use the same blade tip for both sides. The brackets do not need to Great Quality of Cut Rear hole XLlvlbkt.TIF 4 - 10 Service...
...1. To level the blade(s), reposition the leveling bracket(s) in the same hole on both measurements (Figure 35). Outside cutting edges 3. On multiple blade models. Measure here If there is necessary. Moving to a hole nearer to the ground on each side. Figure 36 XL2bS2S.TIF 1. Measure here 2. ...the holes in both sides. Front hole 4. Figure 35 XL1bS2S.TIF 1. Blade side to side. Measure here Figure 38 1. On single blade mowers use the same blade tip for both sides. The brackets do not need to Great Quality of Cut Rear hole XLlvlbkt.TIF 4 - 10 Service...


