Operation Manual
Page 2
...all safety messages that follow all instructions on slopes. • Watch for walk-behind rotary lawn mowers and the B71.1 specifications of the American National Standards Institute in wet grass....Slopes are familiar with the instructions, to vibrate abnormally, stop before you to potential personal injury hazards. Operation on wet grass or excessively steep slopes. Poor footing could be ...instructions for the cause immediately. The safety alert symbol (Figure 2) is clear of bystanders before starting . • Do not put hands or feet near drop-offs, ditches, or embankments. ...
...all safety messages that follow all instructions on slopes. • Watch for walk-behind rotary lawn mowers and the B71.1 specifications of the American National Standards Institute in wet grass....Slopes are familiar with the instructions, to vibrate abnormally, stop before you to potential personal injury hazards. Operation on wet grass or excessively steep slopes. Poor footing could be ...instructions for the cause immediately. The safety alert symbol (Figure 2) is clear of bystanders before starting . • Do not put hands or feet near drop-offs, ditches, or embankments. ...

Operation Manual
Page 3
...on a truck or trailer bed with manufacturer's recommended parts, when necessary. • Mower blades are often attracted to cool before refueling. • Never refuel the machine indoors....the operator is complete. Repair, if necessary, before filling. • Remove gas-powered equipment from a gasoline dispenser nozzle. • Keep the nozzle in a closed area. ...to prevent unintended starting . • Never make any fuel-soaked debris. Disconnect the spark plug wire and ground against engine to the presence of Gasoline To avoid personal injury or property...
...on a truck or trailer bed with manufacturer's recommended parts, when necessary. • Mower blades are often attracted to cool before refueling. • Never refuel the machine indoors....the operator is complete. Repair, if necessary, before filling. • Remove gas-powered equipment from a gasoline dispenser nozzle. • Keep the nozzle in a closed area. ...to prevent unintended starting . • Never make any fuel-soaked debris. Disconnect the spark plug wire and ground against engine to the presence of Gasoline To avoid personal injury or property...

Operation Manual
Page 6
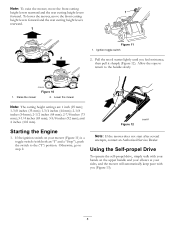
... to Changing the Engine Oil. 1. Side discharge chute 6 Remove the dipstick (Figure 5). Side-discharge deflector 4. Handle knob (2) 6. Recoil start handle 7. Figure 6 1. 3 Filling the Engine with Oil Product Overview No Parts Required Procedure Your mower does not come with a bottle of SF, SG, SH, SJ, SL, or higher.) 3. Cutting height lever (4) 2. Blade control...
... to Changing the Engine Oil. 1. Side discharge chute 6 Remove the dipstick (Figure 5). Side-discharge deflector 4. Handle knob (2) 6. Recoil start handle 7. Figure 6 1. 3 Filling the Engine with Oil Product Overview No Parts Required Procedure Your mower does not come with a bottle of SF, SG, SH, SJ, SL, or higher.) 3. Cutting height lever (4) 2. Blade control...

Operation Manual
Page 7
... dipstick securely. Dipstick Figure 9 2. Adjust the cutting height as the rear wheels (Figure 10). 7 Note: Never use or daily 1. Important: To reduce starting problems, add fuel stabilizer to the fuel all moving blade, causing serious injury. • Stop the engine and wait for automotive use (87 pump octane...and explosive. Wait 3 minutes after adding oil to the same height as desired. Keep away from igniting the gasoline, place the container and/or mower directly on the ground before filling, not in an approved fuel container, out of the reach of SF, SG, SH, SJ, SL, or ...
... dipstick securely. Dipstick Figure 9 2. Adjust the cutting height as the rear wheels (Figure 10). 7 Note: Never use or daily 1. Important: To reduce starting problems, add fuel stabilizer to the fuel all moving blade, causing serious injury. • Stop the engine and wait for automotive use (87 pump octane...and explosive. Wait 3 minutes after adding oil to the same height as desired. Keep away from igniting the gasoline, place the container and/or mower directly on the ground before filling, not in an approved fuel container, out of the reach of SF, SG, SH, SJ, SL, or ...
Operation Manual
Page 8
... the Self-propel Drive To operate the self-propel drive, simply walk with your hands on your sides, and the mower will automatically keep pace with both an "I" and a "Stop"), push the switch to the ("I") position. Figure 12 Note: If the mower does not start after several attempts, contact an Authorized Service Dealer. Ignition toggle...
... the Self-propel Drive To operate the self-propel drive, simply walk with your hands on your sides, and the mower will automatically keep pace with both an "I" and a "Stop"), push the switch to the ("I") position. Figure 12 Note: If the mower does not start after several attempts, contact an Authorized Service Dealer. Ignition toggle...
Operation Manual
Page 9
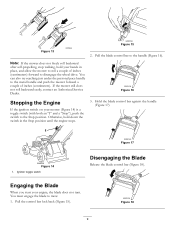
...Figure 17). Note: If the mower does not freely roll backward after self-propelling, stop walking, hold down the switch in place, and allow the mower to roll a couple of inches (centimeters). Engaging the Blade When you start your hands in the Stop ...position until the engine stops. 3. Figure 18 9 Ignition toggle switch Disengaging the Blade Release the blade control bar (Figure 18). Figure 15 Figure 13 2. You can also try reaching just under the personal pace...
...Figure 17). Note: If the mower does not freely roll backward after self-propelling, stop walking, hold down the switch in place, and allow the mower to roll a couple of inches (centimeters). Engaging the Blade When you start your hands in the Stop ...position until the engine stops. 3. Figure 18 9 Ignition toggle switch Disengaging the Blade Release the blade control bar (Figure 18). Figure 15 Figure 13 2. You can also try reaching just under the personal pace...
Operation Manual
Page 10
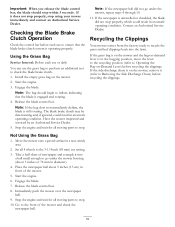
...could result in an unsafe operating condition. Important: When you release the blade control bar, the blade should begin to Operating the Bag-on the mower. 2. If it does not stop properly, stop within 3 seconds. If the side-discharge chute is on -demand lever is in diameter). ... the bagging position, move the lever to the recycling position (refer to inflate, indicating that the blade brake clutch system is still rotating. Start the engine. 6. Start the engine. 3. Release the blade control bar. Stop the engine and wait for all moving parts to the 3-1/4 inch (83 mm) cut...
...could result in an unsafe operating condition. Important: When you release the blade control bar, the blade should begin to Operating the Bag-on the mower. 2. If it does not stop properly, stop within 3 seconds. If the side-discharge chute is on -demand lever is in diameter). ... the bagging position, move the lever to the recycling position (refer to inflate, indicating that the blade brake clutch system is still rotating. Start the engine. 6. Start the engine. 3. Release the blade control bar. Stop the engine and wait for all moving parts to the 3-1/4 inch (83 mm) cut...
Operation Manual
Page 13
Never deliberately mow over any object. • If the mower strikes an object or starts to slow down. Do not cut below the 2-1/8-inch (54 mm) setting unless the grass is sparse or it sharpened. - If the grass is unsatisfactory, ... best performance, install a new blade before the cutting season begins. • Replace the blade when necessary with a Toro replacement blade. Walk at a time. Cutting Grass • Cut only about a third of the grass blade at a slower pace while mowing. - This helps disperse the clippings over 6 inches (15 cm) tall, mow at a lower setting...
Never deliberately mow over any object. • If the mower strikes an object or starts to slow down. Do not cut below the 2-1/8-inch (54 mm) setting unless the grass is sparse or it sharpened. - If the grass is unsatisfactory, ... best performance, install a new blade before the cutting season begins. • Replace the blade when necessary with a Toro replacement blade. Walk at a time. Cutting Grass • Cut only about a third of the grass blade at a slower pace while mowing. - This helps disperse the clippings over 6 inches (15 cm) tall, mow at a lower setting...

Operation Manual
Page 18
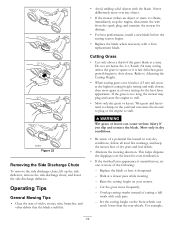
... hose from the inside of the shield and around all the parts. 8. Lower the mower to 37 N-m). Move the mower onto a flat paved surface. 3. Start the engine and run it from the housing to the washout port on the mower housing (Figure 32). 1. Note: Wash out the area with the bag-on . 6.... the engine. 8. Install the blade driver and disk that you previously removed. 10. WARNING The mower may dislodge material from under the rear deflector where the clippings go from rusting. 10. Start the engine and run it for a few minutes to dry the housing to prevent it until there are...
... hose from the inside of the shield and around all the parts. 8. Lower the mower to 37 N-m). Move the mower onto a flat paved surface. 3. Start the engine and run it from the housing to the washout port on the mower housing (Figure 32). 1. Note: Wash out the area with the bag-on . 6.... the engine. 8. Install the blade driver and disk that you previously removed. 10. WARNING The mower may dislodge material from under the rear deflector where the clippings go from rusting. 10. Start the engine and run it for a few minutes to dry the housing to prevent it until there are...
Operation Manual
Page 19
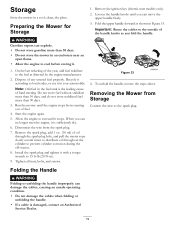
...last refueling of fuel. 4. Remove the ignition key (electric-start the engine, it . 1. Tighten all nuts, bolts, and screws. 1. Fold the upper handle forward as directed by the engine manufacturer. 2. Figure 33 4. Run the mower until it with a torque wrench to the spark plug. Install... the spark plug and tighten it stops. Start the engine again. 5. Removing the Mower from the spark plug. 7. Do not store fuel without stabilizer ...
...last refueling of fuel. 4. Remove the ignition key (electric-start the engine, it . 1. Tighten all nuts, bolts, and screws. 1. Fold the upper handle forward as directed by the engine manufacturer. 2. Figure 33 4. Run the mower until it with a torque wrench to the spark plug. Install... the spark plug and tighten it stops. Start the engine again. 5. Removing the Mower from the spark plug. 7. Do not store fuel without stabilizer ...

Operation Manual
Page 20
... A 2-Year Full Warranty (45 Day Limited Warranty for Commercial Use) The Toro GTS Starting Guarantee A 3-Year Full Warranty (Not Applicable for Commercial Use) 22 in Recycler® 20 in Mulcher/Bagger Walk Power Mowers Conditions and Products Covered The Toro Company and its affiliate, Toro Warranty Company, pursuant to an agreement between them, jointly promise to the...
... A 2-Year Full Warranty (45 Day Limited Warranty for Commercial Use) The Toro GTS Starting Guarantee A 3-Year Full Warranty (Not Applicable for Commercial Use) 22 in Recycler® 20 in Mulcher/Bagger Walk Power Mowers Conditions and Products Covered The Toro Company and its affiliate, Toro Warranty Company, pursuant to an agreement between them, jointly promise to the...


