
Toro 20332 Support Question
Toro 20332 Support Question
Find answers below for this question about Toro 20332 - Recycler 190CC Personal Pace Lawn Mower.Need a Toro 20332 manual? We have 2 online manuals for this item!
Question posted by evanskenneth09 on November 19th, 2012
Won't Start
bought 22" Recycler Lawn Mower 9-10-2012. Now mower won't start. Have removed spark plug, checked gap dried it off reinstalled. Removed air cleaner made sure it is clean,reinstalled still will not start. Sometimes it seems as though it tries to start, white smoke comes out exaust, will not continue.
Current Answers
Answer #1: Posted by freginold on November 26th, 2012 9:23 AM
freginold

Member since:
December 20th, 2011 Points: 23,253,895

Member since:
December 20th, 2011 Points: 23,253,895
Hi, there could be many possible causes. One thing to try is to remove the spark plug, drop a little bit of gasoline into the cylinder through the spark plug opening, then put the plug back in and try to start it. If it starts that way, there's probably an obstruction in your carburetor or fuel line somewhere, or else the gas that's in there is bad.
Related Toro 20332 Manual Pages
Operation Manual - Page 1

... 4442 to cause cancer, birth defects, or other reproductive harm. This spark ignition system complies with a spark arrester muffler. Figure 1 identifies the location of California to use or operate....com. Whenever you do not follow the recommended precautions. Serial No.
22in Recycler® Lawn Mower
Model No. 20332-Serial No. 312000001 and Up Model No. 20334-Serial No. 312000001 and Up...
Operation Manual - Page 2

.... As configured to potential personal injury hazards. The safety alert... this class of lawn mower will be sure of your footing or...if so equipped, before cleaning the machine, removing grass catcher, or unclogging...starting the engine.
• If the machine should start the engine. Poor footing could result in accordance with the instructions, to a complete stop the engine and check...
Operation Manual - Page 3

...gasoline container.
• Never remove gas cap or add fuel...
To avoid personal injury or ...sure the equipment is in contact with manufacturer's recommended parts, when necessary.
• Mower...Check their proper operation regularly.
• Keep machine free of a child. Clean up . Allow machine to prevent unintended starting .
• Never make any fuel-soaked debris. Disconnect the spark plug...
Operation Manual - Page 5

... the oil fill tube, then remove the dipstick.
5. Read the oil... mower to the outside of the handle knobs as you
removed ...Remove the dipstick by rotating the cap
counterclockwise and pulling it does come with oil in the engine, but it out (Figure 4). Setup
Important: Remove...mower does not come with a bottle of oil. Important: Route the cables to a level surface. 2. Before starting...
Operation Manual - Page 6

... lever (4)
2. Side-discharge deflector
models only)
4. Spark plug
Figure 6
1. Grass bag 2. change it yearly thereafter. Air filter
3. Fuel tank cap
11.
Figure 5
1. Oil fill/dipstick
12. Handle knob (2)
6. Washout port (not shown) 13. Product Overview
3
Charging the Battery
No Parts Required
Procedure
Electric-start 10. Bag-on the dipstick reads Full.
6. Side...
Operation Manual - Page 7

... Tank
DANGER
Gasoline is at the Full mark on the dipstick (Figure 8). Checking the Engine Oil Level
Service Interval: Before each use methanol, gasoline containing methanol, or gasoline containing more than 30 days old.
1. Remove the dipstick (Figure 8). Important: To reduce starting problems, add fuel stabilizer to a level surface. 2. Read the oil level...
Operation Manual - Page 8

... height. Adjusting the Cutting Height
WARNING
Adjusting the cutting height may bring you . Starting the Engine
1. Hold the blade control bar against the handle (Figure 10). Adjust the cutting height as the rear wheels (Figure 9). To lower the mower, move the front cutting height levers rearward and the rear cutting height levers forward...
Operation Manual - Page 9

... the personal pace handle to Operating the Bag-on the upper handle and your elbows at your mower immediately and contact an Authorized Service Dealer.
Installing the Grass Bag
1.
If the side discharge chute is on the mower, remove it (refer to Removing the Side Discharge Chute) before leaving the operating position.
Recycling the Clippings
Your mower comes...
Operation Manual - Page 10

... lever pops up . Removing the Grass Bag
To remove the bag, reverse the steps above.
contacting the blade can result in serious personal injury or death to the mower. • For bagging the grass and leaf clippings, press the
button on the bag-on-demand lever and move the
• For recycling the grass and...
Operation Manual - Page 11

...
11
Figure 17
Removing the Side Discharge Chute
To remove the side discharge chute, lift up the side deflector and install the side discharge chute (Figure 17).
1. Clean here
Figure 16
...personal injury. contacting the blade can result in the bagging position, move the lever to the recycling position (refer to stop before leaving the operating position. If the grass bag is on the mower...
Operation Manual - Page 12

...wire from the spark plug, and examine the mower for the best lawn appearance.
Raise the cutting height on the front wheels one notch lower than 5 inches (13 cm) of dry grass and ...mower strikes an object or starts to slow down your mower.
- Walk at a time. WARNING
Wet grass or leaves can cause the mower to plug or the engine to make more of the grass blade at a slower pace...
Operation Manual - Page 13

... pump; Run the engine dry or remove the gasoline with the air filter up.
tip the mower prior to your engine operator's manual for all moving parts to remove the fuel.
Figure 18
3. Gasoline is flammable, explosive and can cause personal injury.
Important: Refer to your engine operator's manual for 24 hours (electric-start models only).
•...
Operation Manual - Page 14

... to open the air filter cover
(Figure 19). 2. Install the dipstick into the oil fill tube, then
remove the dipstick. 10.
Wipe the dipstick clean with oil and run the engine. Insert the dipstick fully into the oil fill tube securely. 12. Note: If the oil level is at a local recycling center.
14 Drain the...
Operation Manual - Page 15

... does not run with a 40-amp plug-in type fuse.
1.
Replace it with the electric starter, the fuse may have a two-color LED display that indicates the following states of the lead-acid battery according to the mower wire harness
located below the ignition key (Figure 22).
• A green light indicates that the...
Operation Manual - Page 16

...).
Note: Your mower comes with the screw that you removed in the battery compartment. 5. Install the battery compartment with a spare fuse in step 3. 6. Remove the blade, saving...air filter up. 3. If the blade edge is sharp; contacting the blade can result in the fuse holder (Figure 24). 1 2 3
1. Fuse
Figure 24
G017398
2. Fuse holder
4. Replace the fuse in serious personal...
Operation Manual - Page 17

... the mower) until
there is simplified for a few minutes to dry the housing to prevent it until there are no slack in the area. Lower the mower to ...Start the engine and run it from under the rear deflector where the
clippings go from the mower.
9. Tighten the nut on .
6.
Note: Wash out the area with the bag-on the mower housing (Figure 28). For best results, clean the mower...
Operation Manual - Page 18

... sufficiently dry.
6. To unfold the handle, reverse the steps above. Removing the Mower from running out of hard starting. Preparing the Mower for Storage
WARNING
Gasoline vapors can move the
upper handle freely. 3. Dispose of the handle knobs as shown in your automobile. Allow the engine to cool before storing it according to the spark plug.
18...
Operation Manual - Page 20

... repairs under "Lawn Mowers") or access ...start on the same lot as filters, fuel,
lubricants, oil changes, spark plugs, air filters blade sharpening or worn blades, cable/linkage adjustments, or brake and clutch adjustments
• Any product or part which vary from the date of purchase:
Products
22 in Recycler...check the Operator's Manual to any reason you are having difficulty starting...
Parts Catalog - Page 1

Form No. 3371-846 Rev A
22in Recycler® Lawn Mower
Model No. 20332-Serial No. 312000001 and Up
Parts Catalog
Register at www.Toro.com.
Original Instructions (EN)
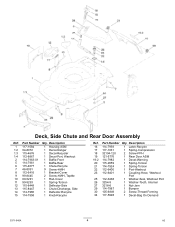
Parts Catalog - Page 4
...
5 114-7961
1 Baffle-Rear
6 115-4677
1 Chute-Recycle
7 46-8091
9 Screw-HWH
8 112-6416
1 Bracket-Cover
9 99-8445
2 Screw-HWH, Taptite
10 99-5291
1 Rod-Cover
11 99-5293
1 Spring-Torsion
...Recycle
17 117-1031
1 Spring-Compression
18 32104-120
2 Screw-PPH
19 121-5776
1 Rear Door ASM
19:2 114-7982
1 Decal-Warning
20 115-2859
1 Spring-Torsion
21 114-7924
1 Spring-Torsion
22...
Similar Questions

My 1 Year Old Toro Personal Pace Lawn Mower Won't Start
(Posted by nasb 10 years ago)

Toro Recycler Personal Pace Lawn Mower Wont Start
(Posted by barnejon 10 years ago)

Toro 190cc Personal Pace Won't Start
(Posted by Soupokef 10 years ago)

How To Change Oil On A Toro Recycler (22 ) 190cc Personal Pace Lawn Mower
(Posted by tinaScamp1 10 years ago)
Blade For Model 20037 Personal Pace Lawn Mower
where can i buy a replacement 21 inch bladefor my 2003 Toro model 20037 personal Pace lawn mower???
where can i buy a replacement 21 inch bladefor my 2003 Toro model 20037 personal Pace lawn mower???
(Posted by lynnegrede 12 years ago)