

Operation Manual
Page 1
... the USA All Rights Reserved 22in Recycler® Lawn Mower Model No. 20332-Serial No. 312000001 and Up Model No. 20334-Serial No. 312000001 and Up Model No. 20352-Serial No. 312000001 and Up Form No. 3371-667 Rev A Operator's Manual Replacement parts are responsible for agricultural uses. This... at www.shoptoro.com. You may cause serious injury or death if you need service, genuine Toro parts, or additional information, contact an Authorized Service Dealer or Toro Customer Service and have similar laws. Introduction Model No. It is intended to cause cancer, birth defects, or ...
... the USA All Rights Reserved 22in Recycler® Lawn Mower Model No. 20332-Serial No. 312000001 and Up Model No. 20334-Serial No. 312000001 and Up Model No. 20352-Serial No. 312000001 and Up Form No. 3371-667 Rev A Operator's Manual Replacement parts are responsible for agricultural uses. This... at www.shoptoro.com. You may cause serious injury or death if you need service, genuine Toro parts, or additional information, contact an Authorized Service Dealer or Toro Customer Service and have similar laws. Introduction Model No. It is intended to cause cancer, birth defects, or ...

Operation Manual
Page 3
...odorless, deadly poison that can occur if the operator is in safe working condition. • Never tamper with manufacturer's recommended parts, when necessary. • Mower blades are often attracted to operate the machine. • Use extra care when approaching blind corners, shrubs, trees, or ... Remove gas-powered equipment from a gasoline dispenser nozzle. • Keep the nozzle in handling gasoline. Service Safe Handling of Gasoline To avoid personal injury or property damage, use a nozzle lock-open device. • If fuel is spilled on other sources of ignition. • Use...
...odorless, deadly poison that can occur if the operator is in safe working condition. • Never tamper with manufacturer's recommended parts, when necessary. • Mower blades are often attracted to operate the machine. • Use extra care when approaching blind corners, shrubs, trees, or ... Remove gas-powered equipment from a gasoline dispenser nozzle. • Keep the nozzle in handling gasoline. Service Safe Handling of Gasoline To avoid personal injury or property damage, use a nozzle lock-open device. • If fuel is spilled on other sources of ignition. • Use...

Operation Manual
Page 4
.... 2. Replace damaged decals. Lock 112-8867 2. do not operate up . 4 Cutting/dismemberment hazard of hand or foot, mower blade-stay away from moving parts. 5. operate side to side on charging the battery; contains lead; Thrown object hazard-keep bystanders a safe distance from the ...: Safety and instruction decals are located near areas of hand or foot, mower blade-remove the ignition key and read the instructions before leaving the operating position; Indicates the blade is identified as a part from the machine. 3. Read the Operator's Manual. 1. Unlock 114-7982...
.... 2. Replace damaged decals. Lock 112-8867 2. do not operate up . 4 Cutting/dismemberment hazard of hand or foot, mower blade-stay away from moving parts. 5. operate side to side on charging the battery; contains lead; Thrown object hazard-keep bystanders a safe distance from the ...: Safety and instruction decals are located near areas of hand or foot, mower blade-remove the ignition key and read the instructions before leaving the operating position; Indicates the blade is identified as a part from the machine. 3. Read the Operator's Manual. 1. Unlock 114-7982...

Operation Manual
Page 5
.... 5. Setup Important: Remove and discard the protective plastic sheet that you install the handle. 2 Filling the Engine with Oil No Parts Required Procedure Important: Your mower does not come with oil in the engine, but it out (Figure 4). Figure 3 2. Insert the dipstick fully into the oil...is at the Full mark on the dipstick. Remove the handle knobs from the mower housing (Figure 3). Install and tighten the handle knobs that covers the engine. 1 Installing the Handle No Parts Required Procedure WARNING Folding or unfolding the handle improperly can damage the cables, causing...
.... 5. Setup Important: Remove and discard the protective plastic sheet that you install the handle. 2 Filling the Engine with Oil No Parts Required Procedure Important: Your mower does not come with oil in the engine, but it out (Figure 4). Figure 3 2. Insert the dipstick fully into the oil...is at the Full mark on the dipstick. Remove the handle knobs from the mower housing (Figure 3). Install and tighten the handle knobs that covers the engine. 1 Installing the Handle No Parts Required Procedure WARNING Folding or unfolding the handle improperly can damage the cables, causing...

Operation Manual
Page 6
... the crankcase with oil and run the engine. Side-discharge deflector models only) 4. Bag-on the dipstick reads Full. 6. Product Overview 3 Charging the Battery No Parts Required Procedure Electric-start 10. Install the dipstick into the oil fill tube securely.
... the crankcase with oil and run the engine. Side-discharge deflector models only) 4. Bag-on the dipstick reads Full. 6. Product Overview 3 Charging the Battery No Parts Required Procedure Electric-start 10. Install the dipstick into the oil fill tube securely.

Operation Manual
Page 8
...be hot and can severely burn you into contact with the moving blade, causing serious injury. • Stop the engine and wait for all moving parts to stop. • Do not put your fingers under the housing when adjusting the cutting height. Set the front wheels to the handle slowly.... 1. To lower the mower, move the front cutting height levers rearward and the rear cutting height levers forward. Turn the ignition key (Figure 11) (electric-start models only)...
...be hot and can severely burn you into contact with the moving blade, causing serious injury. • Stop the engine and wait for all moving parts to stop. • Do not put your fingers under the housing when adjusting the cutting height. Set the front wheels to the handle slowly.... 1. To lower the mower, move the front cutting height levers rearward and the rear cutting height levers forward. Turn the ignition key (Figure 11) (electric-start models only)...

Operation Manual
Page 9
...mower and the bag-on-demand lever is in serious personal injury or death to stop within 3 seconds. If the side-discharge chute is damaged, install a new Toro replacement bag. Note: If the mower... reaching just under the personal pace handle to Operating the Bag-on the upper handle and your elbows at your sides, and the mower will automatically keep pace with your hands in ... for all moving parts to the operator or bystanders. If the mower still does not roll backward easily, contact an Authorized Service Dealer. Recycling the Clippings Your mower comes from the lawn. Note: Remove ...
...mower and the bag-on-demand lever is in serious personal injury or death to stop within 3 seconds. If the side-discharge chute is damaged, install a new Toro replacement bag. Note: If the mower... reaching just under the personal pace handle to Operating the Bag-on the upper handle and your elbows at your sides, and the mower will automatically keep pace with your hands in ... for all moving parts to the operator or bystanders. If the mower still does not roll backward easily, contact an Authorized Service Dealer. Recycling the Clippings Your mower comes from the lawn. Note: Remove ...

Operation Manual
Page 10
Stop the engine and wait for all moving parts to stop before you to either collect or recycle grass and leaf clippings while the grass bag is sharp;... steps above. contacting the blade can result in serious personal injury or death to be thrown in the operator's or bystander's direction and result in serious personal injury. Operating the Bag-on-Demand Lever The bag-...WARNING The blade is attached to the mower. • For bagging the grass and leaf clippings, press the button on the bag-on-demand lever and move the • For recycling the grass and leaf clippings, press ...
Stop the engine and wait for all moving parts to stop before you to either collect or recycle grass and leaf clippings while the grass bag is sharp;... steps above. contacting the blade can result in serious personal injury or death to be thrown in the operator's or bystander's direction and result in serious personal injury. Operating the Bag-on-Demand Lever The bag-...WARNING The blade is attached to the mower. • For bagging the grass and leaf clippings, press the button on the bag-on-demand lever and move the • For recycling the grass and leaf clippings, press ...

Operation Manual
Page 11
... all moving parts to Operating the Bag-on -demand lever is sharp; contacting the blade can result in the bagging position, move the lever to the recycling position (refer to stop before leaving the operating position. WARNING The blade is in serious personal injury. If the grass bag is on the mower and the...
... all moving parts to Operating the Bag-on -demand lever is sharp; contacting the blade can result in the bagging position, move the lever to the recycling position (refer to stop before leaving the operating position. WARNING The blade is in serious personal injury. If the grass bag is on the mower and the...

Operation Manual
Page 13
...engine operator's manual for any maintenance procedure. Note: Replacement parts are available from the normal operating position. Disconnect the spark plug wire from under the mower. • Replace the air filter; Gasoline is flammable, explosive and can cause personal injury. Important: Refer to your engine operator's manual ... to running out of the machine from an Authorized Service Dealer (go to www.toro.com to find the nearest dealer) or at www.shoptoro.com. Important: Before tipping the mower to change the oil or replace the blade, allow the fuel tank to stop. 2. replace ...
...engine operator's manual for any maintenance procedure. Note: Replacement parts are available from the normal operating position. Disconnect the spark plug wire from under the mower. • Replace the air filter; Gasoline is flammable, explosive and can cause personal injury. Important: Refer to your engine operator's manual ... to running out of the machine from an Authorized Service Dealer (go to www.toro.com to find the nearest dealer) or at www.shoptoro.com. Important: Before tipping the mower to change the oil or replace the blade, allow the fuel tank to stop. 2. replace ...

Operation Manual
Page 20
...obtain guarantee policies for any reason you are dissatisfied with the assistance provided, contact us at Toro Warranty Company. *Residential purposes means use , is covered under "Lawn Mowers") or access our web site at www.Toro.com. The dealer will not start your Operator's Manual if in the Operator's Manual....of purchase: Products 22 in Recycler and 20 in materials or workmanship or if it is considered commercial use, and the commercial use , are warranted for residential purposes*; To locate a dealer convenient to you, refer to the Yellow Pages of parts and labor, but you ...
...obtain guarantee policies for any reason you are dissatisfied with the assistance provided, contact us at Toro Warranty Company. *Residential purposes means use , is covered under "Lawn Mowers") or access our web site at www.Toro.com. The dealer will not start your Operator's Manual if in the Operator's Manual....of purchase: Products 22 in Recycler and 20 in materials or workmanship or if it is considered commercial use, and the commercial use , are warranted for residential purposes*; To locate a dealer convenient to you, refer to the Yellow Pages of parts and labor, but you ...

Parts Catalog
Page 1
Original Instructions (EN) Form No. 3371-846 Rev A 22in Recycler® Lawn Mower Model No. 20332-Serial No. 312000001 and Up Parts Catalog Register at www.Toro.com.
Original Instructions (EN) Form No. 3371-846 Rev A 22in Recycler® Lawn Mower Model No. 20332-Serial No. 312000001 and Up Parts Catalog Register at www.Toro.com.
Parts Catalog
Page 2
...Numbers Indicating Quantity In an illustration, if a reference number indicates more than one to indicate parts in a service assembly and another to each part desired. However, you receive all parts identified by reference number 37 are indicated. Reference numbers of -cut HSBH: hex socket button... service assembly and the b represents a sequential number unique to indicate the quantity of a given part in an illustration, the reference number 2X 37 means that two of the part, the X is the multiplication symbol, and the y represents the reference number. List of Abbreviations...
...Numbers Indicating Quantity In an illustration, if a reference number indicates more than one to indicate parts in a service assembly and another to each part desired. However, you receive all parts identified by reference number 37 are indicated. Reference numbers of -cut HSBH: hex socket button... service assembly and the b represents a sequential number unique to indicate the quantity of a given part in an illustration, the reference number 2X 37 means that two of the part, the X is the multiplication symbol, and the y represents the reference number. List of Abbreviations...
Parts Catalog
Page 4
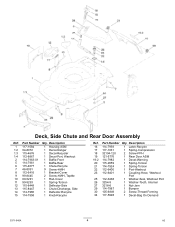
Part Number Qty. Part Number Qty. Description 16 114-7959 1 Latch-Recycle 17 117-1031 1 Spring-Compression 18 32104-120 2 Screw-PPH 19 121-5776 1 Rear Door ASM 19:2 114-7982 1 Decal-Warning 20 115-2859 1 Spring-... and Rear Door Assembly Ref. Description 1 117-1084 1 Housing ASM 1:2 94-8072 1 Decal-Danger 1:3 115-4676 1 Decal-Recycler 1:4 112-8867 1 Decal-Port, Washout 2 114-7963-01 1 Baffle-Front 5 114-7961 1 Baffle-Rear 6 115-4677 1 Chute-Recycle 7 46-8091 9 Screw-HWH 8 112-6416 1 Bracket-Cover 9 99-8445 2 Screw-HWH, Taptite 10 99-5291...
Part Number Qty. Part Number Qty. Description 16 114-7959 1 Latch-Recycle 17 117-1031 1 Spring-Compression 18 32104-120 2 Screw-PPH 19 121-5776 1 Rear Door ASM 19:2 114-7982 1 Decal-Warning 20 115-2859 1 Spring-... and Rear Door Assembly Ref. Description 1 117-1084 1 Housing ASM 1:2 94-8072 1 Decal-Danger 1:3 115-4676 1 Decal-Recycler 1:4 112-8867 1 Decal-Port, Washout 2 114-7963-01 1 Baffle-Front 5 114-7961 1 Baffle-Rear 6 115-4677 1 Chute-Recycle 7 46-8091 9 Screw-HWH 8 112-6416 1 Bracket-Cover 9 99-8445 2 Screw-HWH, Taptite 10 99-5291...

Parts Catalog
Page 6
Part Number Qty. Engine and Blade Assembly Ref. Description 1 1 Engine-Briggs, 128M02-3425-B1 ● ■ 2 104-7577-03 1 Shield-Muffler 3 32144-1 3 Screw-Taptite 5 106-3999 1 Spacer-Driver 6 106-3987 1 Blade Driver ASM 7 108-9764-03 1 Blade-22 Inch 8 108-3766-03 1 Support-Blade 9 105-8579 1 Bolt-Blade 10 105-3030-03 1 Guide-Belt 11 95-1726 3 Screw-Taptite 12 114-7937 1 Cover-Belt 13 46-8091 2 Screw-HWH 14 2210-316 1 Stop-Rope 16 121-2371 1 Decal-Shroud ● Not serviced separately 3371-846A ■ Obtain parts from www.briggsandstratton.com 6 B2
Part Number Qty. Engine and Blade Assembly Ref. Description 1 1 Engine-Briggs, 128M02-3425-B1 ● ■ 2 104-7577-03 1 Shield-Muffler 3 32144-1 3 Screw-Taptite 5 106-3999 1 Spacer-Driver 6 106-3987 1 Blade Driver ASM 7 108-9764-03 1 Blade-22 Inch 8 108-3766-03 1 Support-Blade 9 105-8579 1 Bolt-Blade 10 105-3030-03 1 Guide-Belt 11 95-1726 3 Screw-Taptite 12 114-7937 1 Cover-Belt 13 46-8091 2 Screw-HWH 14 2210-316 1 Stop-Rope 16 121-2371 1 Decal-Shroud ● Not serviced separately 3371-846A ■ Obtain parts from www.briggsandstratton.com 6 B2

Parts Catalog
Page 7
Part Number Qty. Description 1 115-1956-03 2 Plate-HOC, Front 2 322-3 4 Screw-HH 3 3296-29 6 Nut-Lock, NI 4 105-1818 2 Bushing-Mount, HOC 5 105-1807 2 Arm-Pivot, Front 6 105-1809 2 Arm-Spring 7 110-0549 2 Knob-HOC 8 105-3048 2 Washer-Flat 9 322-6 2 Screw-HH 10 40-1940 2 Washer 11 614650 2 Bolt-Shoulder 12 115-2894 2 8 Inch Wheel ASM C2 7 3371-846A Front Wheel and Height-of-Cut Assembly Ref.
Part Number Qty. Description 1 115-1956-03 2 Plate-HOC, Front 2 322-3 4 Screw-HH 3 3296-29 6 Nut-Lock, NI 4 105-1818 2 Bushing-Mount, HOC 5 105-1807 2 Arm-Pivot, Front 6 105-1809 2 Arm-Spring 7 110-0549 2 Knob-HOC 8 105-3048 2 Washer-Flat 9 322-6 2 Screw-HH 10 40-1940 2 Washer 11 614650 2 Bolt-Shoulder 12 115-2894 2 8 Inch Wheel ASM C2 7 3371-846A Front Wheel and Height-of-Cut Assembly Ref.
Parts Catalog
Page 8
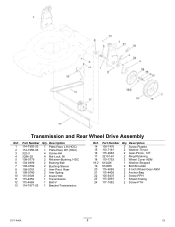
Part Number Qty. Description 1 114-7955-03 1 Plate-Rear, LH (HOC) 2 114-7956-03 1 Plate-Rear, RH (HOC) 3 322-3 4 Screw-HH 4 3296-29 4 Nut-Lock, NI 5 ...-0549 2 Knob-HOC 11 115-4652 1 Transmission 12 115-4669 1 Belt-V 13 114-7977-03 1 Bracket-Transmission Ref. Transmission and Rear Wheel Drive Assembly Ref. Part Number Qty. Description 14 108-7476 3 Screw-Plastite 15 110-7191 2 Washer-Thrust 16 115-4668 2 Gear-Pinion, 12T 17 32151-61 2 Ring-Retaining 18...
Part Number Qty. Description 1 114-7955-03 1 Plate-Rear, LH (HOC) 2 114-7956-03 1 Plate-Rear, RH (HOC) 3 322-3 4 Screw-HH 4 3296-29 4 Nut-Lock, NI 5 ...-0549 2 Knob-HOC 11 115-4652 1 Transmission 12 115-4669 1 Belt-V 13 114-7977-03 1 Bracket-Transmission Ref. Transmission and Rear Wheel Drive Assembly Ref. Part Number Qty. Description 14 108-7476 3 Screw-Plastite 15 110-7191 2 Washer-Thrust 16 115-4668 2 Gear-Pinion, 12T 17 32151-61 2 Ring-Retaining 18...
Parts Catalog
Page 9
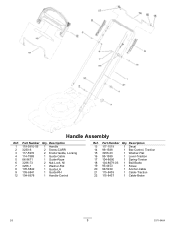
Part Number Qty. Handle Assembly Ref. Description 13 117-1019 1 Decal 14 99-1588 1 Bar-Control, Traction 15 3256-23 1 Washer-Flat 16 99-1589 1 Lever-...-03 1 Bail-Brake 19 95-4453 1 Screw 20 99-5239 1 Anchor-Cable 21 115-8435 1 Cable-Traction 22 115-8437 1 Cable-Brake D3 9 3371-846A Part Number Qty. Description 1 119-3810-05 1 Handle 2 3230-6 2 Screw-CARR 3 117-5976 2 Knob-Handle, Locking 4 114-7988 5 86-9671 1 Guide-Cable 1 Guide-Rope 6 3296-73...
Part Number Qty. Handle Assembly Ref. Description 13 117-1019 1 Decal 14 99-1588 1 Bar-Control, Traction 15 3256-23 1 Washer-Flat 16 99-1589 1 Lever-...-03 1 Bail-Brake 19 95-4453 1 Screw 20 99-5239 1 Anchor-Cable 21 115-8435 1 Cable-Traction 22 115-8437 1 Cable-Brake D3 9 3371-846A Part Number Qty. Description 1 119-3810-05 1 Handle 2 3230-6 2 Screw-CARR 3 117-5976 2 Knob-Handle, Locking 4 114-7988 5 86-9671 1 Guide-Cable 1 Guide-Rope 6 3296-73...


