User Guide
Page 4
... Objects and Liquid Entry - Damage Require Service - The power supply cord or plug has been damaged. Do not defeat the safety purpose of time. 10. E. All other appliances (including amplifiers) that may cause hazards. 12. It is equipped with it is in the user's operating ...one blade wider than the other). The unit does not appear to where it is plugged into the enclosure through the ventilation openings. 4. Timex Audio Products Division Customer Service, 1-800-888-4491. 17. Please read all warnings, and always follow the instruction on the appliance. 6....
... Objects and Liquid Entry - Damage Require Service - The power supply cord or plug has been damaged. Do not defeat the safety purpose of time. 10. E. All other appliances (including amplifiers) that may cause hazards. 12. It is equipped with it is in the user's operating ...one blade wider than the other). The unit does not appear to where it is plugged into the enclosure through the ventilation openings. 4. Timex Audio Products Division Customer Service, 1-800-888-4491. 17. Please read all warnings, and always follow the instruction on the appliance. 6....
User Guide
Page 5
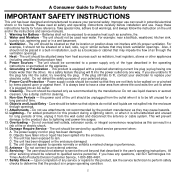
...or the AC cord is connected. Please make sure the AC power is accidentally disconnected, the display backlight will not remain lit, but current time and alarm time settings will be placed between it is flashing, it and the furniture. 2. ends of the case. 5. Otherwise, you dispose of the unit.... 3. Note: Make sure you must reset the time and alarm settings. ᕡ ᕣ If the Battery Low Icon located on a natural oil or lacquered finish. Place unit on the bottom of ...
...or the AC cord is connected. Please make sure the AC power is accidentally disconnected, the display backlight will not remain lit, but current time and alarm time settings will be placed between it is flashing, it and the furniture. 2. ends of the case. 5. Otherwise, you dispose of the unit.... 3. Note: Make sure you must reset the time and alarm settings. ᕡ ᕣ If the Battery Low Icon located on a natural oil or lacquered finish. Place unit on the bottom of ...

User Guide
Page 6
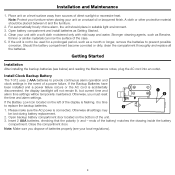
Controls and Indicators ᕤ Alarm-1/Alarm-2 Button Mode Button ᕣ Preset Buttons ᕢ Alarm Reset/Power On ᕡ /Off Button ᕥ Volume Button ᕦ Button ᕧ Button ᕨ Time Set Button ᕩ Sleep Button µ MP3 Line-in Jack Perspective view ¹ DST Switch 7-5-2 Button ¸ Ƹ Time Zone Button ƹ Snooze/Dimmer Button Top view 4
Controls and Indicators ᕤ Alarm-1/Alarm-2 Button Mode Button ᕣ Preset Buttons ᕢ Alarm Reset/Power On ᕡ /Off Button ᕥ Volume Button ᕦ Button ᕧ Button ᕨ Time Set Button ᕩ Sleep Button µ MP3 Line-in Jack Perspective view ¹ DST Switch 7-5-2 Button ¸ Ƹ Time Zone Button ƹ Snooze/Dimmer Button Top view 4
User Guide
Page 7
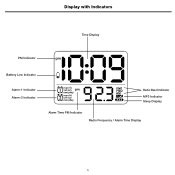
Display with Indicators Time Display PM Indicator Battery Low Indicator Alarm-1 Indicator Alarm-2 Indicator Radio Band Indicator MP3 Indicator Sleep Display Alarm Time PM Indicator Radio Frequency / Alarm Time Display 5
Display with Indicators Time Display PM Indicator Battery Low Indicator Alarm-1 Indicator Alarm-2 Indicator Radio Band Indicator MP3 Indicator Sleep Display Alarm Time PM Indicator Radio Frequency / Alarm Time Display 5
User Guide
Page 8
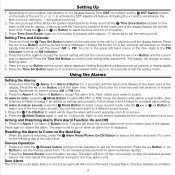
... details on the back of the unit for your location. 3. Press and hold the ᕤ Alarm-1 or Alarm-2 Button for 10 seconds. Press Time Zone Button again (or if no button is displayed. The display will subtract one hour. 2. Next, select your location and whether or not Daylight ... the Alarm 1 (or Alarm 2) Button to a different sound source. 3. Press the desired radio station preset button. (See Listening to show the current alarm time on when an alarm icon is now armed, indicated by the numbered alarm clock icon. The alarm is set to set the current year. Press...
... details on the back of the unit for your location. 3. Press and hold the ᕤ Alarm-1 or Alarm-2 Button for 10 seconds. Press Time Zone Button again (or if no button is displayed. The display will subtract one hour. 2. Next, select your location and whether or not Daylight ... the Alarm 1 (or Alarm 2) Button to a different sound source. 3. Press the desired radio station preset button. (See Listening to show the current alarm time on when an alarm icon is now armed, indicated by the numbered alarm clock icon. The alarm is set to set the current year. Press...
User Guide
Page 9
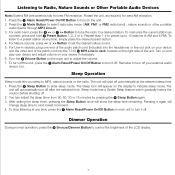
...For radio band, press the ᕦ > Button to tune the radio to set the desired nature sound. 5. To listen to a preset station at any time, simply press the desired preset button. 4. The unit will shut off your device and the other portable audio device through MP3 Line-in Jack, located... 3 or 4. Dimmer Operation During normal operation, press the ƹ Snooze/Dimmer Button to control the brightness of the unit. To stop listening at any time, press the ᕡ Alarm Reset/Power On/Off Button on the right side of the LCD display. 7 To turn off the unit, press the &#...
...For radio band, press the ᕦ > Button to tune the radio to set the desired nature sound. 5. To listen to a preset station at any time, simply press the desired preset button. 4. The unit will shut off your device and the other portable audio device through MP3 Line-in Jack, located... 3 or 4. Dimmer Operation During normal operation, press the ƹ Snooze/Dimmer Button to control the brightness of the unit. To stop listening at any time, press the ᕡ Alarm Reset/Power On/Off Button on the right side of the LCD display. 7 To turn off the unit, press the &#...


