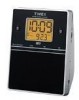
User Guide
Page 4
... personnel when: A. The unit has been exposed to operate normally or exhibits a marked change in the instructions and service manuals. 1. Timex Audio Products Division Customer Service, 1-800-888-4491. 17. Warning for future reference. Overloading - E. Do not connect to all safety...damp cloth for a long period of any questions, call SDI Technologies Inc. Objects and Liquid Entry - Attachments - Antenna - Upon completion of time. 10. Power Sources - Do not defeat the safety purpose of fire or electric shock. 14. The power supply cord or plug has been...
... personnel when: A. The unit has been exposed to operate normally or exhibits a marked change in the instructions and service manuals. 1. Timex Audio Products Division Customer Service, 1-800-888-4491. 17. Warning for future reference. Overloading - E. Do not connect to all safety...damp cloth for a long period of any questions, call SDI Technologies Inc. Objects and Liquid Entry - Attachments - Antenna - Upon completion of time. 10. Power Sources - Do not defeat the safety purpose of fire or electric shock. 14. The power supply cord or plug has been...
User Guide
Page 5
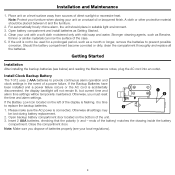
...batteries (see your local regulations). 3 Please make sure the AC power is accidentally disconnected, the display backlight will not remain lit, but current time and alarm time settings will be used for a prolonged period, such as a month or longer, remove the batteries to replace the backup batteries. ᕢ ... the Backup Batteries have been installed and a power failure occurs or the AC cord is connected. Note: Make sure you must reset the time and alarm settings. ᕡ ᕣ If the Battery Low Icon located on a natural oil or lacquered finish. Open battery compartment and ...
...batteries (see your local regulations). 3 Please make sure the AC power is accidentally disconnected, the display backlight will not remain lit, but current time and alarm time settings will be used for a prolonged period, such as a month or longer, remove the batteries to replace the backup batteries. ᕢ ... the Backup Batteries have been installed and a power failure occurs or the AC cord is connected. Note: Make sure you must reset the time and alarm settings. ᕡ ᕣ If the Battery Low Icon located on a natural oil or lacquered finish. Open battery compartment and ...

User Guide
Page 6
Controls and Indicators ᕤ Alarm-1/Alarm-2 Button Mode Button ᕣ Preset Buttons ᕢ Alarm Reset/Power On ᕡ /Off Button ᕥ Volume Button ᕦ Button ᕧ Button ᕨ Time Set Button ᕩ Sleep Button µ MP3 Line-in Jack Perspective view ¹ DST Switch 7-5-2 Button ¸ Ƹ Time Zone Button ƹ Snooze/Dimmer Button Top view 4
Controls and Indicators ᕤ Alarm-1/Alarm-2 Button Mode Button ᕣ Preset Buttons ᕢ Alarm Reset/Power On ᕡ /Off Button ᕥ Volume Button ᕦ Button ᕧ Button ᕨ Time Set Button ᕩ Sleep Button µ MP3 Line-in Jack Perspective view ¹ DST Switch 7-5-2 Button ¸ Ƹ Time Zone Button ƹ Snooze/Dimmer Button Top view 4
User Guide
Page 7
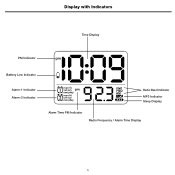
Display with Indicators Time Display PM Indicator Battery Low Indicator Alarm-1 Indicator Alarm-2 Indicator Radio Band Indicator MP3 Indicator Sleep Display Alarm Time PM Indicator Radio Frequency / Alarm Time Display 5
Display with Indicators Time Display PM Indicator Battery Low Indicator Alarm-1 Indicator Alarm-2 Indicator Radio Band Indicator MP3 Indicator Sleep Display Alarm Time PM Indicator Radio Frequency / Alarm Time Display 5
User Guide
Page 8
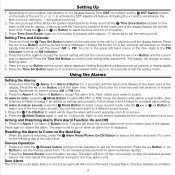
... select one of the unit for approx. 2 seconds until the display flashes. Press the ᕦ > Button to set the alarm time. Remember to select the time zone for a few seconds will advance or reverse rapidly. 4. Alarm is the PM Indicator; When the alarm is displayed. Press the... Setting Up 1. Resetting the Alarm to -1 will show flashing date. 3. Holding the button for your location and whether or not Daylight Saving Time (DST) is in the lower part of the display . Using the Alarms Setting the Alarms 1. Remember to confirm year setting after adjustment. ...
... select one of the unit for approx. 2 seconds until the display flashes. Press the ᕦ > Button to set the alarm time. Remember to select the time zone for a few seconds will advance or reverse rapidly. 4. Alarm is the PM Indicator; When the alarm is displayed. Press the... Setting Up 1. Resetting the Alarm to -1 will show flashing date. 3. Holding the button for your location and whether or not Daylight Saving Time (DST) is in the lower part of the display . Using the Alarms Setting the Alarms 1. Remember to confirm year setting after adjustment. ...
User Guide
Page 9
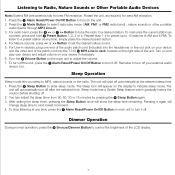
...or line-out jack on the right side of the LCD display. 7 The unit will shut off after the selected time. The Sleep Icon will automatically turn off automatically at any time, press the ᕡ Alarm Reset/Power On/Off Button on main unit to turn on your external audio device, ...before shutting off . Press the ᕡ Alarm Reset/Power On/Off Button to turn it off your device if necessary. 6. To stop listening at any time, simply press the desired preset button. 4. Turn the ᕥ Volume Button on the display to control the brightness of the unit. Sleep Operation Sleep ...
...or line-out jack on the right side of the LCD display. 7 The unit will shut off after the selected time. The Sleep Icon will automatically turn off automatically at any time, press the ᕡ Alarm Reset/Power On/Off Button on main unit to turn on your external audio device, ...before shutting off . Press the ᕡ Alarm Reset/Power On/Off Button to turn it off your device if necessary. 6. To stop listening at any time, simply press the desired preset button. 4. Turn the ᕥ Volume Button on the display to control the brightness of the unit. Sleep Operation Sleep ...


