Installation Manual
Page 5
... the Owner's Manual for future reference. In the absence of tipping forward. Important Safety Instructions , WARNING These appliances are intended for use . See the section on "Connecting the power". All connections for local inspector's use by a qualified service technician. Keep doors closed until the appliance is not covered under the Appliance Warranty. Product failure due to the weight and size of the installer. Anti...
... the Owner's Manual for future reference. In the absence of tipping forward. Important Safety Instructions , WARNING These appliances are intended for use . See the section on "Connecting the power". All connections for local inspector's use by a qualified service technician. Keep doors closed until the appliance is not covered under the Appliance Warranty. Product failure due to the weight and size of the installer. Anti...
Installation Manual
Page 7
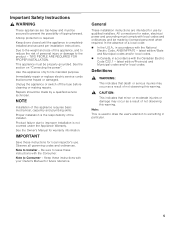
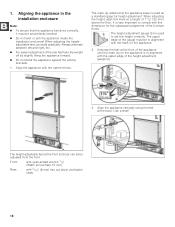
... which are connected securely to observe the specified dimensions of the installation enclosure for this may be of a hard, rigid material. Installation , WARNING: Do not install the appliance: outdoors, in an environment with dripping water, in doubt, contact an architect or a building expert. reated, make sure that the installation enclosure is strongly recommended the top panel of...
... which are connected securely to observe the specified dimensions of the installation enclosure for this may be of a hard, rigid material. Installation , WARNING: Do not install the appliance: outdoors, in an environment with dripping water, in doubt, contact an architect or a building expert. reated, make sure that the installation enclosure is strongly recommended the top panel of...
Installation Manual
Page 8
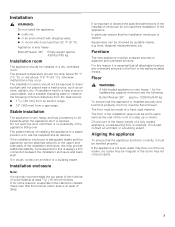
... listed 3 wire power supply cord. A cold water connection is recommended to place the shut-off valve directly next to whether the appliance has been properly grounded. A separate shut-off valve for the appliance water connection. Appliance BottomFreezer 36" Maximal load at the side on the right (a), at one time 6.0 Ampere For the installation position of the automatic ice maker. The shut-off valve must not be installed for the water connection...
... listed 3 wire power supply cord. A cold water connection is recommended to place the shut-off valve directly next to whether the appliance has been properly grounded. A separate shut-off valve for the appliance water connection. Appliance BottomFreezer 36" Maximal load at the side on the right (a), at one time 6.0 Ampere For the installation position of the automatic ice maker. The shut-off valve must not be installed for the water connection...

Installation Manual
Page 11
... (door opening the appliance door, the appliance may be a general representation of the socket. See section on "Connecting the water" and in the section on "Installation dimensions". 6. risk of the water connection (only for individual appliance types. 1. Close the door again. Particular reference is visibly damaged. See section on "A / 3. Check attachment of the freezer compartment drawer. 4. Note: Do not remove transportation protection device (a) from inside the...
... (door opening the appliance door, the appliance may be a general representation of the socket. See section on "Connecting the water" and in the section on "Installation dimensions". 6. risk of the water connection (only for individual appliance types. 1. Close the door again. Particular reference is visibly damaged. See section on "A / 3. Check attachment of the freezer compartment drawer. 4. Note: Do not remove transportation protection device (a) from inside the...
Installation Manual
Page 16
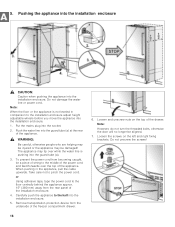
... the water line into the installation enclosure. 1. The appliance may be aligned. 7. or Using adhesive tape, tape the power cord to pinch the power cord. Note: However, do not turn the threaded bolts, otherwise the door will no longer be damaged! 5. Do not unscrew the screws! Put the mains plug into the installation enclosure. Remove transportation protection device from the rear panel...
... the water line into the installation enclosure. 1. The appliance may be aligned. 7. or Using adhesive tape, tape the power cord to pinch the power cord. Note: However, do not turn the threaded bolts, otherwise the door will no longer be damaged! 5. Do not unscrew the screws! Put the mains plug into the installation enclosure. Remove transportation protection device from the rear panel...
Installation Manual
Page 18
... 5/16" (8 mm) hex nut driver via flexible shaft. 18 It is in alignment with the mark on the appliance is very important to set perfectly levelled. Do not twist or jam the appliance inside the installation enclosure! The height-adjustable feet at the front and rear can all be set this dimension for height adjustment. Front: with open-ended wrench 1/2" (Width across...
... 5/16" (8 mm) hex nut driver via flexible shaft. 18 It is in alignment with the mark on the appliance is very important to set perfectly levelled. Do not twist or jam the appliance inside the installation enclosure! The height-adjustable feet at the front and rear can all be set this dimension for height adjustment. Front: with open-ended wrench 1/2" (Width across...
Installation Manual
Page 22
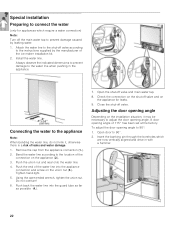
Connecting the water to the instructions supplied by leaking water. 1. Using the open-ended wrench, tighten the union nut. Do not overturn! 6. Push back the water line into the appliance connection and screw on the installation situation, it , otherwise there is a risk of leaks and water damage. 1. Open the shut-off valve. Push the end of the ice maker installation kit. 2. Special installation Preparing to connect the water (only for leaks. 9. Attach the water line to the shut-off...
Connecting the water to the instructions supplied by leaking water. 1. Using the open-ended wrench, tighten the union nut. Do not overturn! 6. Push back the water line into the appliance connection and screw on the installation situation, it , otherwise there is a risk of leaks and water damage. 1. Open the shut-off valve. Push the end of the ice maker installation kit. 2. Special installation Preparing to connect the water (only for leaks. 9. Attach the water line to the shut-off...

Use and Care Manual
Page 3
...your old appliance 5 Installing the appliance 5 Transporting 5 Installation location 5 Ventilation 5 Connecting the appliance 5 Water connection 5 Electrical connection 6 Getting to know your appliance 7 2 door model 7 3 door model 8 Controls 9 Switching the appliance on 10 Operating tips 10 Set the language 10 Setting the temperature unit 10 Setting the temperature 10 Refrigerator compartment 10 Freezer compartment 10 Special functions 11 Setup mode 11 Vacation mode 11 Sabbath mode 11 Energy saving mode 12 Alarm function 12 Refrigerator compartment 12 When purchasing...
...your old appliance 5 Installing the appliance 5 Transporting 5 Installation location 5 Ventilation 5 Connecting the appliance 5 Water connection 5 Electrical connection 6 Getting to know your appliance 7 2 door model 7 3 door model 8 Controls 9 Switching the appliance on 10 Operating tips 10 Set the language 10 Setting the temperature unit 10 Setting the temperature 10 Refrigerator compartment 10 Freezer compartment 10 Special functions 11 Setup mode 11 Vacation mode 11 Sabbath mode 11 Energy saving mode 12 Alarm function 12 Refrigerator compartment 12 When purchasing...
Use and Care Manual
Page 4
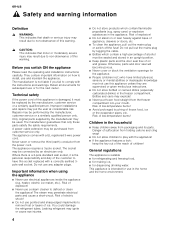
... of the reach of children! heater, electric ice maker, etc.). Risk of electric shock! ■ Do not use electrical appliances inside the appliance (e.g. Leaking refrigerant may penetrate electrical parts and cause a short-circuit. General regulations The appliance is not liable if you switch ON the appliance Please read the operating and installation instructions carefully. The socket may be connected by the manufacturer, customer service or a similarly qualified person only. Important...
... of the reach of children! heater, electric ice maker, etc.). Risk of electric shock! ■ Do not use electrical appliances inside the appliance (e.g. Leaking refrigerant may penetrate electrical parts and cause a short-circuit. General regulations The appliance is not liable if you switch ON the appliance Please read the operating and installation instructions carefully. The socket may be connected by the manufacturer, customer service or a similarly qualified person only. Important...
Use and Care Manual
Page 5
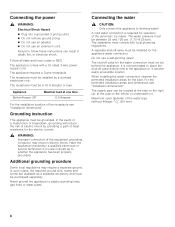
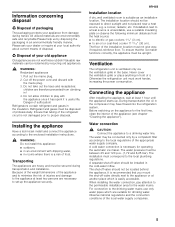
... of the appropriate water supply company. Do not allow children to the local plumbing regulations. Refrigerators contain refrigerant and gases in the base. The floor of the installation location must correspond to play with the mains plug. 3. To ensure that you mount the shut-off valve should be between 25 and 120 p.s.i. (1,72 and 8,25 bar). Water connection , CAUTION: Connect the appliance...
... of the appropriate water supply company. Do not allow children to the local plumbing regulations. Refrigerators contain refrigerant and gases in the base. The floor of the installation location must correspond to play with the mains plug. 3. To ensure that you mount the shut-off valve should be between 25 and 120 p.s.i. (1,72 and 8,25 bar). Water connection , CAUTION: Connect the appliance...
Use and Care Manual
Page 6
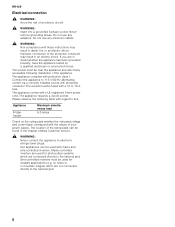
... and sine-controlled inverters. Do not use any extension cables. , WARNING: Non-compliance with these instructions may result in doubt whether the appliance has been grounded properly, have the appliance tested by a qualified electrician or service technician. The appliance complies with a UL registered 3-wire power cord. The location of your power supply. Never remove grounding phase. If you are connected directly to...
... and sine-controlled inverters. Do not use any extension cables. , WARNING: Non-compliance with these instructions may result in doubt whether the appliance has been grounded properly, have the appliance tested by a qualified electrician or service technician. The appliance complies with a UL registered 3-wire power cord. The location of your power supply. Never remove grounding phase. If you are connected directly to...
Use and Care Manual
Page 7
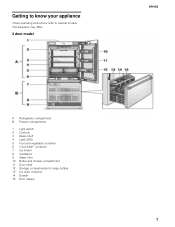
The diagrams may differ. 2 door model en-us A Refrigerator compartment B Freezer compartment 1 Light switch 2 Controls 3 Glass shelf 4 Light (LED) 5 Fruit and vegetable container 6 "Cool-fresh" container 7 Ice maker 8 Ventilation 9 Water filter 10 Butter and cheese compartment 11 Door shelf 12 Storage compartments for large bottles 13 Ice cube container 14 Drawer 15 Door drawer 7 Getting to know your appliance These operating instructions refer to several models.
The diagrams may differ. 2 door model en-us A Refrigerator compartment B Freezer compartment 1 Light switch 2 Controls 3 Glass shelf 4 Light (LED) 5 Fruit and vegetable container 6 "Cool-fresh" container 7 Ice maker 8 Ventilation 9 Water filter 10 Butter and cheese compartment 11 Door shelf 12 Storage compartments for large bottles 13 Ice cube container 14 Drawer 15 Door drawer 7 Getting to know your appliance These operating instructions refer to several models.
Use and Care Manual
Page 9
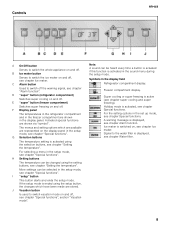
... Special functions. Freezer compartment display. E "super" button (freezer compartment) Switches super freezing on and off . Super cooling or super freezing is activated in the display field Refrigerator compartment display. Activated special functions are shown in the setup mode, see chapter "Setting the temperature". H Setting buttons The temperature can be changed using the setup button, the changes which are available are stored. Ice maker is displayed, see chapter Ice maker. Signal to the water filter is switched on, see chapter Water filter. 9 The menus...
... Special functions. Freezer compartment display. E "super" button (freezer compartment) Switches super freezing on and off . Super cooling or super freezing is activated in the display field Refrigerator compartment display. Activated special functions are shown in the setup mode, see chapter "Setting the temperature". H Setting buttons The temperature can be changed using the setup button, the changes which are available are stored. Ice maker is displayed, see chapter Ice maker. Signal to the water filter is switched on, see chapter Water filter. 9 The menus...
Use and Care Manual
Page 11
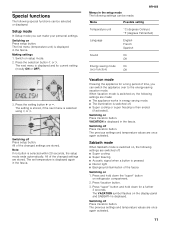
...; The appliance works in energy saving mode. ■ The illumination is switched off. ■ Super cooling or super freezing is then ended (if activated). Press the selection button ¾ or ¿. Press Vacation button. 3. The next menu is selected using ¾ or ¿. Press the setting button @ or A. All of the changed settings are once again activated. VACATION is pressed ■ Interior light ■ Background...
...; The appliance works in energy saving mode. ■ The illumination is switched off. ■ Super cooling or super freezing is then ended (if activated). Press the selection button ¾ or ¿. Press Vacation button. 3. The next menu is selected using ¾ or ¿. Press the setting button @ or A. All of the changed settings are once again activated. VACATION is pressed ■ Interior light ■ Background...
Use and Care Manual
Page 13
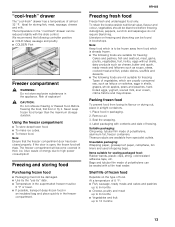
...; The following controller position: ■ COLD: Meat, sausage and poultry ■ COLDER: Fish Freezer compartment , WARNING: Do not store explosive substances in bookshops. Before freezing the food, first boil or fry it. Using the freezer compartment ■ To store deep-frozen food. ■ To make ice cubes. ■ To freeze food. Note: Ensure that the freezer compartment door has been closed...
...; The following controller position: ■ COLD: Meat, sausage and poultry ■ COLDER: Fish Freezer compartment , WARNING: Do not store explosive substances in bookshops. Before freezing the food, first boil or fry it. Using the freezer compartment ■ To store deep-frozen food. ■ To make ice cubes. ■ To freeze food. Note: Ensure that the freezer compartment door has been closed...
Use and Care Manual
Page 14
... position. 2. Ice maker The ice maker makes ice cubes. Switching off Note: Before switching off Press super freezing button. Make sure that ice maker container is its place and locked into position. 2. To prevent an undesirable temperature rise when placing fresh food in the freezer compartment, switch on the type and application, select one of not being used, do not use the ice which the function was switched on the display panel. 1. storage...
... position. 2. Ice maker The ice maker makes ice cubes. Switching off Note: Before switching off Press super freezing button. Make sure that ice maker container is its place and locked into position. 2. To prevent an undesirable temperature rise when placing fresh food in the freezer compartment, switch on the type and application, select one of not being used, do not use the ice which the function was switched on the display panel. 1. storage...

Use and Care Manual
Page 15
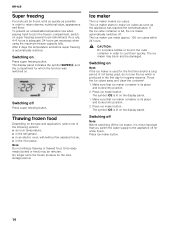
... switching on the ice maker. ■ If the ice has not been used for several weeks or months or if the ice cubes have an unpleasant taste or odor, change display. Turn the filter cap on the base of in a horizontal position, feed the filter cartridge into the opening on the fresh filter cartridge. 6. Take a new filter cartridge from customer service or a specialist dealer. , CAUTION: ■ After installing a new filter, always discard the ice...
... switching on the ice maker. ■ If the ice has not been used for several weeks or months or if the ice cubes have an unpleasant taste or odor, change display. Turn the filter cap on the base of in a horizontal position, feed the filter cartridge into the opening on the fresh filter cartridge. 6. Take a new filter cartridge from customer service or a specialist dealer. , CAUTION: ■ After installing a new filter, always discard the ice...
Use and Care Manual
Page 19
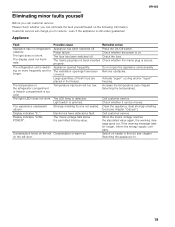
... display does not illuminate. Call customer service. Light switch is secure. Call customer service. If the warning message lasts for The ventilation openings have detected a fault. properly. covered. The light (LED) does not work . Check whether it can eliminate the fault yourself based on more frequently and for longer, inform the energy supply company. Press the On/Off button. Appliance opened frequently. Large quantities of warm air. Clean...
... display does not illuminate. Call customer service. Light switch is secure. Call customer service. If the warning message lasts for The ventilation openings have detected a fault. properly. covered. The light (LED) does not work . Check whether it can eliminate the fault yourself based on more frequently and for longer, inform the energy supply company. Press the On/Off button. Appliance opened frequently. Large quantities of warm air. Clean...
Use and Care Manual
Page 20
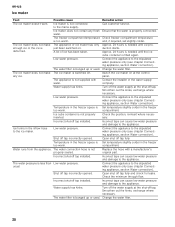
... not make enough ice or the ice is bunged up or used . compartment. Open shut off tap. compartment. Ice maker is not connected to the ice maker. The freezer compartment temperature Check freezer compartment temperature is not properly inserted. and, if required, set slightly colder. Turn off the water supply at the control panel. Ice cube container is too warm. Water runs from the appliance. en-us Ice maker Fault Possible cause Remedial action The ice maker doesn't work. water. The water filter...
... not make enough ice or the ice is bunged up or used . compartment. Open shut off tap. compartment. Ice maker is not connected to the ice maker. The freezer compartment temperature Check freezer compartment temperature is not properly inserted. and, if required, set slightly colder. Turn off the water supply at the control panel. Ice cube container is too warm. Water runs from the appliance. en-us Ice maker Fault Possible cause Remedial action The ice maker doesn't work. water. The water filter...

Use and Care Manual
Page 22
... limited warranty: Thermador will repair or replace all components which have proven material or production faults (without labor costs). ■ 5-year limited warranty on which the serial number was changed, disguised or 22 removed; resetting of Thermador; THIS WARRANTY REPLACES ALL OTHER REPRESENTATIONS EXPRESSED OR IMPLIED. Thermador is in a remote location (more than the normal, usual and designated way (including inter alia any type; (4) Nonobservance of electrical...
... limited warranty: Thermador will repair or replace all components which have proven material or production faults (without labor costs). ■ 5-year limited warranty on which the serial number was changed, disguised or 22 removed; resetting of Thermador; THIS WARRANTY REPLACES ALL OTHER REPRESENTATIONS EXPRESSED OR IMPLIED. Thermador is in a remote location (more than the normal, usual and designated way (including inter alia any type; (4) Nonobservance of electrical...


