Design Guide - Freedom Refrigeration
Page 3
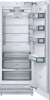
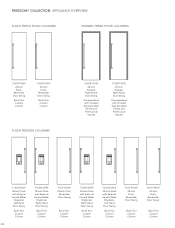
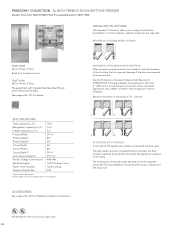
..., Reversible Door Swing Build Your Custom Column T30IR70NSP 30-Inch Flush, Reversible Door Swing Build Your Custom Column FLUSH FREEZER COLUMNS T24BR70FSE 24-Inch Framed, Right-Hand Door Swing Pre-assembled with Chiseled Stainless Steel Panels and Professional Handle T30BR70FSE 30-Inch Framed, Right-Hand Door Swing Pre-assembled with Chiseled Stainless Steel Panels and Professional Handle T18Id80NLP 18-Inch Flush with External Ice and Water Dispenser Left-Hand Door Swing Build Your Custom...
..., Reversible Door Swing Build Your Custom Column T30IR70NSP 30-Inch Flush, Reversible Door Swing Build Your Custom Column FLUSH FREEZER COLUMNS T24BR70FSE 24-Inch Framed, Right-Hand Door Swing Pre-assembled with Chiseled Stainless Steel Panels and Professional Handle T30BR70FSE 30-Inch Framed, Right-Hand Door Swing Pre-assembled with Chiseled Stainless Steel Panels and Professional Handle T18Id80NLP 18-Inch Flush with External Ice and Water Dispenser Left-Hand Door Swing Build Your Custom...

Design Guide - Freedom Refrigeration
Page 4
... External Ice and Water Dispenser, Left-Hand Door Swing Pre-assembled with Chiseled Stainless Steel Panels and Professional Handle T18BF70FSE 18-Inch Framed, Left-Hand Door Swing Pre-assembled with Chiseled Stainless Steel Panels and Professional Handle FLUSH BOTTOM FREEZERS T18IW50NSP 18-Inch Flush, Reversible Door Swing T24IW50NSP 24-Inch Flush, Reversible Door Swing Build Your Custom Column Build Your Custom Column FRAMEd BOTTOM FREEZERS T36IB70NSP 36-Inch Flush 2-Door, Reversible Door Swing Build Your Custom Column...
... External Ice and Water Dispenser, Left-Hand Door Swing Pre-assembled with Chiseled Stainless Steel Panels and Professional Handle T18BF70FSE 18-Inch Framed, Left-Hand Door Swing Pre-assembled with Chiseled Stainless Steel Panels and Professional Handle FLUSH BOTTOM FREEZERS T18IW50NSP 18-Inch Flush, Reversible Door Swing T24IW50NSP 24-Inch Flush, Reversible Door Swing Build Your Custom Column Build Your Custom Column FRAMEd BOTTOM FREEZERS T36IB70NSP 36-Inch Flush 2-Door, Reversible Door Swing Build Your Custom Column...

Design Guide - Freedom Refrigeration
Page 9
The hinge is able to support virtually any custom wood panel you choose. 218 THERMADOR EXCLUSIVE LUMINOUS™ BRIGHT HALOGEN LIGHT TOWERS Luminous Bright Halogen Light Towers and upper halogen spotlights fully illuminate food to prevent items from freezing together, providing constant dispensing of available ice. FREEFLOW™ COLD AIR SYSTEM Our FreeFlow Cold Air System utilizes a cold air channel located behind the door bins to ensure food items stored...
The hinge is able to support virtually any custom wood panel you choose. 218 THERMADOR EXCLUSIVE LUMINOUS™ BRIGHT HALOGEN LIGHT TOWERS Luminous Bright Halogen Light Towers and upper halogen spotlights fully illuminate food to prevent items from freezing together, providing constant dispensing of available ice. FREEFLOW™ COLD AIR SYSTEM Our FreeFlow Cold Air System utilizes a cold air channel located behind the door bins to ensure food items stored...

Design Guide - Freedom Refrigeration
Page 10
... ICE BIN Redesigned ice bin maximizes and improves ice production. WINE PRESERVATION DUAL CONTROL WINE PRESERVATION Store your food stays fresh no transfer of a button, providing increased versatility and the liberty to adjust a fully loaded shelf with dual temperature settings. The hinge is no matter where you to maximize the interior space quickly and easily. FREEDOM REFRIGERATION FREEDOM® COLLECTION FEATURES & BENEFITS BOTTOM FREEZER GLASS TIERED SHELVING...
... ICE BIN Redesigned ice bin maximizes and improves ice production. WINE PRESERVATION DUAL CONTROL WINE PRESERVATION Store your food stays fresh no transfer of a button, providing increased versatility and the liberty to adjust a fully loaded shelf with dual temperature settings. The hinge is no matter where you to maximize the interior space quickly and easily. FREEDOM REFRIGERATION FREEDOM® COLLECTION FEATURES & BENEFITS BOTTOM FREEZER GLASS TIERED SHELVING...

Design Guide - Freedom Refrigeration
Page 11
...-Inch Freezer Column 950 lbs. / 425 kg* (*Without water dispenser) To ensure that fails because of a manufacturing defect. Important: Under no circumstances may occur. The base must be made of the cavity must be checked by suitable means. WARRANTY Limited two-year warranty-for additional warranty details. **Sealed refrigeration system includes compressor, evaporator, condenser, dryer/strainer and connecting tubing. 220 Limited warranty...
...-Inch Freezer Column 950 lbs. / 425 kg* (*Without water dispenser) To ensure that fails because of a manufacturing defect. Important: Under no circumstances may occur. The base must be made of the cavity must be checked by suitable means. WARRANTY Limited two-year warranty-for additional warranty details. **Sealed refrigeration system includes compressor, evaporator, condenser, dryer/strainer and connecting tubing. 220 Limited warranty...

Design Guide - Freedom Refrigeration
Page 12
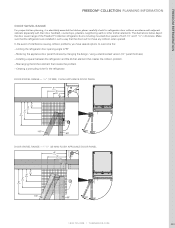
...). FREEdOM REFRIGERATION FREEdOM® COLLECTION PLANNING INFORMATION ELECTRICAL SPECIFICATIONS The appliance comes with local plumbing regulations. UL listed in Electrical Location. The appliance requires a 3-wire receptacle that is installed in doubt as to plastic plumbing lines, gas lines or water pipes. GROUNdING INSTRUCTION This appliance must comply with a 3-wire power supply cord. When installing the water connection, observe the permitted installation areas for the electric current. ELECTRICAL LOCATION SPLIT COLUMN INSTALLATION 18-Inch...
...). FREEdOM REFRIGERATION FREEdOM® COLLECTION PLANNING INFORMATION ELECTRICAL SPECIFICATIONS The appliance comes with local plumbing regulations. UL listed in Electrical Location. The appliance requires a 3-wire receptacle that is installed in doubt as to plastic plumbing lines, gas lines or water pipes. GROUNdING INSTRUCTION This appliance must comply with a 3-wire power supply cord. When installing the water connection, observe the permitted installation areas for the electric current. ELECTRICAL LOCATION SPLIT COLUMN INSTALLATION 18-Inch...

Design Guide - Freedom Refrigeration
Page 13
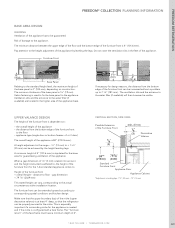
... the original design intent (basic idea). Alternatively you can simply replace any standard size kitchen cabinet with custom made appliance door panels that the appliance will fit into. When planning the installation niche, it is that the side walls are completely fl...refrigerators are used in this design guide, please refer to the following definitions: CASE This is equal to the depth of cabinets (frameless cabinetry) typically do not have any kind of face frame at the front of a kitchen cabinet and is typical for some reason this is not the situation, please make...
... the original design intent (basic idea). Alternatively you can simply replace any standard size kitchen cabinet with custom made appliance door panels that the appliance will fit into. When planning the installation niche, it is that the side walls are completely fl...refrigerators are used in this design guide, please refer to the following definitions: CASE This is equal to the depth of cabinets (frameless cabinetry) typically do not have any kind of face frame at the front of a kitchen cabinet and is typical for some reason this is not the situation, please make...
Design Guide - Freedom Refrigeration
Page 14
..., it is absolutely essential the kitchen planer carefully check for the refrigerator dOOR SWIVEL RANGE - 3/4" (19 MM) FLUSH APPLIANCE dOOR PANEL dOOR SWIVEL RANGE - 1 1/2" (38 MM) FLUSH APPLIANCE dOOR PANEL 1.800.735.4328 | THERMADOR.COM 223 Reducing the appliance door panel thickness by changing the design / using a stainless steel version (3/4" panel thickness). - Installing a spacer between the refrigerator and the kitchen element that creates the collision problem. - The illustrations below depict...
..., it is absolutely essential the kitchen planer carefully check for the refrigerator dOOR SWIVEL RANGE - 3/4" (19 MM) FLUSH APPLIANCE dOOR PANEL dOOR SWIVEL RANGE - 1 1/2" (38 MM) FLUSH APPLIANCE dOOR PANEL 1.800.735.4328 | THERMADOR.COM 223 Reducing the appliance door panel thickness by changing the design / using a stainless steel version (3/4" panel thickness). - Installing a spacer between the refrigerator and the kitchen element that creates the collision problem. - The illustrations below depict...

Design Guide - Freedom Refrigeration
Page 17
...;ned by adding the dimensions of the two single columns. B: Area for installing the power connection D: Opening depth of niche, depending on the right. 48" SxS (18" freezer + 30" refrigerator) A: Area for the power supply and the water line are completely flush! It is strongly recommended the top panel boundary of the niche be placed adjacent to make sure that the furniture...
...;ned by adding the dimensions of the two single columns. B: Area for installing the power connection D: Opening depth of niche, depending on the right. 48" SxS (18" freezer + 30" refrigerator) A: Area for the power supply and the water line are completely flush! It is strongly recommended the top panel boundary of the niche be placed adjacent to make sure that the furniture...

Design Guide - Freedom Refrigeration
Page 19
Single Door Models W Dispenser Models W Bottom Freezer W V Wine Cooler W U M R S H H NH H 4" (102mm) Note #1 F Drawer Door L Note #2 Model Description Max. However 2 ½" (75mm) is a perfect compromise for a wide range of the stainless steel models. The toe kick height, the cabinet height and other relevant dimensions of each 8" (205 mm). As the custom appliance door panels will exceed the appliance door at upper and lower side, please make sure that also the...
Single Door Models W Dispenser Models W Bottom Freezer W V Wine Cooler W U M R S H H NH H 4" (102mm) Note #1 F Drawer Door L Note #2 Model Description Max. However 2 ½" (75mm) is a perfect compromise for a wide range of the stainless steel models. The toe kick height, the cabinet height and other relevant dimensions of each 8" (205 mm). As the custom appliance door panels will exceed the appliance door at upper and lower side, please make sure that also the...
Design Guide - Freedom Refrigeration
Page 20
... the refrigerator can vary, corresponding to the appliance. VERTICAL SECTION, SIDE VIEW: Possible Extension of the Furniture Front Decorative Valance Standard Furniture Front Appliance Door Appliance Cabinet *Adjustment in the feet of the appliance. appliance type (single door or bottom freezer-2 or 3 door) The overall height of the appliance is 4" (101.6 mm). The minimum thickness of the base panel is used to...
... the refrigerator can vary, corresponding to the appliance. VERTICAL SECTION, SIDE VIEW: Possible Extension of the Furniture Front Decorative Valance Standard Furniture Front Appliance Door Appliance Cabinet *Adjustment in the feet of the appliance. appliance type (single door or bottom freezer-2 or 3 door) The overall height of the appliance is 4" (101.6 mm). The minimum thickness of the base panel is used to...

Design Guide - Freedom Refrigeration
Page 24
... used to complete the water cycle inside the appliance when no water filter is necessary. (For fresh food or freezer columns only) REPLFLTR10 REPLACEMENT SCREEN FILTER For fresh food or freezer columns only. This sealing mat protects the connection area from negative effects of the refrigerator door are two different kits available: For single door models and for the secure merging of Thermador Professional Series...
... used to complete the water cycle inside the appliance when no water filter is necessary. (For fresh food or freezer columns only) REPLFLTR10 REPLACEMENT SCREEN FILTER For fresh food or freezer columns only. This sealing mat protects the connection area from negative effects of the refrigerator door are two different kits available: For single door models and for the secure merging of Thermador Professional Series...

Design Guide - Freedom Refrigeration
Page 35
... Ice and Water Dispenser, Left-Hand Door Swing Pre-assembled with Chiseled Stainless Steel Panels and Professional Handle SPECIFICATIONS Total Capacity (cu. Use the Extreme Combination Side-by -side sealing kit (BSEALKIT10) and a 42-inch or 48-inch top frame part to ensure a stable connection. Minimum thickness of the partition 5/8" (16 mm). 1 2 3 4 AT THE END OF A kITCHEN If one side of the furniture fronts to a freezer...
... Ice and Water Dispenser, Left-Hand Door Swing Pre-assembled with Chiseled Stainless Steel Panels and Professional Handle SPECIFICATIONS Total Capacity (cu. Use the Extreme Combination Side-by -side sealing kit (BSEALKIT10) and a 42-inch or 48-inch top frame part to ensure a stable connection. Minimum thickness of the partition 5/8" (16 mm). 1 2 3 4 AT THE END OF A kITCHEN If one side of the furniture fronts to a freezer...
Design Guide - Freedom Refrigeration
Page 43
... Cutout Height Cutout Depth** Door Swing Clearance Annual Energy Consumption Electrical Supply Power Cord Included Shipping Weight (lbs.) 19.6 14.3 5.3 35 3/4'' 84" 24" 36" 84" 24 3/4" 20 21/32" 448 kWh 120V/15 Amp Circuit 120V-3 prong 545 *Depth without door panel **Cutout depth for flush installation with Chiseled Stainless Steel Panels and Professional Handles See pages 230- 231 for permanent connection of installation...
... Cutout Height Cutout Depth** Door Swing Clearance Annual Energy Consumption Electrical Supply Power Cord Included Shipping Weight (lbs.) 19.6 14.3 5.3 35 3/4'' 84" 24" 36" 84" 24 3/4" 20 21/32" 448 kWh 120V/15 Amp Circuit 120V-3 prong 545 *Depth without door panel **Cutout depth for flush installation with Chiseled Stainless Steel Panels and Professional Handles See pages 230- 231 for permanent connection of installation...

User Manual
Page 3
... IMPORTANT SAFETY INSTRUCTIONS 4 Congratulations 5 Your new appliance 6 Installation 7 Installing and connecting the appliance 7 Connection to the power supply 7 Additional grounding procedure 8 Grounding instruction 8 Switching on the appliance 8 Switching off and disconnecting the appliance 8 Functions 8 Variable interior design 9 Control panel 10 Setting the temperature 11 Super function 11 Setup mode 11 Settings which can be changed in setup mode 12 Vacation Mode 13 Sabbath Mode 13 Refrigerating 14 How to save energy 14 Operating noises 14 Defrosting 14 Cleaning the...
... IMPORTANT SAFETY INSTRUCTIONS 4 Congratulations 5 Your new appliance 6 Installation 7 Installing and connecting the appliance 7 Connection to the power supply 7 Additional grounding procedure 8 Grounding instruction 8 Switching on the appliance 8 Switching off and disconnecting the appliance 8 Functions 8 Variable interior design 9 Control panel 10 Setting the temperature 11 Super function 11 Setup mode 11 Settings which can be changed in setup mode 12 Vacation Mode 13 Sabbath Mode 13 Refrigerating 14 How to save energy 14 Operating noises 14 Defrosting 14 Cleaning the...

User Manual
Page 4
... mechanism, or with the Installation Instructions before cleaning and making repairs. NOTE: We strongly recommend that children may result in order to help prevent accidents. IMPORTANT SAFETY INSTRUCTIONS READ AND SAVE THESE INSTRUCTIONS! e WARNING When using this or any servicing be installed by a qualified individual. 9. Before replacing a burnedĆout light bulb, set the POWER switch in the OFF position to turn off the doors. - Have the appliance...
... mechanism, or with the Installation Instructions before cleaning and making repairs. NOTE: We strongly recommend that children may result in order to help prevent accidents. IMPORTANT SAFETY INSTRUCTIONS READ AND SAVE THESE INSTRUCTIONS! e WARNING When using this or any servicing be installed by a qualified individual. 9. Before replacing a burnedĆout light bulb, set the POWER switch in the OFF position to turn off the doors. - Have the appliance...

User Manual
Page 7
... the heavy weight of frost. Installing and connecting the appliance d CAUTION d Have the appliance installed by suitable means, e.g. During transit the oil in an environment with an UL listed, 3Ćwire power supply cord. Plug into a grounded 3 prong outlet. - Have the appliance checked by suitable means. The appliance requires a 3Ćwire receptacle. in the refrigeration system may have moved. After...
... the heavy weight of frost. Installing and connecting the appliance d CAUTION d Have the appliance installed by suitable means, e.g. During transit the oil in an environment with an UL listed, 3Ćwire power supply cord. Plug into a grounded 3 prong outlet. - Have the appliance checked by suitable means. The appliance requires a 3Ćwire receptacle. in the refrigeration system may have moved. After...

User Manual
Page 17
... interior light does not function. Set a warmer temperature (see Changing the bulb"). airtight containers (see Odors"). q Release the cover and remove from the clip. q Attach the cover and connect to appliance before making repairs, reconnect power. Pull out the mains plug or switch off the appliance with bare fingers. The display does not come on more and more frequently and for longer. The ventilation openings are covered. The light switch...
... interior light does not function. Set a warmer temperature (see Changing the bulb"). airtight containers (see Odors"). q Release the cover and remove from the clip. q Attach the cover and connect to appliance before making repairs, reconnect power. Pull out the mains plug or switch off the appliance with bare fingers. The display does not come on more and more frequently and for longer. The ventilation openings are covered. The light switch...

User Manual
Page 19
... obtain assistance or service if you need service, first see the "Troubleshooting" section of this information on the model and serial number label located on the inside wall of the refrigerator compartment. Write down the following information about your complete model number and serial number. q Pull out used odor filter. Phone number: Purchase date: Model number: FD number: Serial number: Type: q Close the filter holder. 19 q ReĆinsert the Temperature Controlled Drawer. Changing the odor filter i Replacement filters are available...
... obtain assistance or service if you need service, first see the "Troubleshooting" section of this information on the model and serial number label located on the inside wall of the refrigerator compartment. Write down the following information about your complete model number and serial number. q Pull out used odor filter. Phone number: Purchase date: Model number: FD number: Serial number: Type: q Close the filter holder. 19 q ReĆinsert the Temperature Controlled Drawer. Changing the odor filter i Replacement filters are available...
User Manual
Page 20
... parts installed by any nonĆdesignated service company during the limited warranty periods. Warranty TWOĆYEAR FULL WARRANTY For two years from the date of purchase, when this refrigerator (excluding the water filter cartridges) is operated and maintained according to instructions attached to or furnished with the product, Thermador will pay for : 1. This warranty gives you specific legal rights, and you how to use...
... parts installed by any nonĆdesignated service company during the limited warranty periods. Warranty TWOĆYEAR FULL WARRANTY For two years from the date of purchase, when this refrigerator (excluding the water filter cartridges) is operated and maintained according to instructions attached to or furnished with the product, Thermador will pay for : 1. This warranty gives you specific legal rights, and you how to use...


