Use and Care Guide
Page 2
... 9 Description 10 Model and Parts Identification - 48" Range 10 Model and Parts Identification - 36" Range 12 Model and Parts Identification - 30" Range 13 Using The Cooktop 14 Cookware Recommendations 18 Specialty Cookware 20 Cooking Recommendations 21 Surface Burner Cooking Recommendations 21 Using the Gas Grill 23...Gas Grill 25 About the 12" and 24" Electric Griddle 27 Griddle Cooking Recommendations 28 Using the Oven 29 Bake 29 Convection 30 Setting Bake/Convection Bake 32 Other Uses of Bake 33 Warm (Secondary Oven 34 Proof (Secondary Oven 34 Baking Recommendations 35 ...
... 9 Description 10 Model and Parts Identification - 48" Range 10 Model and Parts Identification - 36" Range 12 Model and Parts Identification - 30" Range 13 Using The Cooktop 14 Cookware Recommendations 18 Specialty Cookware 20 Cooking Recommendations 21 Surface Burner Cooking Recommendations 21 Using the Gas Grill 23...Gas Grill 25 About the 12" and 24" Electric Griddle 27 Griddle Cooking Recommendations 28 Using the Oven 29 Bake 29 Convection 30 Setting Bake/Convection Bake 32 Other Uses of Bake 33 Warm (Secondary Oven 34 Proof (Secondary Oven 34 Baking Recommendations 35 ...
Use and Care Guide
Page 5
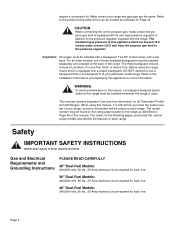
...circuit required for each line. 48" Dual-Fuel Models: 240/208 volts, 60 Hz., 50 Amp electrical circuit required for this manual. The 30" model comes with its own high-pressure regulator in addition to the pressure regulator. Page 2 Before using this appliance must be installed with ... rating plate located on the range as some information will be installed whenever the range is critical that it is used. For all Thermador Professional® Ranges. Make certain your range, as identified on Page 45 of this range must be ordered separately and installed at...
...circuit required for each line. 48" Dual-Fuel Models: 240/208 volts, 60 Hz., 50 Amp electrical circuit required for this manual. The 30" model comes with its own high-pressure regulator in addition to the pressure regulator. Page 2 Before using this appliance must be installed with ... rating plate located on the range as some information will be installed whenever the range is critical that it is used. For all Thermador Professional® Ranges. Make certain your range, as identified on Page 45 of this range must be ordered separately and installed at...
Use and Care Guide
Page 11
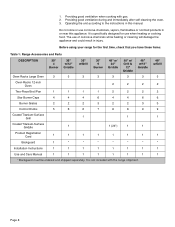
... range shipment. 48" w/Grill 3 2 2 6 3 9 1 1 * 1 1 Page 8 It is specifically designed for the first time, check that you have these items: Table 1: Range Accessories and Parts DESCRIPTION 30" 4 Burner 36" w/12" Griddle 36" w/Grill 36" 6 Burner 48" w/ 24" Griddle 48" w/ Grill & 12" Griddle 48" w/12" Griddle Oven Racks Large Oven 3 3 3 3 3 3 3 Oven Racks 12...
... range shipment. 48" w/Grill 3 2 2 6 3 9 1 1 * 1 1 Page 8 It is specifically designed for the first time, check that you have these items: Table 1: Range Accessories and Parts DESCRIPTION 30" 4 Burner 36" w/12" Griddle 36" w/Grill 36" 6 Burner 48" w/ 24" Griddle 48" w/ Grill & 12" Griddle 48" w/12" Griddle Oven Racks Large Oven 3 3 3 3 3 3 3 Oven Racks 12...
Use and Care Guide
Page 12
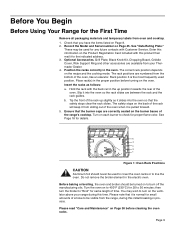
...will keep it from sliding out of the rack up position towards the rear of the range's cooktop. Turn the oven on each burner to 30 minutes; Page 9 Hold the rack with Customer Service. Turn on to 450°F (230°C) for 20 to check for any future ... Page 18 for the First Time Remove all packaging materials and temporary labels from oven and cooktop. 1. Enter this information on the ventilator above your Thermador Dealer. 4. Do not remove the broiler element in the up slightly as follows: a. Before You Begin Before Using Your Range for details. 5 4 3 2 1 Figure ...
...will keep it from sliding out of the rack up position towards the rear of the range's cooktop. Turn the oven on each burner to 30 minutes; Page 9 Hold the rack with Customer Service. Turn on to 450°F (230°C) for 20 to check for any future ... Page 18 for the First Time Remove all packaging materials and temporary labels from oven and cooktop. 1. Enter this information on the ventilator above your Thermador Dealer. 4. Do not remove the broiler element in the up slightly as follows: a. Before You Begin Before Using Your Range for details. 5 4 3 2 1 Figure ...
Use and Care Guide
Page 16
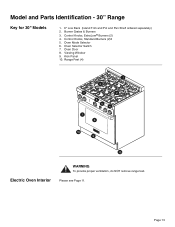
Control Knobs, ExtraLow® Burners (2) 4. Oven Door 8. Viewing Window 9. Oven Selector Switch 7. Model and Parts Identification - 30" Range Key for 30" Models 1. 6" Low Back (Island Trim and Pot and Pan Shelf ordered separately) 2. Page 13 Please see Page 11. Kick Panel 10. Control Knobs, Standard Burners (2)3 5. Range Feet (4) 1 2 3 2 5 6 4 7 8 10 9 10 Electric Oven Interior WARNING To provide proper ventilation, do NOT remove range feet. Oven Mode Selector 6. Burner Grates & Burners 3.
Control Knobs, ExtraLow® Burners (2) 4. Oven Door 8. Viewing Window 9. Oven Selector Switch 7. Model and Parts Identification - 30" Range Key for 30" Models 1. 6" Low Back (Island Trim and Pot and Pan Shelf ordered separately) 2. Page 13 Please see Page 11. Kick Panel 10. Control Knobs, Standard Burners (2)3 5. Range Feet (4) 1 2 3 2 5 6 4 7 8 10 9 10 Electric Oven Interior WARNING To provide proper ventilation, do NOT remove range feet. Oven Mode Selector 6. Burner Grates & Burners 3.

Use and Care Guide
Page 26
.... Page 23 cover, bring liquid to a SIM to desired doneness Same as for Standard Burners Same as for Standard Burners Stir Fry HI - to a boil 30 minutes, or until tender Frozen Deep Frying In Pouch Saute HI - to hold, cover vegetables to hold , cover* HI - maintain frying temperature Same as for...
.... Page 23 cover, bring liquid to a SIM to desired doneness Same as for Standard Burners Same as for Standard Burners Stir Fry HI - to a boil 30 minutes, or until tender Frozen Deep Frying In Pouch Saute HI - to hold, cover vegetables to hold , cover* HI - maintain frying temperature Same as for...
Use and Care Guide
Page 33
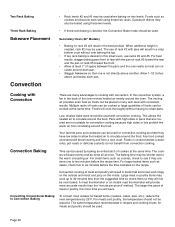
... pan. • Stagger bakeware so that one to two minutes before the time indicated on two levels. For small items such as cookies, check to 30 minutes less than the "minute per pound" method. Convection cooking of cookies at the same time. Large meat or poultry items may be used . The...
... pan. • Stagger bakeware so that one to two minutes before the time indicated on two levels. For small items such as cookies, check to 30 minutes less than the "minute per pound" method. Convection cooking of cookies at the same time. Large meat or poultry items may be used . The...
Use and Care Guide
Page 35
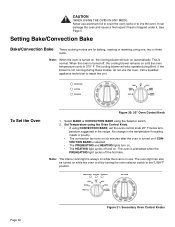
... Bake/Convection Bake Bake/Convection Bake These cooking modes are for baking, roasting or warming using the Selector switch. 2. To Set the Oven Figure 20: 30" Oven Control Knob 1. Select BAKE or CONVECTION BAKE using one, two or three racks. See Page 5. When the oven is in the recipe. Set Temperature...
... Bake/Convection Bake Bake/Convection Bake These cooking modes are for baking, roasting or warming using the Selector switch. 2. To Set the Oven Figure 20: 30" Oven Control Knob 1. Select BAKE or CONVECTION BAKE using one, two or three racks. See Page 5. When the oven is in the recipe. Set Temperature...

Use and Care Guide
Page 38
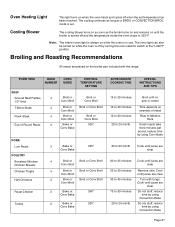
...; 400° 375° 400° TOTAL SUGGESTED COOKING TIME 8 to 12 minutes 25 to 35 minutes 30 to 40 minutes 60 to 75 minutes 20 to 25 minutes 10 to 15 minutes 55 to 70 minutes 14 ...to 19 minutes 35 to 45 minutes 25 to 30 minutes 25 to 30 minutes 12 to 18 minutes 25 to 30 minutes 20 to cook. Liver slices must be turned over 1-1/2 inches thick. ...If you are using the large oven at the same time you preheat the broil element before starting to 30 minutes Tips for optimum results, that you are over regardless of fish, etc.). Convection broil available in the...
...; 400° 375° 400° TOTAL SUGGESTED COOKING TIME 8 to 12 minutes 25 to 35 minutes 30 to 40 minutes 60 to 75 minutes 20 to 25 minutes 10 to 15 minutes 55 to 70 minutes 14 ...to 19 minutes 35 to 45 minutes 25 to 30 minutes 25 to 30 minutes 12 to 18 minutes 25 to 30 minutes 20 to cook. Liver slices must be turned over 1-1/2 inches thick. ...If you are using the large oven at the same time you preheat the broil element before starting to 30 minutes Tips for optimum results, that you are over regardless of fish, etc.). Convection broil available in the...
Use and Care Guide
Page 40
... with the range. reduce time by using Conv Bake 20 to 25 min/lb Cook until juices are clear 20 to 25 minutes 25 to 30 minutes 30 to 45 minutes 75 to 90 minutes 20 to Medium Rare Small roasts take more minutes per pound; FOOD ITEM RACK NUMBER OVEN MODE...
... with the range. reduce time by using Conv Bake 20 to 25 min/lb Cook until juices are clear 20 to 25 minutes 25 to 30 minutes 30 to 45 minutes 75 to 90 minutes 20 to Medium Rare Small roasts take more minutes per pound; FOOD ITEM RACK NUMBER OVEN MODE...
Use and Care Guide
Page 42
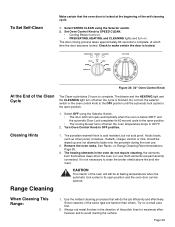
Check to make certain the door is acid resistant, but not acid proof. Figure 23: 30" Oven Control Knob At the End of the polish lines for maximum effectiveness and to avoid marring the surface. Do not turn the selector switch ...
Check to make certain the door is acid resistant, but not acid proof. Figure 23: 30" Oven Control Knob At the End of the polish lines for maximum effectiveness and to avoid marring the surface. Do not turn the selector switch ...
