
Design Guide - Built-In Microwaves
Page 4
.... MODEL MBES MBESLFTD MCES REQuIRED CIRCuIT BREAKER 240V, 60 Hz 20 Amp 20 Amp 20 Amp ELECTRICAL LOCATION The outlet must be properly grounded in the backwall directly behind a coordinating stainless steel door with either a Masterpiece® or Professional Handle for complete details before installing. Note: See page 207 for electrical location for additional warranty details. Before installing a Thermador microwave oven, be operated with all applicable codes. CAUTIOn: Electrical appliances must be installed...
.... MODEL MBES MBESLFTD MCES REQuIRED CIRCuIT BREAKER 240V, 60 Hz 20 Amp 20 Amp 20 Amp ELECTRICAL LOCATION The outlet must be properly grounded in the backwall directly behind a coordinating stainless steel door with either a Masterpiece® or Professional Handle for complete details before installing. Note: See page 207 for electrical location for additional warranty details. Before installing a Thermador microwave oven, be operated with all applicable codes. CAUTIOn: Electrical appliances must be installed...
Design Guide - Built-In Microwaves
Page 5
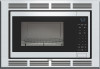
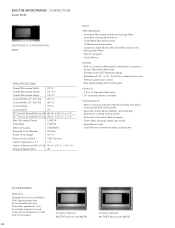
... performance - 1,200 Watts Microwave power - 10 Microwave power levels - Automatic Smart Sensor Reheat - cavity - 16 1/2" recessed glass turntable CONVENIENCE - Quick Minute conveniently adds cooking time ACCESSORIES TRIM KITS Designed for a sleek built-in installation Only. Microwave Power 1,200 W Total Watts 1,460 W Electrical Supply 120V/60Hz Required Circuit Breaker 20 Amp Power Cord Length 41 5/16'' Power Cord Included 120V-3 prong Interior Capacity (cu. ft.) 2.1 Interior Dimensions (W x H x D) 18 7/16'' x 10 15/16'' x 18 1/2'' Shipping Weight (lbs.) 40 MBES...
... performance - 1,200 Watts Microwave power - 10 Microwave power levels - Automatic Smart Sensor Reheat - cavity - 16 1/2" recessed glass turntable CONVENIENCE - Quick Minute conveniently adds cooking time ACCESSORIES TRIM KITS Designed for a sleek built-in installation Only. Microwave Power 1,200 W Total Watts 1,460 W Electrical Supply 120V/60Hz Required Circuit Breaker 20 Amp Power Cord Length 41 5/16'' Power Cord Included 120V-3 prong Interior Capacity (cu. ft.) 2.1 Interior Dimensions (W x H x D) 18 7/16'' x 10 15/16'' x 18 1/2'' Shipping Weight (lbs.) 40 MBES...
Design Guide - Built-In Microwaves
Page 6
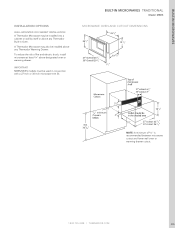
... MICROWAVE OVEn AnD CUTOUT DIMEnSIOnS 12 27 Overall 26 30 Overall 29 NOTE: A minimum of fire and electric shock, install microwave at least 3/4" above any Thermador Built-in conjunction with a 27-inch or 30-inch microwave trim kit. To reduce the risk of 3/4" is recommended between microwave cutout and lower wall oven or warming drawer cutout. 1.800.735.4328 | THERMADOR.COM 205 IMPORTANT MBES/MCES models must be installed into a cabinet...
... MICROWAVE OVEn AnD CUTOUT DIMEnSIOnS 12 27 Overall 26 30 Overall 29 NOTE: A minimum of fire and electric shock, install microwave at least 3/4" above any Thermador Built-in conjunction with a 27-inch or 30-inch microwave trim kit. To reduce the risk of 3/4" is recommended between microwave cutout and lower wall oven or warming drawer cutout. 1.800.735.4328 | THERMADOR.COM 205 IMPORTANT MBES/MCES models must be installed into a cabinet...

Design Guide - Built-In Microwaves
Page 7
... & PROfESSIONAL MBESLFTD For use with microwave MBESLFTD only). 206 MASTERPIECE SERIES LIfT DOOR LFTD30M PROfESSIONAL SERIES LIfT DOOR LFTD30P Microwave Power 1,200 W Total Watts 1,460 W Electrical Supply 120V/60Hz Required Circuit Breaker 20 Amp Power Cord Length 41 5/16'' Power Cord Included 120V-3 prong Interior Capacity (cu. Innovative Microwave Inverter technology offers consistent cooking performance - 1,200 Watts Microwave power - 10 Microwave power levels - automatically determines cooking level and time - Popcorn program - Premium glass touch control -
... & PROfESSIONAL MBESLFTD For use with microwave MBESLFTD only). 206 MASTERPIECE SERIES LIfT DOOR LFTD30M PROfESSIONAL SERIES LIfT DOOR LFTD30P Microwave Power 1,200 W Total Watts 1,460 W Electrical Supply 120V/60Hz Required Circuit Breaker 20 Amp Power Cord Length 41 5/16'' Power Cord Included 120V-3 prong Interior Capacity (cu. Innovative Microwave Inverter technology offers consistent cooking performance - 1,200 Watts Microwave power - 10 Microwave power levels - automatically determines cooking level and time - Popcorn program - Premium glass touch control -
Design Guide - Built-In Microwaves
Page 8
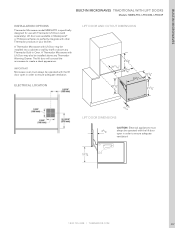
... be installed into a cabinet or wall by itself or above any Thermador Built-in order to create a sleek appearance. A Thermador Microwave with other Thermador products in order to ensure adequate ventilation! 1.800.735.4328 | THERMADOR.COM 207 A Thermador Microwave with the lift door open in your kitchen. IMPORTANT Microwave oven must always be operated with Lift Door may be installed above any Thermador Warming Drawer. ELECTRICAL LOCATION LIFT DOOR AnD CUTOUT DIMEnSIOnS LIFT DOOR DIMEnSIOnS CAuTION: Electrical appliances...
... be installed into a cabinet or wall by itself or above any Thermador Built-in order to create a sleek appearance. A Thermador Microwave with other Thermador products in order to ensure adequate ventilation! 1.800.735.4328 | THERMADOR.COM 207 A Thermador Microwave with the lift door open in your kitchen. IMPORTANT Microwave oven must always be operated with Lift Door may be installed above any Thermador Warming Drawer. ELECTRICAL LOCATION LIFT DOOR AnD CUTOUT DIMEnSIOnS LIFT DOOR DIMEnSIOnS CAuTION: Electrical appliances...
Design Guide - Built-In Microwaves
Page 9
... Weight (lbs.) 40 MCES PERFORMANCE - Quick Defrost DESIgN - Premium glass touch control - Stainless Steel cavity - 15" recessed ceramic turntable CONVENIENCE - Timer offers automatic delay start mode - Innovative Microwave Inverter technology offers consistent cooking performance - 1,000 Watts Microwave power - 10 Microwave power levels - Popcorn program - Built-in Convection Microwave is the perfect companion for built-in installation Only. ft. Sensor cooking programs measure humidity and adjust cooking level and cooking time - automatically determines cooking level and time...
... Weight (lbs.) 40 MCES PERFORMANCE - Quick Defrost DESIgN - Premium glass touch control - Stainless Steel cavity - 15" recessed ceramic turntable CONVENIENCE - Timer offers automatic delay start mode - Innovative Microwave Inverter technology offers consistent cooking performance - 1,000 Watts Microwave power - 10 Microwave power levels - Popcorn program - Built-in Convection Microwave is the perfect companion for built-in installation Only. ft. Sensor cooking programs measure humidity and adjust cooking level and cooking time - automatically determines cooking level and time...

Design Guide - Built-In Microwaves
Page 10
... A Thermador Microwave may be installed into a cabinet or wall by itself or above any Thermador Warming Drawer. BUILT-IN MICROWAVES CONVECTION Model: MCES MICROWAVE OVEN AND CUTOUT DIMENSIONS 27 Overall 26 30 Overall 29 NOTE: A minimum of fire and electric shock, install microwave at least 3/4" above designated oven or warming drawer. BUILT-IN MICROWAVES INSTALLATION OPTIONS WALL-MOUNTEd OR CABINET INSTALLATION A Thermador Microwave may also be installed above any Thermador Built-in conjunction with a 27-inch or 30-inch microwave trim kit. IMPORTANT...
... A Thermador Microwave may be installed into a cabinet or wall by itself or above any Thermador Warming Drawer. BUILT-IN MICROWAVES CONVECTION Model: MCES MICROWAVE OVEN AND CUTOUT DIMENSIONS 27 Overall 26 30 Overall 29 NOTE: A minimum of fire and electric shock, install microwave at least 3/4" above designated oven or warming drawer. BUILT-IN MICROWAVES INSTALLATION OPTIONS WALL-MOUNTEd OR CABINET INSTALLATION A Thermador Microwave may also be installed above any Thermador Built-in conjunction with a 27-inch or 30-inch microwave trim kit. IMPORTANT...

Installation Instructions
Page 2
... Safety 1 Important Safety Instructions 1 Installation 3 Before you Begin 3 Trim Kits 3 Combination with Wall Ovens 3 Tools and Parts Needed 3 Parts Included 4 Power Requirements 4 Cabinet Cutout Dimensions 5 Outlet Area 5 Installation Procedure 6 Prepare the Appliance 6 Prepare Cabinet Cutout 8 Connect to hearing from you! Huntington Beach, CA 92649 Questions? 1-800-735-4328 www.thermador.com We look forward to Electricity 9 Install the Appliance 10 Service 11 Before Calling Service 11 Data Plate 11 This Thermador Appliance is made...
... Safety 1 Important Safety Instructions 1 Installation 3 Before you Begin 3 Trim Kits 3 Combination with Wall Ovens 3 Tools and Parts Needed 3 Parts Included 4 Power Requirements 4 Cabinet Cutout Dimensions 5 Outlet Area 5 Installation Procedure 6 Prepare the Appliance 6 Prepare Cabinet Cutout 8 Connect to hearing from you! Huntington Beach, CA 92649 Questions? 1-800-735-4328 www.thermador.com We look forward to Electricity 9 Install the Appliance 10 Service 11 Before Calling Service 11 Data Plate 11 This Thermador Appliance is made...

Installation Instructions
Page 3
... INSTRUCTIONS APPLIANCE HANDLING SAFETY SAFETY CODES AND STANDARDS ELECTRIC SAFETY m WARNING: When properly cared for, your new appliance has been designed to specific installations. This appliance complies with a cord and plug, do not cut or remove the ground prong. For appliances equipped with one or more of the following pages. Installer - These precautions will reduce the risk of the circuit breaker or fuse...
... INSTRUCTIONS APPLIANCE HANDLING SAFETY SAFETY CODES AND STANDARDS ELECTRIC SAFETY m WARNING: When properly cared for, your new appliance has been designed to specific installations. This appliance complies with a cord and plug, do not cut or remove the ground prong. For appliances equipped with one or more of the following pages. Installer - These precautions will reduce the risk of the circuit breaker or fuse...
Installation Instructions
Page 4
... repaired, replaced, or adjusted by a qualified technician. MICROWAVE SAFETY PRECAUTIONS TO BE OBSERVED BEFORE AND DURING SERVICING TO AVOID POSSIBLE EXPOSURE TO EXCESSIVE MICROWAVE ENERGY (a) Do not operate or allow children to play with packaging material. Destroy the packaging after unpacking the appliance. For example, do not remove leveling legs, panels, wire covers or anti-tip brackets/screws. The plug must be grounded. Installation, electrical...
... repaired, replaced, or adjusted by a qualified technician. MICROWAVE SAFETY PRECAUTIONS TO BE OBSERVED BEFORE AND DURING SERVICING TO AVOID POSSIBLE EXPOSURE TO EXCESSIVE MICROWAVE ENERGY (a) Do not operate or allow children to play with packaging material. Destroy the packaging after unpacking the appliance. For example, do not remove leveling legs, panels, wire covers or anti-tip brackets/screws. The plug must be grounded. Installation, electrical...

User Manual
Page 5
... of table or counter. Do not immerse cord or plug in a wet basement, near a swimming pool, or similar locations. Install or locate this appliance, unless closely supervised by qualified service personnel. Some products such as described in radiation leaks. for industrial or laboratory use of the door and oven that because a child has mastered one cooking skill he/she can cook everything. The use .
... of table or counter. Do not immerse cord or plug in a wet basement, near a swimming pool, or similar locations. Install or locate this appliance, unless closely supervised by qualified service personnel. Some products such as described in radiation leaks. for industrial or laboratory use of the door and oven that because a child has mastered one cooking skill he/she can cook everything. The use .

User Manual
Page 6
... any adjustments or repairs to Door, Control Panel Frame, Safety Interlock Switches, or any other combustible materials are placed inside the oven ignite, keep oven door closed, turn oven off, and disconnect the power cord, or shut off power at the fuse or circuit breaker panel. Carefully attend appliance when paper, plastic, or other part of oven, microwave leakage may cause sparks and result in use the cavity for cooking. Liquids, such as...
... any adjustments or repairs to Door, Control Panel Frame, Safety Interlock Switches, or any other combustible materials are placed inside the oven ignite, keep oven door closed, turn oven off, and disconnect the power cord, or shut off power at the fuse or circuit breaker panel. Carefully attend appliance when paper, plastic, or other part of oven, microwave leakage may cause sparks and result in use the cavity for cooking. Liquids, such as...
User Manual
Page 7
... Tray in either direction. 3. Verify that the Ceramic Tray is not present to controls may cause sparking. Use only the Ceramic Tray specifically designed for proper heating. Do not cook directly on a rack set in a microwave safe dish, or on the Ceramic Tray. Always place food in a microwave safe dish. 6. If food or utensil on the Ceramic Tray touches oven walls, causing the tray to stop moving, the tray will reflect continuously throughout the oven...
... Tray in either direction. 3. Verify that the Ceramic Tray is not present to controls may cause sparking. Use only the Ceramic Tray specifically designed for proper heating. Do not cook directly on a rack set in a microwave safe dish, or on the Ceramic Tray. Always place food in a microwave safe dish. 6. If food or utensil on the Ceramic Tray touches oven walls, causing the tray to stop moving, the tray will reflect continuously throughout the oven...

User Manual
Page 8
... a wall cabinet use an adapter. 8 D Do not remove ground prong. It is enquipped with a cord having a grounding wire with the kit. ř WARNING:ĄImproper use . For proper operation, the oven must be plugged into properly installed and grounded 3 prong outlet. D Do not block air vents. This appliance is not approved or tested for household use . INSTALLATION & GROUNDING INSTRUCTIONS Examine Your Oven Placement of Oven Installation Grounding Instructions Unpack oven, remove all instructions...
... a wall cabinet use an adapter. 8 D Do not remove ground prong. It is enquipped with a cord having a grounding wire with the kit. ř WARNING:ĄImproper use . For proper operation, the oven must be plugged into properly installed and grounded 3 prong outlet. D Do not block air vents. This appliance is not approved or tested for household use . INSTALLATION & GROUNDING INSTRUCTIONS Examine Your Oven Placement of Oven Installation Grounding Instructions Unpack oven, remove all instructions...
User Manual
Page 9
... the oven. A short powerĆsupply cord is the responsibility of the microwave oven may cause interference to part 18 of a table or counter. 3. Operation of the user to your radio, TV or similar equpment. It is provided to correct the interference: D Clean door and sealing surface of the radio or television. Power Supply Wiring Requirements TV / Radio Interference 1. If a long cord or extension cord is...
... the oven. A short powerĆsupply cord is the responsibility of the microwave oven may cause interference to part 18 of a table or counter. 3. Operation of the user to your radio, TV or similar equpment. It is provided to correct the interference: D Clean door and sealing surface of the radio or television. Power Supply Wiring Requirements TV / Radio Interference 1. If a long cord or extension cord is...

User Manual
Page 10
... eggs and cooking SCRAMBLED eggs is also available. In addition, the combination oven cannot maintain the food at the fuse or circuit breaker panel. D Do not dry meats, herbs, fruits or vegetables in your microwave oven without the shell. Disconnect the power cord or shut off and leave oven door closed jar. D Potatoes, apples, whole squash and sausages are not followed, the popcorn may...
... eggs and cooking SCRAMBLED eggs is also available. In addition, the combination oven cannot maintain the food at the fuse or circuit breaker panel. D Do not dry meats, herbs, fruits or vegetables in your microwave oven without the shell. Disconnect the power cord or shut off and leave oven door closed jar. D Potatoes, apples, whole squash and sausages are not followed, the popcorn may...
User Manual
Page 38
.... After use oven cleaners on the outside of the oven door. To help loosen soil before cleaning, heat 500 ml (2 cups) of the oven is important to seep into ventilation openings. Steam will condense on the oven walls and door. Unplug oven at High power for 5 minutes or until boiling. The interior of water in the proper position and press Pause/Stop Pad to the oven. Wipe...
.... After use oven cleaners on the outside of the oven door. To help loosen soil before cleaning, heat 500 ml (2 cups) of the oven is important to seep into ventilation openings. Steam will condense on the oven walls and door. Unplug oven at High power for 5 minutes or until boiling. The interior of water in the proper position and press Pause/Stop Pad to the oven. Wipe...
User Manual
Page 39
When cleaning the Control Panel, leave the oven door open to prevent the oven from the oven vents. Remove and wash in warm soapy water or in the proper position. Clean the bottom surface of the oven with the microwave oven. The oven has an odor and generates smoke when using the Bake function. D During cooking, steam and warm air are normal: The oven causes interference with my TV...
When cleaning the Control Panel, leave the oven door open to prevent the oven from the oven vents. Remove and wash in warm soapy water or in the proper position. Clean the bottom surface of the oven with the microwave oven. The oven has an odor and generates smoke when using the Bake function. D During cooking, steam and warm air are normal: The oven causes interference with my TV...

User Manual
Page 40
... Care and Cleaning of your Microwave oven. See section Settings. 40 Remove plug from the Ceramic Tray. There is tripped or blown. Another program has not been entered correctly. Reset circuit breaker or replace fuse. Start Pad was activated. Press Pause/Stop Pad to the Operating Instructions. Program again according to cancel the previous program and program again. with the outlet. The CHILD LOCK was not pressed after programming. Circuit breaker or fuse is a problem...
... Care and Cleaning of your Microwave oven. See section Settings. 40 Remove plug from the Ceramic Tray. There is tripped or blown. Another program has not been entered correctly. Reset circuit breaker or replace fuse. Start Pad was activated. Press Pause/Stop Pad to the Operating Instructions. Program again according to cancel the previous program and program again. with the outlet. The CHILD LOCK was not pressed after programming. Circuit breaker or fuse is a problem...

User Manual
Page 42
... other connecting facilities. The warranty is installed in residential applications; Service must be defective due to materials and workmanship. D Service by the original purchaser during the warranty period, the new owner continues to improper installation. All repair and replacement parts found to be purchased through the Canadian distribution channel to appliances used in a location with local electrical codes or plumbing codes, or improper storage of...
... other connecting facilities. The warranty is installed in residential applications; Service must be defective due to materials and workmanship. D Service by the original purchaser during the warranty period, the new owner continues to improper installation. All repair and replacement parts found to be purchased through the Canadian distribution channel to appliances used in a location with local electrical codes or plumbing codes, or improper storage of...


