Data Sheet
Page 1
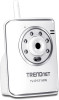
...up to 32 TRENDnet cameras with Wi-Fi Protected Setup (WPS). Wireless n technology provides unsurpassed wireless coverage and improved streaming video quality. SecurView Wireless N Day/Night Internet Camera TV-IP121WN(V1.0R) The SecurView Wireless N Day/Night Internet Camera (model TV-IP121WN) transmits real-...time high quality video over the Internet. Add this camera to your wireless network at up to 30 frames per...
...up to 32 TRENDnet cameras with Wi-Fi Protected Setup (WPS). Wireless n technology provides unsurpassed wireless coverage and improved streaming video quality. SecurView Wireless N Day/Night Internet Camera TV-IP121WN(V1.0R) The SecurView Wireless N Day/Night Internet Camera (model TV-IP121WN) transmits real-...time high quality video over the Internet. Add this camera to your wireless network at up to 30 frames per...
Data Sheet
Page 2
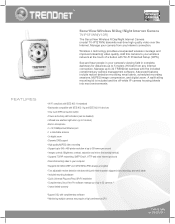
SecurView Wireless N Day/Night Internet Camera TV-IP121WN(V1.0R) SPECIFICATIONS Camera General Image & Video Hardware Network LED Reset Button Power Consumption...8226; Restore to factory default • 6 Watts (max.) • 5V, 2.5A external power adapter • 70 x 100 x 57mm (2.7 x 3.9 x 3.0 in.) • Camera: 155g (5.5 oz.) • Stand: 135g (4.8 oz.) • Operating: 0°C ~ 45°C (32°F ~ 113°F) • Storage: -15°C ~ 60... type: continuous, schedule or motion detection with software • HTTP port: 80 (default) • 3x TV-IP121WN rev: 02.02.2011
SecurView Wireless N Day/Night Internet Camera TV-IP121WN(V1.0R) SPECIFICATIONS Camera General Image & Video Hardware Network LED Reset Button Power Consumption...8226; Restore to factory default • 6 Watts (max.) • 5V, 2.5A external power adapter • 70 x 100 x 57mm (2.7 x 3.9 x 3.0 in.) • Camera: 155g (5.5 oz.) • Stand: 135g (4.8 oz.) • Operating: 0°C ~ 45°C (32°F ~ 113°F) • Storage: -15°C ~ 60... type: continuous, schedule or motion detection with software • HTTP port: 80 (default) • 3x TV-IP121WN rev: 02.02.2011
Data Sheet
Page 3
... most recent product information please visit http://www.trendnet.com Copyright ©TRENDnet.All Rights Reserved. Other Brands and product names are trademarks of their respective holders. Information provided in this document pertain to change at any time, without notice. SecurView Wireless N Day/Night Internet Camera TV-IP121WN(V1.0R) SPECIFICATIONS Settings Dynamic DNS Time...
... most recent product information please visit http://www.trendnet.com Copyright ©TRENDnet.All Rights Reserved. Other Brands and product names are trademarks of their respective holders. Information provided in this document pertain to change at any time, without notice. SecurView Wireless N Day/Night Internet Camera TV-IP121WN(V1.0R) SPECIFICATIONS Settings Dynamic DNS Time...
User's Guide
Page 2
... and configuration values in dark environments. The camera can access and control it using the web browser on operating SecurView™ Pro software. The actual settings depend on how to use this guide are for purchasing the TV-IP121WN, a powerful and high-quality image SecurView Wireless... Day/Night Internet Camera. Preface Thank you for reference only. This User Guide provides you through the configuration of the...
... and configuration values in dark environments. The camera can access and control it using the web browser on operating SecurView™ Pro software. The actual settings depend on how to use this guide are for purchasing the TV-IP121WN, a powerful and high-quality image SecurView Wireless... Day/Night Internet Camera. Preface Thank you for reference only. This User Guide provides you through the configuration of the...
User's Guide
Page 3
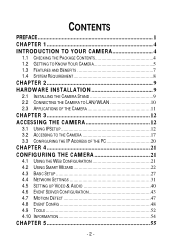
... AND BENEFITS 7 1.4 SYSTEM REQUIREMENT 8 CHAPTER 2 9 HARDWARE INSTALLATION 9 2.1 INSTALLING THE CAMERA STAND 9 2.2 CONNECTING THE CAMERA TO LAN/WLAN 10 2.3 APPLICATIONS OF THE CAMERA 11 CHAPTER 3 12 ACCESSING THE CAMERA 12 3.1 USING IPSETUP 12 3.2 ACCESSING TO THE CAMERA 17 3.3 CONFIGURING THE IP ADDRESS OF THE PC 20 CHAPTER 4 21 CONFIGURING THE CAM ERA 21 4.1 USING THE WEB...
... AND BENEFITS 7 1.4 SYSTEM REQUIREMENT 8 CHAPTER 2 9 HARDWARE INSTALLATION 9 2.1 INSTALLING THE CAMERA STAND 9 2.2 CONNECTING THE CAMERA TO LAN/WLAN 10 2.3 APPLICATIONS OF THE CAMERA 11 CHAPTER 3 12 ACCESSING THE CAMERA 12 3.1 USING IPSETUP 12 3.2 ACCESSING TO THE CAMERA 17 3.3 CONFIGURING THE IP ADDRESS OF THE PC 20 CHAPTER 4 21 CONFIGURING THE CAM ERA 21 4.1 USING THE WEB...
User's Guide
Page 4
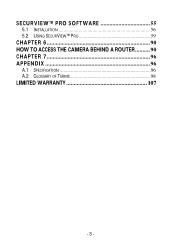
SECURVIEW™ PRO SOFT WARE 55 5.1 INSTALLATION 56 5.2 USING SECURVIEW™ PRO 59 CHAPTER 6 90 HOW TO ACCESS THE CAMERA BEHIND A ROUTER.......... 90 CHAPTER 7 96 APPENDIX 96 A.1 SPECIFICATION 96 A.2 GLOSSARY OF TERMS 98 LIMITED WARRANTY 107 - 3 -
SECURVIEW™ PRO SOFT WARE 55 5.1 INSTALLATION 56 5.2 USING SECURVIEW™ PRO 59 CHAPTER 6 90 HOW TO ACCESS THE CAMERA BEHIND A ROUTER.......... 90 CHAPTER 7 96 APPENDIX 96 A.1 SPECIFICATION 96 A.2 GLOSSARY OF TERMS 98 LIMITED WARRANTY 107 - 3 -

User's Guide
Page 5
You should have the following: TV-IP121WN 1 x CD-ROM (Utility & User's Guide) 1 x Multi-Language Quick Installation Guide 1 x External antenna 1 x 5V 2.5A power adapter 1 x Network cable 1 x Camera stand. NOTE: If there is any packaging content missing, please contact with your local authorized dealer for replacement. - 4 - CHAPTER 1 INTRODUCTION TO YOUR CAMERA 1.1 Checking the Package Contents Check the items contained in the package carefully.
You should have the following: TV-IP121WN 1 x CD-ROM (Utility & User's Guide) 1 x Multi-Language Quick Installation Guide 1 x External antenna 1 x 5V 2.5A power adapter 1 x Network cable 1 x Camera stand. NOTE: If there is any packaging content missing, please contact with your local authorized dealer for replacement. - 4 - CHAPTER 1 INTRODUCTION TO YOUR CAMERA 1.1 Checking the Package Contents Check the items contained in the package carefully.

User's Guide
Page 6
Built-in Microphone: It allows the camera to Know Your Camera - 1.2 Getting to receive the sound or voice - 5 -
Built-in Microphone: It allows the camera to Know Your Camera - 1.2 Getting to receive the sound or voice - 5 -

User's Guide
Page 7
...It is used to the environmental light level. - LAN Port: It is pressed continuously for three seconds or when Power LED begins to your camera to the camera. - Reset Button: Rest will begin to flash. - 6 - Release the reset button and the Power LED will be initiated when the reset...: Connects the AC power adapter to supply power to capture clear images in a dark environment. - Power LED: A steady orange light indicates the camera is pressed once. Factory Reset will be initiated when the reset button is powered on and off the Infrared LEDs according to connect the network...
...It is used to the environmental light level. - LAN Port: It is pressed continuously for three seconds or when Power LED begins to your camera to the camera. - Reset Button: Rest will begin to flash. - 6 - Release the reset button and the Power LED will be initiated when the reset...: Connects the AC power adapter to supply power to capture clear images in a dark environment. - Power LED: A steady orange light indicates the camera is pressed once. Factory Reset will be initiated when the reset button is powered on and off the Infrared LEDs according to connect the network...
User's Guide
Page 8
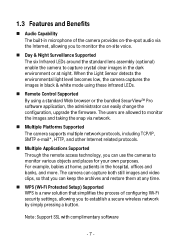
... the on-site voice. Day & Night Surveillance Supported The six Infrared LEDs around the standard lens assembly (optional) enable the camera to capture crystal clear images in the dark environment or at night. The users are allowed to monitor the images and taking the snap ... for your own purposes. Note: Support SSL with complimentary software - 7 - When the Light Sensor detects the environmental light level becomes low, the camera captures the images in black & white mode using these infrared LEDs. Remote Control Supported By using a standard Web browser or the bundled ...
... the on-site voice. Day & Night Surveillance Supported The six Infrared LEDs around the standard lens assembly (optional) enable the camera to capture crystal clear images in the dark environment or at night. The users are allowed to monitor the images and taking the snap ... for your own purposes. Note: Support SSL with complimentary software - 7 - When the Light Sensor detects the environmental light level becomes low, the camera captures the images in black & white mode using these infrared LEDs. Remote Control Supported By using a standard Web browser or the bundled ...
User's Guide
Page 9
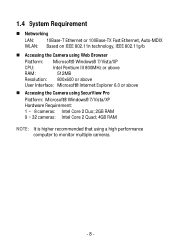
... Ethernet or 100Base-TX Fast Ethernet, Auto-MDIX WLAN: Based on IEEE 802.11n technology, IEEE 802.11g/b Accessing the Camera using Web Browser Platform: Microsoft® Windows® 7/Vista/XP CPU: Intel Pentium III 800MHz or above RAM: 512MB Resolution: 800x600...above User Interface: Microsoft® Internet Explorer 6.0 or above Accessing the Camera using SecurView Pro Platform: Microsoft® Windows® 7/Vista/XP Hardware Requirement: 1 ~ 8 cameras: Intel Core 2 Duo; 2GB RAM 9 ~ 32 cameras: Intel Core 2 Quad; 4GB RAM NOTE: It is higher recommended that using...
... Ethernet or 100Base-TX Fast Ethernet, Auto-MDIX WLAN: Based on IEEE 802.11n technology, IEEE 802.11g/b Accessing the Camera using Web Browser Platform: Microsoft® Windows® 7/Vista/XP CPU: Intel Pentium III 800MHz or above RAM: 512MB Resolution: 800x600...above User Interface: Microsoft® Internet Explorer 6.0 or above Accessing the Camera using SecurView Pro Platform: Microsoft® Windows® 7/Vista/XP Hardware Requirement: 1 ~ 8 cameras: Intel Core 2 Duo; 2GB RAM 9 ~ 32 cameras: Intel Core 2 Quad; 4GB RAM NOTE: It is higher recommended that using...
User's Guide
Page 10
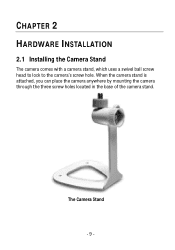
When the camera stand is attached, you can place the camera anywhere by mounting the camera through the three screw holes located in the base of the camera stand. The Camera Stand - 9 - CHAPTER 2 HARDWARE INSTALLATION 2.1 Installing the Camera Stand The camera comes with a camera stand, which uses a swivel ball screw head to lock to the camera's screw hole.
When the camera stand is attached, you can place the camera anywhere by mounting the camera through the three screw holes located in the base of the camera stand. The Camera Stand - 9 - CHAPTER 2 HARDWARE INSTALLATION 2.1 Installing the Camera Stand The camera comes with a camera stand, which uses a swivel ball screw head to lock to the camera's screw hole.
User's Guide
Page 11
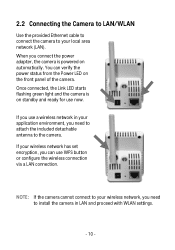
... LAN/WLAN Use the provided Ethernet cable to connect the camera to install the camera in your application environment, you connect the power adapter, the camera is on standby and ready for use WPS button or configure the wireless connection via a LAN connection. When you need to your local... area network (LAN). If your wireless network, you need to attach the included detachable antenna to the camera. NOTE: If the camera cannot connect to your wireless network has set encryption, you use a wireless network in LAN and proceed with WLAN settings. - 10 -...
... LAN/WLAN Use the provided Ethernet cable to connect the camera to install the camera in your application environment, you connect the power adapter, the camera is on standby and ready for use WPS button or configure the wireless connection via a LAN connection. When you need to your local... area network (LAN). If your wireless network, you need to attach the included detachable antenna to the camera. NOTE: If the camera cannot connect to your wireless network has set encryption, you use a wireless network in LAN and proceed with WLAN settings. - 10 -...
User's Guide
Page 12
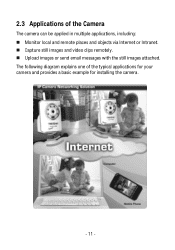
2.3 Applications of the typical applications for your camera and provides a basic example for installing the camera. - 11 - The following diagram explains one of the Camera The camera can be applied in multiple applications, including: Monitor local and remote places and objects via Internet or Intranet. Capture still images and video clips remotely. Upload images or send email messages with the still images attached.
2.3 Applications of the typical applications for your camera and provides a basic example for installing the camera. - 11 - The following diagram explains one of the Camera The camera can be applied in multiple applications, including: Monitor local and remote places and objects via Internet or Intranet. Capture still images and video clips remotely. Upload images or send email messages with the still images attached.
User's Guide
Page 13
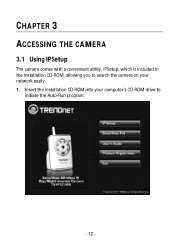
Insert the Installation CD-ROM into your computer's CD-ROM drive to search the camera on your network easily. 1. CHAPTER 3 ACCESSING THE CAMERA 3.1 Using IPSetup The camera comes with a convenient utility, IPSetup, which is included in the Installation CD-ROM, allowing you to initiate the Auto-Run program. - 12 -
Insert the Installation CD-ROM into your computer's CD-ROM drive to search the camera on your network easily. 1. CHAPTER 3 ACCESSING THE CAMERA 3.1 Using IPSetup The camera comes with a convenient utility, IPSetup, which is included in the Installation CD-ROM, allowing you to initiate the Auto-Run program. - 12 -
User's Guide
Page 16
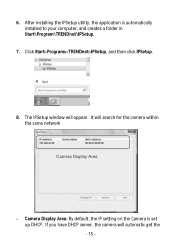
It will appear. The IPSetup window will search for the camera within the same network Camera Display Area - Camera Display Area: By default, the IP setting on the Camera is automatically installed to your computer, and creates a folder in Start\Program\TRENDnet\IPSetup. 7. If you have DHCP server, the camera will automatic get the - 15 - 6. Click Start>Programs>TRENDnet>IPSetup, and then click IPSetup. 8. After installing the IPSetup utility, the application is set up DHCP.
It will appear. The IPSetup window will search for the camera within the same network Camera Display Area - Camera Display Area: By default, the IP setting on the Camera is automatically installed to your computer, and creates a folder in Start\Program\TRENDnet\IPSetup. 7. If you have DHCP server, the camera will automatic get the - 15 - 6. Click Start>Programs>TRENDnet>IPSetup, and then click IPSetup. 8. After installing the IPSetup utility, the application is set up DHCP.
User's Guide
Page 17
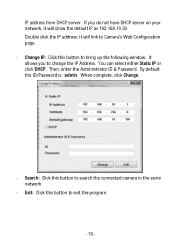
... - By default the ID/Password is: admin. Exit: Click this button to change the IP Address. IP address from DHCP server. it will link to Camera's Web Configuration page. - Then, enter the Administrator ID & Password. Search: Click this button to bring up the following window. Double click the IP address; It... will show the default IP as 192.168.10.30. You can select either Static IP or click DHCP. If you to search the connected camera in the same network - When complete, click Change. -
... - By default the ID/Password is: admin. Exit: Click this button to change the IP Address. IP address from DHCP server. it will link to Camera's Web Configuration page. - Then, enter the Administrator ID & Password. Search: Click this button to bring up the following window. Double click the IP address; It... will show the default IP as 192.168.10.30. You can select either Static IP or click DHCP. If you to search the connected camera in the same network - When complete, click Change. -
User's Guide
Page 18
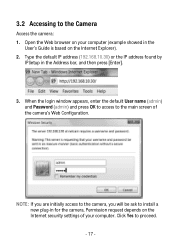
...login window appears, enter the default User name (admin) and Password (admin) and press OK to access to the Camera Access the camera: 1. Click Yes to install a new plug-in for the camera. Type the default IP address (192.168.10.30) or the IP address found by IPSetup in the User's Guide... is based on the Internet security settings of the camera's Web Configuration. NOTE: If you are initially access to the camera, you will be ask to proceed. - 17 - Permission request depends on the Internet Explorer). 2. Open the Web browser on...
...login window appears, enter the default User name (admin) and Password (admin) and press OK to access to the Camera Access the camera: 1. Click Yes to install a new plug-in for the camera. Type the default IP address (192.168.10.30) or the IP address found by IPSetup in the User's Guide... is based on the Internet security settings of the camera's Web Configuration. NOTE: If you are initially access to the camera, you will be ask to proceed. - 17 - Permission request depends on the Internet Explorer). 2. Open the Web browser on...

User's Guide
Page 19
...to control the video functions. Manual Record allows you with many useful information and functions, including: Camera Information - After you login into the Web Configuration of the camera, the main page will appear as below: Zoom In Buttons Live View/Setup Switch Function Buttons... Camera Information Nightmode Button Live View Image The main page of the connected camera. Live View/Setup Switch - The information can be modified in the Web Configuration. Live...
...to control the video functions. Manual Record allows you with many useful information and functions, including: Camera Information - After you login into the Web Configuration of the camera, the main page will appear as below: Zoom In Buttons Live View/Setup Switch Function Buttons... Camera Information Nightmode Button Live View Image The main page of the connected camera. Live View/Setup Switch - The information can be modified in the Web Configuration. Live...

User's Guide
Page 20
... disable the protected mode of video setting. NOTE: If you are using Microsoft 7/Vista platform, you receive the on-site sound and voice from the camera. Zoom In Buttons - You will reduce the frame rate of Security in the dark environment. Open IE Browser 2. Snapshot allows you to capture...
... disable the protected mode of video setting. NOTE: If you are using Microsoft 7/Vista platform, you receive the on-site sound and voice from the camera. Zoom In Buttons - You will reduce the frame rate of Security in the dark environment. Open IE Browser 2. Snapshot allows you to capture...


