
Quick Installation Guide
Page 2
TTaabblleeoof Cf oCnotennttesnts English ...1 1. Add the Network Printer to Install 2 3. Before You Start 1 2. How to your PC 6 Troubleshooting 8 Version 05.22.06 Configure the Print Server 3 4.
TTaabblleeoof Cf oCnotennttesnts English ...1 1. Add the Network Printer to Install 2 3. Before You Start 1 2. How to your PC 6 Troubleshooting 8 Version 05.22.06 Configure the Print Server 3 4.

Quick Installation Guide
Page 3
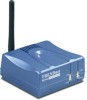
Before You Start Package Content TEW-P1UG Utility CD-ROM Quick Installation Guide 1 x 2dbi Detachable Antenna AC Power Adapter (5V DC, 2.5A) System Requirements CD-ROM Drive CPU: Intel Pentium 100MHz or above Memory: 8MB or above Windows 2003/XP/2000/ME/98SE, Unixware, Linux, Mac OS X Application Notebook with Wireless PC Card (TEW-421PC) 54Mbps 802.11g Wireless 1-Port USB 2.0 Print Server (TEW-P1UG) USB Printer Workstation with Wireless PCI Adapter (TEW-423PI) 54Mbps Wireless 54Mbps 802.11g Wireless Firewall Router (TEW-432BRP) 1 English Internet Cable/DSL Modem 1.
Before You Start Package Content TEW-P1UG Utility CD-ROM Quick Installation Guide 1 x 2dbi Detachable Antenna AC Power Adapter (5V DC, 2.5A) System Requirements CD-ROM Drive CPU: Intel Pentium 100MHz or above Memory: 8MB or above Windows 2003/XP/2000/ME/98SE, Unixware, Linux, Mac OS X Application Notebook with Wireless PC Card (TEW-421PC) 54Mbps 802.11g Wireless 1-Port USB 2.0 Print Server (TEW-P1UG) USB Printer Workstation with Wireless PCI Adapter (TEW-423PI) 54Mbps Wireless 54Mbps 802.11g Wireless Firewall Router (TEW-432BRP) 1 English Internet Cable/DSL Modem 1.

Quick Installation Guide
Page 4
Connect the AC Power Adapter to the Print Server and then to the USB port of the Print Server. 2. Connect the USB Printer to a power outlet. 5. Connect a RJ-45 network cable from a Switch/Router to the print server. 1. Connect the detachable antenna. 3. Power ON printer. 2 English 2. How to Install Note: Please power off all printers before connecting them to the LAN port of the Print Server. 4.
Connect the AC Power Adapter to the Print Server and then to the USB port of the Print Server. 2. Connect the USB Printer to a power outlet. 5. Connect a RJ-45 network cable from a Switch/Router to the print server. 1. Connect the detachable antenna. 3. Power ON printer. 2 English 2. How to Install Note: Please power off all printers before connecting them to the LAN port of the Print Server. 4.

Quick Installation Guide
Page 5
... IP address is an available number from 2-254). Insert the Utility CD-ROM into your computers IP address to access the Print Server's Web Utility. Click Start > All Programs > PSUtility, and then click PS-Utility. 3 English Then enter http://192.168.0.1 in your web browser ....168.0.X (where X is 192.168.0.1, make sure no other network devices are assigned an IP address of 192.168.0.1. Configure the Print Server Note: The Print Server can be managed using the PS-Utility or a web browser. For Windows Users 1. Click Finish. 3. 3. Follow the InstallShield Wizard instructions.
... IP address is an available number from 2-254). Insert the Utility CD-ROM into your computers IP address to access the Print Server's Web Utility. Click Start > All Programs > PSUtility, and then click PS-Utility. 3 English Then enter http://192.168.0.1 in your web browser ....168.0.X (where X is 192.168.0.1, make sure no other network devices are assigned an IP address of 192.168.0.1. Configure the Print Server Note: The Print Server can be managed using the PS-Utility or a web browser. For Windows Users 1. Click Finish. 3. 3. Follow the InstallShield Wizard instructions.

Quick Installation Guide
Page 6
4. Note: The IP Address must match the network segment of the Print Server and then click OK. Manually set the IP Address of your network. 5. Click OK. 6. Click Show Web Setup. 7. Click the Print Server and click Change IP Address. Write down the Server Name and Printer Name. 4 English
4. Note: The IP Address must match the network segment of the Print Server and then click OK. Manually set the IP Address of your network. 5. Click OK. 6. Click Show Web Setup. 7. Click the Print Server and click Change IP Address. Write down the Server Name and Printer Name. 4 English

Quick Installation Guide
Page 7
Select the proper SSID and then click Save. Print Server configuration is now complete. 5 English 8. Click on Configuration, then Wireless.
Select the proper SSID and then click Save. Print Server configuration is now complete. 5 English 8. Click on Configuration, then Wireless.

Quick Installation Guide
Page 8
Go into the Control Panel and double-click the Printers and Faxes icon. 2. Add the Network Printer to this printer and type in the Server Name and the Printer Name in the following format: \\server_name\printer_name Click Next. 6 English Select Network Printer and then click Next. 4. 4. Click Add Printer and then click Next. 3. Select Connect to your PC Note: For TCP/IP Printing instructions, please consult the User's Guide included on the Utility CD-ROM. Windows 2000/XP 1.
Go into the Control Panel and double-click the Printers and Faxes icon. 2. Add the Network Printer to this printer and type in the Server Name and the Printer Name in the following format: \\server_name\printer_name Click Next. 6 English Select Network Printer and then click Next. 4. 4. Click Add Printer and then click Next. 3. Select Connect to your PC Note: For TCP/IP Printing instructions, please consult the User's Guide included on the Utility CD-ROM. Windows 2000/XP 1.

Quick Installation Guide
Page 9
Select the appropriate driver for your printer and then click OK. 7. Repeat steps 1 to 8 to add the network printer to the User's Guide included on the network. Add Network Printer is now complete. Click OK. 6. Select Yes and then click Next. 8. Click Finish. 9. 5. For detailed information regarding the TEW-P1UG configuration and advanced settings, please refer to other computers on the Utility CD-ROM or TRENDnet's website at www.trendnet.com 7 English
Select the appropriate driver for your printer and then click OK. 7. Repeat steps 1 to 8 to add the network printer to the User's Guide included on the network. Add Network Printer is now complete. Click OK. 6. Select Yes and then click Next. 8. Click Finish. 9. 5. For detailed information regarding the TEW-P1UG configuration and advanced settings, please refer to other computers on the Utility CD-ROM or TRENDnet's website at www.trendnet.com 7 English

Quick Installation Guide
Page 10
...the wireless settings match your print server's IP Address. Second, verify that the print server name and printer name are correct, but I cannot print anything from a DHCP server, and now I still cannot add a network printer. Waste electrical and electronic products must accept any questions regarding the TEW-P1UG, ...check on the Utility CD-ROM or contact TRENDnet's Technical Support Department. make sure that may not cause harmful interference. (2) This device must not be no spaces, and the back slashes that the print server name and printer name are entered correctly. ...
...the wireless settings match your print server's IP Address. Second, verify that the print server name and printer name are correct, but I cannot print anything from a DHCP server, and now I still cannot add a network printer. Waste electrical and electronic products must accept any questions regarding the TEW-P1UG, ...check on the Utility CD-ROM or contact TRENDnet's Technical Support Department. make sure that may not cause harmful interference. (2) This device must not be no spaces, and the back slashes that the print server name and printer name are entered correctly. ...

Quick Installation Guide
Page 11
... Torrance, CA 90505 USA Copyright ©2006. Italy . Friday MET Worldwide Telephone: +(31) (0) 20 504 05 35 English/Espanol - 24/7 Francais/Deutsch - 11am-8pm, Monday - TRENDnet Technical Support US . Switzerland . France . UK) Toll Free Telephone: +00800 60 76 76 67 English/Espanol - 24/7 Francais/Deutsch - 11am-8pm, Monday - Go to register...
... Torrance, CA 90505 USA Copyright ©2006. Italy . Friday MET Worldwide Telephone: +(31) (0) 20 504 05 35 English/Espanol - 24/7 Francais/Deutsch - 11am-8pm, Monday - TRENDnet Technical Support US . Switzerland . France . UK) Toll Free Telephone: +00800 60 76 76 67 English/Espanol - 24/7 Francais/Deutsch - 11am-8pm, Monday - Go to register...

Windows Setup Guide
Page 1
... the Print Server 1. Select the Print Server and click Change IP Address. Connect the USB Printer to uncompress the file. 3. Follow the steps to download the Windows 7 Utility. Connect the detachable antenna (for TEW-P1UG only)... 5. Power on PSUtilitySetup_v3.13.exe. 2. Click OK Manually assign the IP Address of your desktop. 2. Right click on the Print Server 7. Note: The IP Address must match the network segment of the Print Server and then click OK. Save the file to your network. Go to http://www.trendnet.com/downloads/ to configure the Print server...
... the Print Server 1. Select the Print Server and click Change IP Address. Connect the USB Printer to uncompress the file. 3. Follow the steps to download the Windows 7 Utility. Connect the detachable antenna (for TEW-P1UG only)... 5. Power on PSUtilitySetup_v3.13.exe. 2. Click OK Manually assign the IP Address of your desktop. 2. Right click on the Print Server 7. Note: The IP Address must match the network segment of the Print Server and then click OK. Save the file to your network. Go to http://www.trendnet.com/downloads/ to configure the Print server...

Windows Setup Guide
Page 2
Unplug the Ethernet cable and the power adapter from the print server. Click on Configuration, then Wireless. Please contact your wireless network is encrypted. Wait 15 seconds, then plug the power adapter back in (TEW-P1UG only). e. c. d. Select the proper SSID and then click Save. (Enable and enter the encryption key if your Network Administrator for the encryption key)(TEW-P1UG only). Click Show Web Setup.
Unplug the Ethernet cable and the power adapter from the print server. Click on Configuration, then Wireless. Please contact your wireless network is encrypted. Wait 15 seconds, then plug the power adapter back in (TEW-P1UG only). e. c. d. Select the proper SSID and then click Save. (Enable and enter the encryption key if your Network Administrator for the encryption key)(TEW-P1UG only). Click Show Web Setup.

Windows Setup Guide
Page 3
Select the print server, select the port and then click Add Printer. Double click on PSWizardSetup_v2.20.exe 2. b. Follow the steps to add the printer to your computer 1. Select the appropriate driver for your computer a. Add the Printer to your printer and then click Next. Click Select from manufacturer list.
Select the print server, select the port and then click Add Printer. Double click on PSWizardSetup_v2.20.exe 2. b. Follow the steps to add the printer to your computer 1. Select the appropriate driver for your computer a. Add the Printer to your printer and then click Next. Click Select from manufacturer list.

Windows Setup Guide
Page 5
f. g. Click Finish. Repeat the above steps to add the printer to other computers on the network
f. g. Click Finish. Repeat the above steps to add the printer to other computers on the network

Windows Setup Guide
Page 6
...PS Wizard (See Add the Printer to your wireless network settings. 2. Verify that the print server and printer are powered ON and are properly connected. 2. By default, there is lit. What should I do? 1. make sure that the wireless settings match your PC) to default. Also...wireless network settings, I can print a test page, but I cannot go . Take a pin or paper clip and press the reset button. Click on the Windows icon on the bottom left-hand corner of the unit. 2. After I successfully configured the TEW-P1UG to my computer and I can not print through the Print Server...
...PS Wizard (See Add the Printer to your wireless network settings. 2. Verify that the print server and printer are powered ON and are properly connected. 2. By default, there is lit. What should I do? 1. make sure that the wireless settings match your PC) to default. Also...wireless network settings, I can print a test page, but I cannot go . Take a pin or paper clip and press the reset button. Click on the Windows icon on the bottom left-hand corner of the unit. 2. After I successfully configured the TEW-P1UG to my computer and I can not print through the Print Server...