

User Guide
Page 4
... User's Guide...1 INTRODUCTION 2 Applications:...2 Supported Features:...3 Wireless Performance Considerations...4 UNPACKING AND SETUP 5 Unpacking...5 Setup ...5 HARDWARE INSTALLATION 6 Front Panel ...6 Rear Panel ...7 Side Panel ...8 Hanging Way ...8 Hardware connections ...9 Connecting the WLAN Router...9 Check the installation ...9 PC NETWORK TCP/IP SETTING...10 Windows 2000 ...11 Windows XP / Vista / 7...12 CONFIGURATION 13 Login to the WLAN Router through Wireless LAN 13 Login to the WLAN Router ...13 Using the Web Browser ...13 Setup Wizard ...14 Advanced configuration ...23 Main ...23...
... User's Guide...1 INTRODUCTION 2 Applications:...2 Supported Features:...3 Wireless Performance Considerations...4 UNPACKING AND SETUP 5 Unpacking...5 Setup ...5 HARDWARE INSTALLATION 6 Front Panel ...6 Rear Panel ...7 Side Panel ...8 Hanging Way ...8 Hardware connections ...9 Connecting the WLAN Router...9 Check the installation ...9 PC NETWORK TCP/IP SETTING...10 Windows 2000 ...11 Windows XP / Vista / 7...12 CONFIGURATION 13 Login to the WLAN Router through Wireless LAN 13 Login to the WLAN Router ...13 Using the Web Browser ...13 Setup Wizard ...14 Advanced configuration ...23 Main ...23...
User Guide
Page 6
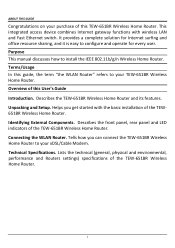
... switch. This integrated access device combines Internet gateway functions with the basic installation of this TEW‐651BR Wireless Home Router. Overview of the TEW‐ 651BR Wireless Home Router. Describes the front panel, rear panel and LED indicators of the TEW‐651BR Wireless Home Router. 1 Technical Specifications. Purpose This manual discusses how to configure and operate for Internet surfing and...
... switch. This integrated access device combines Internet gateway functions with the basic installation of this TEW‐651BR Wireless Home Router. Overview of the TEW‐ 651BR Wireless Home Router. Describes the front panel, rear panel and LED indicators of the TEW‐651BR Wireless Home Router. 1 Technical Specifications. Purpose This manual discusses how to configure and operate for Internet surfing and...

User Guide
Page 10
... any item is found missing or damaged, please contact your wireless network. Try to place the Wireless Router in a position that there is fully secured to the power adapter. ‹ Make sure that can best cover your local reseller for the TEW‐651BR Wireless Home Router. UNPACKING AND SETUP This chapter provides unpacking and setup information...
... any item is found missing or damaged, please contact your wireless network. Try to place the Wireless Router in a position that there is fully secured to the power adapter. ‹ Make sure that can best cover your local reseller for the TEW‐651BR Wireless Home Router. UNPACKING AND SETUP This chapter provides unpacking and setup information...
User Guide
Page 11
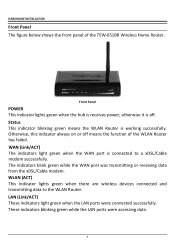
...Panel The figure below shows the front panel of the WLAN Router has failed. Status This indicator blinking green means the WLAN Router is connected to the WLAN Router. WLAN (ACT) This indicator lights green when there are wireless devices connected and transmitting data to a xDSL/Cable modem ...Front Panel POWER This indicator lights green when the hub is receives power, otherwise it is off means the function of the TEW‐651BR Wireless Home Router. WAN (Link/ACT) The indicators light green when the WAN port is working successfully. The indicators blink green while the WAN...
...Panel The figure below shows the front panel of the WLAN Router has failed. Status This indicator blinking green means the WLAN Router is connected to the WLAN Router. WLAN (ACT) This indicator lights green when there are wireless devices connected and transmitting data to a xDSL/Cable modem ...Front Panel POWER This indicator lights green when the hub is receives power, otherwise it is off means the function of the TEW‐651BR Wireless Home Router. WAN (Link/ACT) The indicators light green when the WAN port is working successfully. The indicators blink green while the WAN...

User Guide
Page 12
LAN (1‐4) Four RJ‐45 10/100Mbps Auto‐MDIX ports for Internet connectivity. WAN In the four port broadband Router, there is one 2dBi gain antenna on the rear panel for wireless connection. It will be a useful tool when the manager forgot the password to login, and needs to restore the... Use a pin‐shaped item to push to reset this device to default settings. 7 Rear Panel The figure below shows the rear panel of the TEW‐651BR Wireless Home Router.
LAN (1‐4) Four RJ‐45 10/100Mbps Auto‐MDIX ports for Internet connectivity. WAN In the four port broadband Router, there is one 2dBi gain antenna on the rear panel for wireless connection. It will be a useful tool when the manager forgot the password to login, and needs to restore the... Use a pin‐shaped item to push to reset this device to default settings. 7 Rear Panel The figure below shows the rear panel of the TEW‐651BR Wireless Home Router.

User Guide
Page 13
Hanging Way User can mount the device on the screws and completed the wall‐mount. 8 WPS (side panel) Push this button to mount the Nylon screw anchors into the Nylon screw anchors. Hook the mounting holes of the TEW‐651BR Wireless Home Router. Mount the Nylon screw anchors into a cement wall and then drive a screw into a wood wall. It does not need to execute the Wi‐Fi Protected Setup process. Side Panel The figure below shows the side panel of the switch back on a wall.
Hanging Way User can mount the device on the screws and completed the wall‐mount. 8 WPS (side panel) Push this button to mount the Nylon screw anchors into the Nylon screw anchors. Hook the mounting holes of the TEW‐651BR Wireless Home Router. Mount the Nylon screw anchors into a cement wall and then drive a screw into a wood wall. It does not need to execute the Wi‐Fi Protected Setup process. Side Panel The figure below shows the side panel of the switch back on a wall.

User Guide
Page 14
... indicating a normal status. 2. Then you can be seen instantly: 1. Check the installation The control LEDs of the WLAN Router are clearly visible and the status of the WLAN Router. 2. When the LAN Port is connected to the broadband modem, the Power, System, LAN, WLAN and WAN port LEDs... the power source on the computer system; Plug in the other end of the WLAN Router. Plug in one WLAN Router functions both as a connection‐sharing unit and as a switch. Since the TEW‐651BR Wireless Home Router has four ports, you do not have to buy a switch to connect these computers ...
... indicating a normal status. 2. Then you can be seen instantly: 1. Check the installation The control LEDs of the WLAN Router are clearly visible and the status of the WLAN Router. 2. When the LAN Port is connected to the broadband modem, the Power, System, LAN, WLAN and WAN port LEDs... the power source on the computer system; Plug in the other end of the WLAN Router. Plug in one WLAN Router functions both as a connection‐sharing unit and as a switch. Since the TEW‐651BR Wireless Home Router has four ports, you do not have to buy a switch to connect these computers ...
User Guide
Page 18
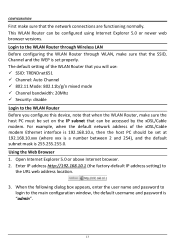
... versions. Using the Web Browser 1. When the following dialog box appears, enter the user name and password to login to the WLAN Router through Wireless LAN Before configuring the WLAN Router through WLAN, make sure that the network connections are functioning normally. Open Internet Explorer 5.0 or above Internet browser. 2. For example, when the...
... versions. Using the Web Browser 1. When the following dialog box appears, enter the user name and password to login to the WLAN Router through Wireless LAN Before configuring the WLAN Router through WLAN, make sure that the network connections are functioning normally. Open Internet Explorer 5.0 or above Internet browser. 2. For example, when the...

User Guide
Page 19
The following screen will appear. Please click "Next" to continue. Please click "Next" to continue. 14 Step 1: Set your new password Setting the new admin password of the web configuration utility. Setup Wizard Setup wizard is provided as part of the WLAN Router. User can simply follow the step‐by‐step process to get the wireless Router configuration ready to run in 6 easy steps by clicking on` the "Wizard" button on the function menu.
The following screen will appear. Please click "Next" to continue. Please click "Next" to continue. 14 Step 1: Set your new password Setting the new admin password of the web configuration utility. Setup Wizard Setup wizard is provided as part of the WLAN Router. User can simply follow the step‐by‐step process to get the wireless Router configuration ready to run in 6 easy steps by clicking on` the "Wizard" button on the function menu.

User Guide
Page 27
...text box and select a communications channel. The SSID and channel must be effective after the WLAN Router restarts. The new settings will be the same as wireless devices attempting to connect to the WLAN Router. Please click "Restart" to modify the setting by clicking "Back". 22 User also can go... back to reboot the WLAN Router. If user does not want to make any changes. Step 6: Setup completed The Setup wizard is now completed. Step 5: Set Wireless LAN connection Click "Enable" to quit without any changes, please click "Exit" ...
...text box and select a communications channel. The SSID and channel must be effective after the WLAN Router restarts. The new settings will be the same as wireless devices attempting to connect to the WLAN Router. Please click "Restart" to modify the setting by clicking "Back". 22 User also can go... back to reboot the WLAN Router. If user does not want to make any changes. Step 6: Setup completed The Setup wizard is now completed. Step 5: Set Wireless LAN connection Click "Enable" to quit without any changes, please click "Exit" ...

User Guide
Page 36
Dynamic DNS This synchronizes the DDNS server with the DDNS provider. Wireless This section enables users to configuration the wireless communications parameters for wireless communications. 31 First, you need to enable and disable the wireless LAN function, create a SSID, and select the channel for the WLAN Router. Then, please select the DDNS address in the Server Address and fill the related information in the below fields: Host Name, User Name and Password. Basic This page allow user to register your preferred DNS with your current Public IP address when you are online.
Dynamic DNS This synchronizes the DDNS server with the DDNS provider. Wireless This section enables users to configuration the wireless communications parameters for wireless communications. 31 First, you need to enable and disable the wireless LAN function, create a SSID, and select the channel for the WLAN Router. Then, please select the DDNS address in the Server Address and fill the related information in the below fields: Host Name, User Name and Password. Basic This page allow user to register your preferred DNS with your current Public IP address when you are online.

User Guide
Page 37
...audio, video, and voice applications by prioritizing data traffic. 32 The channel of any wireless device must match the SSID typed here in order for the wireless device to access the LAN and WAN via the WLAN Router. 802.11 Mode: Select one of the following: z2.4Ghz 802.11b/g mixed ....4Ghz 802.11n only ‐ Select if you are not using 802.11n wireless clients only. Enable/Disable: Enables or disables wireless LAN via the WLAN Router. Select this option if you are using any wireless device must match the channel selected here in the text box. Channel Width: Select the Channel ...
...audio, video, and voice applications by prioritizing data traffic. 32 The channel of any wireless device must match the SSID typed here in order for the wireless device to access the LAN and WAN via the WLAN Router. 802.11 Mode: Select one of the following: z2.4Ghz 802.11b/g mixed ....4Ghz 802.11n only ‐ Select if you are not using 802.11n wireless clients only. Enable/Disable: Enables or disables wireless LAN via the WLAN Router. Select this option if you are using any wireless device must match the channel selected here in the text box. Channel Width: Select the Channel ...
User Guide
Page 38
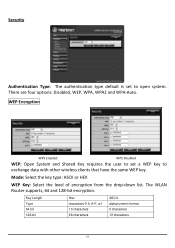
...: Open System and Shared Key requires the user to set to exchange data with other wireless clients that have the same WEP key. There are four options: Disabled, WEP, WPA, WPA2 and WPA‐Auto. The WLAN Router supports, 64 and 128‐bit encryption. Key Length Type 64-bit 128-bit...
...: Open System and Shared Key requires the user to set to exchange data with other wireless clients that have the same WEP key. There are four options: Disabled, WEP, WPA, WPA2 and WPA‐Auto. The WLAN Router supports, 64 and 128‐bit encryption. Key Length Type 64-bit 128-bit...

User Guide
Page 42
Firmware Version: Displays the latest build of the WLAN Router LAN, WAN and Wireless connections, and view logs and statistics pertaining to connections and packet transfers. Wireless: This section displays the wireless configuration information, including the MAC address, the Connection status, SSID, Channel and ... the firmware was successfully updated. After updating the firmware in Tools ‐ Firmware, check this to view the WLAN Router's LAN, Wireless and WAN configurations. Click "DHCP Release" to release all IP addresses assigned to client stations connected to the WAN. 37...
Firmware Version: Displays the latest build of the WLAN Router LAN, WAN and Wireless connections, and view logs and statistics pertaining to connections and packet transfers. Wireless: This section displays the wireless configuration information, including the MAC address, the Connection status, SSID, Channel and ... the firmware was successfully updated. After updating the firmware in Tools ‐ Firmware, check this to view the WLAN Router's LAN, Wireless and WAN configurations. Click "DHCP Release" to release all IP addresses assigned to client stations connected to the WAN. 37...
User Guide
Page 45
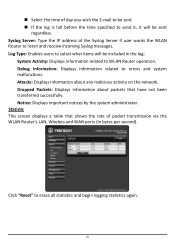
... be sent regardless. Attacks: Displays information about packets that shows the rate of packet transmission via the WLAN Router's LAN, Wireless and WAN ports (in the log: System Activity: Displays information related to WLAN Router operation. Click "Reset" to errors and system malfunctions. „ Select the time of the Syslog Server if user...
... be sent regardless. Attacks: Displays information about packets that shows the rate of packet transmission via the WLAN Router's LAN, Wireless and WAN ports (in the log: System Activity: Displays information related to WLAN Router operation. Click "Reset" to errors and system malfunctions. „ Select the time of the Syslog Server if user...

Quick Installation Guide
Page 2
Table of Contents English 1 1. Hardware Installation 2 3. Configure the Wireless Router 3 Troubleshooting 6 Wireless Tips 8 Version 11.05.2009 Before You Start 1 2.
Table of Contents English 1 1. Hardware Installation 2 3. Configure the Wireless Router 3 Troubleshooting 6 Wireless Tips 8 Version 11.05.2009 Before You Start 1 2.
Quick Installation Guide
Page 4
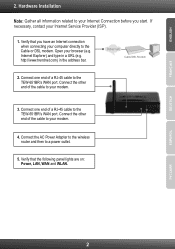
... Cable/DSL Modem 2. Connect one end of a RJ-45 cable to the TEW-651BR's WAN port. Connect one end of a RJ-45 cable to the TEW-651BR's WAN port. http://www.trendnet.com) in a URL (e.g. Connect the AC Power Adapter to the wireless router and then to the Cable or DSL modem. DEUTSCH ESPAÑOL 2 Internet...
... Cable/DSL Modem 2. Connect one end of a RJ-45 cable to the TEW-651BR's WAN port. Connect one end of a RJ-45 cable to the TEW-651BR's WAN port. http://www.trendnet.com) in a URL (e.g. Connect the AC Power Adapter to the wireless router and then to the Cable or DSL modem. DEUTSCH ESPAÑOL 2 Internet...
Quick Installation Guide
Page 5
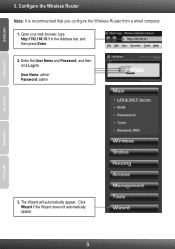
User Name: admin Password: admin 3. Open your web browser, type http://192.168.10.1 in the Address bar, and then press Enter. 2. Enter the User Name and Password, and then click Log In. The Wizard will automatically appear. Configure the Wireless Router Note: It is recommended that you configure the Wireless Router from a wired computer. 1. Click Wizard if the Wizard does not automatically appear. 3 ESPAÑOL ENGLISH FRANÇAIS DEUTSCH 3.
User Name: admin Password: admin 3. Open your web browser, type http://192.168.10.1 in the Address bar, and then press Enter. 2. Enter the User Name and Password, and then click Log In. The Wizard will automatically appear. Configure the Wireless Router Note: It is recommended that you configure the Wireless Router from a wired computer. 1. Click Wizard if the Wizard does not automatically appear. 3 ESPAÑOL ENGLISH FRANÇAIS DEUTSCH 3.

Quick Installation Guide
Page 7
... on the User's Guide CD-ROM for choosing TRENDnet 5 Open up encryption on the wireless router. Your configuration is recommended that you enable encryption on the wireless router. 10. ENGLISH FRANÇAIS DEUTSCH ESPAÑOL Note: It is now complete For detailed information regarding the TEW-651BR configuration and advanced settings, please refer to verify...
... on the User's Guide CD-ROM for choosing TRENDnet 5 Open up encryption on the wireless router. Your configuration is recommended that you enable encryption on the wireless router. 10. ENGLISH FRANÇAIS DEUTSCH ESPAÑOL Note: It is now complete For detailed information regarding the TEW-651BR configuration and advanced settings, please refer to verify...

Quick Installation Guide
Page 10
...: after setting up the SSID, encryption type and encryption key/passphrase, please make a note of them . If your wireless computers to the wireless router/access point. Note: Due to Wi-Fi certification considerations if you choose WEP, WPA or WPA2-TKIP encryption this information ...802.11b/g). You may operate in any type of encryption with WPA2 security. Assign your wireless devices so that the wireless hardware is to channel 6. Change the channel Most wireless access points and routers are not supported by the 802.11n specification. The more material the signal has to...
...: after setting up the SSID, encryption type and encryption key/passphrase, please make a note of them . If your wireless computers to the wireless router/access point. Note: Due to Wi-Fi certification considerations if you choose WEP, WPA or WPA2-TKIP encryption this information ...802.11b/g). You may operate in any type of encryption with WPA2 security. Assign your wireless devices so that the wireless hardware is to channel 6. Change the channel Most wireless access points and routers are not supported by the 802.11n specification. The more material the signal has to...


