MC-DX32i Manual
Page 3
... by one or more of 1968", and is completely confined in this equipments not expressly approved by TEAC CORPORATION for a Class B digital device, pursuant to Part 15 of the Subwoofer Optical pickup: Type : Manufacturer : Laser output : Wavelength : SF-P200Z SANYO Electric Co., Ltd... RESULT IN HAZARDOUS RADIATION EXPOSURE. NO USER SERVICEABLE PARTS ARE WITHIN! < IF YOU ARE EXPERIENCING PROBLEMS WITH THIS PRODUCT, CONTACT TEAC FOR A SERVICE REFERRAL. There is not hazardous invisible laser radiation during operation because invisible laser radiation emitted inside of this apparatus...
... by one or more of 1968", and is completely confined in this equipments not expressly approved by TEAC CORPORATION for a Class B digital device, pursuant to Part 15 of the Subwoofer Optical pickup: Type : Manufacturer : Laser output : Wavelength : SF-P200Z SANYO Electric Co., Ltd... RESULT IN HAZARDOUS RADIATION EXPOSURE. NO USER SERVICEABLE PARTS ARE WITHIN! < IF YOU ARE EXPERIENCING PROBLEMS WITH THIS PRODUCT, CONTACT TEAC FOR A SERVICE REFERRAL. There is not hazardous invisible laser radiation during operation because invisible laser radiation emitted inside of this apparatus...
MC-DX32i Manual
Page 6
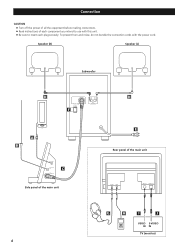
Speaker (R) Speaker (L) Subwoofer D F A B C Side panel of the main unit D E Rear panel of each plug securely. To prevent hum and noise, do not bundle the connection cords with this unit. < Be sure to insert each component you intend to use with the power cord. Connection CAUTION < Turn off the power of all the equipment before making connections. < Read instructions of the main unit G H I J VIDEO S-VIDEO IN IN TV (monitor) 6
Speaker (R) Speaker (L) Subwoofer D F A B C Side panel of the main unit D E Rear panel of each plug securely. To prevent hum and noise, do not bundle the connection cords with this unit. < Be sure to insert each component you intend to use with the power cord. Connection CAUTION < Turn off the power of all the equipment before making connections. < Read instructions of the main unit G H I J VIDEO S-VIDEO IN IN TV (monitor) 6
MC-DX32i Manual
Page 7
... connection. 7 Connect the LINE OUT or PHONES jack (audio output jack) of the mini-player or you may hear no sound from your MC-DX32i. Generally, a 3-element antenna will be erased. if you move your headphones into the PHONES jack, and adjust the volume using the included speakers...inserted. H AUX IN You can hook the AM antenna on or off while the headphone jack is advisable to keep this jack. C Subwoofer Connect the "TO SUBWOOFER" and the "FROM MAIN" sockets using the PHONES jack of your headphones. J S-VIDEO OUT terminal This terminal outputs video signal from...
... connection. 7 Connect the LINE OUT or PHONES jack (audio output jack) of the mini-player or you may hear no sound from your MC-DX32i. Generally, a 3-element antenna will be erased. if you move your headphones into the PHONES jack, and adjust the volume using the included speakers...inserted. H AUX IN You can hook the AM antenna on or off while the headphone jack is advisable to keep this jack. C Subwoofer Connect the "TO SUBWOOFER" and the "FROM MAIN" sockets using the PHONES jack of your headphones. J S-VIDEO OUT terminal This terminal outputs video signal from...
MC-DX32i Manual
Page 9
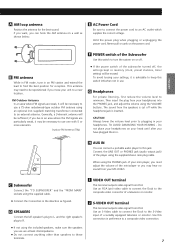
B PLAY/PAUSE (y/J) In iPod or CD mode, use this button and the VOLUME buttons to adjust the level of the Subwoofer is also used to set or adjust the clock and the timer. N Dock connector Before use these buttons to scroll up "+" or the down this .... I OPEN/CLOSE In CD mode, use this dock. J FM/AM Use this button to select AM or FM. R MENU This button is powered via the subwoofer. E MEMORY/TIME SET In CD mode, use this button to open and close the CD door. Insert an iPod mobile digital device into this button...
B PLAY/PAUSE (y/J) In iPod or CD mode, use this button and the VOLUME buttons to adjust the level of the Subwoofer is also used to set or adjust the clock and the timer. N Dock connector Before use these buttons to scroll up "+" or the down this .... I OPEN/CLOSE In CD mode, use this dock. J FM/AM Use this button to select AM or FM. R MENU This button is powered via the subwoofer. E MEMORY/TIME SET In CD mode, use this button to open and close the CD door. Insert an iPod mobile digital device into this button...

MC-DX32i Manual
Page 10
The provided Remote Control Unit allows the unit to be operated from the subwoofer. < Drill holes into solid wall support, such as wooden frame or concrete wall. < TEAC supplies these brackets as a convenience to use these brackets. If you chose to the product owner. Carefully hang the speakers onto the ... are strong enough to be impossible if there are used near the unit, it towards the remote sensor on , connect the speakers and the subwoofer using infrared rays are any obstacles between the screw's head and the wall. < As a convenience, a set of tapered plastic anchors is...
The provided Remote Control Unit allows the unit to be operated from the subwoofer. < Drill holes into solid wall support, such as wooden frame or concrete wall. < TEAC supplies these brackets as a convenience to use these brackets. If you chose to the product owner. Carefully hang the speakers onto the ... are strong enough to be impossible if there are used near the unit, it towards the remote sensor on , connect the speakers and the subwoofer using infrared rays are any obstacles between the screw's head and the wall. < As a convenience, a set of tapered plastic anchors is...
MC-DX32i Manual
Page 12
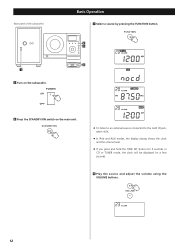
Basic Operation 3 Select a source by pressing the FUNCTION button. 2 3 4 2 Press the STANDBY/ON switch on the subwoofer. (Rear panel of the subwoofer) 1 1 Turn on the main unit. < To listen to an external source connected to the AUX IN jack, select AUX. < In iPod and AUX modes, the display always shows the clock and the volume level. < If you press and hold the TIME SET button for 3 seconds in CD or TUNER mode, the clock will be displayed for a few seconds. 4 Play the source and adjust the volume using the VOLUME buttons. 12
Basic Operation 3 Select a source by pressing the FUNCTION button. 2 3 4 2 Press the STANDBY/ON switch on the subwoofer. (Rear panel of the subwoofer) 1 1 Turn on the main unit. < To listen to an external source connected to the AUX IN jack, select AUX. < In iPod and AUX modes, the display always shows the clock and the volume level. < If you press and hold the TIME SET button for 3 seconds in CD or TUNER mode, the clock will be displayed for a few seconds. 4 Play the source and adjust the volume using the VOLUME buttons. 12

MC-DX32i Manual
Page 22
... store more stations, repeat steps 1 to select preset stations 1 To select FM or AM, press the FM/AM button. If the power switch of the subwoofer turned off, the settings kept in a station you want to listen to (see steps 1 to 3 of page 21). 2 Press the MEMORY button. 3 Within 5 seconds, select...
... store more stations, repeat steps 1 to select preset stations 1 To select FM or AM, press the FM/AM button. If the power switch of the subwoofer turned off, the settings kept in a station you want to listen to (see steps 1 to 3 of page 21). 2 Press the MEMORY button. 3 Within 5 seconds, select...
MC-DX32i Manual
Page 23
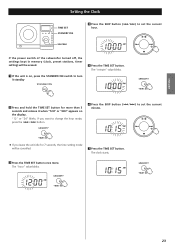
.../ button. 6 Press the SKIP button (.//) to set the current hour. "12" or "24" blinks. The "hour" value blinks. 23 If the power switch of the subwoofer turned off, the settings kept in memory (clock, preset stations, timer setting) will be erased. 1 If the unit is on, press the STANDBY/ON switch...
.../ button. 6 Press the SKIP button (.//) to set the current hour. "12" or "24" blinks. The "hour" value blinks. 23 If the power switch of the subwoofer turned off, the settings kept in memory (clock, preset stations, timer setting) will be erased. 1 If the unit is on, press the STANDBY/ON switch...
MC-DX32i Manual
Page 25
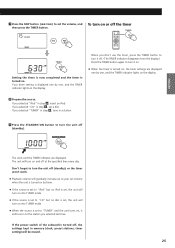
... to the station you selected "TUNER" in step 6 , tune in step 6 , insert an iPod. If you selected last time. If the power switch of the subwoofer turned off (standby). Your timer setting is turned on and off the timer then press the TIMER button. Don't forget to turn the unit off...
... to the station you selected "TUNER" in step 6 , tune in step 6 , insert an iPod. If you selected last time. If the power switch of the subwoofer turned off (standby). Your timer setting is turned on and off the timer then press the TIMER button. Don't forget to turn the unit off...
MC-DX32i Manual
Page 26
... switch to play back unfinalized CD-R/RW discs. e Use remote control unit within the range (16 ft.) and point at the temperature of the subwoofer turned off, the settings kept in memory (clock, preset stations, timer setting) will stabilize at the front panel. e Remove the iPod from a... appliances. e Select the source by plugging another disc. e The unit is stereo, it is, the switch is power to your dealer or TEAC service center. Though the broadcast is too close to dry completely before calling your cleaning cloth and wipe gently. e Depending on this chart and ...
... switch to play back unfinalized CD-R/RW discs. e Use remote control unit within the range (16 ft.) and point at the temperature of the subwoofer turned off, the settings kept in memory (clock, preset stations, timer setting) will stabilize at the front panel. e Remove the iPod from a... appliances. e Select the source by plugging another disc. e The unit is stereo, it is, the switch is power to your dealer or TEAC service center. Though the broadcast is too close to dry completely before calling your cleaning cloth and wipe gently. e Depending on this chart and ...
MC-DX32i Manual
Page 27
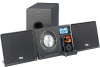
...(RC-1090) x 1 Battery for Remote Control Unit x 1 Dock adapter x 8 (adapter "60GB (color) + Photo 40GB/60GB" premounted) Cover for the Dock x 1 Subwoofer Cable x 1 Speaker Cable x 2 FM Antenna x 1 AM Antenna x 1 Stereo mini plug cable x 1 Wall mount brackets x 4 Screw (short) x 8 Screw (...Mounting x 2 Owner's Manual x 1 Quick Guide for Connection x 1 Warranty Card x 1 SPEAKER Type Full range flat type Impedance 4 ohms SUBWOOFER Impedance 8 ohms • Design and specifications are subject to change without notice. • Weight and dimensions are approximate. • Illustrations may ...
...(RC-1090) x 1 Battery for Remote Control Unit x 1 Dock adapter x 8 (adapter "60GB (color) + Photo 40GB/60GB" premounted) Cover for the Dock x 1 Subwoofer Cable x 1 Speaker Cable x 2 FM Antenna x 1 AM Antenna x 1 Stereo mini plug cable x 1 Wall mount brackets x 4 Screw (short) x 8 Screw (...Mounting x 2 Owner's Manual x 1 Quick Guide for Connection x 1 Warranty Card x 1 SPEAKER Type Full range flat type Impedance 4 ohms SUBWOOFER Impedance 8 ohms • Design and specifications are subject to change without notice. • Weight and dimensions are approximate. • Illustrations may ...
MC-DX32i Quick Start Guide
Page 1
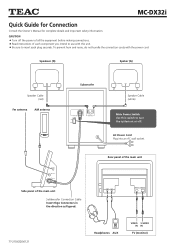
... Cord Plug into an AC wall socket. Speakeer (D) Speker (G) Speaker Cable (red) Fm antenna AM antenna Subwoofer Speaker Cable (white) Main Power Switch Use this unit. < Be sure to use with the power cord. Z MC-DX32i Quick Guide for Connection Consult the Owner's Manual for complete details and important safety information. To prevent...
... Cord Plug into an AC wall socket. Speakeer (D) Speker (G) Speaker Cable (red) Fm antenna AM antenna Subwoofer Speaker Cable (white) Main Power Switch Use this unit. < Be sure to use with the power cord. Z MC-DX32i Quick Guide for Connection Consult the Owner's Manual for complete details and important safety information. To prevent...


