Owners Manual
Page 1
Z CEC6P10501630 GF-450K7 CD recorder with turntable/cassette player OWNER'S MANUAL
Z CEC6P10501630 GF-450K7 CD recorder with turntable/cassette player OWNER'S MANUAL
Owners Manual
Page 4
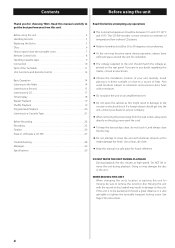
... an electrician. < Choose the installation location of heat. The CD-RW recorder is more sensitive to extremes of the Turntable 11 Unit Functions and Remote Control 12 Basic Operation 14 Listening to the Radio 14 Listening to a Record 15 Listening to a CD 17 Time Display 18 Repeat Playback 19 Shuffle Playback... 5°C and 35°C (41°F and 95°F). WHEN MOVING THIS UNIT When changing the unit's location or packing the unit for choosing TEAC. If the unit is also advisable to the circuitry or electrical shock. Use a clean, dry cloth. < Keep this unit. Do NOT lift or ...
... an electrician. < Choose the installation location of heat. The CD-RW recorder is more sensitive to extremes of the Turntable 11 Unit Functions and Remote Control 12 Basic Operation 14 Listening to the Radio 14 Listening to a Record 15 Listening to a CD 17 Time Display 18 Repeat Playback 19 Shuffle Playback... 5°C and 35°C (41°F and 95°F). WHEN MOVING THIS UNIT When changing the unit's location or packing the unit for choosing TEAC. If the unit is also advisable to the circuitry or electrical shock. Use a clean, dry cloth. < Keep this unit. Do NOT lift or ...
Owners Manual
Page 5
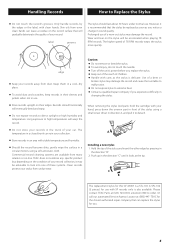
...stylus is delicate. label grooves The stylus should last about 50 hours under normal use of a bent or broken stylus may damage the record and cause the turntable to malfunction. < Do not expose stylus to detach. The higher speed of the stylus and insert the other edge by the edges or... press down the uneven part in use with your car. Use of a worn-out stylus may be accelerated when playing 78 RPM records. A Installing a new stylus 1. TEAC for you experience difficulty in sound quality. Skin oils from many retailers or on their sleeves and jackets when not in front of ...
...stylus is delicate. label grooves The stylus should last about 50 hours under normal use of a bent or broken stylus may damage the record and cause the turntable to malfunction. < Do not expose stylus to detach. The higher speed of the stylus and insert the other edge by the edges or... press down the uneven part in use with your car. Use of a worn-out stylus may be accelerated when playing 78 RPM records. A Installing a new stylus 1. TEAC for you experience difficulty in sound quality. Skin oils from many retailers or on their sleeves and jackets when not in front of ...

Owners Manual
Page 7
... that has been finalized can be played satisfactorily on the disc (and the disc has not been finalized), additional material can be recorded once only. To Open: 1 Lift the turntable cover all the way up until a final table of contents (TOC) has been written at the start of audio CD players. However... CD-RW disc, a standard CD player will now stay open /close the turntable cover About CD-R and CD-RW discs CD-R discs can be erased or re-recorded. Make sure you may be written on the disc can be recorded. The cover will not be written to the disk. Lift the cover all...
... that has been finalized can be played satisfactorily on the disc (and the disc has not been finalized), additional material can be recorded once only. To Open: 1 Lift the turntable cover all the way up until a final table of contents (TOC) has been written at the start of audio CD players. However... CD-RW disc, a standard CD player will now stay open /close the turntable cover About CD-R and CD-RW discs CD-R discs can be erased or re-recorded. Make sure you may be written on the disc can be recorded. The cover will not be written to the disk. Lift the cover all...
Owners Manual
Page 9
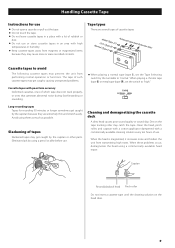
...unit from magnets or magnetized items because they are extremely thin and stretch easily. Slackening of tapes Slackened tapes may cause noise or erase recorded contents. Eliminate slack by the capstan or other parts. When these problems occur, demagnetize the head using them as much as possible. Handling...chrome tape (type @) or metal tape (type !%), set the Tape Selecting switch by the capstan because they may get caught by the turntable to "normal." The tape of use. Long-recording tapes Tapes for use < Do not open a cassette or pull out the tape. < Do not touch the tape. < Do ...
...unit from magnets or magnetized items because they are extremely thin and stretch easily. Slackening of tapes Slackened tapes may cause noise or erase recorded contents. Eliminate slack by the capstan or other parts. When these problems occur, demagnetize the head using them as much as possible. Handling...chrome tape (type @) or metal tape (type !%), set the Tape Selecting switch by the capstan because they may get caught by the turntable to "normal." The tape of use. Long-recording tapes Tapes for use < Do not open a cassette or pull out the tape. < Do not touch the tape. < Do ...

Owners Manual
Page 11
... a tape. K 45 RPM adaptor 11 G Cassette tape operation button Play (y) Use this switch to switch between "RECORD" and "TAPE." A turntable B screw fixing the turntable for transport During transport During use this button to play facing up. When a record or cassette tape is selected by pulling it clockwise with the exposed tape in the direction...
... a tape. K 45 RPM adaptor 11 G Cassette tape operation button Play (y) Use this switch to switch between "RECORD" and "TAPE." A turntable B screw fixing the turntable for transport During transport During use this button to play facing up. When a record or cassette tape is selected by pulling it clockwise with the exposed tape in the direction...
Owners Manual
Page 14
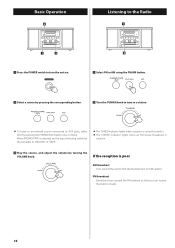
... to turn around the unit to find the best position for AM stations. When PHONO/TAPE is selected, set the Input Selecting switch by the turntable to "RECORD" or "TAPE." < The TUNED indicator lights when a station is correctly tuned in. < The STEREO indicator lights when an FM stereo broadcast is poor AM...
... to turn around the unit to find the best position for AM stations. When PHONO/TAPE is selected, set the Input Selecting switch by the turntable to "RECORD" or "TAPE." < The TUNED indicator lights when a station is correctly tuned in. < The STEREO indicator lights when an FM stereo broadcast is poor AM...
Owners Manual
Page 15
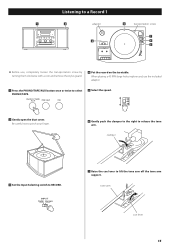
... , completely loosen the transportation screw by turning them clockwise with a coin and remove the stylus guard. 4 Put the record on the turntable. tone arm cue lever 15 Be careful not to pinch your finger. 6 Gently push the clamper to the right to lift the tone arm off ...the tone arm support. clamper 3 Set the Input Selecting switch to RECORD. 7 Raise the cue lever to release the tone arm. Listening to a Record 1 1 2 adaptor 4 ...
... , completely loosen the transportation screw by turning them clockwise with a coin and remove the stylus guard. 4 Put the record on the turntable. tone arm cue lever 15 Be careful not to pinch your finger. 6 Gently push the clamper to the right to lift the tone arm off ...the tone arm support. clamper 3 Set the Input Selecting switch to RECORD. 7 Raise the cue lever to release the tone arm. Listening to a Record 1 1 2 adaptor 4 ...
Owners Manual
Page 16
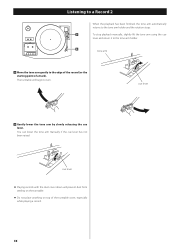
You can lower the tone arm manually if the cue lever has not been raised. Listening to a Record 2 When the playback has been finished, the tone arm automatically returns to the tone arm holder and the rotation stops. 9 To stop playback manually, slightly ... tone arm by slowly releasing the cue lever. cue lever < Playing records with the dust cover down will begin to the edge of the record (or the starting point of the turntable cover, especially while playing a record. 16 The turntable will prevent dust from settling on the turntable. < Do not place anything on top of a track).
You can lower the tone arm manually if the cue lever has not been raised. Listening to a Record 2 When the playback has been finished, the tone arm automatically returns to the tone arm holder and the rotation stops. 9 To stop playback manually, slightly ... tone arm by slowly releasing the cue lever. cue lever < Playing records with the dust cover down will begin to the edge of the record (or the starting point of the turntable cover, especially while playing a record. 16 The turntable will prevent dust from settling on the turntable. < Do not place anything on top of a track).
Owners Manual
Page 21
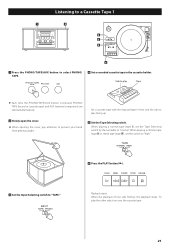
...exposed tape in the cassette holder. When playing a chrome tape (type @) or metal tape (type !%), set the Tape Selecting switch by the turntable to "normal." When the playback of one side finishes, the playback stops. To play Tape < Each time the PHONO/TAPE/AUX button is... pressed, PHONO/ TAPE (record or cassette tape) and AUX (external component) are selected alternatively. Listening to a Cassette Tape 1 1 2 3 5 4 6 1 Press the PHONO/TAPE/AUX button ...
...exposed tape in the cassette holder. When playing a chrome tape (type @) or metal tape (type !%), set the Tape Selecting switch by the turntable to "normal." When the playback of one side finishes, the playback stops. To play Tape < Each time the PHONO/TAPE/AUX button is... pressed, PHONO/ TAPE (record or cassette tape) and AUX (external component) are selected alternatively. Listening to a Cassette Tape 1 1 2 3 5 4 6 1 Press the PHONO/TAPE/AUX button ...
Owners Manual
Page 23
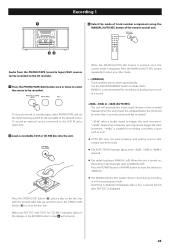
...signal will not work. 23 MANUAL is placed. To record an external source connected to the desired source. To record a record or cassette tape, select PHONO/TAPE and set the Input Selecting switch by the turntable to the AUX IN jacks, select AUX. 2 Load a recordable CD-R or CD-RW disc into the unit. ...-20db, -30db or -40db (AUTO REC) The unit will automatically insert a track division in the recorded material when the sound level has dropped below ...
...signal will not work. 23 MANUAL is placed. To record an external source connected to the desired source. To record a record or cassette tape, select PHONO/TAPE and set the Input Selecting switch by the turntable to the AUX IN jacks, select AUX. 2 Load a recordable CD-R or CD-RW disc into the unit. ...-20db, -30db or -40db (AUTO REC) The unit will automatically insert a track division in the recorded material when the sound level has dropped below ...
Owners Manual
Page 24
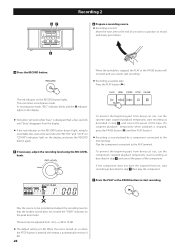
...turntable is 0 dB. To prevent the beginning part from being cut out, cue the component, suspend playback temporarily, start recording as described in step 7 , and cancel the pause of the component. To prevent the beginning part from being cut out, cue the cassette tape, suspend playback temporarily, start recording... setting is stopped, the PLAY or the PAUSE button will work and you cannot start recording. 47 Recording 2 6 Prepare a recording source. < Recording a record Move the tone arm to the end of the tape. (To suspend playback temporarily when playback is ...
...turntable is 0 dB. To prevent the beginning part from being cut out, cue the component, suspend playback temporarily, start recording as described in step 7 , and cancel the pause of the component. To prevent the beginning part from being cut out, cue the cassette tape, suspend playback temporarily, start recording... setting is stopped, the PLAY or the PAUSE button will work and you cannot start recording. 47 Recording 2 6 Prepare a recording source. < Recording a record Move the tone arm to the end of the tape. (To suspend playback temporarily when playback is ...
Owners Manual
Page 25
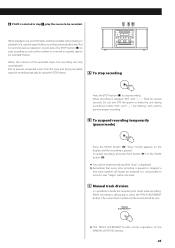
..." briefly appears on a record or cassette tape to be recorded finishes. C Manual track division It is taking place, press the TRACK INCREMENT button. C AB When playback of a record finishes and the turntable stops rotating or playback of the turntable stops, the recording will always be incremented by... using the STOP button. But to stop the recording manually by one track. Do not turn OFF the ...
..." briefly appears on a record or cassette tape to be recorded finishes. C Manual track division It is taking place, press the TRACK INCREMENT button. C AB When playback of a record finishes and the turntable stops rotating or playback of the turntable stops, the recording will always be incremented by... using the STOP button. But to stop the recording manually by one track. Do not turn OFF the ...
Owners Manual
Page 28
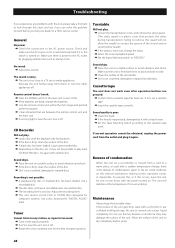
...does not have a recordable area. Adjust the recording level. e This unit cannot record CD-R or CD-RW discs designed for the best reception position. e Tune in the air could condense on . e Rotate the unit or antenna wire for computer systems. Use a disc bearing the "DIGITAL AUDIO" mark. Turntable Will not play ....turn it with the playback side facing down. e Set the Tape Selecting switch according to dry completely before you call your dealer or a TEAC service center. Beware of the unit gets dirty, wipe with a soft cloth or use thinner, benzine or alcohol as a lamp or fan...
...does not have a recordable area. Adjust the recording level. e This unit cannot record CD-R or CD-RW discs designed for the best reception position. e Tune in the air could condense on . e Rotate the unit or antenna wire for computer systems. Use a disc bearing the "DIGITAL AUDIO" mark. Turntable Will not play ....turn it with the playback side facing down. e Set the Tape Selecting switch according to dry completely before you call your dealer or a TEAC service center. Beware of the unit gets dirty, wipe with a soft cloth or use thinner, benzine or alcohol as a lamp or fan...


