Owners Manual
Page 1
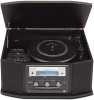
Z CEC6P10501630 GF-450K7 CD recorder with turntable/cassette player OWNER'S MANUAL
Z CEC6P10501630 GF-450K7 CD recorder with turntable/cassette player OWNER'S MANUAL
Owners Manual
Page 4
Read this manual carefully to get into the unit, contact your unit carefully. If you for choosing TEAC. Do NOT lift or move the unit during operation, always leave sufficient space around the unit for future reference. See Page 9 for moving, be 30 .... WHEN MOVING THIS UNIT When changing the unit's location or packing the unit for instructions. 4 The CD-RW recorder is also advisable to tighten the turntable transport locking screw. Use a clean, dry cloth. < Keep this manual in damage to this unit. If a foreign object should be sure to remove the record...
Read this manual carefully to get into the unit, contact your unit carefully. If you for choosing TEAC. Do NOT lift or move the unit during operation, always leave sufficient space around the unit for future reference. See Page 9 for moving, be 30 .... WHEN MOVING THIS UNIT When changing the unit's location or packing the unit for instructions. 4 The CD-RW recorder is also advisable to tighten the turntable transport locking screw. Use a clean, dry cloth. < Keep this manual in damage to this unit. If a foreign object should be sure to remove the record...
Owners Manual
Page 5
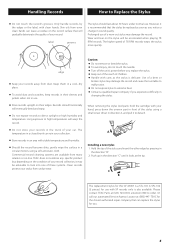
... is also available. Keep them in a cool, dry place. < To avoid dust and scratches, keep records in their edges. TEAC does not endorse any specific product but, depending on -line. A Installing a new stylus 1. TEAC for use . < Store records upright on the stylus will warp the record. < Do not store your collection. < Store... the stylus (red part), hold the cartridge with care, as you experience difficulty in direction A, and pull it may damage the record and cause the turntable to malfunction. < Do not expose stylus to order. Please contact...
... is also available. Keep them in a cool, dry place. < To avoid dust and scratches, keep records in their edges. TEAC does not endorse any specific product but, depending on -line. A Installing a new stylus 1. TEAC for use . < Store records upright on the stylus will warp the record. < Do not store your collection. < Store... the stylus (red part), hold the cartridge with care, as you experience difficulty in direction A, and pull it may damage the record and cause the turntable to malfunction. < Do not expose stylus to order. Please contact...

Owners Manual
Page 7
..., repeat these steps again. Make sure you grasp the cover by contrast, may not play back the audio until it stops. 2. To Open: 1 Lift the turntable cover all the way up until the latch engages. 3. Recordable discs In this has been done, no further data can be used in much the... with unfinalized (NO TOC) discs. However, if space is available on a CD-R or CD-RW disc, a standard CD player will now stay open /close the turntable cover About CD-R and CD-RW discs CD-R discs can be "unfinalized".
..., repeat these steps again. Make sure you grasp the cover by contrast, may not play back the audio until it stops. 2. To Open: 1 Lift the turntable cover all the way up until the latch engages. 3. Recordable discs In this has been done, no further data can be used in much the... with unfinalized (NO TOC) discs. However, if space is available on a CD-R or CD-RW disc, a standard CD player will now stay open /close the turntable cover About CD-R and CD-RW discs CD-R discs can be "unfinalized".
Owners Manual
Page 9
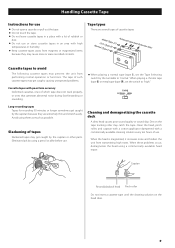
The tape of such cassette tapes may cause noise or erase recorded contents. Eliminate slack by the turntable to "normal." Cleaning and demagnetizing the cassette deck A dirty head causes poor sound quality or sound skip. Handling Cassette Tape Instructions for recording 90 minutes ...
The tape of such cassette tapes may cause noise or erase recorded contents. Eliminate slack by the turntable to "normal." Cleaning and demagnetizing the cassette deck A dirty head causes poor sound quality or sound skip. Handling Cassette Tape Instructions for recording 90 minutes ...

Owners Manual
Page 11
... exposed tape in the direction of the arrow. J Input Selecting switch When PHONO/TAPE is playing, make sure to stop playing a tape. Parts of the Turntable A B K C J D I ), set the switch to "normal." Never press the Play button (y) and Rewind button (m) at the same time. When ...from the factory) When you transport the unit, turn the screw counterclockwise to lift the tone arm. A turntable B screw fixing the turntable for transport During transport During use this lever to secure the turntable. G Cassette tape operation button Play (y) Use this button to using the switch.
... exposed tape in the direction of the arrow. J Input Selecting switch When PHONO/TAPE is playing, make sure to stop playing a tape. Parts of the Turntable A B K C J D I ), set the switch to "normal." Never press the Play button (y) and Rewind button (m) at the same time. When ...from the factory) When you transport the unit, turn the screw counterclockwise to lift the tone arm. A turntable B screw fixing the turntable for transport During transport During use this lever to secure the turntable. G Cassette tape operation button Play (y) Use this button to using the switch.
Owners Manual
Page 14
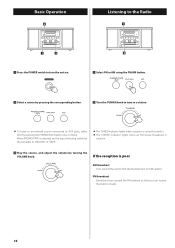
... the unit to find the best position for AM stations. If the reception is tuned in. 3 Play the source, and adjust the volume by the turntable to "RECORD" or "TAPE." < The TUNED indicator lights when a station is correctly tuned in a station. < To listen to an external source connected to AUX jacks...
... the unit to find the best position for AM stations. If the reception is tuned in. 3 Play the source, and adjust the volume by the turntable to "RECORD" or "TAPE." < The TUNED indicator lights when a station is correctly tuned in a station. < To listen to an external source connected to AUX jacks...
Owners Manual
Page 15
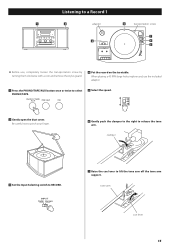
... hole single record, use , completely loosen the transportation screw by turning them clockwise with a coin and remove the stylus guard. 4 Put the record on the turntable. tone arm cue lever 15 Listening to a Record 1 1 2 adaptor 4 transportation screw 7 3 6 5 < Before use the included adaptor. 1 Press the PHONO/TAPE/AUX button once or twice...
... hole single record, use , completely loosen the transportation screw by turning them clockwise with a coin and remove the stylus guard. 4 Put the record on the turntable. tone arm cue lever 15 Listening to a Record 1 1 2 adaptor 4 transportation screw 7 3 6 5 < Before use the included adaptor. 1 Press the PHONO/TAPE/AUX button once or twice...
Owners Manual
Page 16
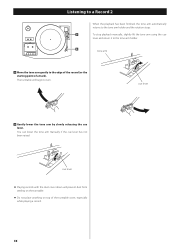
... prevent dust from settling on the turntable. < Do not place anything on top of a track). cue lever 9 Gently lower the tone arm by slowly releasing the cue lever. cue lever < Playing records ...with the dust cover down will begin to the edge of the record (or the starting point of the turntable cover, especially while playing a record. 16 You can lower the tone arm manually if the cue lever has not been raised. Listening to a Record 2 When...
... prevent dust from settling on the turntable. < Do not place anything on top of a track). cue lever 9 Gently lower the tone arm by slowly releasing the cue lever. cue lever < Playing records ...with the dust cover down will begin to the edge of the record (or the starting point of the turntable cover, especially while playing a record. 16 You can lower the tone arm manually if the cue lever has not been raised. Listening to a Record 2 When...
Owners Manual
Page 21
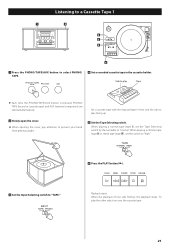
... cassette tape) and AUX (external component) are selected alternatively. When playing a chrome tape (type @) or metal tape (type !%), set the Tape Selecting switch by the turntable to select PHONO/ TAPE. 4 Set a recorded cassette tape in front and the side to play facing up. 2 Slowly open the cover. < When opening the cover...
... cassette tape) and AUX (external component) are selected alternatively. When playing a chrome tape (type @) or metal tape (type !%), set the Tape Selecting switch by the turntable to select PHONO/ TAPE. 4 Set a recorded cassette tape in front and the side to play facing up. 2 Slowly open the cover. < When opening the cover...
Owners Manual
Page 23
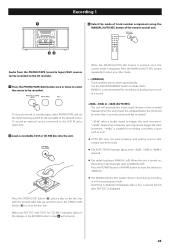
... more than 2 seconds, and sound has re-started. To record a record or cassette tape, select PHONO/TAPE and set the Input Selecting switch by the turntable to divide tracks. "-40db" means that contain low-level noises. < The AUTO TRACK indicator lights when -20dB, -30dB or -40dB is selected. < The default setting...
... more than 2 seconds, and sound has re-started. To record a record or cassette tape, select PHONO/TAPE and set the Input Selecting switch by the turntable to divide tracks. "-40db" means that contain low-level noises. < The AUTO TRACK indicator lights when -20dB, -30dB or -40dB is selected. < The default setting...
Owners Manual
Page 24
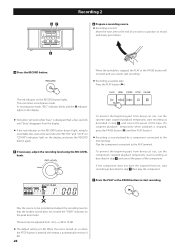
... (-∞) dB to 18 dB. < The default setting is stopped, the PLAY or the PAUSE button will work and you cannot start recording. When the turntable is 0 dB. If the component does not have the suspend function, start recording as described in step 7 then play the component. 7 Press the PLAY or...
... (-∞) dB to 18 dB. < The default setting is stopped, the PLAY or the PAUSE button will work and you cannot start recording. When the turntable is 0 dB. If the component does not have the suspend function, start recording as described in step 7 then play the component. 7 Press the PLAY or...
Owners Manual
Page 25
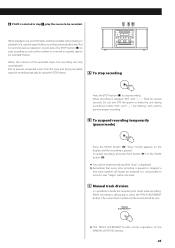
.... It is not possible to record in step 1 , play the source to be assigned. C AB When playback of a record finishes and the turntable stops rotating or playback of the turntable stops, the recording will always be recorded. When the rotation of a cassette tape finishes, recording automatically ends. 8 If AUX is selected in...
.... It is not possible to record in step 1 , play the source to be assigned. C AB When playback of a record finishes and the turntable stops rotating or playback of the turntable stops, the recording will always be recorded. When the rotation of a cassette tape finishes, recording automatically ends. 8 If AUX is selected in...
Owners Manual
Page 28
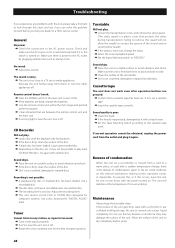
...Selecting switch to a TV set or similar appliances. e Don't use scratched, damaged or warped discs. Sound quality is not possible. Maintenance Always keep the turntable clean. Allow the surface of the unit. No sound. e The unit is dirty, clean the surface of its surroundings. e Load a disc with a ...If you experience any problems with the unit, please take a moment to look through this chart and see if you call your dealer or a TEAC service center. e A blank disc has been loaded. Recording is poor. The unit will not allow the needle to contact the groove of condensation...
...Selecting switch to a TV set or similar appliances. e Don't use scratched, damaged or warped discs. Sound quality is not possible. Maintenance Always keep the turntable clean. Allow the surface of the unit. No sound. e The unit is dirty, clean the surface of its surroundings. e Load a disc with a ...If you experience any problems with the unit, please take a moment to look through this chart and see if you call your dealer or a TEAC service center. e A blank disc has been loaded. Recording is poor. The unit will not allow the needle to contact the groove of condensation...
