
Owner's Manual
Page 1
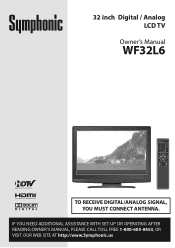
IF YOU NEED ADDITIONAL ASSISTANCE WITH SET-UP OR OPERATING AFTER READING OWNER'S MANUAL, PLEASE CALL TOLL FREE 1-800-605-8453, OR VISIT OUR WEB SITE AT http://www.Symphonic.us 32 inch Digital / Analog LCD TV Owner's Manual WF32L6 POWER INPUT SLEEP SELECT 12 45 78 -0 SETUP 3 6 AUDIO 9 STILL SCREEN MODE ENTER BACK INFO CH RETURN VOL. MUTE CH HIGH-DEFINITION TELEVISION TO RECEIVE DIGITAL/ANALOG SIGNAL, YOU MUST CONNECT ANTENNA.
IF YOU NEED ADDITIONAL ASSISTANCE WITH SET-UP OR OPERATING AFTER READING OWNER'S MANUAL, PLEASE CALL TOLL FREE 1-800-605-8453, OR VISIT OUR WEB SITE AT http://www.Symphonic.us 32 inch Digital / Analog LCD TV Owner's Manual WF32L6 POWER INPUT SLEEP SELECT 12 45 78 -0 SETUP 3 6 AUDIO 9 STILL SCREEN MODE ENTER BACK INFO CH RETURN VOL. MUTE CH HIGH-DEFINITION TELEVISION TO RECEIVE DIGITAL/ANALOG SIGNAL, YOU MUST CONNECT ANTENNA.
Owner's Manual
Page 2
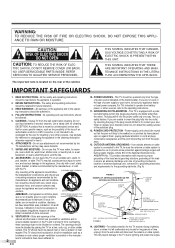
...CODE GROUND CLAMP ANTENNA LEAD IN WIRE ELECTRIC SERVICE EQUIPMENT NEC - NO USER SERVICEABLE PARTS INSIDE. IMPORTANT SAFEGUARDS 1. Unplug TV from battery power, or other purpose, may cause hazards. 7. pod, bracket, or table. The TV may cause the appliance and cart combination to ... or cable system. NATIONAL ELECTRICAL CODE S2898A ANTENNA DISCHARGE UNIT (NEC SECTION 810-20) GROUNDING CONDUCTORS (NEC SECTION 810-21) GROUND CLAMPS POWER SERVICE GROUNDING ELECTRODE SYSTEM (NEC ART 250, PART H) 14. ATTACHMENTS - Do not place this TV receiver during a lightning storm, or...
...CODE GROUND CLAMP ANTENNA LEAD IN WIRE ELECTRIC SERVICE EQUIPMENT NEC - NO USER SERVICEABLE PARTS INSIDE. IMPORTANT SAFEGUARDS 1. Unplug TV from battery power, or other purpose, may cause hazards. 7. pod, bracket, or table. The TV may cause the appliance and cart combination to ... or cable system. NATIONAL ELECTRICAL CODE S2898A ANTENNA DISCHARGE UNIT (NEC SECTION 810-20) GROUNDING CONDUCTORS (NEC SECTION 810-21) GROUND CLAMPS POWER SERVICE GROUNDING ELECTRODE SYSTEM (NEC ART 250, PART H) 14. ATTACHMENTS - Do not place this TV receiver during a lightning storm, or...
Owner's Manual
Page 3
...are required, be thrown away or incinerated but disposed of the TV. If liquid has been spilled, or objects have fallen into such power lines or circuits. Serial No. Please dispose of cable entry as they may cause harmful interference unless the modifications are recyclable and can fall...should be fatal. 16. Do not overload wall outlets and extension cords as this product may expose you to this TV from touching such power lines or circuits as the original part. Never spill liquid of any materials in the owner's manual. Do not attempt to qualified service...
...are required, be thrown away or incinerated but disposed of the TV. If liquid has been spilled, or objects have fallen into such power lines or circuits. Serial No. Please dispose of cable entry as they may cause harmful interference unless the modifications are recyclable and can fall...should be fatal. 16. Do not overload wall outlets and extension cords as this product may expose you to this TV from touching such power lines or circuits as the original part. Never spill liquid of any materials in the owner's manual. Do not attempt to qualified service...
Owner's Manual
Page 4
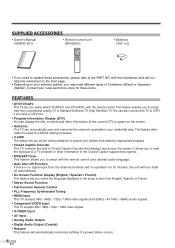
... in Closed Caption Decoder that displays text across the screen. Contact your local electronics store for 15 minutes, the unit will automatically memorize settings if a power failure occurs. 4 EN You can also connect this TV to the PART NO. SUPPLIED ACCESSORIES • Owner's Manual (1EMN21951) • Remote control unit (NF006UD) •...
... in Closed Caption Decoder that displays text across the screen. Contact your local electronics store for 15 minutes, the unit will automatically memorize settings if a power failure occurs. 4 EN You can also connect this TV to the PART NO. SUPPLIED ACCESSORIES • Owner's Manual (1EMN21951) • Remote control unit (NF006UD) •...
Owner's Manual
Page 6
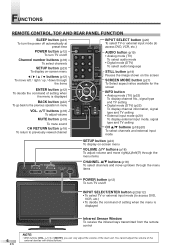
... mode, signal type and TV setting CH K/L buttons (p18/p20) To select channels and external input mode SETUP TV CONTROL VOLUME CHANNEL INPUT SELECT/ POWER ENTER SETUP button (p23) To display on-screen menu VOLUME X/Y buttons (p18) To adjust volume and move right(X)/left(Y) through the menu items CHANNEL... K/L buttons (p18) To select channels and move left / right / up /down through the menu items POWER button (p12) To turn TV on/off Channel number buttons (p18) To select channels SETUP button (p23) To display on /off INPUT SELECT/ENTER ...
... mode, signal type and TV setting CH K/L buttons (p18/p20) To select channels and external input mode SETUP TV CONTROL VOLUME CHANNEL INPUT SELECT/ POWER ENTER SETUP button (p23) To display on-screen menu VOLUME X/Y buttons (p18) To adjust volume and move right(X)/left(Y) through the menu items CHANNEL... K/L buttons (p18) To select channels and move left / right / up /down through the menu items POWER button (p12) To turn TV on/off Channel number buttons (p18) To select channels SETUP button (p23) To display on /off INPUT SELECT/ENTER ...
Owner's Manual
Page 8
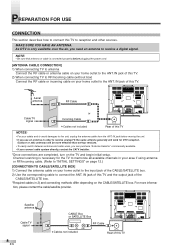
... jack of this TV. Aerial antenna RF Cable Cable TV signal or Incoming Cable Cables not included INNER JACKS ANT. IN jack before plugging the power cord. [ANTENNA CABLE CONNECTION] 1) When connecting TV to antenna Connect the RF cable or antenna cable on your safety and to avoid damages to receive...
... jack of this TV. Aerial antenna RF Cable Cable TV signal or Incoming Cable Cables not included INNER JACKS ANT. IN jack before plugging the power cord. [ANTENNA CABLE CONNECTION] 1) When connecting TV to antenna Connect the RF cable or antenna cable on your safety and to avoid damages to receive...

Owner's Manual
Page 12
...6 AUDIO 9 STILL SCREEN MODE ENTER BACK INFO 1 After making all the necessary connections, turn on this screen appears you turn on the power, the following screen is used will be displayed every time you can select the menu language displayed on the screen among English, Spanish and ... provided on the front page of ANT. INITIAL SETTINGS Hint: Before starting initial setup you first turn on the power after you first turn on the power. INITIAL SETTINGS This section describes the initial settings when you must connect antenna. If you have previously registered channels...
...6 AUDIO 9 STILL SCREEN MODE ENTER BACK INFO 1 After making all the necessary connections, turn on this screen appears you turn on the power, the following screen is used will be displayed every time you can select the menu language displayed on the screen among English, Spanish and ... provided on the front page of ANT. INITIAL SETTINGS Hint: Before starting initial setup you first turn on the power after you first turn on the power. INITIAL SETTINGS This section describes the initial settings when you must connect antenna. If you have previously registered channels...
Owner's Manual
Page 13
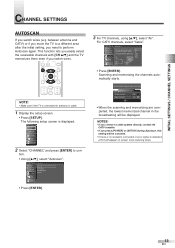
... TV to complete. Select the destination of "ANT IN" jack. firm. • Using [K/L], select "Autoscan". INITIAL SETTINGS / CHANNEL SETTINGS CHANNEL SETTINGS AUTOSCAN If you press [POWER] or [SETUP] during Autoscan, this setting will be displayed.
... TV to complete. Select the destination of "ANT IN" jack. firm. • Using [K/L], select "Autoscan". INITIAL SETTINGS / CHANNEL SETTINGS CHANNEL SETTINGS AUTOSCAN If you press [POWER] or [SETUP] during Autoscan, this setting will be displayed.
Owner's Manual
Page 15
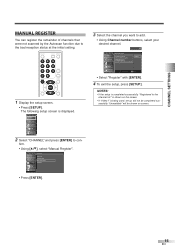
is shown on screen. 2 Select "CHANNEL" and press [ENTER] to register using number keys. POWER INPUT SLEEP SELECT 12 45 78 -0 SETUP 3 6 AUDIO 9 STILL SCREEN MODE ENTER BACK INFO 1 Display the setup screen. • Press [SETUP]. firm. • Using [K/L], select "...
is shown on screen. 2 Select "CHANNEL" and press [ENTER] to register using number keys. POWER INPUT SLEEP SELECT 12 45 78 -0 SETUP 3 6 AUDIO 9 STILL SCREEN MODE ENTER BACK INFO 1 Display the setup screen. • Press [SETUP]. firm. • Using [K/L], select "...
Owner's Manual
Page 16
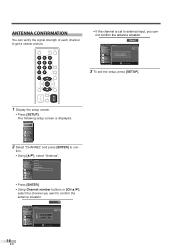
... get a clearer picture. MUTE CH 1 Display the setup screen. • Press [SETUP]. firm. • Using [K/L], select "Antenna". Video1 Antenna Back Indicator is set to con- POWER INPUT SLEEP SELECT 12 45 78 -0 SETUP 3 6 AUDIO 9 STILL SCREEN MODE ENTER BACK INFO CH RETURN VOL. ANTENNA CONFIRMATION You can verify the signal strength...
... get a clearer picture. MUTE CH 1 Display the setup screen. • Press [SETUP]. firm. • Using [K/L], select "Antenna". Video1 Antenna Back Indicator is set to con- POWER INPUT SLEEP SELECT 12 45 78 -0 SETUP 3 6 AUDIO 9 STILL SCREEN MODE ENTER BACK INFO CH RETURN VOL. ANTENNA CONFIRMATION You can verify the signal strength...
Owner's Manual
Page 18
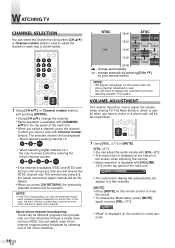
... top panel of the main unit. • When you select a channel, press the channel number you press [-], the lowest memorized digital channel will be selected. POWER INPUT SLEEP SELECT 12 45 78 -0 SETUP 3 6 AUDIO 9 STILL SCREEN MODE ENTER BACK INFO CH RETURN VOL. In this case, the main channel is called...
... top panel of the main unit. • When you select a channel, press the channel number you press [-], the lowest memorized digital channel will be selected. POWER INPUT SLEEP SELECT 12 45 78 -0 SETUP 3 6 AUDIO 9 STILL SCREEN MODE ENTER BACK INFO CH RETURN VOL. In this case, the main channel is called...
Owner's Manual
Page 19
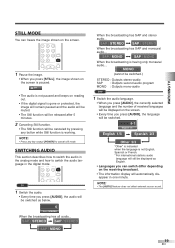
... international stations audio language will still be displayed as English. • Languages you press [AUDIO], the audio will be canceled by pressing any key except [POWER] to switch the audio language in the digital mode. 78 -0 SETUP AUDIO 9 STILL SCREEN MODE TV 1 Switch the audio. • Every time you can freeze...
... international stations audio language will still be displayed as English. • Languages you press [AUDIO], the audio will be canceled by pressing any key except [POWER] to switch the audio language in the digital mode. 78 -0 SETUP AUDIO 9 STILL SCREEN MODE TV 1 Switch the audio. • Every time you can freeze...
Owner's Manual
Page 20
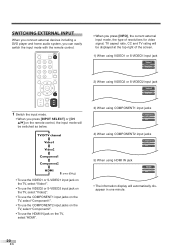
... displayed at the top-right of resolutions for video signal, TV aspect ratio, CC and TV rating will automatically disappear in one minute. 20 EN POWER INPUT SLEEP SELECT 12 45 78 -0 SETUP 3 6 AUDIO 9 STILL SCREEN MODE ENTER BACK INFO CH RETURN VOL.
... displayed at the top-right of resolutions for video signal, TV aspect ratio, CC and TV rating will automatically disappear in one minute. 20 EN POWER INPUT SLEEP SELECT 12 45 78 -0 SETUP 3 6 AUDIO 9 STILL SCREEN MODE ENTER BACK INFO CH RETURN VOL.
Owner's Manual
Page 23
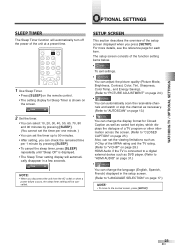
... the channel as necessary. (Refer to "AUTOSCAN" on page 13.) • You can change the language (English, Spanish, French) displayed in a few seconds. POWER INPUT SLEEP SELECT 12 45 78 -0 SETUP 3 6 AUDIO 9 STILL SCREEN MODE ENTER 1 Use Sleep Timer. • Press [SLEEP] on the screen. Sleep ...varied font styles, which displays the dialogue of the setup screen displayed when you disconnect the unit from the AC outlet or when a power failure occurs, the sleep timer setting will be cancelled. WATCHING TV / OPTIONAL SETTINGS OPTIONAL SETTINGS SLEEP TIMER The Sleep Timer function will ...
... the channel as necessary. (Refer to "AUTOSCAN" on page 13.) • You can change the language (English, Spanish, French) displayed in a few seconds. POWER INPUT SLEEP SELECT 12 45 78 -0 SETUP 3 6 AUDIO 9 STILL SCREEN MODE ENTER 1 Use Sleep Timer. • Press [SLEEP] on the screen. Sleep ...varied font styles, which displays the dialogue of the setup screen displayed when you disconnect the unit from the AC outlet or when a power failure occurs, the sleep timer setting will be cancelled. WATCHING TV / OPTIONAL SETTINGS OPTIONAL SETTINGS SLEEP TIMER The Sleep Timer function will ...
Owner's Manual
Page 28
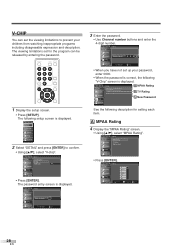
... buttons and enter the 4-digit number. PIN Code BACK Back • When you have not set the viewing limitations to confirm. • Using [K/L], select "V-chip". POWER INPUT SLEEP SELECT 12 45 78 -0 SETUP 3 6 AUDIO 9 STILL SCREEN MODE ENTER BACK INFO 1 Display the setup screen. • Press [SETUP]. The password entry screen...
... buttons and enter the 4-digit number. PIN Code BACK Back • When you have not set the viewing limitations to confirm. • Using [K/L], select "V-chip". POWER INPUT SLEEP SELECT 12 45 78 -0 SETUP 3 6 AUDIO 9 STILL SCREEN MODE ENTER BACK INFO 1 Display the setup screen. • Press [SETUP]. The password entry screen...
Owner's Manual
Page 30
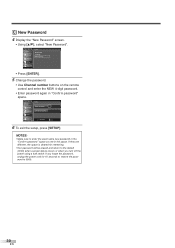
...different, the space is cleared for reentering. • Your password will be erased and return to the default (0000) when a power failure occurs or when you forget the password, unplug the power cord for 10 seconds to restore the password to enter the exact same new password in the space. If you... turn off the power using a wall switch. C New Password 4 Display the "New Password" screen. • Using [K/L], select "New Password". NOTES: • Make sure to 0000. 30 EN V-Chip ...
...different, the space is cleared for reentering. • Your password will be erased and return to the default (0000) when a power failure occurs or when you forget the password, unplug the power cord for 10 seconds to restore the password to enter the exact same new password in the space. If you... turn off the power using a wall switch. C New Password 4 Display the "New Password" screen. • Using [K/L], select "New Password". NOTES: • Make sure to 0000. 30 EN V-Chip ...

Owner's Manual
Page 32
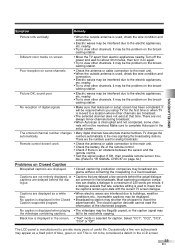
... Lines or streaks in picture Picture blurred Ghosts in the setup screen. • Try to view other channels. casting station. • Turn off the power and wait for about 1 minute, then turn it on again. • Check the antenna or cable connection to the main unit. • When ... due to the electric appliances, etc. MISCELLANEOUS TROUBLESHOOTING GUIDE Before calling for 30 minutes to allow the unit to reset itself. • Check if the power is on. • Check the outlet connection. • Check the antenna or cable connection to the main unit. • When the outside antenna...
... Lines or streaks in picture Picture blurred Ghosts in the setup screen. • Try to view other channels. casting station. • Turn off the power and wait for about 1 minute, then turn it on again. • Check the antenna or cable connection to the main unit. • When ... due to the electric appliances, etc. MISCELLANEOUS TROUBLESHOOTING GUIDE Before calling for 30 minutes to allow the unit to reset itself. • Check if the power is on. • Check the outlet connection. • Check the antenna or cable connection to the main unit. • When the outside antenna...
Owner's Manual
Page 33
Turn off the power and wait for about 30 minutes, then turn it on the broad- nearby. • Try to view other channels. No reception of 220 words per ...
Turn off the power and wait for about 30 minutes, then turn it on the broad- nearby. • Try to view other channels. No reception of 220 words per ...
Owner's Manual
Page 34
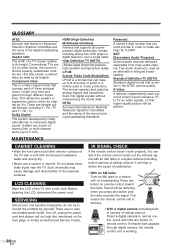
..., to define the cause of cellular phone). LCD CLEANING Wipe the LCD of the current analog broadcasting standards. Turn off, unplug the power cord and please call our help to locate an Authorized Service Center. Component video This is almost square); MAINTENANCE CABINET CLEANING •...The format samples and captures analog signals and transforms them into digital signals without compressing the sound data. Before cleaning the LCD, disconnect the power cord. This audio channel is working . 34 EN Conventional TVs are 16:9 (the screen is almost twice as wide as it is...
..., to define the cause of cellular phone). LCD CLEANING Wipe the LCD of the current analog broadcasting standards. Turn off, unplug the power cord and please call our help to locate an Authorized Service Center. Component video This is almost square); MAINTENANCE CABINET CLEANING •...The format samples and captures analog signals and transforms them into digital signals without compressing the sound data. Before cleaning the LCD, disconnect the power cord. This audio channel is working . 34 EN Conventional TVs are 16:9 (the screen is almost twice as wide as it is...
Owner's Manual
Page 35
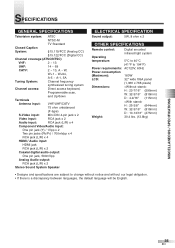
... Sound output: 5W, 8 ohm x 2 OTHER SPECIFICATIONS Remote control: Digital encoded infrared light system Operating temperature: 5°C to 40°C (41°F to 104°F) Power requirements: AC120V, 60Hz Power consumption (Maximum): 160W LCD: 32" wide XGA panel (1,366 x 768 pixels) Dimensions: H : 23-7/16" (595mm) W: 32-3/16" (818mm) D : 4-9/16" (115mm) H : 25-3/8" (644mm) W: 32...
... Sound output: 5W, 8 ohm x 2 OTHER SPECIFICATIONS Remote control: Digital encoded infrared light system Operating temperature: 5°C to 40°C (41°F to 104°F) Power requirements: AC120V, 60Hz Power consumption (Maximum): 160W LCD: 32" wide XGA panel (1,366 x 768 pixels) Dimensions: H : 23-7/16" (595mm) W: 32-3/16" (818mm) D : 4-9/16" (115mm) H : 25-3/8" (644mm) W: 32...


